Tag Archives: vulcanite

Restemming a Stemless Sandblast Larsen Super Canadian


Blog by Steve Laug

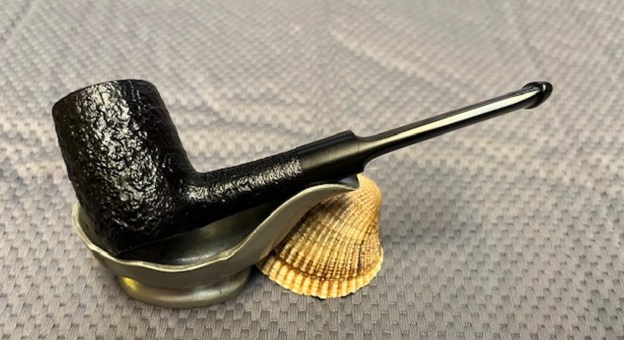
The next pipe on the worktable is a Danish made pipe from the workshop W.O. Larsen. It is a sandblast Canadian with silver band on the shank end. The bowl is a classic Danish looking Canadian with almost a Brandy shaped bowl. It came without a stem. The pipe came to us from eBay on 01/22/2024 from a seller in Jordan, Minnesota, USA.  The pipe is very dirty with a thick cake in the bowl and heavy lava on the rim top. The rim edge looks to be okay but it was hard to know what was under the lava coat on the top and edges. It is stamped on the underside of the bowl and shank on a smooth panel. It reads * followed by Larsen [over] Copenhagen. That is followed by Handmade [over] Made in Denmark. That is followed by the stamping Super. The finish was dusty and there were oils and grime ground into the sandblast finish around the sides of the bowl. The silver band was in good condition and was faintly stamped Sterling Silver arched on the top back of the band. Jeff took some photos of the pipe before he started his cleanup work. Jeff took a photo of the rim top to show the thick build up of lava in the sandblast of the rim top. It is also built up on the inner edge of the bowl. The thick cake in the bowl is very visible.He took photos of the sides and the heel of the bowl to show the blast finish on the pipe. It is a unique blast that really shows the birdseye and other grain around the bowl sides. He took a series of photos to capture the stamping on the heel of the bowl and the underside of the shank. The first photo shows the * on the heel of the bowl. Each one moves down the shank to the band on the shank end. It is clear and readable as noted above. He also took photos of he band on the end of the shank. It is well fit and it is cosmetic rather than a repair band. There is no crack in the shank end.The shape and stamping on this one reminded me of another Larsen Super Canadian I had worked on in the past. I remembered the shape and look of the pipe. I looked up the link and have included it below (https://rebornpipes.com/2021/10/25/restoring-a-sandblast-canadian-hand-made-designed-by-w-o-larsen-super-tan-65/). I also quoted the information on  the brand that I had researched at that time.

I turned to Pipephil (http://www.pipephil.eu/logos/en/logo-l2.html) to get a quick view of the brand once again. I did a screen capture of the site’s information and have included that below. The pipe I am working on is a W.O. Larsen as it is stamped similarly to the ones in the photos. It is interestingly stamped with a lot more detail than any of the ones shown in the screen capture below. I turned to Pipedia (https://pipedia.org/wiki/W.%C3%98._Larsen) for a quick read. The site is worth reading the history of the shop and the brand and its influence on Danish pipe carving. There was no additional information on this pipe.

What I learned from the research is that the pipe is a W.O. Larsen made pipe that was probably esigned by W.O Larsen himself or at least one of the shop carvers. It is a beauty though.

With that information I moved forward to work on the pipe itself and see what I had to do with it. Jeff had done an amazing job in removing all of the cake and the lava on the sand blast rim top. He had reamed the bowl with a PipNet Pipe Reamer and cleaned up the remnants with a Savinelli Fitsall Pipe Knife. He took the cake back to bare briar so we could check the walls for damage. He scrubbed the exterior of the bowl with Murphy’s Oil Soap and a tooth brush to remove the grime on the bowl and rim and was able to remove the lava and dirt. The finish on the bowl and rim top looked very good showing a unique and beautiful sandblast. He cleaned out the interior of the bowl and shank with pipe cleaners, cotton swabs and alcohol until they came out clean. I took photos of the pipe before I started my part of the restoration. I took a photo of the stamping on the underside of the shank to show the condition after the cleanup. This stamping is clearer than the photo shows. The Sterling Silver stamp on the band is scratched with wear but still readable. I went through my collection of stems looking for one that would match the previous Larsen Super that I referred to above (https://rebornpipes.com/2021/10/25/restoring-a-sandblast-canadian-hand-made-designed-by-w-o-larsen-super-tan-65/). I found one that was the right shape and length. It was a little wider so it would take some work to fit it to the shank size. The tenon was very close so a little sandpaper would remember that and make the fit proper. Here is a photo of the stem. NB: This is the reason I am always picking up stems where ever I can find them. I just know that one day I will need one and it might just be the one!I decided to start my work this time following Kenneth’s pattern of working on the stem first. This something I rarely ever do, but there is always room for change. I started with the stem fitting. I marked the stem width with a pencil, ran some sandpaper over the tenon for a fit and took off the excess width on the stem on the top and each side with a rasp. With a bit of careful fiddling and fussing I was able to get a proper fit on the stem. I put it on the shank and took the photos below. Now I needed to sand it to clean up the file marks and fine tune the shape.I started polishing the stem with 320-3500 grit sanding pads. I worked on the file marks and fine shaping of the stem fit against the shank. The pads worked to polish out the marks and the fit to the shank was very good. The stem began to take on a rich shine in the vulcanite by the time I sanded it with the 3500 grit pad.I set the bowl aside and polished it with micromesh sanding pads – dry sanding with 1500-12000 grit sanding pads. I wiped it down after each sanding pad with a cloth containing some Obsidian Oil. I finished polishing it with Before & After Pipe Stem Polish – both Fine and Extra Fine and buffed it off with a cotton cloth.  I set the finished stem aside and turned my attention to the bowl. I worked over the sandblast surface on the rim top and bowl sides with a brass bristle brush to remove any residual debris from the valleys in the finish. I wiped it down with a damp cloth to remove anything that remained. It was a nice sandblast finish. I worked some Before & After Restoration Balm into the surface of the sandblast briar with my fingertips and a horsehair shoe brush to clean, enliven and protect the briar. I let the balm sit for about ten minutes and then buffed with a cotton cloth to raise the shine. The photos show the bowl at this point in the restoration process. 
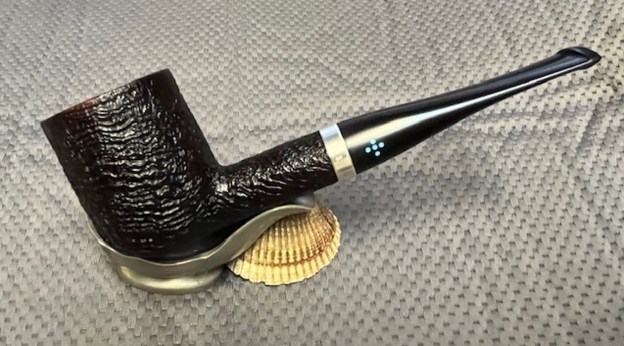
I polished the silver band with a jeweller’s cloth to raise the shine and protect it from oxidation. The scratches have been lessened, though still remaining. It looks much better at this point. 
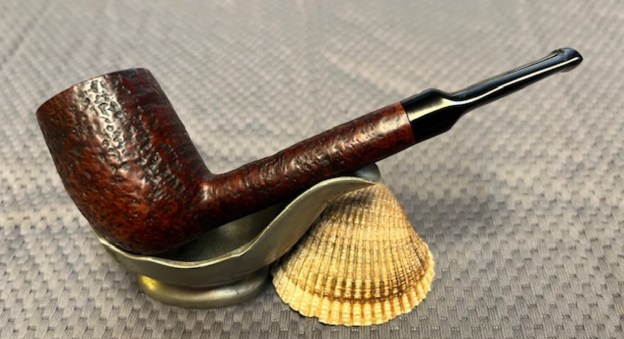
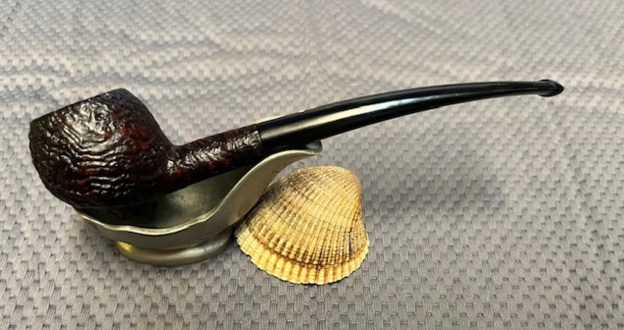
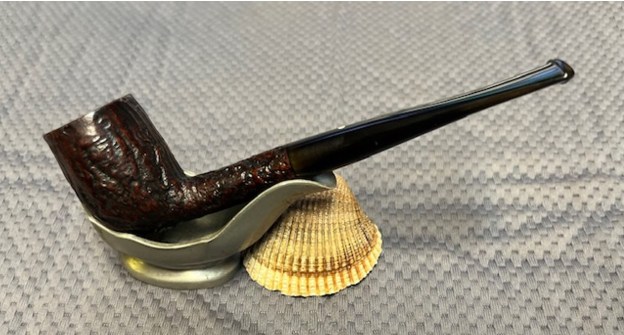
This Larsen Hand Made Larsen Super Canadian is a great looking pipe now that it has been restored. The shape is elegant and flowing with a thin turned vulcanite stem. I put the new stem on the bowl and carefully buffed the pipe with Blue Diamond on the buffing wheel using a light touch on the briar. I gave the bowl multiple coats of Conservator’s Wax and the stem multiple coats of carnauba wax on the buffing wheel and followed that by buffing the entire pipe with a clean buffing pad. I hand buffed the pipe with a microfiber cloth to deepen the shine. The finished Larsen Super Canadian fits nicely in the hand and feels great. Give the finished pipe a look in the photos below. The dimensions of the pipe are Length: 6 inches, Height: 2 inches, Outside diameter of the bowl: 1 ¼ inches, Chamber diameter: 7/8 of an inch. The weight of the pipe is 1.69 ounces/49 grams. I will be putting it on the Danish Pipe Maker Section of the rebornpipes store shortly. If you are interested in adding this pipe to your collection send me a message or an email. Thanks for reading this blog and my reflections on the pipe while I worked on it. There are many more to come!

Another Amazing Find 4109 Dunhill Shell Canadian with hexagon shank


Blog by Steve Laug

The next pipe on the table is another Dunhill Shell Briar with a great looking blast on the bowl and a unique hexagonal shank and taper stem. The bottom of the shank and bowl is smooth so it is a sitter. This one came with a Dunhill box (wrong number on the outside but still very nice) and a leather (calf skin) pipe sock. In the box is a brochure on joining the Fellowship of the White Spot, a Dunhill tobacco brochure and one on Dunhill Pipes with the guarantee. We purchased it from our contact in Copenhagen, Denmark 02/11/2024. The pipe is stamped on the heel of the bowl and the underside of the shank on a smooth panel. On the heel it is stamped with the shape number 4109 followed by Dunhill Shell [over]Made in England with a faint date stamp that looks like 20 following the D in England. The number is approximately the same size as the D in England. The pipe had been smoked and there was a light cake in the bowl with some light lava on the rim top. The edges of the rim are crisp and clean with no damage. The stem is lightly oxidized and had tooth marks and chatter on the surface on both the top and underside of the stem just ahead of the button. Jeff took photos of the pipe before he started his clean up work. I have included them below. Jeff took photos of the bowl and the stem to give a sense of the condition of the pipe. The bowl has a moderate cake on the walls and an overflow of lava on the rim top. The stem is oxidized and has scratches, tooth marks and chatter on both sides ahead of the button. He took photos of the sides and heel of the bowl to give a clear picture of the look of the sandblast. It really is a stunning pipe. He took photos of the stamping on the underside of the bowl and the shank. It is clear and readable and read as noted above. I turned to the dating key on Pipephil’s site (http://www.pipephil.eu/logos/en/dunhill/cledat-en1a.html) to establish a date for the pipe. I drew a red box around the pertinent information below. It fits the criteria of a Sandblast with a year suffix and a Non possessive form Dunhill. The suffix is the number 20 which puts in the section below which notes 1960 + suffix to establish a date. In this case it is 1960 +20 making the pipe a 1980.From there I turned to the Dunhill shape chart to unpack the shape number stamp 4110 on the heel of the bowl (http://www.pipephil.eu/logos/en/dunhill/shapes.html). This gave me the information I needed to interpret the 4109 shape stamp. The first digit 4 is the size of the pipe – a Group 4. The second digit is the style of the stem which in this case is a 1 telling me that the stem is a tapered stem. The last two digits the 09 tell me that the pipe is a Canadian. I have included the shape below and encircled it with a red box.Now it was my turn to work on the pipe. Jeff had done an amazing cleanup of the pipe. He reamed the light cake with a PipNet reamer and cleaned up that with a Savinelli Fitsall Pipe Knife. He scrubbed the internals of the bowl and stem with alcohol, cotton swabs and pipe cleaners. He scrubbed the externals with undiluted Murphy’s Oil Soap and rinsed the bowl off with running water. He soaked the stem in Briarville’s Pipe stem Deoxidizer and once it had soaked rinsed it off with warm water to remove the residual solution. He dried it off and rubbed it down to remove any oxidation that was still on the stem. The pipe looked very good when I received it. I took photos of the bowl and the rim top as well as both sides of the stem to show the condition of the pipe before I started my work. It really looked remarkably good.I took a photo of the stamping on the shank. The photo of the stamping is clear and readable. I also removed the stem and took a photo of the parts of the pipe. It is a unique piece of pipe history.The bowl was in such good condition that I had to do some minimal work with it. I rubbed the briar down with Before & After Restoration Balm. I worked it into the briar with my fingertips and a horsehair shoe brush to work it into the nooks and crannies of the sandblast finish. The product works to clean, enliven and preserve the briar. I let it sit for 10 minutes then I buffed it with a cotton cloth to deepen the shine. The briar really comes alive with the balm. I set the bowl aside and turned my attention to the stem. I sanded the surface of the stem smooth with 320-3500 grit sanding pads. It worked well to smooth things out and remove the tooth marks and the remnants of oxidation. When finished the stem looked much better.I polished the vulcanite with micromesh sanding pads – 1500-12000 grit pads. I wiped it down with Obsidian Oil after each sanding pad. I used Before & After Pipe Polish – both Fine and Extra Fine to further polish the stem. I polished the aluminum inner tube with the micromesh sanding pads. Once finished I inserted it in the tenon in the stem.This 1990 Dunhill Shell 4109 Hexgonal Shank Flat Bottom Canadian has a beautiful, unique Dunhill Sandblast finish that is very deep and craggy. The rich brown/black finish highlights some great grain around the bowl and shank. It has some great rugged sandblast that Dunhill developed and specialized in making. The polished vulcanite diamond taper stem adds to the mix. I put the stem back on the bowl and carefully buffed the pipe with Blue Diamond on the buffing wheel. It is critical to avoid buffing the stamping and to have a lighter touch on the sandblast briar. I gave the bowl multiple coats of Conservator’s Wax and the stem multiple coats of carnauba wax on the buffing wheel and followed that by buffing it with a clean buffing pad. I hand buffed the pipe with a microfiber cloth to deepen the shine. The finished Dunhill Shell 4109 Canadian is quite stunning and feels great in my hand. Give the finished pipe a look in the photos below. The dimensions of the pipe are Length: 5 ½ inches, Height: 2 inches, Outside diameter of the bowl: 1 ¼ inches, Chamber diameter: ¾ of an inch. The weight of the pipe is 1.34 ounces/38 grams. Thanks for walking through the restoration with me as I worked over another beautiful pipe. I am going to add it to the rebornpipes store in the British Pipemakers Section. If you would like to add it to your collection let me know. Thanks for your time.

What a Find, a Unique 4109 Dunhill Shell Diamond Shank Flat Bottom Canadian


Blog by Steve Laug

The next pipe on the table is a Dunhill Shell Briar with a great looking blast on the bowl and a unique diamond shank and diamond taper stem. The bottom of the shank and bowl is smooth so it is a sitter. This one came with a Dunhill box (wrong number on the outside but still very nice) and a leather (calf skin) pipe sock. In the box is a brochure on joining the Fellowship of the White Spot and one on Dunhill Tobaccos. We purchased it from our contact in Copenhagen, Denmark 02/11/2024. The pipe is stamped on the heel of the bowl and the underside of the shank on a smooth panel. On the heel it is stamped with the shape number 4109 followed by Dunhill Shell [over]Made in England with the date stamp 20 following the D in England. The number is approximately the same size as the D in England. The pipe had been smoked and there was a light cake in the bowl with some light lava on the rim top. The edges of the rim are crisp and clean with no damage. The stem is lightly oxidized and had tooth marks and chatter on the surface on both the top and underside of the stem just ahead of the button. Jeff took photos of the pipe before he started his clean up work. I have included them below. Jeff took photos of the rim top, bowl and the surfaces of the stem to give a sense of the condition of the pipe. The walls of the bowl had a light cake on them and some light lava on the rim top. The stem is lightly oxidized and has tooth marks and chatter on both sides ahead of the button. He took photos of the sides and heel of the bowl to give a clear picture of the look of the sandblast. It really is a stunning pipe. He took photos of the stamping on the underside of the bowl and the shank. It is clear and readable and read as noted above. I turned to the dating key on Pipephil’s site (http://www.pipephil.eu/logos/en/dunhill/cledat-en1a.html) to establish a date for the pipe. I drew a red box around the pertinent information below. It fits the criteria of a Sandblast with a year suffix and a Non possessive form Dunhill. The suffix is the number 20 which puts in the section below which notes 1960 + suffix to establish a date. In this case it is 1960 +20 making the pipe a 1980.From there I turned to the Dunhill shape chart to unpack the shape number stamp 4110 on the heel of the bowl (http://www.pipephil.eu/logos/en/dunhill/shapes.html). This gave me the information I needed to interpret the 4109 shape stamp. The first digit 4 is the size of the pipe – a Group 4. The second digit is the style of the stem which in this case is a 1 telling me that the stem is a tapered stem. The last two digits the 09 tell me that the pipe is a Canadian. I have included the shape below and encircled it with a red box.Now it was my turn to work on the pipe. Jeff had done an amazing cleanup of the pipe. He reamed the light cake with a PipNet reamer and cleaned up that with a Savinelli Fitsall Pipe Knife. He scrubbed the internals of the bowl and stem with alcohol, cotton swabs and pipe cleaners. He scrubbed the externals with undiluted Murphy’s Oil Soap and rinsed the bowl off with running water. He soaked the stem in Briarville’s Pipe stem Deoxidizer and once it had soaked rinsed it off with warm water to remove the residual solution. He dried it off and rubbed it down to remove any oxidation that was still on the stem. The pipe looked very good when I received it. I took photos of the bowl and the rim top as well as both sides of the stem to show the condition of the pipe before I started my work. It really looked remarkably good.I took a photo of the stamping on the shank. The photo of the stamping is clear and readable. I also removed the stem and took a photo of the parts of the pipe. It is a unique piece of pipe history.The bowl was in such good condition that I had to do some minimal work with it. I rubbed the briar down with Before & After Restoration Balm. I worked it into the briar with my fingertips and a horsehair shoe brush to work it into the nooks and crannies of the sandblast finish. The product works to clean, enliven and preserve the briar. I let it sit for 10 minutes then I buffed it with a cotton cloth to deepen the shine. The briar really comes alive with the balm. I set the bowl aside and turned my attention to the stem. I sanded the surface of the stem smooth with 320-3500 grit sanding pads. It worked well to remove the tooth marks and the remnants of oxidation. When finished the stem looked much better.I polished the vulcanite with micromesh sanding pads – 1500-12000 grit pads. I wiped it down with Obsidian Oil after each sanding pad. I used Before & After Pipe Polish – both Fine and Extra Fine to further polish the stem. I polished the aluminum inner tube with the micromesh sanding pads. Once finished I inserted it in the tenon in the stem.This 1990 Dunhill Shell 4109 Diamond Shank Flat Bottom Canadian has a beautiful, unique Dunhill Sandblast finish that is very deep and craggy. The rich brown/black finish highlights some great grain around the bowl and shank. It has some great rugged sandblast that Dunhill developed and specialized in making. The polished vulcanite diamond taper stem adds to the mix. I put the stem back on the bowl and carefully buffed the pipe with Blue Diamond on the buffing wheel. It is critical to avoid buffing the stamping and to have a lighter touch on the sandblast briar. I gave the bowl multiple coats of Conservator’s Wax and the stem multiple coats of carnauba wax on the buffing wheel and followed that by buffing it with a clean buffing pad. I hand buffed the pipe with a microfiber cloth to deepen the shine. The finished Dunhill Shell 4109 Canadian is quite stunning and feels great in my hand. Give the finished pipe a look in the photos below. The dimensions of the pipe are Length: 6 inches, Height: 2 inches, Outside diameter of the bowl: 1 ¼ inches, Chamber diameter: ¾ of an inch. The weight of the pipe is 1.48 ounces/42 grams. Thanks for walking through the restoration with me as I worked over another beautiful pipe. I am going to add it to the rebornpipes store in the British Pipemakers Section. If you would like to add it to your collection let me know. Thanks for your time.

Dunhill Shell Briar 40 Lovat Made in England 0


Blog by Steve Laug

The next pipe on the table Dunhill Shell Briar with a worn or shallow blast on the bowl and a smooth rim top. We purchased it from our contact in Copenhagen, Denmark 01/22/24. The pipe is stamped on the heel of the bowl and the underside of the shank on a smooth panel. On the heel it is stamped with the shape number 40 followed by Dunhill [over] Shell Briar. Next to that it is stamped Made in [over] England with the date stamp 0 following the D in England. The number is approximately the same size as the D in England.  Next to that it is stamped 4 in a circle and S which tells me it is a Group 4 sized pipe and it is in the Shell Briar finish. The pipe had been smoked and there was a moderate cake in the bowl with some overflowing as lava on the smooth rim top. There is also some darkening and possible damage on the inner edge of the bowl. The stem is lightly oxidized and had wear on the surface on both the top and underside of the stem just ahead of the button. Jeff took photos of the pipe before he started his clean up work. I have included them below. Jeff took photos of the rim top, bowl and the surfaces of the stem to give a sense of the condition of the pipe. The walls of the bowl had a moderate cake on them and some lava overflow onto the rim top – heavier toward the back of the bowl. There is also some darkening and potential burn damage that can be seen on the inner edge of the rim. The stem is lightly oxidized and has wear on both sides ahead of the button. He took photos of the sides and heel of the bowl to give a clear picture of the look of the light or shallow sandblast. It is hard to know if it is just worn from use or if it came from the factory this way. He took photos of the stamping on the underside of the bowl and the shank. It is clear and readable and read as noted above. I turned to the dating key on Pipephil’s site (http://www.pipephil.eu/logos/en/dunhill/cledat-en1a.html) to establish a date for the pipe. I drew a red box around the pertinent information below. It fits the criteria of a Sandblast with a year suffix and a Non possessive form Dunhill. The suffix is the number 0 same size as the D which puts in the section below which notes 1960 + suffix 0 to establish a date. In this case it is 1960 + 0 making the pipe a 1960.I turned to Pipedia to verify this date on the pipe and have included the link and the post for that below (https://pipedia.org/wiki/Pipedia_Dunhill_Dating_Guide#Post-Patents). It verifies that date is 1960. I have included further information that was on the site for this time period. I have highlighted the pertinent information in red below:

[1955 up to 1969] Only a single suffix number.

The date code is just after ENGLAND: 1950 +: 5, 6, 7, 8 and 9 for the 50s and 0 for 1960 (they are smaller and underscored) then, 1, 2, 3, 4, 5, 6, 7, 8 and 9 for the 60s (they are equal in size to the “D” in the word “ENGLAND”).

  • Sometimes two suffix numbers (one after the other), but it’s an additional stamp for warranty control (see more here).
  • From 1961 up to 1964 we can find numbers without underscore – the code is a raised and smaller than the preceding “D”.
  • Sometimes the numbers 6, 7, 8 and 9, in the 50s, are roughly equal in size to the “D” in the word “ENGLAND”.
  • DUNHILL over finish stamp (BRUYERE or ROOT BRIAR). On sandblasted DUNHILL followed by the name of the finish (DUNHILL SHELL, etc).

Now it was my turn to work on the pipe. Jeff had done an amazing cleanup of the pipe. He reamed the cake with a PipNet reamer and cleaned up that with a Savinelli Fitsall Pipe Knife. He scrubbed the internals of the bowl and stem with alcohol, cotton swabs and pipe cleaners. He scrubbed the externals with undiluted Murphy’s Oil Soap and rinsed the bowl off with running water. He soaked the stem in Briarville’s Pipe stem Deoxidizer and once it had soaked rinsed it off with warm water to remove the residual solution. He dried it off and rubbed it down to remove any oxidation that was still on the stem. The pipe looked very good when I received it. I took photos of the bowl and the rim top as well as both sides of the stem to show the condition of the pipe before I started my work. The rim top shows scratching on the smooth surface and some darkening as well. There is also damage on the inner edge of the rim where it appears to have been damaged with a knife. The stem does not show tooth marks but the sharp edge of the button on both sides is worn and will need to be redefined.I took a photo of the stamping on the shank. The photo of the stamping is clear, though worn in some spot but it is still readable. I also removed the stem and took a photo of the parts of the pipe.I started my work on the pipe by addressing the damage to the rim top and the inner edge. I used a folded piece of 220 grit sandpaper to smooth out the damage on the rim top and also smooth out the inner edge and remove the cut marks. It looked significantly better at this point. There were still some spots of darkening on the rim top on the back and front but those will polish out further as the process continues.I worked further on the rim top with the 320-3500 grit sanding pads. I used them on the smooth surface as well as the inner edge. The darkening is less at this point and the top and edges are taking on a shine.I further polished the rim top and edges using micromesh sanding pads – I dry sand it with 1500-120000 grit pads and wiping it down with a damp cloth after each pad. The shine is deepening and though the darkening is still present in spots it is improving. I stained the rim top with a Maple stain pent to blend it into the bowl colour and to further mask the darkening. At this point the rim top looks quite amazing.Once the stain dried on the rim top I rubbed the briar down with Before & After Restoration Balm. I worked it into the briar with my fingertips and a horsehair shoe brush. The product works to clean, enliven and preserve the briar. I let it sit for 10 minutes then I buffed it with a cotton cloth to deepen the shine. The briar really comes alive with the balm. I set the bowl aside and turned my attention to the stem. I used a small file with a straight edge to redefine the sharp edge of the button. Once it was cut it looked better. I sanded the file marks with 220 grit sandpaper to smooth them out. I sanded the surface of the stem and the repairs smooth with 320-3500 grit sanding pads. It worked well to smooth things out and remove remnants of oxidation. When finished the stem looked much better.I polished the vulcanite with micromesh sanding pads – 1500-12000 grit pads. I wiped it down with Obsidian Oil after each sanding pad. I used Before & After Pipe Polish – both Fine and Extra Fine to further polish the stem. This 1960 Dunhill Shell Briar 40 Group 4 Lovat has a beautiful, unique Dunhill Sandblast finish that is shallow and worn. The rich brown/black finish highlights some great grain around the bowl and shank. It has a sandblast that Dunhill developed and specialized in making. The polished vulcanite saddle stem adds to the mix. I put the stem back on the bowl and carefully buffed the pipe with Blue Diamond on the buffing wheel. It is critical to avoid buffing the stamping and to have a lighter touch on the sandblast briar. I gave the bowl multiple coats of Conservator’s Wax and the stem multiple coats of carnauba wax on the buffing wheel and followed that by buffing it with a clean buffing pad. I hand buffed the pipe with a microfiber cloth to deepen the shine. The finished Dunhill Shell Briar 40 Lovat is quite stunning and feels great in my hand. Give the finished pipe a look in the photos below. The dimensions of the pipe are Length: 5 inches, Height: 1 ¾ inches, Outside diameter of the bowl: 1 ¼ inches, Chamber diameter: ¾ of an inch. The weight of the pipe is 1.23 ounces/35 grams. Thanks for walking through the restoration with me as I worked over another beautiful pipe. I am going to add it to the rebornpipes store in the British Pipemakers Section. If you would like to add it to your collection let me know. Thanks for your time.

What a Classic looking Dunhill Shell Briar 32 FT Billiard 1S


Blog by Steve Laug

The next pipe on the table is a unique one and I think it is an older one. We purchased it from our contact in Copenhagen, Denmark 01/22/24. The pipe is a Shell Briar with a rugged sandblast finish. The pipe is stamped on the heel of the bowl and the underside of the shank on a smooth panel. On the heel it is stamped with the shape number and the designation for a Fish Tail stem – 32 F/T followed by Dunhill [over] Shell Briar. Next to that it is stamped Made in [over] England with the date stamp 7 following the D in England. Next to that it is stamped 1 in a circle and S which tells me it is a Group 1 sized pipe and it is in the Shell Briar finish. The pipe had been smoked and there was a thick cake in the bowl overflowing as lava in the sandblast on the rim top. The stem is oxidized and had tooth marks on both the top and underside of the stem just ahead of the button. Jeff took photos of the pipe before he started his clean up work. I have included them below. Jeff took photos of the rim top, bowl and the surfaces of the stem to give a sense of the condition of the pipe. The walls of the bowl had a thick cake on them and lava overflow onto the rim top – heavier toward the back of the bowl. The stem is oxidized and has tooth marks on both sides ahead of the button. He took photos of the sides and heel of the bowl to give a clear picture of the depth of the sandblast. It really is a great looking blast that shows the grain underneath very well. He took photos of the stamping on the underside of the bowl and the shank. It is clear and readable and read as noted above.   I turned to the dating key on Pipephil’s site (http://www.pipephil.eu/logos/en/dunhill/cledat-en1a.html) to establish a date for the pipe. I drew a red box around the pertinent information below. It fits the criteria of a Sandblast with a year suffix and a Non possessive form Dunhill. The suffix is the number 7 same size as the D which puts in the section below which notes 1960 + suffix 7 to establish a date. In this case it is 1960 + 7 making the pipe a 1967.I turned to Pipedia to verify this date on the pipe and have included the link and the post for that below (https://pipedia.org/wiki/Pipedia_Dunhill_Dating_Guide#Post-Patents). It verifies that date is 1960. I have included further information that was on the site for this time period. I have highlighted the pertinent information in red below:

[1955 up to 1969] Only a single suffix number.

The date code is just after ENGLAND: 1950 +: 5, 6, 7, 8 and 9 for the 50s and 0 for 1960 (they are smaller and underscored) then, 1, 2, 3, 4, 5, 6, 7, 8 and 9 for the 60s (they are equal in size to the “D” in the word “ENGLAND”).

  • Sometimes two suffix numbers (one after the other), but it’s an additional stamp for warranty control (see more here).
  • From 1961 up to 1964 we can find numbers without underscore – the code is a raised and smaller than the preceding “D”.
  • Sometimes the numbers 6, 7, 8 and 9, in the 50s, are roughly equal in size to the “D” in the word “ENGLAND”.
  • DUNHILL over finish stamp (BRUYERE or ROOT BRIAR). On sandblasted DUNHILL followed by the name of the finish (DUNHILL SHELL, etc).

Now it was my turn to work on the pipe. Jeff had done an amazing cleanup of the pipe. He reamed the light cake with a PipNet reamer and cleaned up that with a Savinelli Fitsall Pipe Knife. He scrubbed the internals of the bowl and stem with alcohol, cotton swabs and pipe cleaners. He scrubbed the externals with undiluted Murphy’s Oil Soap and rinsed the bowl off with running water. He soaked the stem in Briarville’s Pipe stem Deoxidizer and once it had soaked rinsed it off with warm water to remove the residual solution. He dried it off and rubbed it down to remove any oxidation that was still on the stem. The pipe looked very good when I received it. I took photos of the bowl and the rim top as well as both sides of the stem to show the condition of the pipe before I started my work. The rim top looked remarkably good. Unfortunately I forgot to take stem photos of the before and only took the ones below after I had some repair work on the top and underside.I took a photo of the stamping on the shank. The photo of the stamping is clear and readable. I also removed the stem and took a photo of the parts of the pipe. The bowl was in such good condition that I had to do some minimal work with it. I rubbed the briar down with Before & After Restoration Balm. I worked it into the briar with my fingertips and a horsehair shoe brush. The product works to clean, enliven and preserve the briar. I let it sit for 10 minutes then I buffed it with a cotton cloth to deepen the shine. The briar really comes alive with the balm. I set the bowl aside and turned my attention to the stem. I “painted” the stem surface with the flame of a Bic lighter to lift the tooth marks. I was able to lift the majority of them. Those that remained I filled in with clear CA glue. Once the repairs cured I used a small file to flatten the spots. It looked much better. I sanded the surface of the stem and the repairs smooth with 320-3500 grit sanding pads. It worked well to smooth things out and remove remnants of oxidation. When finished the stem looked much better.I polished the vulcanite with micromesh sanding pads – 1500-12000 grit pads. I wiped it down with Obsidian Oil after each sanding pad. I used Before & After Pipe Polish – both Fine and Extra Fine to further polish the stem. This 1967 Dunhill Shell Briar 32 F/T Group 1 Billiard has a beautiful, unique Dunhill Sandblast finish that is very deep and craggy. The rich brown/black finish highlights some great grain around the bowl and shank. It has some great rugged sandblast that Dunhill developed and specialized in making. The polished vulcanite taper stem adds to the mix. I put the stem back on the bowl and carefully buffed the pipe with Blue Diamond on the buffing wheel. It is critical to avoid buffing the stamping and to have a lighter touch on the sandblast briar. I gave the bowl multiple coats of Conservator’s Wax and the stem multiple coats of carnauba wax on the buffing wheel and followed that by buffing it with a clean buffing pad. I hand buffed the pipe with a microfiber cloth to deepen the shine. The finished Dunhill Shell Briar 32 F/T Billiard is quite stunning and feels great in my hand. Give the finished pipe a look in the photos below. The dimensions of the pipe are Length: 5 inches, Height: 1 ½ inches, Outside diameter of the bowl: 1 inch, Chamber diameter: ¾ of an inch. The weight of the pipe is .67 ounces/19 grams. Thanks for walking through the restoration with me as I worked over another beautiful pipe. I am going to add it to the rebornpipes store in the British Pipemakers Section. If you would like to add it to your collection let me know. Thanks for your time.

A Prince of a Dunhill Shell Briar!


Blog by Steve Laug

The next pipe on the table is a unique one and I think it is an older one. We purchased it from our contact in Copenhagen, Denmark 02/02/24. The pipe is a Shell Briar with a rugged sandblast finish. The pipe is stamped on the heel of the bowl and the underside of the shank on a smooth panel. On the heel it is stamped with the shape number 314 followed by Dunhill [over] Shell Briar. Next to that it is stamped Made in [over] England 0 7. The 0 7 is the date stamp but it is a bit odd in that it looks as if the 7 was stamped later than the 0 though both are underlined. Next to that it is stamped 2 in a circle and S which tells me it is a Group 2 sized pipe and it is in the Shell Briar finish. The pipe had been smoked and there was a thick cake in the bowl overflowing as lava in the sandblast on the rim top. The stem is oxidized and had light tooth marks on both the top and underside of the stem just ahead of the button. Jeff took photos of the pipe before he started his clean up work. I have included them below. Jeff took photos of the rim top, bowl and the surfaces of the stem to give a sense of the condition of the pipe. The walls of the bowl had a thick cake on them and lava overflow onto the rim top – heavier toward the back of the bowl. The stem is oxidized and has tooth marks on both sides ahead of the button. He took photos of the sides and heel of the bowl to give a clear picture of the depth of the sandblast. It really is a great looking blast that shows the grain underneath very well.   He took photos of the stamping on the underside of the bowl and the shank. It is clear and readable and read as noted above.   He took the stem off the shank and took photos of the dirty inner tube apparatus in the tenon. It will need to be removed and cleaned.I turned to the dating key on Pipephil’s site (http://www.pipephil.eu/logos/en/dunhill/cledat-en1a.html) to establish a date for the pipe. I drew a red box around the pertinent information below. It fits the criteria of a Sandblast with a year suffix and a Non possessive form Dunhill. The suffix is the number 0 same size as the D with an underscored 0. The second number 7 seems to have been added later. Typically, what that means is that the pipe was made in the year of the first number and then sold in the year of the second number which puts in the section below which notes 1960 + suffix 0 to establish a date. In this case it is 1960 + 0 making the pipe a 1960. The addition of the second number which is obviously stamped separately means that the pipe was sold in 1967. I turned to Pipedia to verify this date on the pipe and have included the link and the post for that below (https://pipedia.org/wiki/Pipedia_Dunhill_Dating_Guide#Post-Patents). It verifies that date is 1960. I have included further information that was on the site for this time period. I have highlighted the pertinent information in red below:

[1955 up to 1969] Only a single suffix number.

The date code is just after ENGLAND: 1950 +: 5, 6, 7, 8 and 9 for the 50s and 0 for 1960 (they are smaller and underscored) then, 1, 2, 3, 4, 5, 6, 7, 8 and 9 for the 60s (they are equal in size to the “D” in the word “ENGLAND”).

  • Sometimes two suffix numbers (one after the other), but it’s an additional stamp for warranty control (see more here).
  • From 1961 up to 1964 we can find numbers without underscore – the code is a raised and smaller than the preceding “D”.
  • Sometimes the numbers 6, 7, 8 and 9, in the 50s, are roughly equal in size to the “D” in the word “ENGLAND”.
  • DUNHILL over finish stamp (BRUYERE or ROOT BRIAR). On sandblasted DUNHILL followed by the name of the finish (DUNHILL SHELL, etc).

This information helped me to understand that the first number indeed was the year of manufacture. The second number is an additional stamp for warranty control connected to the date the pipe was sold.

Now it was my turn to work on the pipe. Jeff had done an amazing cleanup of the pipe. He reamed the light cake with a PipNet reamer and cleaned up that with a Savinelli Fitsall Pipe Knife. He scrubbed the internals of the bowl and stem with alcohol, cotton swabs and pipe cleaners. He scrubbed the externals with undiluted Murphy’s Oil Soap and rinsed the bowl off with running water. He soaked the stem in Briarville’s Pipe stem Deoxidizer and once it had soaked rinsed it off with warm water to remove the residual solution. He dried it off and rubbed it down to remove any oxidation that was still on the stem. The pipe looked very good when I received it. I took photos of the bowl and the rim top as well as both sides of the stem to show the condition of the pipe before I started my work. It really looked remarkably good.I took a photo of the stamping on the shank. The photo of the stamping is clear and readable. I also removed the stem and took a photo of the parts of the pipe. It is a unique piece of pipe history.The bowl was in such good condition that I had to do some minimal work with it. I rubbed the briar down with Before & After Restoration Balm. I worked it into the briar with my fingertips and a horsehair shoe brush. The product works to clean, enliven and preserve the briar. I let it sit for 10 minutes then I buffed it with a cotton cloth to deepen the shine. The briar really comes alive with the balm. I set the bowl aside and turned my attention to the stem. I sanded the surface of the stem smooth with 320-3500 grit sanding pads. It worked well to smooth things out and remove remnants of oxidation. When finished the stem looked much better.I polished the vulcanite with micromesh sanding pads – 1500-12000 grit pads. I wiped it down with Obsidian Oil after each sanding pad. I used Before & After Pipe Polish – both Fine and Extra Fine to further polish the stem. I put the inner tube back in place in the tenon and the pipe was ready to reassemble and head to the buffer.This 1960 Dunhill Shell Briar 314 Group 2 Prince has a beautiful, unique Dunhill Sandblast finish that is very deep and craggy. The rich brown/black finish highlights some great grain around the bowl and shank. It has some great rugged sandblast that Dunhill developed and specialized in making. The polished vulcanite taper stem adds to the mix. I put the stem back on the bowl and carefully buffed the pipe with Blue Diamond on the buffing wheel. It is critical to avoid buffing the stamping and to have a lighter touch on the sandblast briar. I gave the bowl multiple coats of Conservator’s Wax and the stem multiple coats of carnauba wax on the buffing wheel and followed that by buffing it with a clean buffing pad. I hand buffed the pipe with a microfiber cloth to deepen the shine. The finished Dunhill Shell Briar Prince is quite stunning and feels great in my hand. Give the finished pipe a look in the photos below. The dimensions of the pipe are Length: 6 inches, Height: 1 ¼ inches, Outside diameter of the bowl: 1 inch, Chamber diameter: ¾ of an inch. The weight of the pipe is .95 ounces/27 grams. Thanks for walking through the restoration with me as I worked over another beautiful pipe. I am going to add it to the rebornpipes store in the British Pipemakers Section. If you would like to add it to your collection let me know. Thanks for your time.

Restoring a Sasieni 5 Dot Billiard with a Taper Stem


Blog by Steve Laug

The next pipe on the table is large sandblast Sasieni Pot. We purchased it off eBay from Jordan, Minnesota, USA on 01/22/2024.The pipe is stamped on the heel of the bowl and the underside of the shank on a smooth panel. It reads Sasieni (in script) 5 DOT [over] Made in England. The silver band is stamped 925 on the left side. It is tarnished and dull looking. The taper stem bears the 5 blue Dot pattern of the Sasieni logo on the left side. The pipe had been smoked and there was a thick cake in the bowl with a thick lava overflow in the sandblast on the inner edge and the rim top. There was dust and debris in the sandblast finish around the bowl sides. The stem is oxidized and calcified. It had light tooth marks on both the top and underside of the stem just ahead of the button. Jeff took photos of the pipe before he started his clean up work. I have included them below. Jeff took photos of the rim top, bowl and the surfaces of the stem to give a sense of the condition of the pipe. The walls of the bowl had a thick cake which overflowed over the rim edges and onto the rim top making a mess. The stem is lightly oxidized and there is a mark on the stem where it appears that it had a Softee Bit on the end to protect it. There are light tooth marks on both sides ahead of the button. He took photos of the sides and heel of the bowl to give a clear picture of the depth of the sandblast. It really is a great looking blast that shows the grain underneath very well. He took photos of the stamping on the underside of the bowl and the shank. It is clear and readable and read as noted above. The five dots on the stem are clear and undamaged as is the 925 stamp on the silver band.I turned to Pipephil’s site to see what I could find about the Sasieni 5 Dot pipes and get some idea of where they fit in terms of the hierarchy (http://www.pipephil.eu/logos/en/logo-sasieni.html). I also wanted to know about a potential date for the pipe. I quote below what I found there. I quote from the side bar below and include a screen shot of the 5 Dot:

Post transition, 2001 – today, “5 dot”I Googled for information that I could find and came across some on the smokingpipes.com website (https://www.smokingpipes.com/pipes/estate/england/moreinfo.cfm?product_id=78680). It included several freehand versions of the 5 Dot but I found the description given by them for one of the pipes really informative. I have quoted it below for the information it includes.

The downside to post-transition Sasieni’s is that the once revered Four Dot wound up being applied to briars that never would have made the cut during the family and transition periods. The upside is that unlike some once-grand old marques, not everything went to pieces, standards-wise. This Five Dot (a purely post-transition designation) for example is solid and true: handsomely shaped, drilled out straight as an arrow, and possessed of quite a healthy bit of wild ring grain. – Eric N. Squires

Now it was my turn to work on the pipe. Jeff had done an amazing cleanup of the pipe. He reamed the light cake with a PipNet reamer and cleaned up that with a Savinelli Fitsall Pipe Knife. He scrubbed the internals of the bowl and stem with alcohol, cotton swabs and pipe cleaners. He scrubbed the externals with undiluted Murphy’s Oil Soap and rinsed the bowl off with running water. He soaked the stem in Briarville’s Pipe stem Deoxidizer and once it had soaked rinsed it off with warm water to remove the residual solution. He dried it off and rubbed it down to remove any oxidation that was still on the stem. The pipe looked very good when I received it. I took photos of the bowl and the rim top as well as both sides of the stem to show the condition of the pipe before I started my work. The rim top was very clean and the edges looked good. The clean up had removed some of the stain on the top the outer edges of the bowl. It really looked remarkably good.I took a photo of the stamping on the shank. The photo of the stamping is clear and readable. I also removed the stem and took a photo of the parts of the pipe. It is a unique piece of pipe history. The bowl was in such good condition that I had to do some minimal work with it. I used a Walnut Stain pen to touch up the rim top and edges of the bowl to match the rest of the bowl. I looks amazingly good.I rubbed the briar down with Before & After Restoration Balm. I worked it into the briar with my fingertips and a horsehair shoe brush to work it into the nooks and crannies of the sandblast finish. The product works to clean, enliven and preserve the briar. I let it sit for 10 minutes then I buffed it with a cotton cloth to deepen the shine. The briar really comes alive with the balm. I waxed the bowl down with some Conservator’s Wax and set it aside to let the wax harden. I buffed it with a soft cloth to raise the shine. It is a beautiful sandblast that shows depth in the finish. I set the bowl aside and turned my attention to the stem. I sanded the surface of the stem smooth with 320-3500 grit sanding pads. It worked well to smooth things out and remove remnants of oxidation. When finished the stem looked much better.I polished the vulcanite with micromesh sanding pads – 1500-12000 grit pads. I wiped it down with Obsidian Oil after each sanding pad. I used Before & After Pipe Polish – both Fine and Extra Fine to further polish the stem. This Silver Banded Sasieni 5 Dot Billiard has a beautiful, Sandblast finish that is very tactile. The rich walnut brown/black finish highlights some great grain around the bowl and shank. The polished vulcanite taper stem adds to the mix. I put the stem back on the bowl and carefully buffed the pipe with Blue Diamond on the buffing wheel. It is critical to avoid buffing the stamping and to have a lighter touch on the sandblast briar. I gave the bowl multiple coats of Conservator’s Wax and the stem multiple coats of carnauba wax on the buffing wheel and followed that by buffing it with a clean buffing pad. I hand buffed the pipe with a microfiber cloth to deepen the shine. The finished Sasieni 5 Dot Billiard is quite stunning and feels great in my hand. Give the finished pipe a look in the photos below. The dimensions of the pipe are Length: 6 ½ inches, Height: 2 inches, Outside diameter of the bowl: 1 ¾ inches, Chamber diameter: 7/8 of an inch. The weight of the pipe is 2.82 ounces/80 grams. Thanks for walking through the restoration with me as I worked over another beautiful pipe. I am going to add it to the rebornpipes store in the British Pipemakers Section. If you would like to add it to your collection let me know. Thanks for your time.

Restoring a Dunhill Shell 7 90 C 4S Poker Stand-up


Blog by Steve Laug

The next pipe on the table is another unique one and a shape I have not worked on before. We purchased it from our contact in Copenhagen, Denmark 02/02/24. The pipe is a Shell with a rugged sandblast finish. The pipe is stamped on the heel of the bowl and the underside of the shank on a smooth panel. On the heel it is stamped with a series of numbers. The first number is 7 (identity unknown) after that is the number 90 followed by a C. After that it is stamped Dunhill Shell [over] Made in England 15. The 15 is the date stamp. On the flat underside of the stem the pipe was stamped 4 in a circle with S following that. This tells me that the pipe is a Group 4 sized pipe in a Shell finish. The pipe had been smoked and there was a light cake in the bowl with no lava overflow in the sandblast on the rim top. There was dust and debris in the sandblast finish. The stem is lightly oxidized and had light tooth marks on both the top and underside of the stem just ahead of the button. Jeff took photos of the pipe before he started his clean up work. I have included them below. Jeff took photos of the rim top, bowl and the surfaces of the stem to give a sense of the condition of the pipe. The walls of the bowl had a light cake on them. The stem is lightly oxidized and has tooth marks on both sides ahead of the button. He also took the stem off to show the inner tube. He took photos of the sides and heel of the bowl to give a clear picture of the depth of the sandblast. It really is a great looking blast that shows the grain underneath very well. He took photos of the stamping on the underside of the shank and the stem. It is clear and readable and read as noted above.I turned to the dating key on Pipephil’s site (http://www.pipephil.eu/logos/en/dunhill/cledat-en1a.html) to establish a date for the pipe. I drew a red box around the pertinent information below. It fits the criteria of a Sandblast with a year suffix and a Non possessive form Dunhill. The suffix is the number 15 which puts in the section below which notes 1960 + suffix to establish a date. In this case it is 1960 +15 making the pipe a 1975.I turned to Pipedia for help with the shape number and the extra stamping of the 7 and the C (https://pipedia.org/wiki/Dunhill_Shapes_List).

90 Poker “Stand-up” 2 4¾” 1928, 1950, 1969 22

There are also two other markings around the shape number that I wanted to understand – 7 and a C. I found an article on Pipedia (https://pipedia.org/wiki/Dunhill_Additional_Stamps) on additional stamps. The C stamp signifies:

C stands for “complementary”. Pipes stamped as such are usually pipe given to business partners as a complementary present and are not for sale.

There was no information on the 7 though the number 6 indicated a saddle stem. I wonder if the 7 could also indicate that. It may be an “unknown” number.

Now it was my turn to work on the pipe. Jeff had done an amazing cleanup of the pipe. He reamed the light cake with a PipNet reamer and cleaned up that with a Savinelli Fitsall Pipe Knife. He scrubbed the internals of the bowl and stem with alcohol, cotton swabs and pipe cleaners. He scrubbed the externals with undiluted Murphy’s Oil Soap and rinsed the bowl off with running water. He soaked the stem in Briarville’s Pipe stem Deoxidizer and once it had soaked rinsed it off with warm water to remove the residual solution. He dried it off and rubbed it down to remove any oxidation that was still on the stem. The pipe looked very good when I received it. I took photos of the bowl and the rim top as well as both sides of the stem to show the condition of the pipe before I started my work. It really looked remarkably good.I took a photo of the stamping on the shank. The photo of the stamping is clear and readable. I also removed the stem and took a photo of the parts of the pipe. It is a unique piece of pipe history.The bowl was in such good condition that I had to do some minimal work with it. I rubbed the briar down with Before & After Restoration Balm. I worked it into the briar with my fingertips and a horsehair shoe brush to work it into the nooks and crannies of the sandblast finish. The product works to clean, enliven and preserve the briar. I let it sit for 10 minutes then I buffed it with a cotton cloth to deepen the shine. The briar really comes alive with the balm. I set the bowl aside and turned my attention to the stem. I sanded the surface of the stem smooth with 320-3500 grit sanding pads. It worked well to smooth things out and remove remnants of oxidation. When finished the stem looked much better.I polished the vulcanite with micromesh sanding pads – 1500-12000 grit pads. I wiped it down with Obsidian Oil after each sanding pad. I used Before & After Pipe Polish – both Fine and Extra Fine to further polish the stem. I put the inner tube back into the tenon and stem and took a photo of it before I put the pipe back together. This 1975 Dunhill Shell 7 90 C Poker Stand-up marled Complementary has a beautiful, Dunhill Sandblast finish that is very tactile. The rich brown/black finish highlights some great grain around the bowl and shank. It has a; great sandblast that Dunhill developed and specialized in making. The polished vulcanite saddle stem adds to the mix. I put the stem back on the bowl and carefully buffed the pipe with Blue Diamond on the buffing wheel. It is critical to avoid buffing the stamping and to have a lighter touch on the sandblast briar. I gave the bowl multiple coats of Conservator’s Wax and the stem multiple coats of carnauba wax on the buffing wheel and followed that by buffing it with a clean buffing pad. I hand buffed the pipe with a microfiber cloth to deepen the shine. The finished Dunhill Shell 90 Poker Stand-up is quite stunning and feels great in my hand. Give the finished pipe a look in the photos below. The dimensions of the pipe are Length: 5 inches, Height: 1 ¾ inches, Outside diameter of the bowl: 1 1/8 inches, Chamber diameter: ¾ of an inch. The weight of the pipe is .99 ounces/28 grams. Thanks for walking through the restoration with me as I worked over another beautiful pipe. I am going to add it to the rebornpipes store in the British Pipemakers Section. If you would like to add it to your collection let me know. Thanks for your time.

Restoring a E 250 F/T Dunhill Shell Billiard


Blog by Steve Laug

The next pipe on the table is one that showed up in the mail this week from a friend, Eric in Ontario. I sent him a message and got some background on the pipe. He purchased it from a small shop in his town and wanted me to restore it or as he said “Work my magic on it”. I have worked on quite a few of his pipes so I was not surprised. The pipe is a Dunhill Shell with a rugged sandblast finish. The pipe is stamped on the heel of the bowl and the underside of the shank on a smooth panel. On the heel it is stamped with the shape number E 250 F/T followed by Dunhill Shell followed by Made in England with no date stamp. Underneath the full stamp above it is stamped Patent No 417574/34. The pipe had been smoked and there was a moderate cake in the bowl with a light lava overflow in the sandblast on the rim top. There was a chip at the back of the bowl near the rim edge. The stem is oxidized and had light tooth marks on both the top and underside of the stem just ahead of the button. I took photos of the pipe before I started his clean up work. I have included them below. I took photos of the rim top, bowl and the surfaces of the stem to give a sense of the condition of the pipe. The rim top has some lava in the surface filling in the sandblast. The walls of the bowl had a moderate cake on them. The stem is oxidized and has light tooth marks on both sides ahead of the button.I took photos of the stamping on the underside of the bowl and the shank. It is clear and readable and read as noted above.  I took the pipe apart and took a photo of the parts to give a sense of what the pipe looked like.I turned to the dating key on Pipephil’s site (http://www.pipephil.eu/logos/en/dunhill/cledat-en1a.html) to establish a date for the pipe. I drew a red box around the pertinent information below. It fits the criteria of a Sandblast Dunhill stamping aligned with Shell. There was no suffix which puts it under 1950 which makes the pipe a 1950.Now it was my turn to work on the pipe. Armed with the facts that I am dealing with a 1950 Dunhill Shell pipe. I started my work on the pipe by reaming the bowl with a PipNet pipe reamer to take the cake back to bare walls. I followed that by using a Savinelli Fitsall Pipe Knife to scrape back the remnants of the cake back to briar. I finished my cleanup of the walls by sanding it with 220 grit sandpaper wrapped around a piece of dowel. I used a brass bristle brush to clean up the rim top. I took photos of the bowl and the rim top as well as both sides of the stem to show the condition of the pipe before I started my work. It really looked remarkably good. I used pipe cleaners, cotton swabs and isopropyl alcohol to clean out the tars and oils in the airway in the shank and the stem. I also cleaned the outside and inside of the aluminum inner tube in the shank and tenon. The internals were quite dirty but cleaned up very well. I scrubbed the grime and oils off the briar on the sandblasted briar with undiluted Murphy’s Oil Soap and a tooth brush. The briar looked much cleaner. I worked over the grime and tars on the rim top at the same time and was able to remove much of the build up. The bowl is beginning to take on a fresh look. I used some briar dust and clear CA glue to repair the chipped area on the back of the bowl edge. I built it up and once cured I used a brass bristle wire brush to knock of the high spots on the repair and blend it into the surrounding sandblast surface.I touched up the rim top, edges and the repaired area with a Walnut stain pen. The colour blends in very well with the colour of the surrounding briar.I rubbed the bowl down with Before & After Restoration Balm. I worked it into the surface of the smooth briar with my fingertips and into the sandblast with a shoe brush. The product works to clean, enliven and protect the briar. I let the balm sit for 15 minutes and then buffed with a cotton cloth to raise the shine. Mark Hoover’s Balm is a product that I have come to appreciate and one I use on every pipe I have been working on. I set the bowl aside and turned my attention to the stem. Once I had it open I turned to work on the outside of the stem and remove the oxidation on the stem surface. I used some Soft Scrub cleanser to scrub of the oxidation on the stem surface. Once finished it looked much better.I started polishing the stem with 320-3500 grit sanding pads. It was great to see the shine really deepen on the vulcanite.I polished the vulcanite with micromesh sanding pads – 1500-12000 grit pads. I wiped it down with Obsidian Oil after each sanding pad. I used Before & After Pipe Polish – both Fine and Extra Fine to further polish the stem. I had cleaned up the inner tube and with the stem polished and ready I reinserted the tube in the tenon.This 1950 Dunhill Shell E 250F F/T Billiard has a beautiful, unique Dunhill Sandblast finish that is very deep and craggy. The rich brown/black finish highlights some great grain around the bowl and shank. It has some great rugged sandblast that Dunhill developed and specialized in making. The polished vulcanite taper stem adds to the mix. I put the stem back on the bowl and carefully buffed the pipe with Blue Diamond on the buffing wheel. It is critical to avoid buffing the stamping and to have a lighter touch on the sandblast briar. I gave the bowl multiple coats of Conservator’s Wax and the stem multiple coats of carnauba wax on the buffing wheel and followed that by buffing it with a clean buffing pad. I hand buffed the pipe with a microfiber cloth to deepen the shine. The finished Dunhill Shell E 250 F/T Billiard is quite stunning and feels great in my hand. Give the finished pipe a look in the photos below. The dimensions of the pipe are Length: 5 ½ inches, Height: 1 ½ inches, Outside diameter of the bowl: 1 inch, Chamber diameter: ¾ of an inch. The weight of the pipe is .95 ounces/27 grams. Thanks for walking through the restoration with me as I worked over another beautiful pipe. I am going to be sending it back to Eric in Ontario later this week. I look forward to hearing what he thinks of it. Thanks for your time.

Restoring a Dunhill Shell Briar 4110 Liverpool


Blog by Steve Laug

The next pipe on the table is a unique one and I think it is an older one. We purchased it from our contact in Copenhagen, Denmark 02/11/24. The pipe is a Shell Briar with a rugged sandblast finish. The pipe is stamped on the heel of the bowl and the underside of the shank on a smooth panel. On the heel it is stamped with the shape number 4110 followed by Dunhill in an oval.  Next to that it is stamped Shell Briar [over] Made in England 30. The 30 is the date stamp. The pipe had been smoked and there was a light cake in the bowl with no lava overflow in the sandblast on the rim top. The stem is lightly oxidized and had light tooth marks on both the top and underside of the stem just ahead of the button. Jeff took photos of the pipe before he started his clean up work. I have included them below. Jeff took photos of the rim top, bowl and the surfaces of the stem to give a sense of the condition of the pipe. The walls of the bowl had a light cake on them. The stem is lightly oxidized and has tooth marks on both sides ahead of the button. He took photos of the sides and heel of the bowl to give a clear picture of the depth of the sandblast. It really is a great looking blast that shows the grain underneath very well.  He took photos of the stamping on the underside of the bowl and the shank. It is clear and readable and read as noted above. I turned to the dating key on Pipephil’s site (http://www.pipephil.eu/logos/en/dunhill/cledat-en1a.html) to establish a date for the pipe. I drew a red box around the pertinent information below. It fits the criteria of a Sandblast with a year suffix and a Non possessive form Dunhill. The suffix is the number 30 which puts in the section below which notes 1960 + suffix to establish a date. In this case it is 1960 +30 making the pipe a 1990.From there I turned to the Dunhill shape chart to unpack the shape number stamp 4110 on the heel of the bowl (http://www.pipephil.eu/logos/en/dunhill/shapes.html). This gave me the information I needed to interpret the 4110 shape stamp. The first digit 4 is the size of the pipe – a Group 4. The second digit is the style of the stem which in this case is a 1 telling me that the stem is a tapered stem. The last two digits the 10 tell me that the pipe is a Liverpool. I have included the shape below and encircled it with a red box.Now it was my turn to work on the pipe. Jeff had done an amazing cleanup of the pipe. He reamed the light cake with a PipNet reamer and cleaned up that with a Savinelli Fitsall Pipe Knife. He scrubbed the internals of the bowl and stem with alcohol, cotton swabs and pipe cleaners. He scrubbed the externals with undiluted Murphy’s Oil Soap and rinsed the bowl off with running water. He soaked the stem in Briarville’s Pipe stem Deoxidizer and once it had soaked rinsed it off with warm water to remove the residual solution. He dried it off and rubbed it down to remove any oxidation that was still on the stem. The pipe looked very good when I received it. I took photos of the bowl and the rim top as well as both sides of the stem to show the condition of the pipe before I started my work. It really looked remarkably good.I took a photo of the stamping on the shank. The photo of the stamping is clear and readable. I also removed the stem and took a photo of the parts of the pipe. It is a unique piece of pipe history.The bowl was in such good condition that I had to do some minimal work with it. I rubbed the briar down with Before & After Restoration Balm. I worked it into the briar with my fingertips and a horsehair shoe brush to work it into the nooks and crannies of the sandblast finish. The product works to clean, enliven and preserve the briar. I let it sit for 10 minutes then I buffed it with a cotton cloth to deepen the shine. The briar really comes alive with the balm. I set the bowl aside and turned my attention to the stem. I sanded the surface of the stem smooth with 320-3500 grit sanding pads. It worked well to smooth things out and remove remnants of oxidation. When finished the stem looked much better.I polished the vulcanite with micromesh sanding pads – 1500-12000 grit pads. I wiped it down with Obsidian Oil after each sanding pad. I used Before & After Pipe Polish – both Fine and Extra Fine to further polish the stem. This 1990 Dunhill Shell Briar 4110 Liverpool has a beautiful, unique Dunhill Sandblast finish that is very deep and craggy. The rich brown/black finish highlights some great grain around the bowl and shank. It has some great rugged sandblast that Dunhill developed and specialized in making. The polished vulcanite taper stem adds to the mix. I put the stem back on the bowl and carefully buffed the pipe with Blue Diamond on the buffing wheel. It is critical to avoid buffing the stamping and to have a lighter touch on the sandblast briar. I gave the bowl multiple coats of Conservator’s Wax and the stem multiple coats of carnauba wax on the buffing wheel and followed that by buffing it with a clean buffing pad. I hand buffed the pipe with a microfiber cloth to deepen the shine. The finished Dunhill Shell Briar Liverpool is quite stunning and feels great in my hand. Give the finished pipe a look in the photos below. The dimensions of the pipe are Length: 5 ½ inches, Height: 1 ¾ inches, Outside diameter of the bowl: 1 ¼ inches, Chamber diameter: ¾ of an inch. The weight of the pipe is 1.41 ounces/40 grams. Thanks for walking through the restoration with me as I worked over another beautiful pipe. I am going to add it to the rebornpipes store in the British Pipemakers Section. If you would like to add it to your collection let me know. Thanks for your time.