Tag Archives: Stanwell Golden Contrast Pipes

A Fun Restoration of a Danish Made Golden Contrast 02 Scoop


Blog by Steve Laug

I have always been intrigued by the Stanwell Golden Contrast finish regardless of the pipes it has been applied to. The contrast of dark and light playing across the grain is beautiful. To me the lines and the elegance of the pipe are stunning and the contrast stain makes the lay of pipe with the grain gorgeous. The stain highlights the birdseye and the flame grain and makes them pop from the surface of the bowl and shank. I did a little digging because I wanted to confirm my guess/my suspicions about the designer. What I found out confirmed what I was thinking. There are two versions listed of the shape number 02. The first is a Freehand, oval bowl and stem, by Sixten Ivarsson. The second is a bent, egg-shaped bowl, sloping top, full mouthpiece. The second one is a clear description of the pipe in hand. Still uncertain of the designer but it is distinctively Danish. For a list of various Stanwell Shape numbers and who they are attributed to you can read this list compiled by leading Stanwell Collector, the late Bas Stevens on rebornpipes at: https://rebornpipes.com/2013/09/03/stanwell-shapes-compiled-by-bas-stevens/

This particular pipe was purchased from an auction in Garland, Texas, USA on 06/24/2023. We always keep an eye out for Stanwell pipes and particularly Golden Contrast pipes. This one was in pretty decent shape. The finish was filthy but appeared to be in great shape. The rim showed an overflow of thick lava coming from the thick cake in the bowl. It is always hard to tell the condition of the inner edge with this kind of lava and cake but it can go one of two ways – protected and fine or damaged and burned. Cleaning would reveal which is true here. The internals were dirty with tars and oils. The stem was oxidized and calcified on the top and underside of the stem from the button forward. There was some tooth chatter as well but no deep tooth marks. The brass crown S on the left side of the taper stem was heavily oxidized with white dusty build up around the entire inlay. The various photos that follow are ones that my brother took before he cleaned the pipe. They show the amazing grain on this beauty.The next photos of the rim and the shank show the condition of the pipe at arrival in Idaho. The grain around the rim top is quite stunning to me. You can see the cake in the bowl and the thick lava on the top. It was a mess but the contrast stain makes the grain even show through the lava on the rim top. Jeff took photos of the grain on the sides and heel of the bowl. It really is a stunning piece of briar. The contrast stain really makes it stand out clearly. The next photos show the various stamping on the sides of the shank. On the left side of the shank it reads Stanwell [over] Golden [over] Contrast in script on the right side it is stamped with the 02 Shape number and on the underside it reads Made in Denmark. All the stamping is sharp and clear. He also captured the heavily oxidized golden Crown “S” Stanwell logo on the left side of the taper stem. I turned to Pipedia to see if I could find specific information on the Golden Contrast line of pipes (https://pipedia.org/wiki/Stanwell). There was a short note there that I have included in full below.

Golden Contrast:  An old series. The blocks are cut on the cross grain. The pipes from this series exhibit Birds Eye grain only. Brass band and brass S in the stem. The pipes have a two-tone staining which really shows the beautiful bird’s eye grain. However, this staining simply takes too much work so the series is discontinued.

With that information I now knew about the discontinued Golden Contrast line. The pipe I was working on did not have a brass band but it did have the kind of staining and colour on the grain on the pipe. It was definitely a two-tone stain on the pipe. Now it was time to work on the pipe.

Jeff had done a great job cleaning up the pipe as usual. He reamed the pipe with a PipNet reamer and cut back the cake back to the bare briar. He cleaned up the walls with a Savinelli Fitsall Pipe Knife. He scrubbed the interior of the bowl and shank with pipe cleaners, cotton swabs and alcohol to remove the tars and oils. He scrubbed the exterior of the pipe with Murphy’s Oil Soap and a tooth brush to remove the grime from the finish. He worked on the rim top lava and darkening with the soap and tooth brush. He scrubbed the inside of the stem with alcohol and pipe cleaners. He scrubbed the exterior with Soft Scrub and then soaked it in Briarville’s Pipe Stem Deoxidizer. He washed it off with warm water to remove the Deoxidizer. The pipe looked far better when it arrived. I took photos of the bowl and rim top as well as the stem to show how clean they were. You can see that rim top and edges look very good. The stem is clean and the tooth and chatter on both sides ahead of the button is very light.I took photos of the stamping on the sides of the shank. The stamping is readable as noted above. I took the stem off the shank and took a photo to give a sense of the flow and proportion of the pipe. It is a beautiful looking pipe. I started my work on the pipe by polishing the briar with micromesh because it was in such good condition. I polished it with 1500-12000 grit micromesh sanding pads. I wiped the bowl down after each sanding pad with a damp cloth. I rubbed the briar down with Before & After Restoration Balm. I worked it into the briar with my fingertips. The product works to clean, enliven and preserve the briar. I let it sit for 10 minutes while I worked on the stem. After the time passed I buffed it with a cotton cloth to deepen the shine. The briar really comes alive with the balm. I set the bowl aside and turned my attention to the stem. I started working on polishing the stem with my 320-2500 grit sanding pads. I was able to remove the scratches and light tooth marks and chatter on both sides ahead of the button. It looked much better at this point in the process.I polished the stem with micromesh sanding pads – dry sanding with 1500-12000 grit pads. I wiped the stem down after each sanding pad with Obsidian Oil. I polished it with Before & After Pipe Stem Polish – both Fine and Extra Fine. I gave it a coat of Obsidian Pipe Stem Oil. It works to protect the stem from oxidizing. I set it aside to dry.
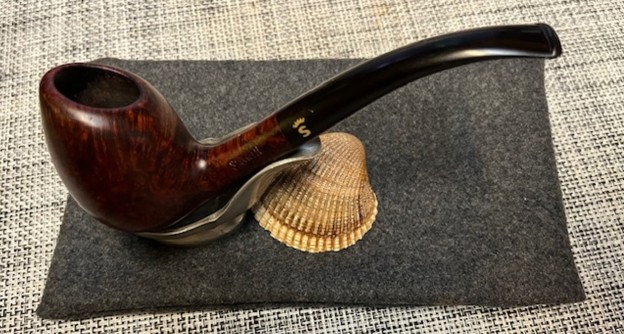
This beautiful Stanwell Golden Contrast 02 Freehand Scoop with a taper vulcanite stem turned out very nice. The mix of brown stains highlights the birdseye and cross grain around the bowl sides and bottom. The rim top and edges look very good. The finish on the pipe is in excellent condition. I put the stem back on the bowl and carefully buffed the pipe with Blue Diamond on the buffing wheel. I gave the bowl and stem multiple coats of carnauba wax on the buffing wheel and followed that by buffing the entire pipe with a clean buffing pad. I hand buffed the pipe with a microfiber cloth to deepen the shine. The finished Stanwell Golden Contrast 02 is very nice and feels great in the hand. Give the finished pipe a look in the photos below. It is a nice pipe whose dimensions are Length: 5 ½ inches, Height: 2 inches, Outside diameter of the bowl: 1 ½ inches, Chamber diameter: ¾ of an inch. The weight of the pipe is 48 grams/1.69 ounces. Thanks for walking through the restoration with me as I worked over another beautiful pipe. This one will be going on the rebornpipes store, in the Danish Pipe Makers Section shortly. If you are interested in adding it to your collection let me know by message or by email to slaug@uniserve.com. Thanks for your time.

As always, I encourage your questions and comments as you read the blog. Thanks to each of you who are reading this blog. Remember we are not pipe owners; we are pipe men and women who hold our pipes in trust until they pass on into the trust of those who follow us.

Restoring a Very Recognizable Stanwell Golden Contrast Made in Denmark 125 Scoop


Blog by Steve Laug

I have always been intrigued by the Stanwell Golden Contrast finish regardless of the pipes it has been applied to. The contrast of dark and light playing across the grain is beautiful. To me the lines and the elegance of the pipe are stunning and the contrast stain makes the lay of pipe with the grain gorgeous. The stain highlights the birdseye and the flame grain and makes them pop from the surface of the bowl and shank. The slight flare of the shank and the saddle on the stem to the pinch of the blade behind the saddle all pointed to a hand that I had seen before. I did a little digging because I wanted to confirm my guess/my suspicions about the designer. What I found out confirmed what I was thinking. This Freehand with an oval shank and saddle stem was designed by Tom Eltang. For a list of various Stanwell Shape numbers and who they are attributed to you can read this list compiled by leading Stanwell Collector, the late Bas Stevens on rebornpipes at: https://rebornpipes.com/2013/09/03/stanwell-shapes-compiled-by-bas-stevens/

This particular pipe was another of the interesting pipes in the recent shipment of estate pipes we purchased from a fellow in Copenhagen, Denmark on 01/26/2023. We have gotten some amazing Stanwell pipes from him. This Golden Contrast was in pretty decent shape. The finish was dirty but in great shape. The rim showed some darkening and a build-up of tars and oils. There was a thick cake in the bowl with tobacco debris on the walls. The internals were dirty with tars and oils. The stem had some light oxidation and calcification on the top and bottom of the stem from the button forward. There was some tooth chatter as well but no deep tooth marks. The brass crown S on the left side of the saddle appeared to be lightly oxidized as well but would take little to make it shine. The various photos that follow are ones that my brother took before he cleaned the pipe. They show the amazing grain on this beauty. The next photos of the rim and the shank show the condition of the pipe at arrival in Idaho. The grain around the rim top is quite stunning to me. You can see the cake in the bowl and the thick lava on the top. It was a mess but the contrast stain makes the grain even show through the lava on the rim top. Jeff took photos of the grain on the sides and heel of the bowl. It really is a stunning piece of briar. The contrast stain really makes it stand out clearly. The next photos show the various stamping on the underside of the shank. It reads shape number 125 [over] Stanwell [over] Golden [over] Contrast in script [over] Made in Denmark. All the stamping is sharp and clear. He also captured the golden Crown “S” Stanwell logo on the left side of the saddle stem. I turned to Pipedia to see if I could find specific information on the Golden Contrast line of pipes (https://pipedia.org/wiki/Stanwell). There was a short note there that I have included in full below.

Golden Contrast:  An old series. The blocks are cut on the cross grain. The pipes from this series exhibit Birds Eye grain only. Brass band and brass S in the stem. The pipes have a two-tone staining which really shows the beautiful bird’s eye grain. However, this staining simply takes too much work so the series is discontinued.

With that information I now knew about the discontinued Golden Contrast line. The pipe I was working on did not have a brass band but it did have the kind of staining and colour on the grain on the pipe. It was definitely a two tone stain on the pipe. Now it was time to work on the pipe.

Jeff had done a great job cleaning up the pipe as usual. He reamed the pipe with a PipNet reamer and cut back the cake back to the bare briar. He cleaned up the walls with a Savinelli Fitsall Pipe Knife. He scrubbed the interior of the bowl and shank with pipe cleaners, cotton swabs and alcohol to remove the tars and oils. He scrubbed the exterior of the pipe with Murphy’s Oil Soap and a tooth brush to remove the grime from the finish. He worked on the rim top lava and darkening with the soap and tooth brush. He scrubbed the inside of the stem with alcohol and pipe cleaners. He scrubbed the exterior with Soft Scrub and then soaked it in Briarville’s Pipe Stem Deoxidizer. He washed it off with warm water to remove the Deoxidizer. The pipe looked far better when it arrived. I took photos of the bowl and rim top as well as the stem to show how clean they were. You can see that rim top and edges look very good. The stem is clean and the tooth and chatter on both sides ahead of the button is very light.I took photos of the stamping on the sides of the shank. The stamping is readable as noted above. I took the stem off the shank and took a photo to give a sense of the flow and proportion of the pipe. It is a beautiful looking pipe.  I started my work on the pipe by polishing the briar with micromesh because it was in such good condition. I polished it with 1500-12000 grit micromesh sanding pads. I wiped the bowl down after each sanding pad with a damp cloth. I rubbed the briar down with Before & After Restoration Balm. I worked it into the briar with my fingertips. The product works to clean, enliven and preserve the briar. I let it sit for 10 minutes while I worked on the stem. After the time passed I buffed it with a cotton cloth to deepen the shine. The briar really comes alive with the balm. I set the bowl aside and turned my attention to the stem. I sanded out the tooth marks against the button edge with 220 grit sandpaper and started the polishing with 600 grit wet dry sandpaper.I polished the stem with micromesh sanding pads – dry sanding with 1500-12000 grit pads. I wiped the stem down after each sanding pad with Obsidian Oil. I polished it with Before & After Pipe Stem Polish – both Fine and Extra Fine. I gave it a coat of Obsidian Pipe Stem Oil. It works to protect the stem from oxidizing. I set it aside to dry. This Tom Eltang designed Stanwell Golden Contrast 125 Freehand Scoop with a saddle vulcanite stem turned out very nice. The mix of brown stains highlights the grain around the bowl sides and bottom. The rim top and edges look very good. The finish on the pipe is in excellent condition. I put the stem back on the bowl and carefully buffed the pipe with Blue Diamond on the buffing wheel. I gave the bowl and stem multiple coats of carnauba wax on the buffing wheel and followed that by buffing the entire pipe with a clean buffing pad. I hand buffed the pipe with a microfiber cloth to deepen the shine. The finished Stanwell Golden Contrast 124 is very nice and feels great in the hand. Give the finished pipe a look in the photos below. It is a nice pipe whose dimensions are Length: 5 ½ inches, Height: 2 inches, Outside diameter of the bowl: 1 ½ inches, Chamber diameter: ¾ of an inch. The weight of the pipe is 50 grams/1.76 ounces. Thanks for walking through the restoration with me as I worked over another beautiful pipe. This one will be going on the rebornpipes store, in the Danish Pipe Makers Section shortly. If you are interested in adding it to your collection let me know by message or by email to slaug@uniserve.com. Thanks for your time.

As always, I encourage your questions and comments as you read the blog. Thanks to each of you who are reading this blog. Remember we are not pipe owners; we are pipe men and women who hold our pipes in trust until they pass on into the trust of those who follow us.

Restoring a Very Recognizable Stanwell Golden Contrast 124


Blog by Steve Laug

I have always been intrigued by the Stanwell Golden Contrast finish regardless of the pipes it has been applied to. The contrast of dark and light playing across the grain is beautiful. To me the lines and the elegance of the pipe are stunning and the contrast stain makes the lay of pipe with the grain gorgeous. The stain highlights the birdseye and the flame grain and makes them pop from the surface of the bowl and shank. The slight flare of the shank and the saddle on the stem to the pinch of the blade behind the saddle all pointed to a hand that I had seen before. I did a little digging because I wanted to confirm my guess/my suspicions about the designer. What I found out confirmed the direction I was thinking. This Freehand shape with a long conical shank, short saddle mouthpiece was designed by Sixten Ivarsson. For a list of various Stanwell Shape numbers and who they are attributed to you can read this list compiled by leading Stanwell Collector, the late Bas Stevens on rebornpipes at: https://rebornpipes.com/2013/09/03/stanwell-shapes-compiled-by-bas-stevens/

This particular pipe was another of the interesting pipes in the recent shipment of estate pipes we purchased from a fellow in Copenhagen, Denmark on 01/26/2023. We have gotten some amazing Stanwell pipes from him. This Golden Contrast was in pretty decent shape. The finish was dirty but in great shape. The rim showed some darkening and a build-up of tars and oils. There was a thick cake in the bowl with tobacco debris on the walls. The internals were dirty with tars and oils. The stem had some light oxidation and calcification on the top and bottom of the stem from the button forward. There was some tooth chatter as well but no deep tooth marks. The brass crown S on the left side of the saddle appeared to be lightly oxidized as well but would take little to make it shine. The various photos that follow are ones that my brother took before he cleaned the pipe. They show the amazing grain on this beauty. The next photos of the rim and the shank show the condition of the pipe at arrival in Idaho. The grain around the rim top is quite stunning to me. You can see the cake in the bowl and the grime on the top. It was a mess but the contrast stain makes the grain even show through the lava on the rim top. Jeff took photos of the grain on the sides and heel of the bowl. It really is a stunning piece of briar. The contrast stain really makes it stand out clearly. The next photos show the various stamping on the shank sides and bottom. The left side of the shank reads Stanwell over Golden Contrast in script. The right side of the shank is stamped with the shape number 124. The underside of the shank is stamped Made in Denmark. All the stamping is sharp and clear. He also captured the golden Crown “S” Stanwell logo on the left side of the saddle stem. I turned to Pipedia to see if I could find specific information on the Golden Contrast line of pipes (https://pipedia.org/wiki/Stanwell). There was a short note there that I have included in full below.

Golden Contrast:  An old series. The blocks are cut on the cross grain. The pipes from this series exhibit Birds Eye grain only. Brass band and brass S in the stem. The pipes have a two-tone staining which really shows the beautiful bird’s eye grain. However, this staining simply takes too much work so the series is discontinued.

With that information I now knew about the discontinued Golden Contrast line. The pipe I was working on did not have a brass band but it did have the kind of staining and colour on the grain on the pipe. It was definitely a two tone stain on the pipe. Now it was time to work on the pipe.

Jeff had done a great job cleaning up the pipe as usual. He reamed the pipe with a PipNet reamer and cut back the cake back to the bare briar. He cleaned up the walls with a Savinelli Fitsall Pipe Knife. He scrubbed the interior of the bowl and shank with pipe cleaners, cotton swabs and alcohol to remove the tars and oils. He scrubbed the exterior of the pipe with Murphy’s Oil Soap and a tooth brush to remove the grime from the finish. He worked on the rim top lava and darkening with the soap and tooth brush. He scrubbed the inside of the stem with alcohol and pipe cleaners. He scrubbed the exterior with Soft Scrub and then soaked it in Briarville’s Pipe Stem Deoxidizer. He washed it off with warm water to remove the Deoxidizer. The pipe looked far better when it arrived. I took photos of the bowl and rim top as well as the stem to show how clean they were. You can see that rim top and edges look very good. The stem is clean and the tooth and chatter on both sides ahead of the button is very light.I took photos of the stamping on the sides of the shank. The stamping is readable as noted above. The Gold colored Stanwell Crown S is on the left side of the saddle stem.I took the stem off the shank and took a photo to give a sense of the flow and proportion of the pipe. It is a beautiful looking pipe.I started my work on the pipe by polishing the briar with micromesh because it was in such good condition. I polished it with 1500-12000 grit micromesh sanding pads. I wiped the bowl down after each sanding pad with a damp cloth. I rubbed the briar down with Before & After Restoration Balm. I worked it into the briar with my fingertips. The product works to clean, enliven and preserve the briar. I let it sit for 10 minutes while I worked on the stem. After the time passed I buffed it with a cotton cloth to deepen the shine. The briar really comes alive with the balm. I set the bowl aside and turned my attention to the stem. I polished the stem with micromesh sanding pads – dry sanding with 1500-12000 grit pads. I wiped the stem down after each sanding pad with Obsidian Oil.I polished it with Before & After Pipe Stem Polish – both Fine and Extra Fine. I gave it a coat of Obsidian Pipe Stem Oil. It works to protect the stem from oxidizing. I set it aside to dry. This Sixten Ivarsson designed Stanwell Golden Contrast 124 Freehand with a short saddle vulcanite stem turned out very nice. The mix of brown stains highlights the grain around the bowl sides and bottom. The rim top and edges look very good. The finish on the pipe is in `excellent condition. I put the stem back on the bowl and carefully buffed the pipe with Blue Diamond on the buffing wheel. I gave the bowl and stem multiple coats of carnauba wax on the buffing wheel and followed that by buffing the entire pipe with a clean buffing pad. I hand buffed the pipe with a microfiber cloth to deepen the shine. The finished Stanwell Golden Contrast 124 is very nice and feels great in the hand. Give the finished pipe a look in the photos below. It is a nice pipe whose dimensions are Length: 5 ½ inches, Height: 2 inches, Outside diameter of the bowl: 1 ½ inches, Chamber diameter: ¾ of an inch. The weight of the pipe is 50 grams/1.76 ounces. Thanks for walking through the restoration with me as I worked over another beautiful pipe. This one will be going on the rebornpipes store, in the Danish Pipe Makers Section shortly. If you are interested in adding it to your collection let me know by message or by email to slaug@uniserve.com. Thanks for your time.

As always, I encourage your questions and comments as you read the blog. Thanks to each of you who are reading this blog. Remember we are not pipe owners; we are pipe men and women who hold our pipes in trust until they pass on into the trust of those who follow us.

A Stanwell Golden Contrast 142


Blog by Steve Laug

I have always been intrigued by the Stanwell Golden Contrast finish regardless of the pipes it has been applied to. The contrast of dark and light playing across the grain is beautiful. To me the lines and the elegance of the pipe are stunning and the contrast stain makes the lay of pipe with the grain gorgeous. The stain highlights the birdseye and the flame grain and makes them pop from the surface of the bowl and shank. The slight flare of the saddle on the stem to the pinch of the blade behind the saddle all pointed to a hand that I had seen before. I did a little digging because I wanted to confirm my guess/my suspicions about the designer. What I found out confirmed the direction I was thinking. It turns out that shape number 142 was originally designed for Stanwell by Jess Chonowitsch. For a list of various Stanwell Shape numbers and who they are attributed to you can read this list compiled by leading Stanwell Collector Bas Stevens on rebornpipes at:  https://rebornpipes.com/2013/09/03/stanwell-shapes-compiled-by-bas-stevens/

This particular pipe was another of the interesting pipes in the recent shipment of estate pipes my brother Jeff picked up. He is getting pretty good at grabbing some great pipes. This Golden Contrast was in pretty decent shape. The finish was dirty but in great shape. The rim showed some darkening and a build-up of tars and oils. There was a light cake in the bowl and the internals were dirty. The stem had some calcification on the top and bottom inch of the stem from the button forward. There was some tooth chatter as well but no deep tooth marks. The stem was oxidized. The brass crown S on the left side of the saddle appeared to be lightly oxidized as well but would take little to make it shine. The various photos that follow are ones that my brother took before he cleaned the pipe. They show the amazing grain on this beauty.Gold1 Gold2 Gold3The next two photos of the rim and the underside of the bowl and shank. The birdseye on the rim and the bottom of the shank is quite stunning to me. The third photo below shows the grain on the side of the bowl and the flame grain. The contrast stain makes the grain stand out.Gold4 Gold5 Gold6The next photos show the various stamping on the shank sides and bottom. The left side of the shank reads Stanwell over Golden Contrast in script. The right side of the shank is stamped with the shape number 142. The underside of the shank is stamped Made in Denmark. All the stamping is sharp and clear.Gold7 Gold8Gold9My brother did the major clean and ream of the pipe. When I received it the pipe was very clean. I ran pipe cleaners through but they came out clean. I took these photos of the pipe when it arrived. The stem was lightly oxidized from the earlier clean up.Gold10 Gold11Jeff had done a great job on the rim top. He was able to remove most of the tars and oils. There was still some darkening on the back edge of the rim.Gold12I took some photos of the top and underside of the stem to show the striping of the oxidation on the vulcanite. The stem was actually clean – no tooth marks or chatter at this point in the process.Gold13The airway in the stem was drilled off centre in the tenon. The photo below shows the location of the airway in the end of the tenon. The alignment of the airway in the stem with the airway in the tenon was off. The mortise airway was centered in the end where it entered the bowl. The one in the tenon was off.Gold14I lightly scraped the bowl with a Savinelli Pipe Knife to clean out a small ridge of cake just above the top of the airway.Gold15I used a sharp knife to bevel the airway in the tenon until the funnel was round and the alignment against the end of the mortise was better. With the funneled airway I was able to get good airflow through the stem with no constriction in the union between the two airways.Gold16I scrubbed the back side of the rim with saliva and a cotton pad and was able to remove more of the rim darkening and reveal the grain pattern underneath. I sanded it with 1500-2400 grit micromesh sanding pads to polish the rim top.Gold17I worked on the oxidation on the stem by wet sanding the stem with 1500-2400 grit micromesh sanding pads. I rubbed the stem down with Obsidian Oil and dry sanded it with 3200-12000 grit pads. I rubbed the stem down with oil between each set of three pads and after the final sanding with the 12000 grit pad. I set the stem aside to dry.Gold18 Gold19 GOld20I buffed the pipe with Blue Diamond on the buffing wheel. I gave it multiple coats of carnauba wax. I buffed it with a clean buffing pad to raise the shine on the bowl and the stem. I hand buffed it with a microfibre cloth to deepen the shine. This is a beautiful piece of briar that the carver aligned flow of the pipe with the direction of the grain. The polishing shows the contrast between the dark and light of the grain. The elegance of the shape and the flow of the grain work well together and the golden contrast stain work together to make a great looking pipe. Thanks for looking.Gold21 Gold22 Gold23 Gold24 Gold25 Gold26 Gold27 Gold28