Blog by Kenneth Lieblich
Next on the chopping block is a personal pipe – and one that is staying in my collection. This pipe is a charming apple shape with a straight stem of what I assume is amberoid – and not real amber. I do not know where my grandfather acquired it (or under what circumstances), but I suppose it does not ultimately matter. My grandfather was an enthusiastic pipe smoker and he clearly enjoyed this one. I am definitely looking forward to cleaning this one up. It has a value well beyond dollars.
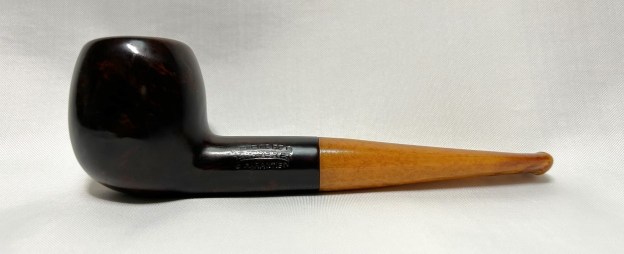
 As the photos show, this pipe has a stem that tapers towards the button. In addition to this, it also has an orific button. These two facts suggest a pipe from the pre-WW2 era. For more information on the orific button, take the time to read Steve’s interesting article on the subject. This type of button is a feature that apparently disappeared by the 1930s, but the metal tenon suggests a date that is more likely in the 1940s.

 The pipe’s markings read Racine de [over] Bruyere [over] Garantie (on the left side of the shank). Alas, there are no other markings to be found. As you may know, Racine de Bruyere Garantie means “Guaranteed Briar Root”. This indicates that the pipe almost certainly comes from St Claude, France, but gives no indication of who made it. As previously mentioned, I do not know the exact date of the pipe, but it is likely from the 1940s.
 Anyway, on to the pipe – and it’s a pipe that just makes you smile. There is something wholesome and comforting about the look of the pipe. I must admit, however, that I may be thinking of my grandfather more than the pipe!
This poor pipe was not without its issues. The stummel had the following problems: lava on the rim, charring to the rim, a bashed rim, plenty of cake in the bowl, a few substantial and ugly fills, and a tired, worn-out colour of wood. By the way, some of the strange “marks” on the bowl are, in fact, old bits of newspaper. After my grandfather died, the pipes were wrapped in newspaper and stuck in a box. The newspaper got wet at some point in the intervening years. Meanwhile, the stem had its own set of problems: major tooth marks and dents, a bite-through, and a filthy stinger.


 The stem was first on my list. The stinger actually screwed into the tenon – and it was being quite stubborn about coming out! I opted to warm the stinger with a heat gun and this provided just enough softening of the internal goo to allow me to pull it out. The stinger then went for a soak in some lemon-infused isopropyl alcohol. I let it set for several hours and then cleaned it off and it looked much improved. I then finished it with some 0000-grit steel wool, greased the threads with some petroleum jelly and moved on.
 I wiped down the outside of the stem with Murphy’s Oil Soap on some cotton pads. Then, I cleaned out the insides with pipe cleaners and isopropyl alcohol. As I mentioned earlier, I think this stem is made from amberoid. This is a synthetic of small pieces of amber, pressed together under great pressure and high heat.
 Now it was time to make a fix the damage. I tried desperately hard to clean the discoloration inside and outside the stem, but this met with limited success. I ended up filing the dents etc. with clean cyanoacrylate adhesive. I first plugged up the stem’s draught hole with a pipe cleaner coated in petroleum jelly. This ensured that any of the cyanoacrylate would not accidentally plug up the air passage in the stem.
 I then used a miniature file to shape the button and make it suitable for sanding. I then sanded the stem down with 220- and 400-grit sandpapers to meld seamlessly into the stem. This ensures that it keeps its shape and looks like it should. I then used all nine Micromesh pads (1,500 through 12,000 grit) on the stem to make look as much like amber as possible. I also used Obsidian Pipe Stem Oil in between each pad scrubbing. It is worth noting that a repair this big on a stem will never be invisible, but I was pleased with how the stem finished up.
 On to the stummel, and the usual cleaning procedures were in order for this pipe. I used the KleenReem to remove the built-up cake, and followed that with 220-grit sandpaper to remove as much as I could. I wanted to take the bowl down to bare briar to ensure there were no hidden flaws in the walls of the bowl. Fortunately, there were none. I then proceeded to clean out the insides of the shank with cotton swabs, pipe cleaners, and isopropyl alcohol. There was quite a bit of filth inside this stummel – it took many pipe cleaners et cetera to clean it out. Have a look at the photos – disgusting!
 I decided that a de-ghosting session would be a good idea. I thrust cotton balls into the bowl and the shank and saturated them with 99% isopropyl alcohol. I let the stummel sit overnight. This caused the oils, tars and smells to leach out into the cotton. The bowl was nice and clean after this.
 One interesting point of note is that the mortise on this pipe is lined with cork (another sign of the pipe’s age). This complicated the cleaning process, as I needed to ensure that the alcohol etc. didn’t degrade the cork. I worked carefully and it turned out alright.
 I followed that up by cleaning the insides with some Castile soap and tube brushes. I then moved on to cleaning the outside of the stummel with Murphy’s Oil Soap and some cotton pads. That removed the bits of aforementioned newspaper and any remaining dirt. I also soaked the rim in Murphy’s for a while, then used a toothbrush to loosen up the lava.
 There were several notable dents and nicks on the rim. Normally, I would top the pipe on a piece of 220-grit sandpaper. I didn’t do that this time because I wanted to maintain the rounded profile of the rim. I still used 220-grit sandpaper, but made sure to keep the look of the pipe.
 Having completed that, I was able to address the fills on the stummel. I used a dental tool to dig out the old, crumbly putty. I filled the divots with a mixture of cyanoacrylate adhesive and briar dust – then let it cure. Now, with the nicks filled, it was time to sand down the stummel. I used all nine Micromesh pads (1,500 through 12,000 grit) to sand everything smooth.
 After that, a light application of Before & After Restoration Balm brought out the best in the stummel’s grain. What a difference that made!


 I felt that this pipe really needed some colour for two reasons: some dark colour would contrast nicely with the orange of the stem and it would help obscure some of the dreadful fills. I applied Fiebing’s Cordovan Leather Dye with a cotton dauber. I flamed it with my Bic lighter, let it set, then coated it again with dye, flamed it again, and let that set too. I decided to let the pipe sit overnight. Upon the morrow, I used isopropyl alcohol to wipe down the pipe and remove excess stain. I am very happy with the results.
 Then it was off for a trip to the buffer. A dose of White Diamond and a few coats of carnauba wax were just what this pipe needed. The lovely shine made the wood look absolutely beautiful.
 This is a wonderfully crafted pipe and has a very elegant feel to it. It took a lot of work, but I am proud of it and the final product is (hopefully) worthy of my beloved grandfather’s memory. Obviously, this is one pipe that I am keeping for myself and adding to my collection. I am sure that I will be enjoying this one for many years to come. I hope you enjoyed reading the story of this pipe as much I as I did restoring it. The approximate dimensions of the pipe are as follows: length 5⅜ in. (136 mm); height 1⅝ in. (43 mm); bowl diameter 1⅜ in. (37 mm); chamber diameter ¾ in. (19 mm). The weight of the pipe is 1¼ oz. (40 g). If you are interested in more of my work, please follow me here on Steve’s website or email me directly at kenneth@knightsofthepipe.com. Thank you very much for reading and, as always, I welcome and encourage your comments.


