Blog by Steve Laug
The next pipe on the work table is one that I had restored previously and had really enjoyed smoking. This older Svendborg Bent Apple was a great smoking pipe that is light weight and enjoyable. I had reamed, cleaned, restored and reclaimed a worn bowl and tired vulcanite stem (https://rebornpipes.com/2013/03/04/refurbished-svendborg-full-bent-apple/). It is stamped on the underside of the shank ahead of the vulcanite shank extension. It reads Svendborg [over] Denmark [over] Hand Made. It has a nice looking dark sandblast finish on the bowl culminating in a thin rim top. The fancy turned saddle stem has a Svendborg logo stamped on the left side. About a year ago we had a flood in our basement and the restoration folks packed my pipes and tobacco storage up and took it away. When they brought it back and unpacked it I found that the tenon was snapped off in the shank extension. Fast forward to a year later – today, and you will find it on my work table. After lunch today, I decided to replace the tenon and re-restore the pipe once again. I decided to record the process once more so you can see the steps. Here is what it looked like when I started.
 I took a photo of the snapped tenon before trying to remove it. I used a drywall screw and tried to pull the broken tenon out of the shank. It was too tight and did not move at all. I put it in the freezer for 20 minutes and once I took it out I tried again to remove the broken tenon. I turned the screw in the airway and it came free of the shank extension without any trouble. It was now ready for a tenon replacement.
 From the previous restoration I have inserted the following information on the brand. I quote it below:
From http://www.pipephil.eu/logos/en/logo-s8.html I learned the following information: The Svendborg brand founded in 1970s by Henrik Jørgensen, Poul Ilsted and Tao Nielsen. They bought an old factory (Nordisc Pibefabriker) in Svendborg on Funen Island. Poul and Tao gradually bowed out from machine manufactured pipes (1982) and Henrik Jørgensen managed the brand until it was taken over by Design Berlin (D) in the late 90’s. Kaj C. Rasmussen joined the firm for several years. 17 employees worked for this brand under Henrik Jørgensen direction. I was given this pipe by a good friend last weekend when I visited him on Vancouver Island. The bowl was in great shape and the stem merely oxidized. There were no bite marks and some minimal tooth chatter on the underside of the stem near the button. The pipe is stamped on the underside Svendborg over Danish over Hand Made and on the left side of the shank is stamped Bark. The stem has the squashed S logo on the left side. The stem is a chairleg type saddle near the shank. The shank has a vulcanite shank extension.
I started the work on the new tenon by flattening the end of the chairleg stem. It was rough from where the tenon had snapped. I used a topping board with 220 grit sandpaper to remove the jagged pieces of vulcanite from the stem end. I went through my tenons and found one that had a similar diameter to the broken tenon piece that I had kept. I would need to be shaped and deduces in diameter to get a snug fit but it was close.
 I used a sanding drum on my Dremel to start the process and finished up with a rasp. I took off the necessary amount and smoothed out the files marks to make sure it was round. I cleaned up the tenon a bit more and put the tenon in the shank. It fit the shank very well at this point.
 I set the bowl aside with the tenon and worked on the stem end. I started opening the airway in the tenon with a pen knife. I have found that doing this gives a good guide for the drilling of the opening. Once finished with the knife I started with a drill bit in my cordless drill that was slightly larger than the airway and slowly turned it into the airway. I changed the bits until I used the 11/64 drill bit. I sanded down the threaded portion of the new tenon until the fit was perfect.
 I painted the threaded end of the tenon with medium thick black CA. I spread it on the tenon with a dental spatula. I pressed it into the stem end and aligned it with a pipe cleaner. I set the stem aside to allow the glue to cure.
 Once the glue cured and the tenon was solidly anchored in the stem I put it in the shank extension and took photos. The pipe was back to normal and looked great.
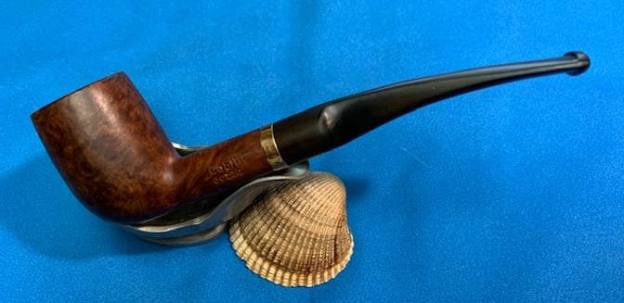
 I took a photo of the bowl and the shank/stem fit. It looked very good and the fit in the shank was snug.
 I took the stem from the shank and took a photo of the parts. You can clearly see the new tenon in the photo. The bend of the stem matches the curves of the bowl and shank. It is a great looking pipe.
 I would soon be able to enjoy it once again. I set the pipe aside until the morning. I generally leave a repair like this cure overnight before smoking a bowl. Thanks for following along with the blog. I hope that at least some of the process is helpful to you in your own restoration work. Enjoy your pipes!