Blog by Steve Laug
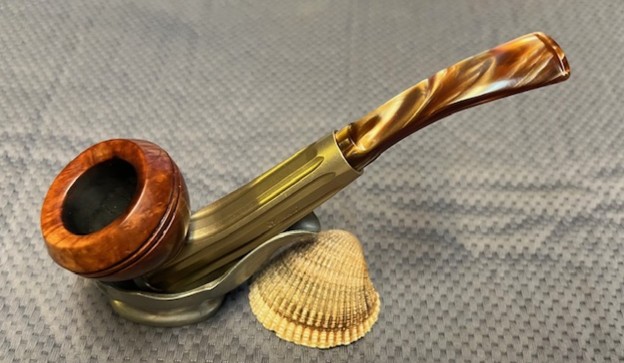
I bought my first Kirsten – a Mandarin in the early 80s from a pipe shop that specialized in them in Idaho Falls, Idaho. That shop is long since gone but there is still something about Kirsten pipes that attracts my attention. It may be the design look of the pipe and it may be the stubborn resolve that gave birth to it when Kirsten invented it after getting word from his doctor that he had to stop smoking. I don’t what it is but I like the boxy look of the base and shank, the grooves in the machined metal, the beautiful grain on the smooth bowls and the gentle curves of the stem. They always catch my eye. This one is no exception. We purchased it at an estate sale on 09/16/2023 in Idaho Falls, Idaho, USA. It has O rings on the stem and the end valve and a base on the bowl so I know that it is one of the more modern renditions. It also has the same kind of thick marbled acrylic stems that the one I purchased had. The pipe is a large one with a silver tone barrel. The smooth Mandarin style bowl has some great grain on it under the grime on the surface. The bowl was thickly caked with a light lava overflow pouring over the rim top. It was hard to know the condition of the inner edge and rim top underneath the lava but cleaning that up will tell the story. The acrylic stem had light tooth marks and chatter on both sides ahead of the button. The internals were heavily tarred and the metal tube and intake to the stem was also very dirty. The valve on the front of the bowl was tight but it was not frozen. It had a flattened base that allowed the stem to stand. Jeff took photos of it before he worked his magic in the cleanup process. 

 The exterior of the pipe was very dirty – grime and grit ground in from years of use and sitting. The rim top was covered with a coat of thick lava that overflowed the bowl. There was also some darkening and lava on the rim top. The bowl itself had a thick cake with flecks of tobacco stuck in the cake on the sides. The acrylic stem surface was dirty and had some tooth marks and chatter on both sides.

 Jeff took photos of the sides of the bowl to give a better feel for the condition of the bowl. You can see the interesting grain on the bowl side and front.
 He took photos of the pipe taken apart to show the constituent part s of the pipe. IT really was a well-made piece of engineering from the Kirsten factory. I was looking forward to working on it.

 The next photos show the stamping on the sides of the barrel shank and it is very readable. It reads Kirsten on the left side of the barrel and on the underside Made in USA E.
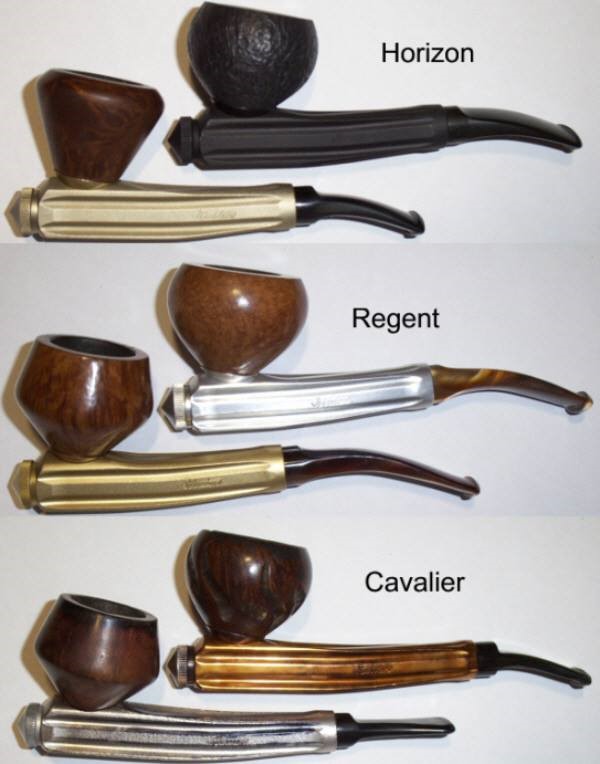
 Before doing cleanup work on the pipe I decided to do some research on the pipe. I have several Kirsten catalogues on the site and turned to the 1993-94. Here is the link to that catalogue (https://rebornpipes.com/2022/11/17/1993-94-kirsten-pipe-catalogue/). I have included several of the pages below. The first shows the bowl shape and the Radiator barrel. The bowl is the Mandarin shape bowl below, the second from the top in the drawings of bowl shapes. The stem is shown in the second catalogue page below. It is a bronze coloured Italian Lucite with a bent.
 With that information in hand I went over the details of the stamping on a previous blog that I had posted by Dave Whitney who wrote Old Briar. He gave a helpful guide to dating a Kirsten pipe by the stamping and component parts. He separated them into generations – 1, 1.5, 2, 3. Going over the details I concluded that what I was dealing with a Generation 3 pipe that was made between 1985 and the present. Here is the link and a portion of the blog. I have italicized the portions that pertain to this particular pipe (https://rebornpipes.com/2012/11/03/kirsten-generation-1-1-5-2-3/).
Generation 3 – 1985 to the present
All current models stamped “Made in U.S.A.” and all have O rings on both the valve and stem. They come in the following models:
Straights
JX Jewel Brass
M Mariner
L Lancer
Quarter-Bents
RX Regent Brass
H Horizon
Full bents
Advertisement
EX Esquire Brass
DX Designer Brass
FOOTNOTE ON VARIATIONS IN LETTER DESIGNATIONS: Generally speaking, the X added to a model letter like “S” stands for brass tone finish, i.e., “SX.” There is one exception to this: In the 1960s Kirsten made a brass tone model with an “Eternalum” finish that gave the brass tone an antiqued look. They were marked with a “X” designation following the model letter. The B added to a model letter like “M” stands for black finish, i.e., “MB.”
He ended his answer to the questions with this great note: “Now the fun part…. this is how they came from the factory. What people did to them after they got them is what makes it an inexact science. Parts for the different sizes are not interchangeable, except for the bowls. I have a Gen 1 – M and -S…nothing interchanges but the bowls. If you get a Gen 1 that has been badly abused, you can end up losing either the bit or metal insert, or both, no matter what you do or how long you try.”
References used:
Whitney, Dave (2009) Old Briar – Pipe smoking on a budget. Pipesbywhitney http://www.kirstenpipe.com/
I now knew that the pipe I was working on was a Generation 3 made between 1985 and the present. It was a Full-Bent and the E made it an Esquire Version. The E is for Esquire shape and it has a silver finished. Now it was time to work on the pipe.
Jeff reamed it with a PipNet pipe reamer and cleaned up the remaining cake in the bowl with a Savinelli Fitsall Pipe Knife. He scrubbed out the internals with alcohol, pipe cleaners and cotton swabs until the pipe was clean. He scrubbed the exterior of the bowl with Murphy’s Oil Soap and a tooth brush to remove the grime and grit on the briar and the lava on the rim top. The finish looks very good with good looking grain around the bowl and shank. The rim top had some significant damage on the back part of the bowl. It had been burned from repeated lighting with a torch lighter. Jeff took the pipe apart and cleaned the barrel, the adjustable valve and the stem with alcohol, pipe cleaners and cotton swabs. He scrubbed the stem with Soft Scrub and soaked it in Briarville’s Pipe Stem Deoxidizer to remove the grime on the acrylic. When the pipe arrived here in Vancouver for the second stop of its restoration tour it looked a lot better. I took photos before I started my part of the work. 
 I took a photo of the bowl and rim top to show how well it had cleaned up. The top and the edges of the bowl are in very good condition. There does not seem to be any damage on either the inner or outer edges and the rim top. The stem had light tooth marks and chatter on both sides ahead of the button.
 I took photos of the stamping on the left side and underside of the shank. It is clear and readable.
 I remove the stem from the barrel and took a photo. I removed the bowl from the barrel and took another photo.
 I started my work on the pipe by polishing the bowl and rim top with micromesh sanding pads – dry sanding with 1500-12000 grit pads. I wiped the bowl with a damp cotton pad after each sanding pad. The surface began to take on a nice shine.


 I worked Before & After Restoration Balm deep into the smooth finish to clean, enliven and protect the briar. I hand rubbed it with my fingers and worked it into the finish. I set it aside to dry for 10-15 minutes. I wiped it off with a soft cloth. I buffed the bowl with a cotton cloth to polish it. It really began to have a deep shine in the briar. I took some photos of the bowl at this point to mark the progress in the restoration. The grain on the bowl stands out with interesting lines moving across the sides of the bowl.

 I set the bowl aside and sanded the stem with the 2 inch square 320-3500 grit sanding pads. I wiped down the stem after each sanding pad. I was able to remove the tooth marks and chatter on both sides with the pads. The stem looked very good.
 I polished the acrylic stem with micromesh sanding pads – dry sanding it with 1500-12000 grit pads. I wiped the stem down after each sanding pad with Obsidian Oil and set it aside to dry.
 I polished it further with Before & After Pipe Polish – using both the Fine and Extra Fine Polishes. I gave it a rubdown with Obsidian Oil one last time and set it aside.
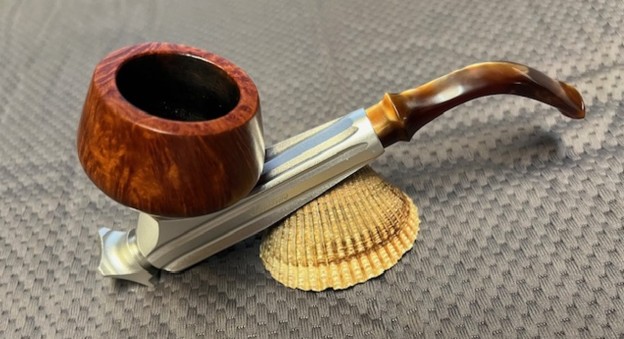
 I put the Kirsten Generation 3 Full Bent Mandarin E back together and worked the pipe over on the buffing wheel using Blue Diamond to lightly polish the bowl and the acrylic stem. I buffed the bowl and stem to raise the gloss on the briar and the acrylic. I gave the pipe multiple coats of carnauba wax. I buffed the entire pipe with a clean buffing pad to raise the shine. I hand buffed it with a microfiber cloth to deepen the shine. The finished the Kirsten Gen 3 Full Bent Mandarin is shown in the photos below. The medium brown stains on the smooth Bulldog shaped bowl works well with the rich bronze Italian acrylic stem. The dimensions of the pipe are: Length: 6 inches, Height: 2 ½ inches, Outside Diameter: 1 ½ inches, Diameter of the chamber: 1 inch. The weight of the pipe is 61 grams/2.15 ounces. This is an interesting piece of briar, cross grain and birdseye on the bowl and shank. I really like how the briar and the vulcanite work well together. This one will soon be on the rebornpipes store. If you are interested in adding a Kirsten to your collection this may well be the one for you. Thanks for walking with me through the restoration process.