Blog by Steve Laug
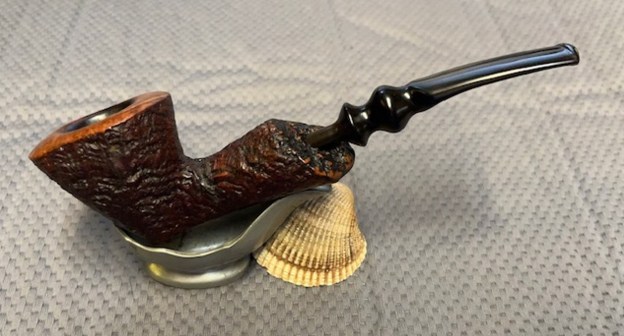
The next pipe on the table is a great looking Bent Billiard with great grain around the bowl. It has a well shaped vulcanite taper stem. We purchased it from an estate sale in Spring Branch. Texas, USA on 02/29/2024. The pipe is stamped on the left side of the shank and reads 1985 [over] 297/350 setting this pipe aside as #297 out of 350 Pipes made in 1985. On the right side it is stamped Pipe Club (separated by a pipe) [over] France. There was a thick cake in the bowl and some darkening and lava on the inner edge of the bowl and some spots of lava on the rim top. It was hard to know for certain the condition of the inner edge though it appeared to be in good condition. There were oils and grime ground into the bowl sides gives the finish a flat look though there is some great grain. The shank has a slight curve to it giving the pipe a Bent Billiard shape. The taper stem matches the curves of the bowl and shank. It has what looks like a pair of bands on the end of the stem – green acrylic and brass. The vulcanite stem is a dirty with some calcification, oxidation, grime, grit on the surface and also light tooth marks on both the top and underside of the stem just ahead of the button. Jeff took photos of the pipe before he started his clean up work. I have included them below.
 He took photos of the pipe’s bowl and rim top to show the cake in the bowl, the darkening on the inner edge and the spotty lava coat overflowing onto the top. It is another dirty pipe. He also took photos of the stem to capture the oxidation, calcification and the light tooth marks on the top and underside of the stem near the button.

 He took photos of the sides and heel of the bowl to show the rich grain around the bowl and the amount of grime ground into the surface of the briar.
 He took photos of the stamping on the sided of the shank. It is clear and quite readable. It reads as noted above. He also took a photo of the twin bands on the stem end – the brass and green acrylic band.
 I remembered that Dal had worked on a Pipe Pub pipe so did a quick search of my site and found the blog (https://rebornpipes.com/tag/pipe-pub-pipes/) that I remembered that Dal had written on the brand. What was fascinating was a conversation that he and I had via email that led him to some helpful information. I quote the majority of his research section from the blog below:
To learn more about the provenance of the Pipe Pub name I started my search in my regular go to sites – Pipedia.com and Pipephil.eu and came up with absolutely nothing. I broadened my search on the internet by simply searching ‘Pipe Pub’ and ‘Pipe Pub Brigade’. My initial findings had more to do with bagpipers, bagpipe brigades, Irish pubs and pipes…, all of these go well together! Yet, I wasn’t finding anything that helped me with the Canadian looking back at me on my worktable. I looked in my copy of Wilczak and Colwell’s ‘Who Made that Pipe?’ and found nothing giving me a direction. Usually, when I face the brick wall my response is to send Steve an email. With all his vast rebornpipes experience, surely, he’ll know something. Steve’s response was quick and helpful:
Hi Dal
I have heard of it. Here is a link to one on Smoking pipes.com
https://www.smokingpipes.com/pipes/estate/england/moreinfo.cfm?product_id=200834
I would try to ferret out the shape number. For instance, on the one from Smoking pipes it is a 124… which interestingly is a GBD shape number for a Billiard. I wonder if the brand was not made by special order for pipe shops and stores. — Steve
I looked at the link and saw my first example another Pipe Pub pipe – a very nice classic Billiard. I immediately looked again to see if I missed a shape number on the Canadian – I still saw no number. But the other piece of information that Steve gave was helpful – the brand was perhaps a special order for pipe shops and stores. I went back to Google not looking for pipes but for places named ‘Pipe Pub.’ I hit pay dirt and the dirt was surprising! With the COM of the Canadian stamped indicating London, England, I had been expecting to find something that was UK based but instead, I found a reference for Pipe Pub that was based in the great US state of Texas – who would have thought? Through several iterations of search parameters, I came across a Google Group chat stream that started in 1998 entitled, “Pipe Pub?” . The question posed was about a Pipe Pub “almost Canadian” pipe that had the same nomenclature and stem ‘PP’ as mine, but the COM was stamped, ‘Italy’. The questioner in the stream proposed a correlation with the Italian Savinelli name wondering if Pipe Pub might be a second of that well-known Italian pipe house?
The next response to Bro. R from Larry introduced the Texas connection:
Bro. R,
Back in the 70’s the mall tobacconists here in Austin, TX, were named Pipe Pub; they became Pipe World a little later. I don’t know if, then or now, these businesses were strictly local or part of a larger chain. I’m pretty sure they sold a store brand with their name on the pipes. Today, Pipe World’s store brand pipes *are* made by Savinelli.
Larry
With these two entries, I knew that we were talking about the same pipe name – the ‘PP’ on the stem was the clincher. Pipe Pub is a local Texas tobacconist which had pipes manufactured with the Pipe Pub name. But there was more information that perhaps should be submitted to Pipedia! The next entry I’m including in its entirely because it brings in much of the historical context with much color and the source of the information is a Jon Carter, who is described by Don Schram as a manager of Pipe Pub in the 80s.
Here’s the skinny on Pipe Pub, as related to me by Jon Carter, former manager of Pipe Pub from 1983 to 1987, who isn’t online as of yet. (Messages will be relayed to him through me at: dsc…@bigfoot.com ,however.)
Pipe Pub was started in the Houston area of Texas in the early 70’s with a single downtown store. It was joined a short time later by a store located in the Austin, TX, area, which was owned and operated by a brother-in-law of the original founders (whose name escapes Jon for the moment). While Pipe Pub wasn’t nationwide, they owned approx. 14 stores throughout Texas, primarily in the Houston area, and were much in competition with Tinderbox. (Comparable to Churchill’s in the S.E. Michigan area.)
The Pipe Pub pipe in question was confirmed by Jon to be a pipe from this chain. The letters ‘PP’ in script on the stem indicate that the bit is original, and you are correct in that it stands for Pipe Pub. As far as the age, there is no definite method of dating this pipe, however; Pipe Pub only carried their own line of ‘Private Label’ pipes between the early 70’s and 1983 when they were phased out in favor of higher grade (and higher priced) pipes, to coincide with the Texas oil boom of the 80’s. Jon was not able to confirm positively that the pipe is indeed of Savinelli make (second or otherwise), however, he did point out that Pipe Pub did have an excellent relationship with the Savinelli company, as they were allowed to carry and sell the rare Savinelli 0000 (Quadruple-ought) Autograph, of which only 3 have been produced in the last century. Jon also pointed out that he and another manager sold it to a gentleman who worked for the telephone company to complete a collection of Savinelli Autographs. (He went to the bank and took out a $5000 loan for it. The bank, initially thought he was purchasing ‘oil drilling pipe’, but gave him a personal loan for the tobacco pipe anyways. He kept it in a lock box for a while, then finally broke it out and smoked it for the first time during the 1986 or 1987 Superbowl.)
 To round out the history of Pipe Pub, the chain was bought out, save one store, in 1985 by a family, by name of Kowalski, who turned the tobacco chain into a chain of mall knick-knack stores. (Sound all-too familiar Churchill’s customers?) The one store, Pipe Pub in Austin, run by the brother-in-law, was not included in the deal, but it was agreed that he would change the name of the store. Jon commented that the lone store may have changed its name to Pipe World, but wasn’t really privy to such information, as it was, more or less, operated as a renegade store. The Kowalski’s opened one additional store in Louisiana, their home state, and promptly ran the chain right into the ground after one Christmas season, due to poor ownership and product focus. Jon pointed out, “They carried vibrating pillows, for God’s sake!” Forcing the company into bankruptcy, the Kowalski’s sold the chain back to the original owners, whom to his knowledge, still own it today.
For more information, Jon recommends calling down to Houston and asking information for their main office, which was on Mitchelldale. [A search of Yahoo Yellow Pages came up empty, however there is a Carol’s Pipe Pub in Bacliff, TX, a suburb of Houston. Phone (281) 488-7300. It’s unknown if they’re related.]– DS (Don Schram.)
This information-filled post is dated, 1998. On a hunch, I google the name of the offshoot store characterized as the ‘renegade’ store that wasn’t part of the reported 1985 Pipe Pub acquisition described in stream above. As part of the legal agreement this store was required to change the name without further association with the Pipe Pub name. Pipe World, based in Austin, and run by a “brother-in-law” family member came into existence – or, more accurately, carried on the original legacy of Pipe Pub under a different name because it seems that the new owners of Pipe World ran the company off the rails. I found http://pipeworld.com/ with different locations in Texas and wondered if this was the same ‘Pipe World’ referenced above.
As I’ve done in the past with surprising success, I go directly to the front door and knock. I went to the ‘Contact Us’ section on the Pipe World site and sent an email asking if anyone had been around long enough to know something about the history of the former, Pipe Pub Tobacconist out of which Pipe World came. You never know what will happen!
I received a reply to my email the same day from Pipe World – from Kyle who asked me to call directly if I had any questions. Thankfully, I have an internet phone from Bulgaria and I called Kyle in Texas. Kyle answered the phone and was extremely helpful. His grasp of the history was amazing – he had been there during the whole transition. I was totally taken off guard when I discovered through our conversation, that he was the owner of Pipe World. His name is Kyle Haas. He was the ‘brother-in-law’ referenced above who opened the new Pipe World and held firm to the values that had been true historically of Pipe Pub.
I enjoyed talking with Kyle, his recall of the events and his grasp of all the many moving parts of the tobacco industry fascinated me. He was able to answer the primary question I had about the origin of the Pipe Pub pipes. Definitively according to Kyle, during the 70s and early 80s, GBD/Comoy’s was producing the English line of pipes with the Pipe Pub name out of the London factory. Pipe Pub pipes marked ITALY were all produced by the well-known Italian house of Savinelli. He said that he doubted that Savinelli continued to do sub-contract work because they sell enough of their own pipes today to make it worthwhile. He said that they had to order a lot of each shape as part of the requirements – I believe he said that they introduced a new shape each year. He mentioned that the pipes that were produced in England and Italy with the Pipe Pub label were done with higher quality in mind. I said that I could attest to this as I looked at the GBD/Comoy’s factory made Pipe Pub Canadian on my worktable.
Armed with Dal’s helpful information I now knew that my pipe was made for Pipe Pub as one of the yearly pipes for the shop. In this case it is a 1985 pipe and was #297 of 350 pipes which also fits the information above. In the last paragraph above Dal mentions that Kyle said that during the 70s and early 80s GBD/Comoy’s which I assume is Cadogan produced the English line of Pipe Pub pipes out of the London Factory. The Pipe I am working on definitely looks like a Comoy’s shape and I would bet that the France Stamp ties it to the Chacom factory (Chapuis-Comoy) in France.
Armed with that information I turned to work on the pipe itself. Jeff had done a great job cleaning up the pipe as usual. He cleaned up the inside of the bowl with a PipNet reamer and a Savinelli Fitsall Pipe Knife. The bowl walls looked very good. He scrubbed the interior of the bowl and shank with shank brushes, pipe cleaners, cotton swabs and alcohol to remove the tars and oils. He scrubbed the exterior of the pipe with Murphy’s Oil Soap and a tooth brush to remove the grime from the finish. He worked on the rim top lava and darkening with the soap and tooth brush. He scrubbed the inside of the stem with alcohol and pipe cleaners. He scrubbed the exterior with Soft Scrub and then soaked it in Briarville’s Pipe Stem Deoxidizer. He washed it off with warm water to remove the deoxidizer. The pipe looked far better. I took photos of the pipe when I received it before I started working on it. 
 I took photos of the bowl and rim top to show how clean it was. The top and the inner edge of the rim show some darkening, nicks and scratches. The stem looks clean of debris and grime. There are light tooth marks and chatter on both sides of the stem.
 I took photos of the stamping on the sides of shank. The stamping is clear and readable (much clearer in person than the photos show). I took a photo of the pipe with the stem removed to show the overall look of stem, tenon and profile of the pipe.
 I polished the briar bowl and shank with micromesh sanding pads – dry sanding with 1500-12000 grit sanding pads. I wiped it down with a damp cloth after each pad to remove the debris. The bowl took on a rich glow.


 I rubbed the bowl down with Before & After Restoration Balm. I worked it into the surface of the briar with my fingertips to clean, enliven and protect it. I let the balm sit for 10 minutes and then buffed with a cotton cloth to raise the shine. Mark Hoover’s Balm is a product that I have come to appreciate and one I use on every pipe I have been working on.

 I set aside the bowl and turned my attention to the stem issues. I painted the surface of the stem with the flame of a Bic lighter to lift the tooth marks. I was able to lift all of them enough that sanding would finish blending them. I sanded the stem with 320-3500 grit sanding pads to further blend them in and smooth out the surface of the stem.
 I polished the vulcanite with micromesh sanding pads – 1500-12000 grit pads. I wiped it down with a damp cloth after each sanding pad. I used Before & After Pipe Polish – both Fine and Extra Fine to further polish the stem.
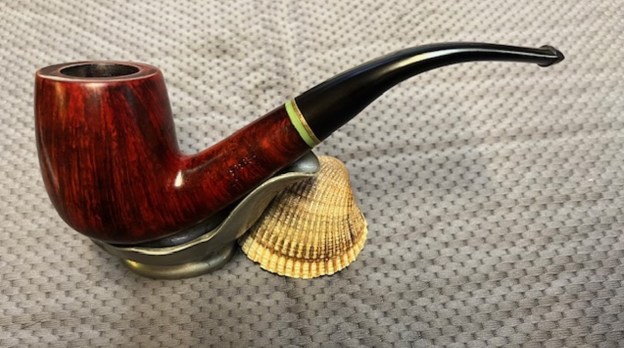
 I put the stem back on the Pipe Club 1985 Bent Billiard France and took it to the buffer. I worked over the smooth portions with Blue Diamond to polish out the remaining small scratches. I gave the bowl and the stem several coats of carnauba wax on the wheel and buffed the pipe with a clean buffing pad to raise the shine. I hand buffed it with a microfiber cloth to deepen the shine. The pipe polished up really well and the rim top and edge looked good. I was happy with the look of the finished pipe. The photos below show what the pipe looks like after the restoration. The oxblood stained Bent Billiard that is a beautiful and unique take on a classic shape. The polished vulcanite taper stem with the twin bands of brass and green acrlyic looks really good with the rich reds of the briar. The dimensions of the pipe are Length: 5 ¾ inches, Height: 2 inches, Outside diameter of the bowl: 1 ¼ inches, Chamber diameter: ¾ of an inch. The weight of the pipe is 1.94 ounces/55 grams. This is another pipe that I will be putting it on the rebornpipes store in the American Pipe Making Companies Section shortly, if you are interested in adding it to your collection. This Bent Billiard looks and feels great in the hand. This one should be a great smoker. Thanks for walking through the restoration with me on this beauty!


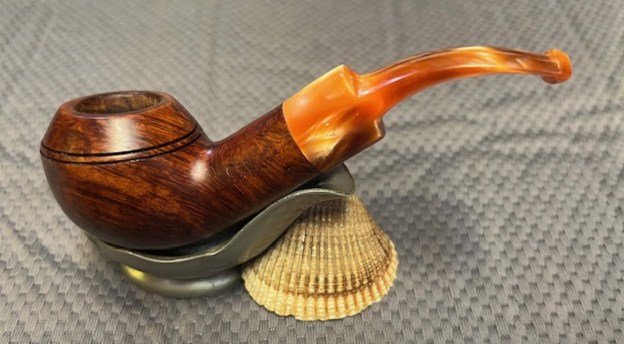
 When the pipe arrived Jeff took photos of it before cleaning it up. Here is what we saw. The pipe is stamped on the left side of the shank and reads Comoy’s [over] Consort. On the right side it is stamped Made in London in a circle [over] England. Underneath the COM stamp is the shape number 1057. To the left of that next to the stem shank junction it is stamped with a letter M. The acrylic stem has the newer Comoy’s C logo worn decal on the left side of the saddle. The bowl had been reamed recently and the inner edge of the bowl looked very good. The rim top has some grime and some lava on the surface. There were oils and grime ground into the bowl sides gives the finish a flat look though there is some great grain. The shank has a slight curve to it giving the pipe a Bent Rhodesian shape. The bend of the saddle stem matches the curves of the bowl and shank. The variegated rose acrylic stem is a dirty and has some light tooth chatter on both the top and underside of the stem just ahead of the button.
 He took photos of the pipe’s bowl and rim top to show the reamed bowl and the spotty lava coat overflowing onto the top. He also took photos of the stem to capture its condition before clean up.

 He took photos of the sides and heel of the bowl to show the rich grain around the bowl and the amount of grime ground into the surface of the briar.
 He took photos of the stamping on the sided of the shank. It is clear and quite readable. It reads as noted above. You can also see the decal of the Comoy’s logo on the side of the stem. It is worn off in places but still identifiable.
 I knew the pipe was probably newer and a Cadogan period pipe by the style of the stamping, the line and the acrylic stem but I wanted to see if I could get a cleared date on the pipe. I turned to Pipedia’s guide for dating Comoy’s pipes and have included what I found below (https://pipedia.org/wiki/Comoy%27s_Dating_Guide#%E2%80%9CMade_In%E2%80%9D_Stamp). I quote the pertinent section –
 Made in London England
 I took photos of the bowl and rim top to show how clean it was. The top and the inner edge of the rim look quite good with just some small scratches. The stem looks clean of debris and grime. There are light tooth marks and chatter on both sides of the stem.
 I took photos of the stamping on the sides of shank. The stamping is clear and readable (much clearer in person than the photos show). I took a photo of the pipe with the stem removed to show the overall look of stem, tenon and profile of the pipe.
 I started polishing the bowl by sanding it with 320-3500 grit sanding pads. I wiped the briar down with a damp cloth after each pad to remove the sanding dust. It looked better and the scratches disappeared.
 I polished the briar bowl and shank with micromesh sanding pads – dry sanding with 1500-12000 grit sanding pads. I wiped it down with a damp cloth after each pad to remove the debris. The bowl took on a rich glow.


 I rubbed the bowl down with Before & After Restoration Balm. I worked it into the surface of the briar with my fingertips to clean, enliven and protect it. I let the balm sit for 10 minutes and then buffed with a cotton cloth to raise the shine. Mark Hoover’s Balm is a product that I have come to appreciate and one I use on every pipe I have been working on.

 I set aside the bowl and turned my attention to the stem. I sanded the stem with 320-3500 grit sanding pads to smooth out the chatter on the surface of the stem.
 I polished the acrylic with micromesh sanding pads – 1500-12000 grit pads. I wiped it down with a damp cloth after each sanding pad. I used Before & After Pipe Polish – both Fine and Extra Fine to further polish the stem.
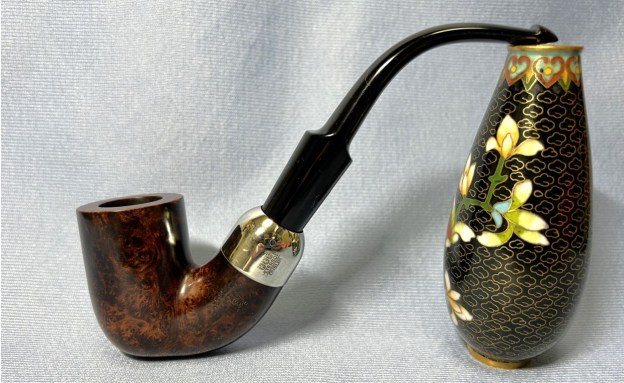
 I put the stem back on the Comoy’s Consort 1057 Rhodesian and took it to the buffer. I worked over the bowl and stem with Blue Diamond to polish out the remaining small scratches. I gave the bowl and the stem several coats of carnauba wax on the wheel and buffed the pipe with a clean buffing pad to raise the shine. I hand buffed it with a microfiber cloth to deepen the shine. The pipe polished up really well and the rim top and edge looked good. I was happy with the look of the finished pipe. The photos below show what the pipe looks like after the restoration. The rich reddish, brown bent Rhodesian is a beautiful take on a classic shape. The polished acrylic saddle stem looks really good with the rich reds of the briar. The dimensions of the pipe are Length: 5 ½ inches, Height: 1 ½ inches, Outside diameter of the bowl: 1 1/8 inches, Chamber diameter: ¾ of an inch. The weight of the pipe is 1.76 ounces/50 grams. I will be putting it on the rebornpipes store in the British Pipe Makers and Companies Section shortly, if you are interested in adding it to your collection. This Bent Rhodesian looks and feels great in the hand. This one should be a great smoker. Thanks for walking through the restoration with me on this beauty!