Blog by Paresh Deshpande
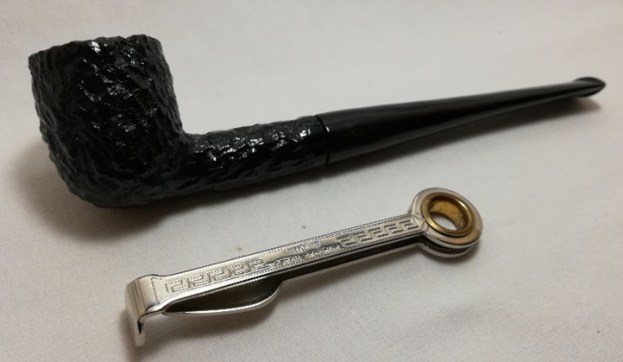
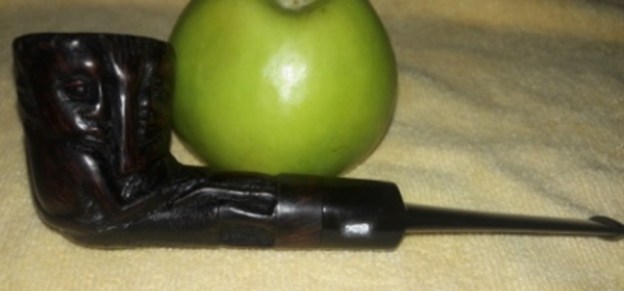
While surfing eBay for pipes a long time ago, I came across a pipe that was a large sized billiard and meerschaum lined. Well, upfront I wish to be candid and confess that I am not a big fan of meerschaum lined bowls and this pipe did not boast as being carved by any of my favorite makers! Yet I went ahead and made an offer which I feverishly hoped the seller would turn down, being ludicrously low from the asking price. However, the seller accepted my offer and a few weeks later, the pipe reached Abha. Surprisingly, she liked the pipe!! What attracted both of us to this large pipe was the hand carved figurines over the stummel surface. These figurines looked like to be that of an African mother holding her child (or is it just a figment of my imagination??).
The pipe is devoid of any stampings. The only clue as to the origins of this pipe came in the form of a stem logo of an Elephant on the left side of the stem saddle.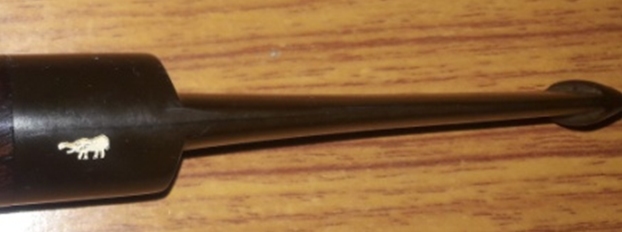 I was keen to know more about the maker and hence turned to pipephil.eu and searched for stem logo under Animal- Mammals!! True enough, it was an easy find. It identified this pipe as Countryman, a brand of Tanganyika Meerschaum Corporation from Amboseli Pipes.
Thereafter I visited Reborn pipes for further information. Here is the link to the write up and it makes for an interesting read. (https://rebornpipes.com/2013/10/13/refurbed-a-tanganyika-meerschaum-prince/).
Kiko, meaning “pipe” in Swahili-Kiswahili to English translation, is probably the best known of the various brands of meerschaum pipes from there. In East Africa Meerschaum is found in Tanganyika, once known as German East Africa, and since 1964 part of the United Republic of Tanzania. The main deposit comes from the Amboseli basin surrounding the Lake Amboseli. Tanganyika Meerschaum is normally stained in shades of brown, black and yellow, and is considered to be inferior to Meerschaum from Turkey. Even though, the raw material is mined by the Tanganyika Meerschaum Corporation and to a large extent used for pipe making. Uncounted pipe makers throughout the world were supplied with Amboseli Meerschaum, preferentially used for Meerschaum lined briars or leather-clad pipes. In Tanganyika the Kilimanjaro Pipe Company Ltd. produced the following brands: Caveman, Countryman (Elephant logo), Kiko (Elephant logo), Kikob (Elephant logo), Kilimanjaro (Rhinoceros logo), Kudu (Giraffe Logo), Makonde (Rhinoceros logo), Merlin (Flying bird or Antelope logo), Sportsman (Elephant logo), Tembo, Townsman, Twiga (Giraffe Logo), White elephant (Elephant logo).
Initial Visual Inspection
The pipe, as it sits on my work table, is dirty with decent layer of cake, covered in dust and grime with a heavily oxidized stem. Here are a few pictures of the pipe before I proceed with a detailed visual inspection of each part of the pipe.
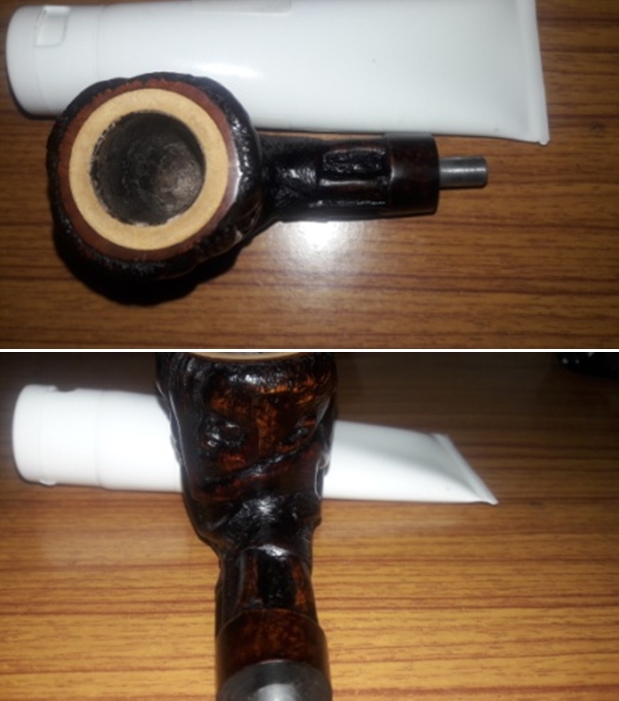
 The creases formed by the hand carved figurines over the stummel surface on this pipe are covered in a thick layer of dust and grime. The stummel appears dull and lackluster. However, the rich brown hues of the raised portions of the figurines contrast beautifully with the darker hues of the stummel and would look more appealing once the stummel has been cleaned and polished. The long and carved shank has a nice thick band of smooth briar. Once polished, this briar band should further enhance the beauty of this pipe. An aluminum tube/ mortise extension is fixed inside of the mortise over which the stem is seated.
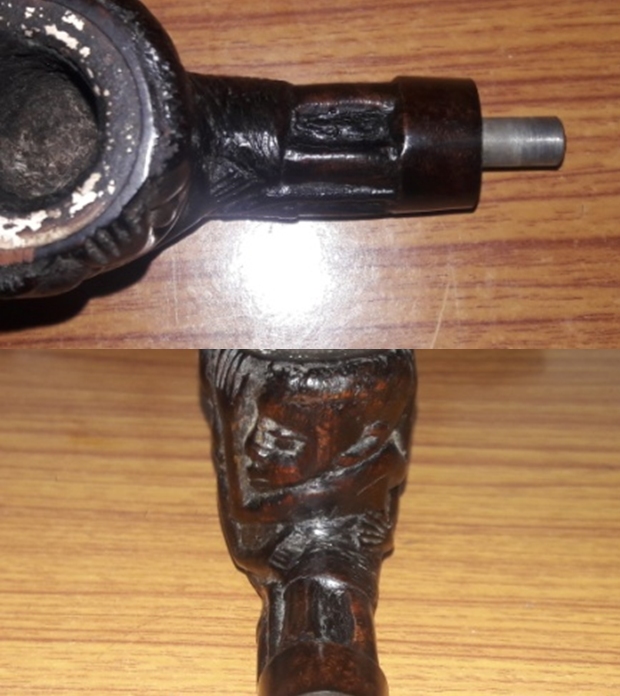
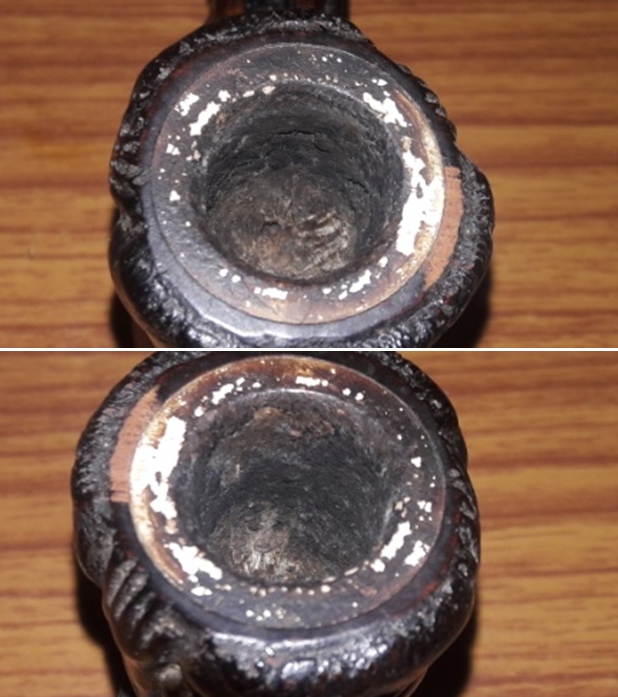
 The meerschaum lined rim top is surrounded by briar wood and is covered in dust, lava overflow, grime and will need to be cleaned and polished. This lava overflow is chipped at places revealing an intact white meerschaum layer. The briar surrounding the inner meer layer is chipped on the left side of the rim top in the 9 o’clock direction. The chamber has an even layer of thin cake that is dry and crumbling. The condition of the meerschaum lined walls of the chamber will be ascertained once the existing cake has been completely removed. The inner meerschaum layered rim edge appears intact, however, the same will be ascertained once the cake and lava overflow from the chamber and rim top is removed.
 The end of the aluminum tube which extends out from the shank end is darkened with a thick layer of dried oils and tars. The insides of this tube is clogged making the draw laborious. The surface of the tube is dull and lackluster.
 The straight tapered vulcanite saddle stem that sits atop the aluminum mortise extension is heavily oxidized and is peppered with deep tooth chatter/ indentations on either surface of the stem. The horizontal slot end of the stem is heavily oxidized to a dark brown coloration while the insides of the tenon end is covered in dried oils and tars. This should be a relatively simple repair and cleaning up job of the stem.

 The Process
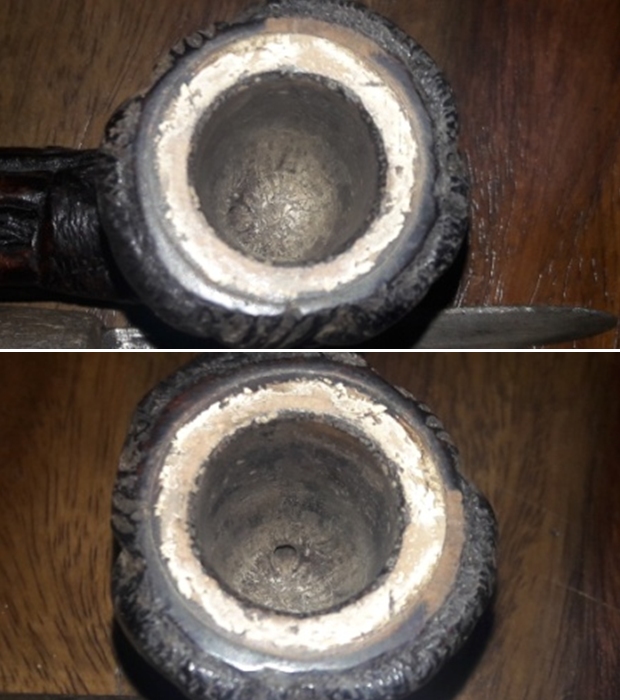
I began the process of refurbishing this pipe with cleaning the internals of the stem using pipe cleaners with isopropyl alcohol (99.9% pure) and dunking the stem in to “Before and After Deoxidizer” solution developed by my friend Mark Hoover. The solution helps to draw out heavy oxidation to the surface making its further removal a breeze, while the minor oxidation is eliminated to a very great extent. I usually dunk stems of 5-7 pipes that are in-line for restoration and this pipe is marked in blue arrow. I generally allow the stems to soak in this solution overnight for the solution to do its work.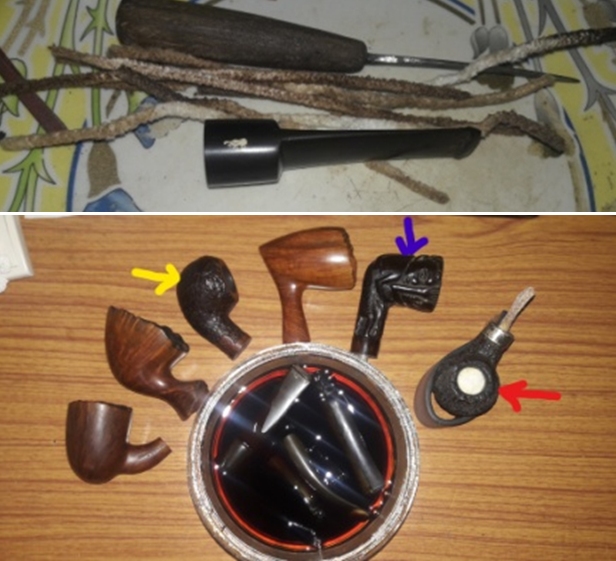 With the stem soaking in the deoxidizer solution, I worked the stummel, reaming the chamber with a Castleford reamer tool, using only the second head. I was very gentle and diligent while using the reamer head by applying minimum force to avoid cracking the meerschaum lining. Using my fabricated knife; I further took the cake down to the meerschaum layer. With a 150 grit sand paper, the walls of the chamber were rid of all the remnants of the cake, revealing smooth meer lined chamber walls. I further wiped the chamber with a cotton swab wetted with isopropyl alcohol to completely remove the sanding dust. I gently scraped off the entire lava overflow from the rim top with a sharp knife blade. The inner rim edge has numerous very tiny dings all around which is not a big concern as these could be easily addressed either by topping or using a sand paper.
 I carefully scraped the aluminum shank extension with a fabricated tool to remove all the crud that had accumulated on the surface and further cleaned the shank internals with bristled and regular pipe cleaners dipped in isopropyl alcohol. I further polished the aluminum extension with a 0000 grade steel wool.
  Next I addressed the issue of numerous dings to the inner rim edge. As mentioned above, I had an option of either using a folded piece of 220 grit sand paper and even out the tiny dings or topping the rim top on a topping board. I decided to follow the later path as it would also address the issue of the chipped briar on the rim top in the 9 o’clock direction. I topped the rim on a piece of 220 grit sand paper, frequently checking the progress as I did not want to sand too much and cause any damage to the carved figurines.
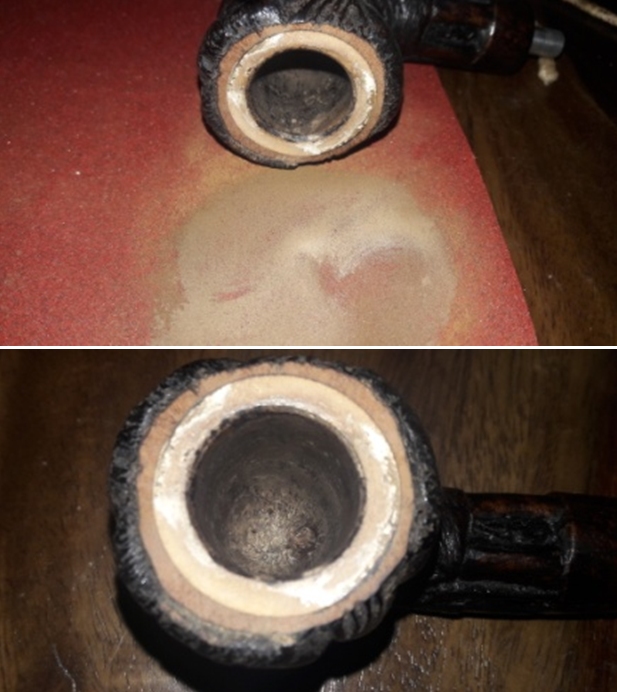 I scrubbed the external surface of the bowl with undiluted Murphy’s oil soap and hard bristled tooth brush and dried it using paper towels and soft cotton cloth. The light brown hues of the carved surfaces of the figurines contrast beautifully with the rest of the dark stummel. I set the stummel aside to dry out naturally. I packed the chamber with paper towels to absorb any water and moisture that may have inadvertently seeped in to the meerschaum.

 I wanted to further highlight the figurines from the rest of the stummel surface and to achieve the desired results; I polished the raised surfaces of the carved figurines, the rim top surface and the briar band at the shank end with micromesh pads, dry sanding with 1500 to 12000 grit pads. I really like the way the figurines stand out from the rest of the stummel surface and also the rim top surface.

 I rubbed a small quantity of “Before and After Restoration Balm” in to briar. I rubbed this balm deep in to the nooks and crannies formed by the carved figurines with my fingers and let it rest for a few minutes. The balm almost immediately works its magic and the briar now has a nice vibrant appearance with the light brown hues of the raised carvings contrasting with the dark stummel surface. I further buff it with a horse hair shoe brush.
 As mentioned in the write up on refurbishing S & R and Donegal Rocky # 999, I had worked on all the stems that had been soaking in the deoxidizer solution overnight. I fished out the stems and cleaned them under running warm water and scrubbed the raised oxidation from the stem surface using scotch brite pad. I further removed the oxidation by scrubbing the stems with 0000 grade steel wool and applied a little olive oil to rehydrate the stems and set them aside for the oil to be absorbed. Unfortunately, I did not click any pictures of these stems at this stage.
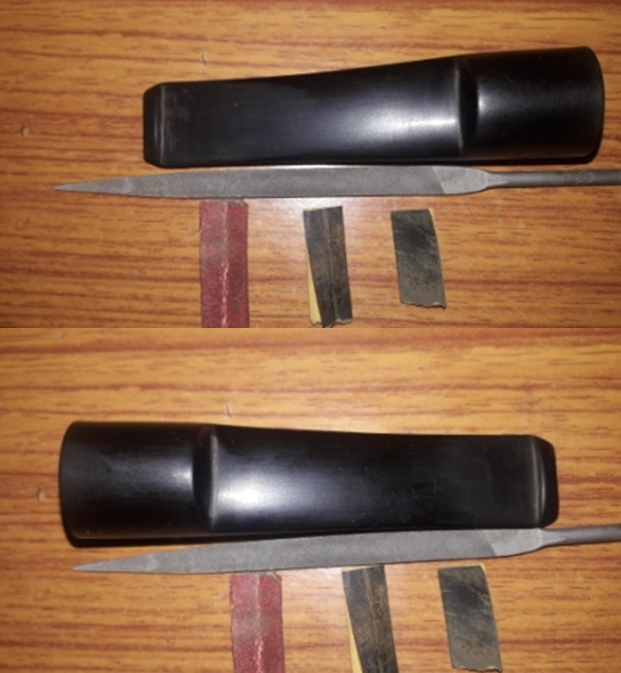
This is how the stem of this pipe came out after the stem cleaning described above. Some traces of oxidation are still visible at the base of the button edges on both surfaces and on the saddle which needs to be removed using more invasive methods. A few tooth indentations are visible on the top button edge and at the base of the button edge on both the surfaces.  I painted both surfaces of the stem with the flame of a lighter to raise the tooth indentations to the surface. This also helps in loosening minor oxidation from the stem surface. I sand the entire stem surface with a folded piece of a 220 grit sand paper to remove the loosened oxidation. I wiped the stem with a cotton swab and Murphy’s oil soap to further remove the oxidation. Even though the most of the minor tooth indentations have been eliminated by heating the damaged stem portion with the flame of a lighter, couple of deeper indentations is still visible on both upper and lower surface in the bite zone. However, I am happy with the way this stem appears at this stage and also with the deoxidizer solution.
 I filled the tooth indentation in the button edge on both lower and upper stem surfaces with a mix of activated charcoal and CA superglue and set it aside for the fill to cure. Once the fill had cured sufficiently, with flat needle file I sanded down the fill to match with rest of the stem surface. With the same file, I sharpened the button edge on both the upper and lower surface. I fine tuned the blending of the fill with the rest of the stem surface using a 220 grit sand paper and also sanded down the entire stem to remove the stubborn residual oxidation. I further sand the stem with 600 and 800 grit sand paper and wiped the stem with cotton pad dipped in alcohol to remove the resultant dust. I rubbed some extra virgin olive oil in to the stem and set it aside to be absorbed in to stem.
 I polished the stem with micromesh pads, wet sanding with 1500 to 12000 grit pads. I rubbed a little extra virgin olive oil in to the stem at the end of the micromesh pads polishing cycle. I finish the polishing of the stem by rubbing a small quantity of Paragon wax and giving it a final polish with a soft cotton cloth. The stem is now nice, smooth and shiny.
  I refreshed the stem logo by masking the logo with a whitener correction pen. Once the whitener had dried, I gently wiped the excess whitener away. The stem logo now looks prominent.
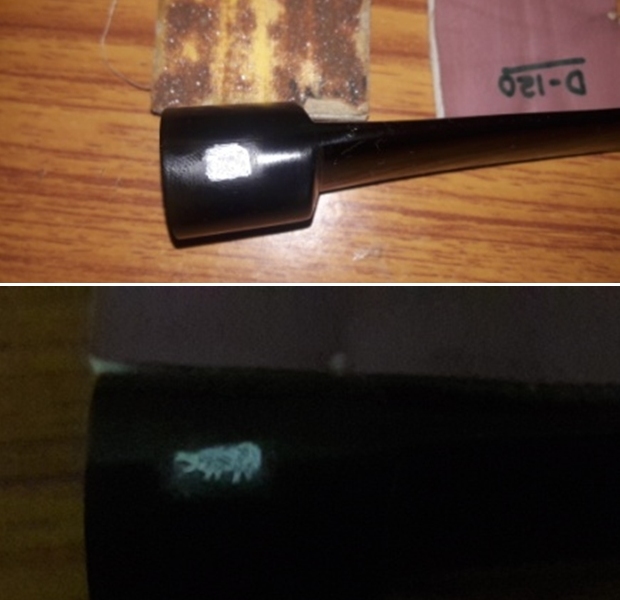 To apply the finishing touches, I mount a cotton cloth buffing wheel on to my hand held rotary tool and apply a coat of Blue Diamond to the stem to polish out the minor scratches. With a cotton buffing wheel that I use for carnauba wax, I apply a coat of carnauba wax to the stummel and stem and continued to work on it till the complete coat of wax had been polished out. I mount a clean cotton cloth buffing wheel and gave the entire pipe a once over buff. I finished the restoration by giving the entire pipe a rigorous hand buffing using a microfiber cloth to raise the shine further. The finished pipe is shown below.


 P.S. – Most discerning Readers would have noticed that after I had topped the rim top surface, I have not stained the briar portion of the rim top to blend in with the rest of the stummel. Well, truth be told, Abha, my wife, liked the play of contrasts between the meerschaum lining, the brown hues of the surrounding briar and the very dark brown stummel. I too liked her suggestion and hence left it without staining. Though this pipe has neither any collector’s value or high resale value, but still I shall add it to my collection because of its uniqueness and it’s no less beautiful to boot.
Thanks for your patience and looking forward to input about the write up. Cheers…