Blog by Paresh Deshpande
During the summer of last year while browsing on Pinterest, I came across pictures of some beautiful pipes and following the links led me to an old gentleman from the UK who was willing to sell these pipes either single or as a lot. There were around 60 odd pipes. I went through the pictures that were sent along with the rates and selected 10 pipes. After a prolonged and interesting interaction, we managed to arrive at a price point. Soon these pipes landed on the shores of India and went in to Customs hold for nearly a month. Finally, it was released and I laid my hands on these pipes after a wait of nearly 3 months! Here is a picture of the lot that I had taken moments after opening the parcel.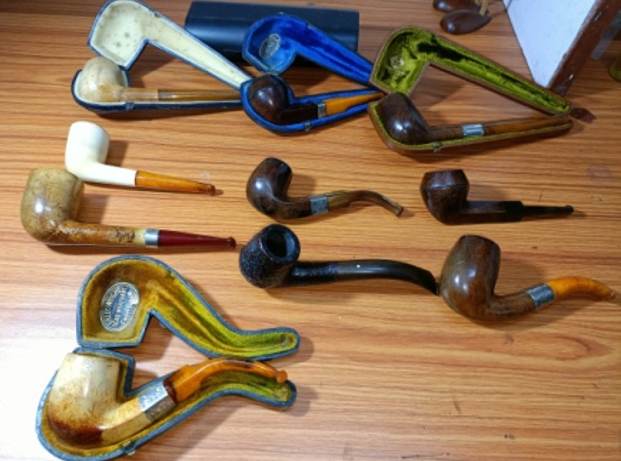 Since then, I have refurbished, repaired a family era Barling’s Make Bulldog (yellow arrow), a c.1901 Samuel McLardy (green arrow) and added them to my personal collection while the c. 1960 Dunhill Shell (blue arrow) has made it’s way to my dear friend to enjoy. This estate lot had a beautiful block Meerschaum billiard with a Redmanol stem (red arrow) that called out to my wife. She liked the size, heft and simple classic straight lines of billiards and the way the red of the stem complimented the overall appearance of the pipe. The following picture will identify the pipes that have been restored and the meer that is now on my work table.
 This solid meerschaum is sans any stampings on the stummel or stem and lack of any housing case makes establishing the provenance of this pipe a tad impossible. The only pointer to this pipe being English is the stampings on the Sterling Silver ferrule at the shank end and should help in dating this pipe and identify the silversmith who mounted it on this pipe. It is stamped “H.T” in an oval over three sterling silver hallmarks. From left to right the first cartouche is with a LION PASSANT certifying silver quality followed by a cartouche with symbol for Chester Assay Office and the last cartouche contains the date code letter “V”.
 In order to link the maker’s mark on the silver band to a silversmith registered with Chester Assay office. I visited https://www.silvermakersmarks.co.uk/Makers/Chester-HP-HZ.html#HT and I have reproduced the findings below that most closely matched the probable silversmith (highlighted in red).
 The cause for doubt in my mind with respect to the findings above is the fact that the “H.T” stamping on the silver band is enclosed in an oval whereas that shown above is in a square cartouche. However, the comment of Henry Tongue being a Pipe mounter and the period are perfectly matched. Thus the circumstantial evidence makes me want to believe that the pipe mounter of this Meerschaum pipe is Henry Tongue. Any esteemed Reader is most welcome to shed more definitive information for the benefit of other members.
The next step was to ascertain the dating on this silver band. I frequent www.silvercollection.it for exact dating of letter code. The font style and the enclosing cartouche of the letter “V” on the shank band matches to the date year 1921. I have reproduced a screenshot of the relevant section of the date charts and the date year is indicated in red.
Now it was time to get working on the pipe.
Initial Inspection
To begin with, the stummel is dirty and covered in dust, dirt and grime of over a century gone by. The age on this pipe is manifested in the number of all the handling related scratches and marks that it has been subjected to. There is a decent layer of cake in the chamber with lava overflow over the rim top surface. Under all the crud, the rim top is deeply scratched all around. The stem seats loose in the shank. The stem has a couple of tooth indentations in the bite zone and other than that the Redmanol stem is in pretty good condition. Here are a few pictures of the pipe as it sits on my worktable.

 Detailed Inspection
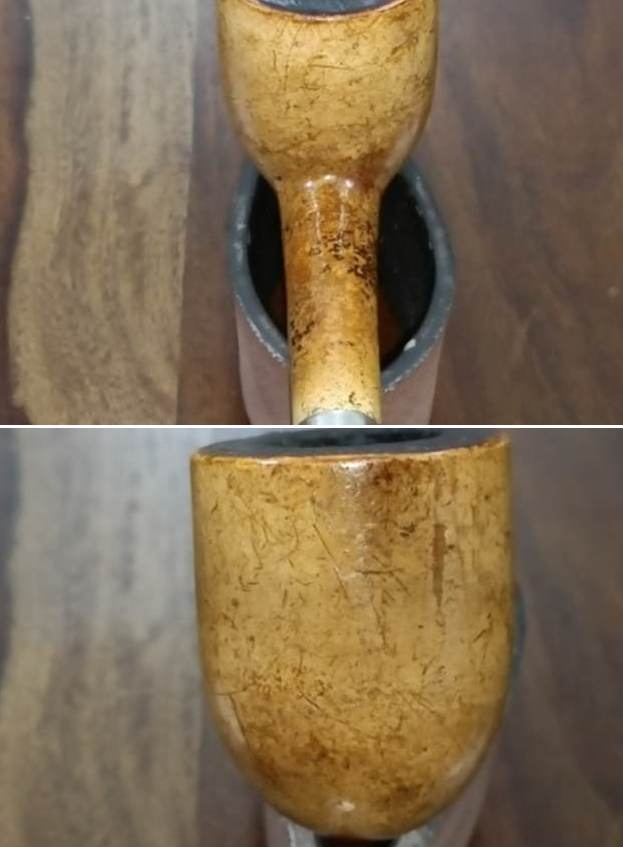
There is a thick layer of cake in the chamber. The rim top surface has lava overflow and has darkened considerably over the entire surface. The rim top is peppered with deep scratches, probably caused when someone, somewhere through the century, tried to remove the crud from the rim top using a sharp knife or it could have been caused as damage due to uncared for storage when the rim top and rest of the stummel was being rubbed against some hard objects. This uncared for storage could be the most likely reason since the stummel too has a number of scratches and marks. The inner and outer rim edges both show a few nicks and dents. The exact extent of damage to the inner rim edge will be ascertained after the chamber and rim surface is rid of all the cake and crud. The chamber walls are thick and feel solid to the touch. The stummel has a number of scratches and marks over the surface. There is a lot of dirt and grime ground in to the stummel surface giving it a dull and patchy appearance. However under all the grime and scratches, the stummel has taken on a beautiful color/ patina through the years of smoking and it is my intent to preserve it through the process. The threads in the mortise are slightly worn out and the mortise itself shows accumulation of oils and grime. Other than these minor issues, the stummel surface is sans any major damage and feels solid to the touch.
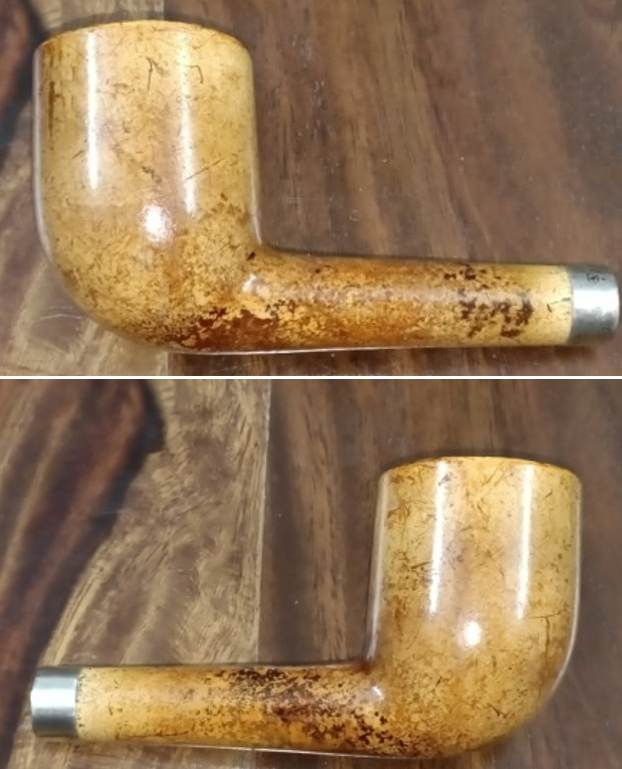
 The opaque cloudy Redmanol stem looks amazing as it is and should add a new dimension to the beauty of the pipe once it is repaired and all polished up. There are a couple of deep tooth indentations in the bite zone (encircled in yellow) that would need to be addressed. The stem airway leading to the round orifice shows remnants of old oils and gunk. The threaded bone tenon is covered in very fine jute threads to increase the diameter of the tenon for improved seating of the tenon in to the mortise. Yet even after this adhoc improvisation, the seating of the stem is pretty loose. I would need to figure out a more accurate, reliable and permanent way to address this issue.
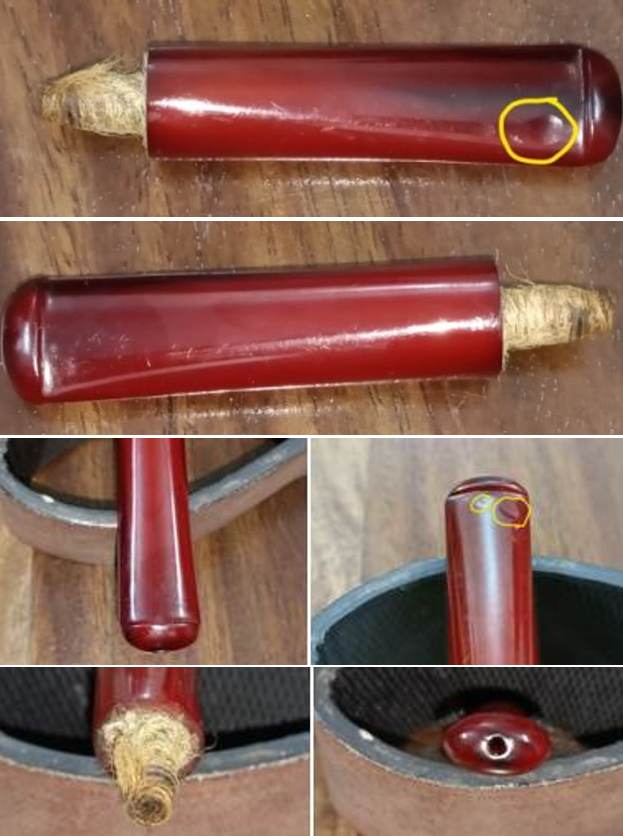 The Process
I started work on this pipe by firstly getting rid of the jute threads from the tenon end and followed it with cleaning the airway using thin shank brushes and anti oil dish cleaning soap. I ran a couple of pipe cleaners to clean and dry out the airway. Using a soft brass wired brush; I cleaned out the entire gunk from the threads of the bone tenon. I filled the tooth indentations with clear superglue and set it aside for the glue to cure. Once the glue had cured, using a flat needle I sand the fill to achieve a rough match with the rest of the stem surface. Once I was through with this step, I dry sand the entire stem with 400, 600 and 800 grit sand papers followed by wet sanding using 1000, 1500 and 2000 grit sand papers. This progressive use of higher grit sandpapers helps to, firstly, reduce the sanding marks left behind by the more abrasive ones, secondly, completely eliminate the oxidation and imparting a clean shine to the stem surface. Thirdly, this also helps to even out the minor tooth chatter from the bite zone.
 To complete the stem polish, I went through the entire set of nine micromesh pads, wet sanding through 1500 to 12000 grit micromesh pads.
 At this stage of refurbishing this pipe, little did I know that I would be carrying out further tedious and unplanned for repairs to the stem towards the end and till then, for all purposes, I have completed the stem restoration.
Next, I worked on the stummel. I began the stummel restoration by reaming the chamber with blade size 2 followed by size 3 of PipNet reamer. With my smaller fabricated knife, I scraped out all the carbon from difficult to reach areas. I used a 220 grit sand paper, pinched between my thumb and forefinger, to sand the inner walls of the chamber of the pipe. Once I had reached the bare walls, I wiped the chamber with a cotton swab dipped in isopropyl alcohol. This removed all the residual carbon dust and also rid the chamber of all ghost smells. The walls of the chamber are nice and solid with no signs of cracks. Using a sharp knife, I gently scraped out the overflow of lava from the rim top. The scratches on the rim surface are now clearly visible and so is the extent of damage to the outer edge of the rim.
 With the stummel internals cleaned up, using my fabricated tool, I scraped out the entire dried gunk from the mortise. I further cleaned the shank internals with a shank brush dipped in alcohol followed by running pipe cleaners through the shank till clean.
 All the while that I was cleaning the chamber and the shank, the sterling silver band came loose. I was extremely relieved to note that beneath the band, the shank was in pristine condition.
 To address the damages to the rim surface, I topped the rim top over a piece of 220 grit sandpaper, frequently checking for the progress made as I wanted to restrict the loss of meer material to not more than absolutely necessary. Close inspection of the rim top at this stage revealed that even though few minor scratches are still visible, they are too minor with the surface smooth to the touch. This will further even and smooth out during polishing with micromesh pads.
 I wiped the stummel surface with a cotton swab and Murphy’s Oil soap. The stummel surface is now free of all the dust and grime. I also cleaned out the last traces of lava from the rim top surface. The stummel and rim top surface now looks dark and dull, but it is clean. The scratches/ lacerations over the stummel surface are now more prominently visible. I shall bring back the rich shine when I polish it further using micromesh pads. This step will also help further reducing a few of the minor scratches and lacerations from the surface.

 At this point I was caught in a conflict; should I sand the stummel with a piece of 220 grit sandpaper to remove the scratches to make it look pristine and loose the patina that has developed over the years or preserve the coloration and patina. I decided on the later, after all it is the coloration taken on by the meer over the years which is more important and the existing scratches are a part of its journey through the years, is how I convinced myself!! I polished the stummel surface by dry sanding it with 1500 to 12000 grit micromesh pads. Some minor scratches were also addressed while imparting a nice deep shine to the stummel. The patina was also preserved. All in all, I am pleased with the appearance of the stummel at this stage.

 Next I gave a beeswax polish to the meerschaum bowl. I assembled the equipment and materials that would be needed during the process — a heat gun, paper towels, q-tips and a container for the wax and of course, beeswax. I stuffed the chamber with cork to prevent inadvertent seepage of the melted beeswax into either. Next, I melted a sufficient quantity of beeswax in the container using my heat gun and thereafter heated the stummel. Using the a folded pipe cleaner, I completely coated the stummel with the wax and continued the application till the surface was saturated and set the stummel aside to absorb the wax. I reheated the stummel with the heat gun about 20 minutes later and let the excess wax either be absorbed or drip off from the stummel surface. I rubbed off the excess wax with a soft cotton cloth and brought a deep shine to the surface with a microfiber cloth. The stummel now sports it’s true dark color which was drawn out by wax treatment, absolutely gorgeous I say.
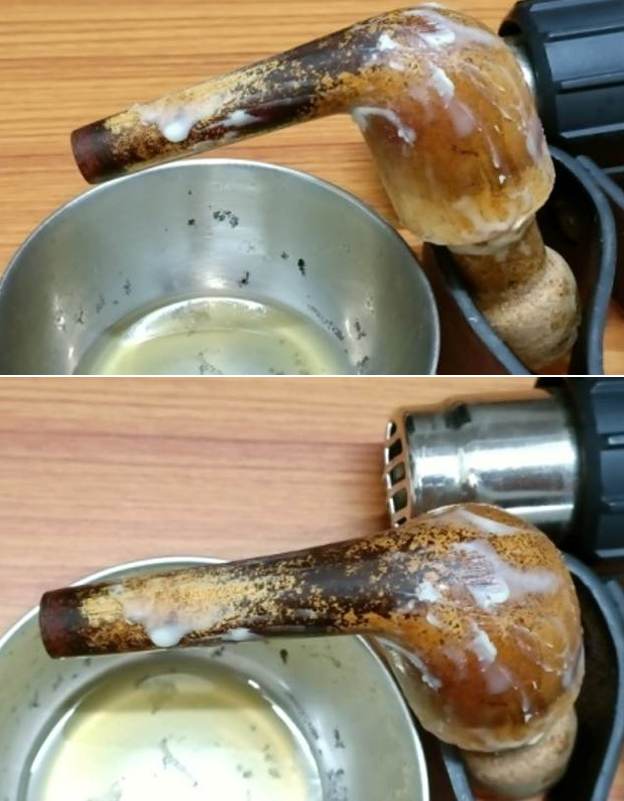


 Next, I reattach the sterling silver band to the shank end using CA superglue after polishing the band with a silver polishing cloth.
 The issue that now needed to be addressed was that of the loose seating of the stem in to the shank. I had an option of either coating the tenon with clear nail polish, which is a temporary solution most suitable for briar pipes or using CA superglue to coat the tenon. This is a more permanent solution, but one needs to be careful and work fast as the tenon may get stuck in to the shank as the glue hardens rapidly. I decided to go with using the superglue.
As decided, I applied a layer of superglue over the tenon surface and quickly turned it in to the shank till I had achieved a perfect alignment. I was equally quick to unscrew the tenon out from the shank to avoid having it stuck inside the shank. After a wait of few minutes to let the glue harden, I applied a second layer and followed the same process explained above. After repeating the process thrice, I decided to apply the glue one last time over the tenon to achieve a perfect thickness. Unfortunately this layer turned out to be one too many and as I was turning the tenon in to the shank, the tenon snapped at the stem end leaving it embedded within the shank. This created an altogether unexpected challenge, not to mention additional work and the need to put in extra man hours. The superglue around the broken tenon would first need to be loosened and thereafter the embedded tenon removed. I used pure acetone to loosen the glue around the broken tenon and pried it out using nose pliers, round needle files and dental tools.
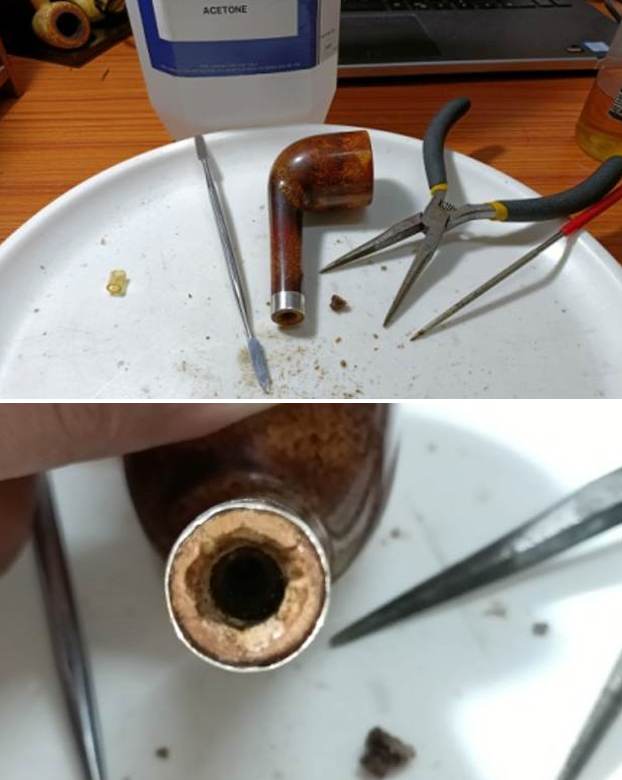 Next on the agenda was to fix a tenon on to the stem. From my can of spare parts, I shortlisted one Teflon Delrin screw tenon that was nearest match to the shank diameter. The shoulders of the threaded tenon perfectly seated and sealed the shank opening. The smooth end of the Delrin tenon would need some work to seat perfectly in to the stem. Following pictures will give you the general idea.
 I evened out the stem airway to accept the Delrin tenon using a round needle file. I was careful while working on this Redmanol stem as I did not want chipped edges on this century old stem. I, thereafter, worked the smooth end of the Delrin tenon by sanding it using a flat head needle file. I fine tuned the seating of the tenon in to the stem by sanding using a piece of 220 grit sandpaper.
 I checked the seating of the stem in to the mortise and alignment of the stem airway, the mortise and the draught hole. Everything was perfectly aligned. Once I was satisfied, I fixed the tenon in to the stem using CA superglue and set it aside for the glue to harden.
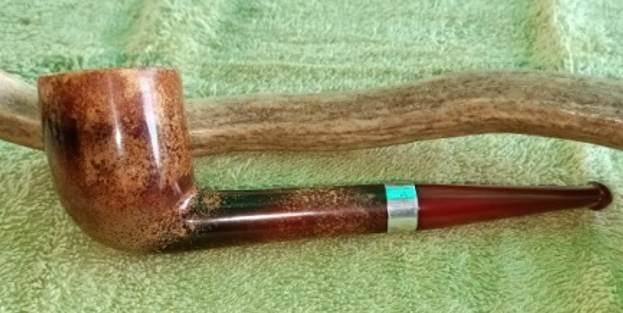
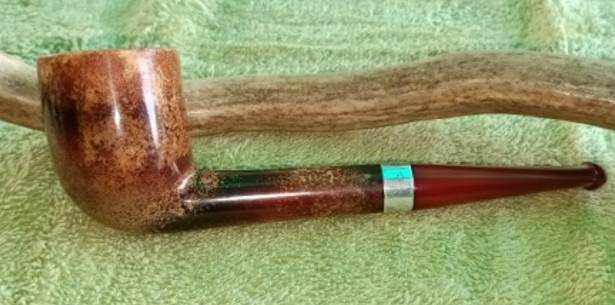
 To give the finishing touches to this gorgeous century old pipe, I reattached the stem with the stummel. I then mounted a cotton cloth wheel on to the hand held rotary tool and applied several coats of carnauba wax over the stummel and the stem. I finished the restoration by giving the pipe a rigorous hand buffing using a microfiber cloth to raise the shine further. The completed pipe, with the shining dark golden hued meerschaum stummel and complimenting red of the Redmanol stem looks lovely, fresh and vibrant; the photographs speak for themselves. I shall be adding it to my ever growing pipe collection. Thanks for the read…Cheers!!!