by Kenneth Lieblich
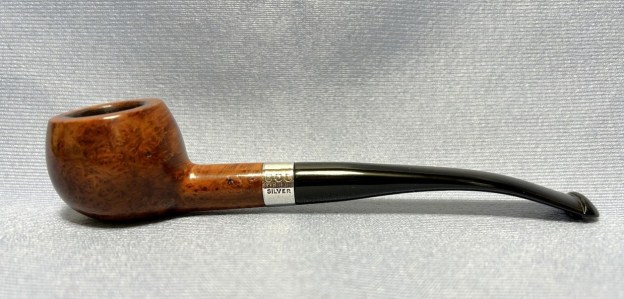
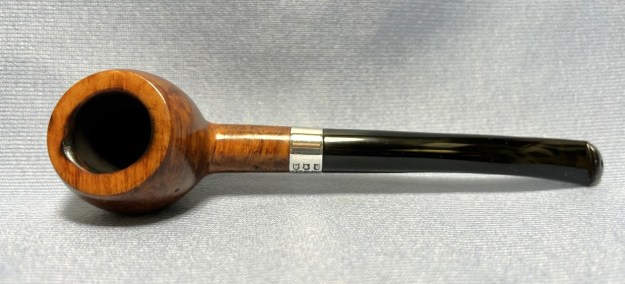
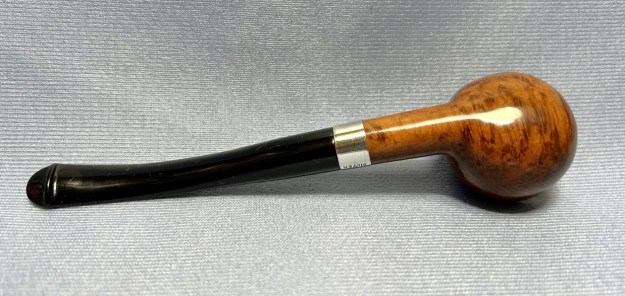
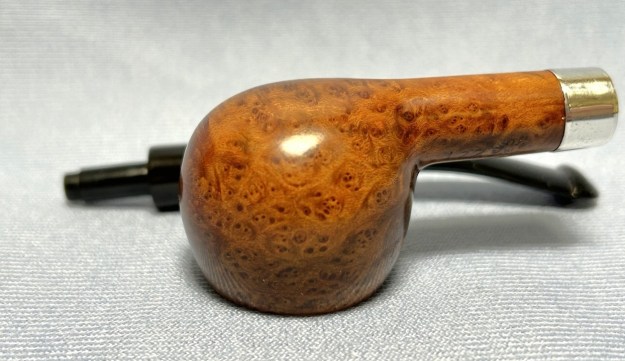
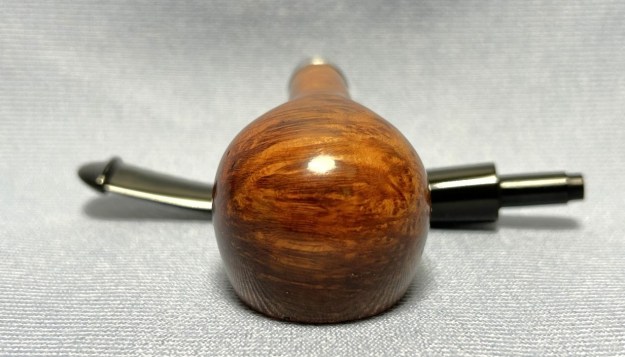
This pipe came to me in a collection of pipes that gave new meaning to the phrase, ‘trash and treasure’. Everything from the sublime to the ridiculous was in here, but when I saw this Pete, I was immediately enchanted. It is a Peterson 221 prince. This is a stunning pipe. It’s an older one and it’s a real veteran, with a few mild battle scars which are part of its history. I can’t help but think that this pipe should be in someone’s Peterson collection – it’s lightweight and breathtaking.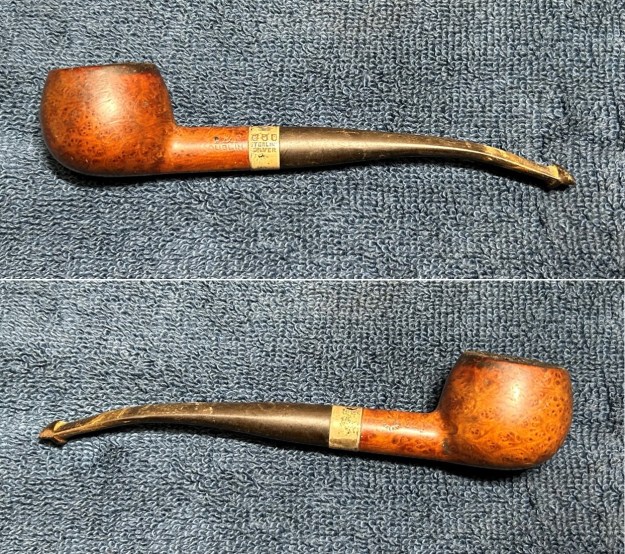
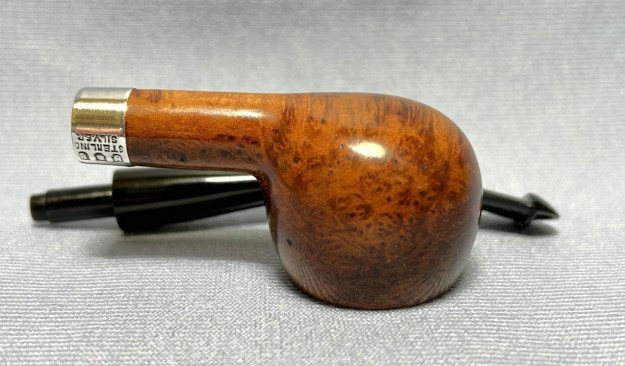
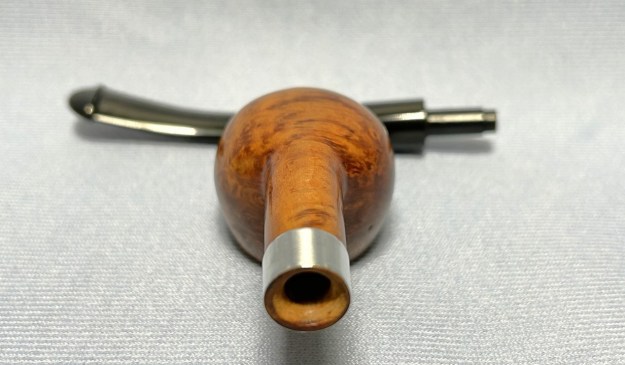
 This was one of the more difficult restorations I’ve ever undertaken. You might read through this blog post and think that it doesn’t seem particularly unusual. And, superficially, you’re right. Most of the steps in this restoration are run-of-the-mill, but, in many cases, these steps had to be done and redone so many times that I nearly launched the pipe across the room. So, settle in for a wild ride. The pipe is marked as follows: on the left side of the shank, it says K&P [over] Dublin. On the left side, it says Made in Ireland in the form of a circle and, next to that, the shape number 221. The circular Made in Ireland suggests that this is an older pipe, possibly (but not definitely) pre-republic. On the sterling silver band is displayed three shields each containing the three marks K&P [over] Sterling [over] Silver. The stem is the traditional Peterson P-lip, but it has no logo.
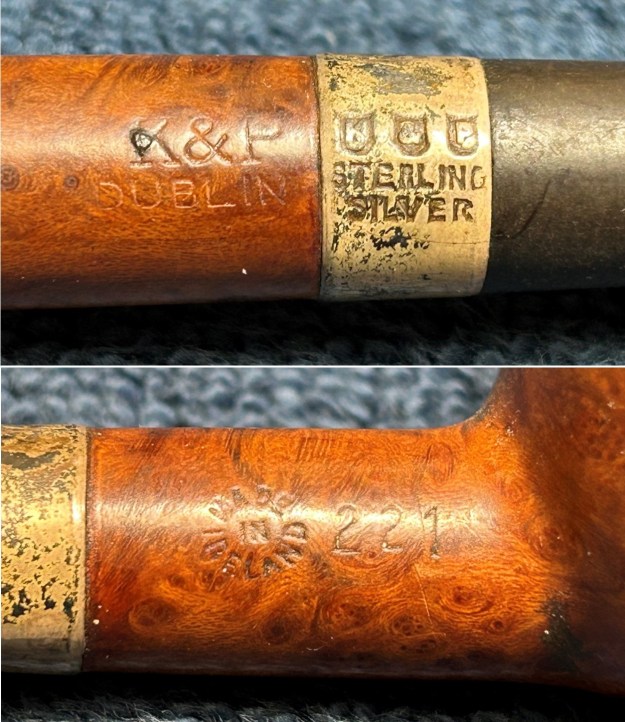 This is an unusual Peterson, by shape and number. There are Pete princes and there are Pete 221s (bent billiards), but I hadn’t seen a 221 prince. I searched extensively for this very pipe and came up empty. I looked at Pipedia and Pipephil – nothing. Many more searches also came up with nothing. Steve kindly referred me to a couple of his articles (from 2016 and 2020) that gave a good clue:
https://rebornpipes.com/2016/09/13/petersons-pipes-brochure-from-genin-trudeau-co-montreal-quebec/
and
The key information is on the old Peterson brochure shown in the blog post. In previous times, Petersons were imported into Canada through a company called Genin Trudeau & Co. (nowadays just Trudeau – the kitchen wares company). Genin Trudeau had the Peterson firm stamp their own shape numbers on the pipes they imported. This brochure supposedly dates from around 1974 and includes a silhouette of a 221, as you can see here in a cropped photo: However, there’s a problem: the 221 in the brochure is close – but not identical – to the 221 I’ve got here. Mine has a gentle bend; the one in the brochure does not. Clearly, my 221 was from a different time. Steve suggested that I contact Mark Irwin at Peterson Pipe Notes, as he is a great repository of Peterson knowledge. Mark was his usual obliging self and directed me to a page from his blog:
https://petersonpipenotes.org/280-canadian-shape-numbers-from-a-gtc-pipe-box-brochure/
In this post, he shows an older brochure, also from Genin Trudeau & Co. and dated to approximately 1955, which also shows a 221 prince. This time, however, it is the correct pipe!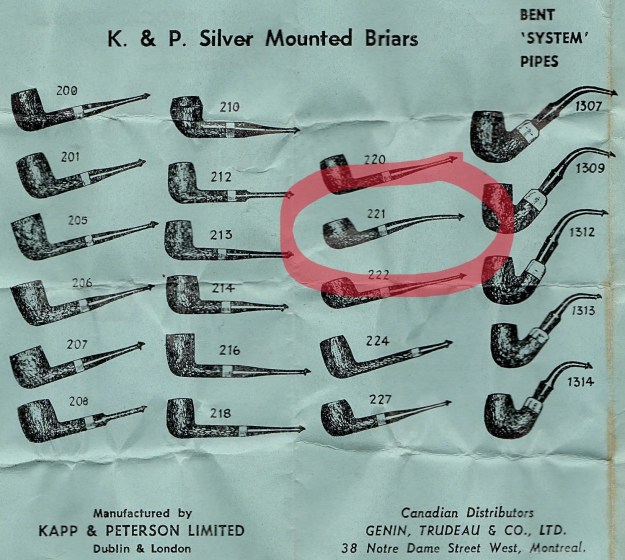 Although the brochure shows a rusticated pipe and mine is smooth, it is clear that the shape is identical. I suspect that this pipes dates from well before 1955, but I cannot prove this. Nonetheless, it is an exciting tidbit of information – thank you to Steve and Mark for their help.
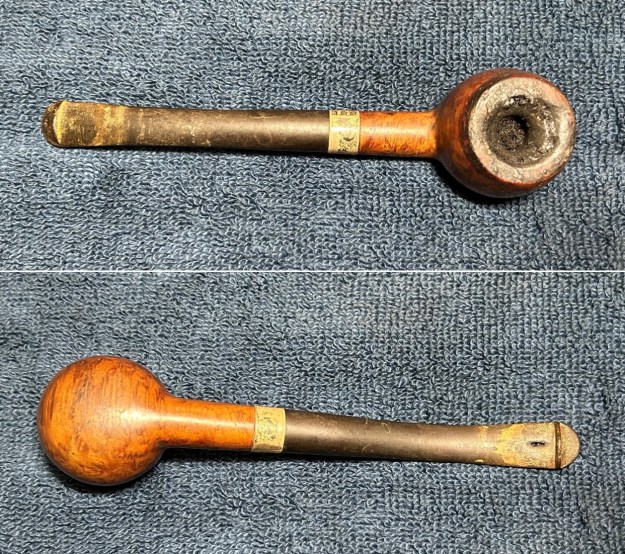
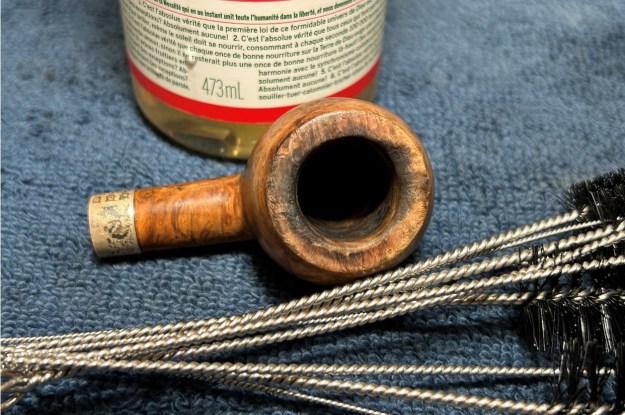
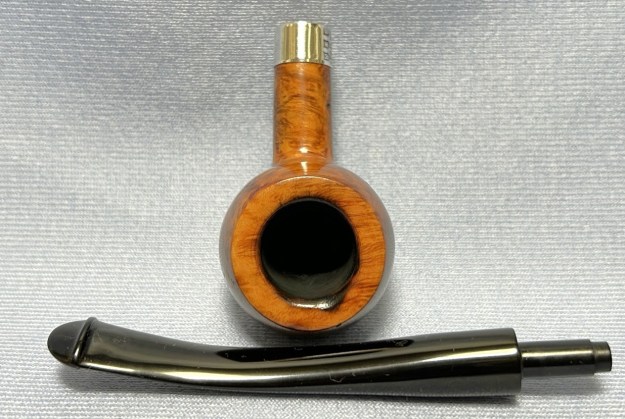
The photos show that this pipe’s former owner must have loved this pipe – it was smoked to the Nth degree. Although it must be a fantastic smoker, it has clearly never seen a pipe cleaner or reamer! The stem is filthy beyond words and it has scratches, bites, oxidation, and calcification. Most unfortunately, the stem also has a significant bite-through on the underside.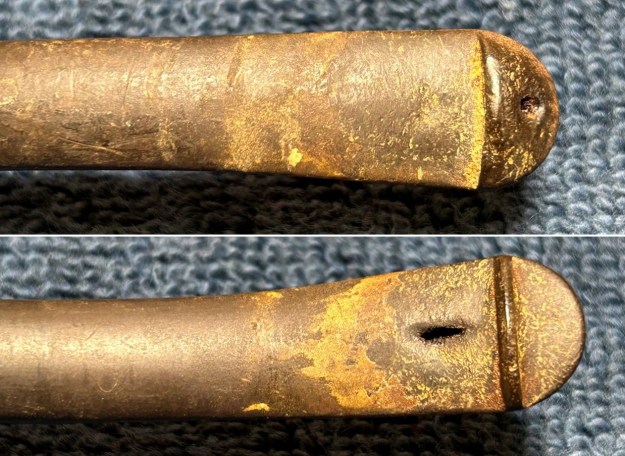 The stummel is also quite rough. There are a few minor nicks in the wood, but nothing serious. The main issue here is the cake in the bowl. Wow. The bowl is literally completely blocked. The cake is rock hard and its lava has erupted all over the rim. This is going to take some work!
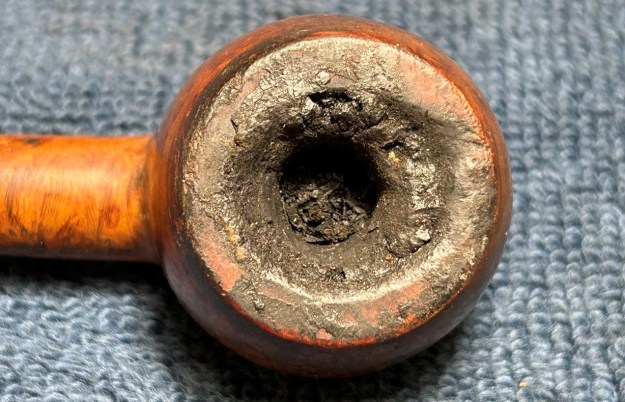 I used a disposable lighter and ‘painted’ the stem with its flame. The gentle heat of the flame can often cause the dents in vulcanite of the stem to expand back into shape. In this case, the dents were alleviated somewhat, but not enough. Better than nothing.
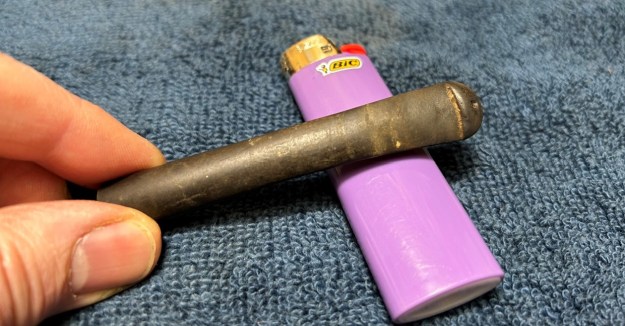 The calcification was quite substantial. I used an old butter knife and gently scraped some of the thicker accretion off. Taking the opportunity to do this now helps later in removing the oxidation.
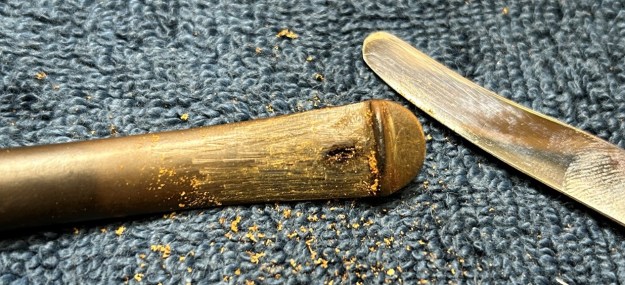 I used oil soap on a few cotton rounds and wiped the stem down. This provides a preliminary cleaning of filth off the stem before moving on to the next steps.
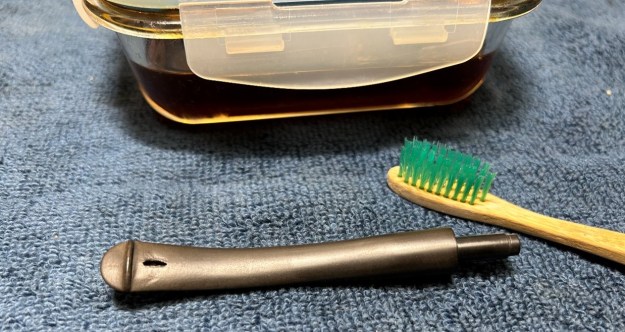
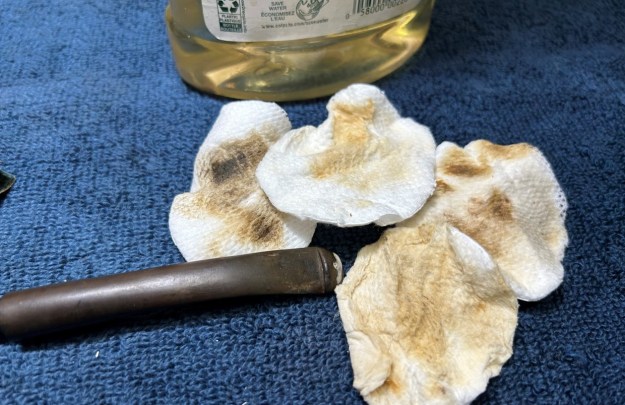 The primary cleaning comes next. I cleaned the inside of the stem with both pipe cleaners and cotton swabs dipped in 99% lemon-infused isopropyl alcohol. I scrubbed thoroughly and made sure the interior was clean. I used a lot of pipe cleaners and cotton swabs. This was a very dirty pipe.
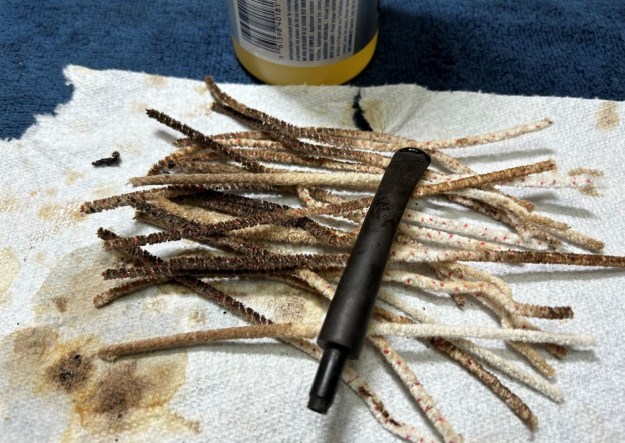 The goal of the next step is the removal (or minimization) of oxidation. Going to my sink, I used cream cleanser, cotton rounds, and a toothbrush, and scoured the stem to remove as much surface oxidation as possible. As the photos show, the result is a hideous brownish mess – but better off the stem than on it. This particular stem was so dirty that I also applied the cleanser to the inside with some tube brushes.
 Once the stem was reasonably clean, I soaked it overnight in some de-oxidation fluid. This solution works to draw oxidation in the stem to the surface. This is a major aid and an important step in ensuring a clean stem. The following day, I drew out the stem from its bath and scrubbed the lingering de-oxidation fluid with a toothbrush.
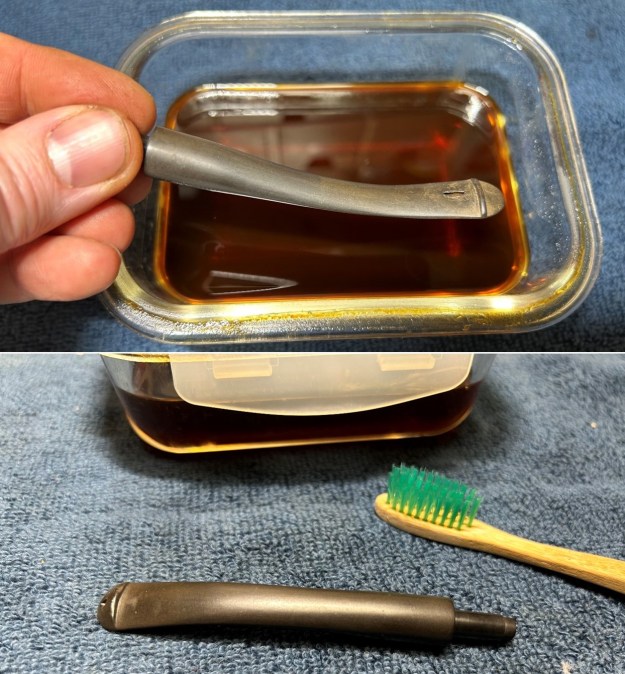
 Once clean and dry, I set about fixing the bite marks in the vulcanite. This is done by filling those divots with black cyanoacrylate adhesive, impregnated with carbon and rubber. I left this to cure and moved on.
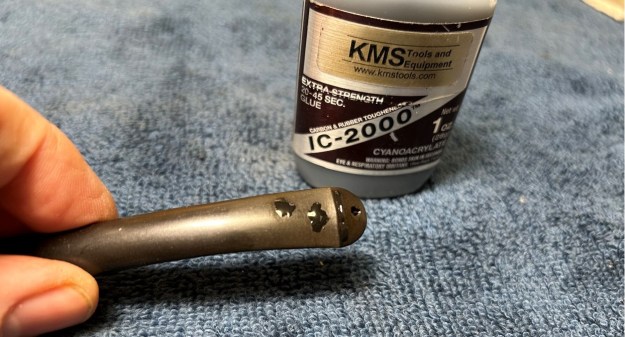 My next task was repairing the large hole on the underside of the stem. There are several methods of doing this and individual circumstances will dictate how to proceed. In this case, I used a straightforward method of employing the same black cyanoacrylate adhesive mentioned above. Before applying the adhesive, some preparatory work is required. With such a large gap in the vulcanite, any applied adhesive will simply run through the aperture and fill the airway. To prevent this, I coated the end of a pipe cleaner with petroleum jelly and lodged it in the airway. This provides a platform for the adhesive to sit on while curing and prevent it from entering the airway. The petroleum jelly is used to prohibit the adhesive from attaching to the pipe cleaner. This repair was much more labour intensive than normal. The adhesive patch I created failed three times before I finally made it work. The precarious nature of the repair impelled me to lay the patch much thicker than I might otherwise have. I am pleased with the final result, but I am not utterly convinced of the patch’s long-term structural integrity.
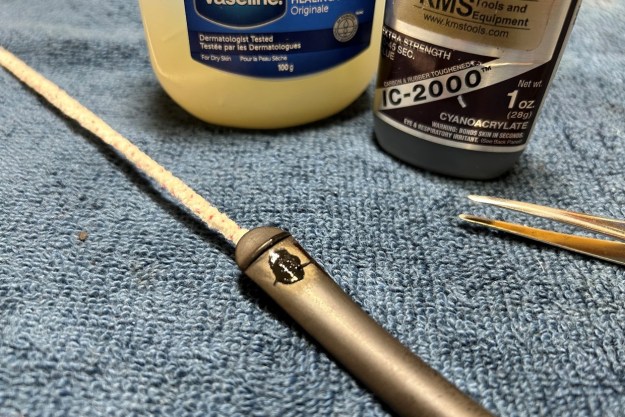 The penultimate step for the stem is sanding. I first used my set of needle files to reduce the bulk of the cyanoacrylate repairs. I do not want to cut into the vulcanite, but I want to lower the height of the adhesive to as close as possible above the surface. Following that, I used all nine of the micromesh sanding pads (1,500 through 12,000 grit) to sand out flaws, even out the vulcanite, and provide gentle polishing of the finished surface. I also apply pipe-stem oil while using the last five micromesh pads. There is a wonderful, deep-black shine to the stem when I am done.
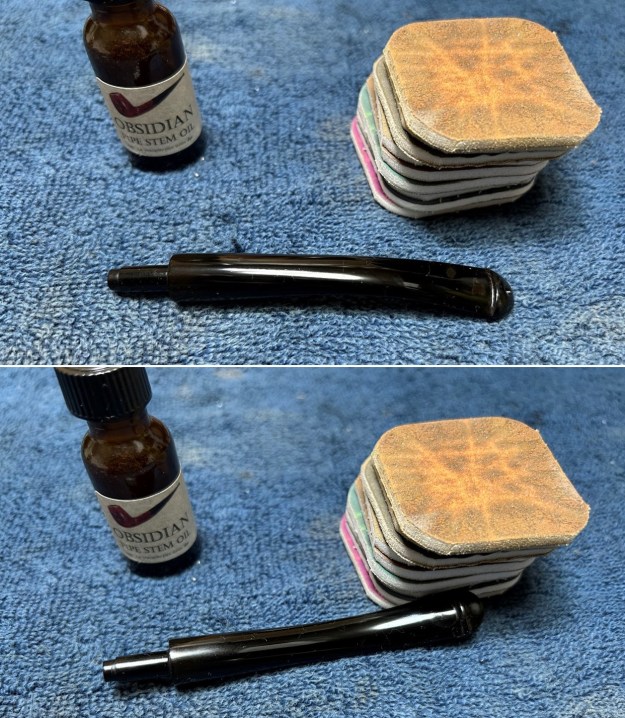 Now that the stem is (nearly) complete, I can move on to the stummel. The first step for me is to ream out the bowl – that is to say, remove all the cake inside the bowl. This accomplishes a couple of things. First (and most obviously), it cleans the bowl and provides a refurbished chamber for future smoking. Second, when the old cake is removed, it allows me to inspect the interior walls of the bowl and determine if there is damage or not. More about that later. In the meantime, I used a reamer, a pipe knife, and a piece of sandpaper taped to a wooden dowel. Collectively, these ensure that all the debris is removed. However, this pipe needed a jackhammer to deal with the rock-hard cake in the bowl. Since I don’t have a jackhammer, I used a ½” rotary burr on my Dremel. This is a tricky procedure and I would not normally use this burr except as a last resort. The cake was so hard, that I had no other option at my disposal. Working with great care, I managed to clean out the bulk of the material and then returned to my normal tools to finish the work. As you can imagine, there was an extraordinary amount of debris in the bowl.
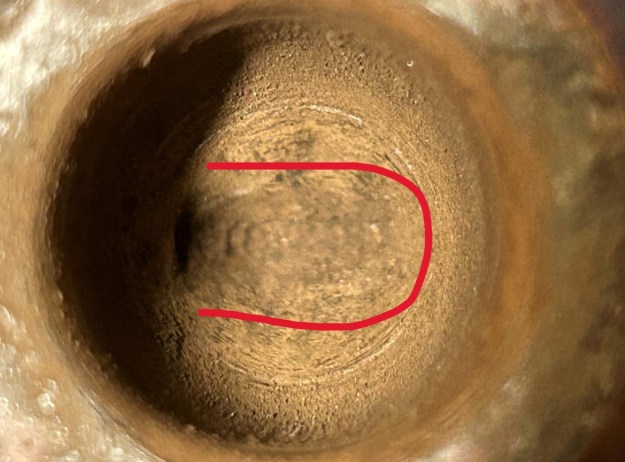
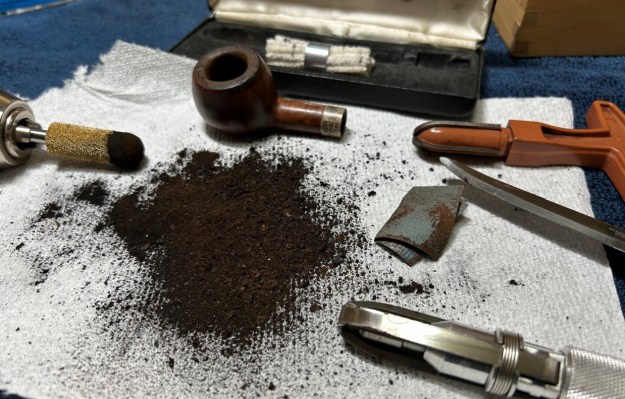 My next step was to remove the lava on the rim. For this, I took a piece of machine steel and gently scraped the lava away. The metal provides an edge that is sharp enough to remove what I need, but not so sharp that it damages the rim. This work revealed a lot of damage underneath: burning, scratches, gouges, etc. This would have to be addressed later.
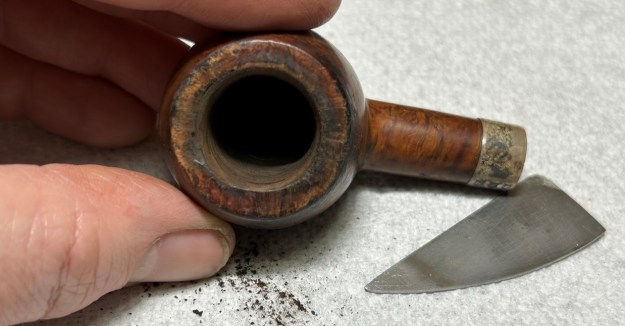 The inside of the stummel needs to be cleaned thoroughly. However, this pipe’s shank was so clogged, that I first needed to open the horribly occluded airway. So, I took a long drill bit, held in a drill chuck, and hand-cranked it to dislodge the dreadful detritus inside. Similar to the stem, I then cleaned the stummel with both pipe cleaners and cotton swabs dipped in 99% lemon-infused isopropyl alcohol. With a pipe this dirty, it took quite a while and much cotton to get clean.
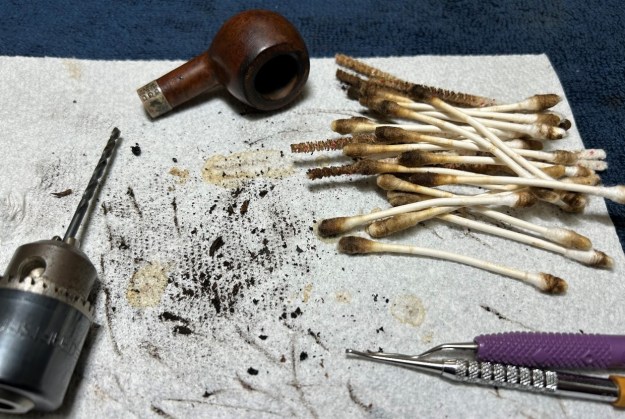 I then decided to ‘de-ghost’ the pipe – that is to say, exorcize the remaining filth from the briar. I filled the bowl and the shank with cotton balls, then saturated them with plain 99% isopropyl alcohol. I let the stummel sit overnight. This caused any remaining oils, tars and smells to leach out into the cotton.
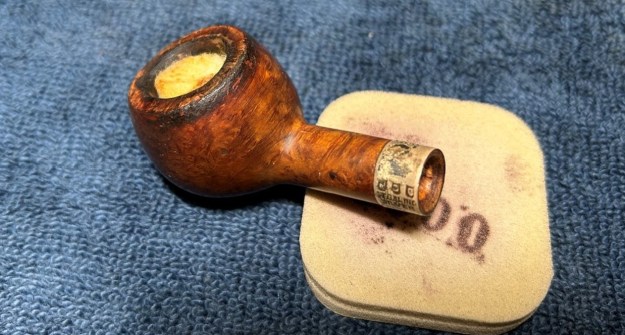 To tidy up the briar, I also wiped down the outside with some oil soap on cotton rounds (and a toothbrush). This does a good job of cleaning any latent dirt on the surface of the briar.
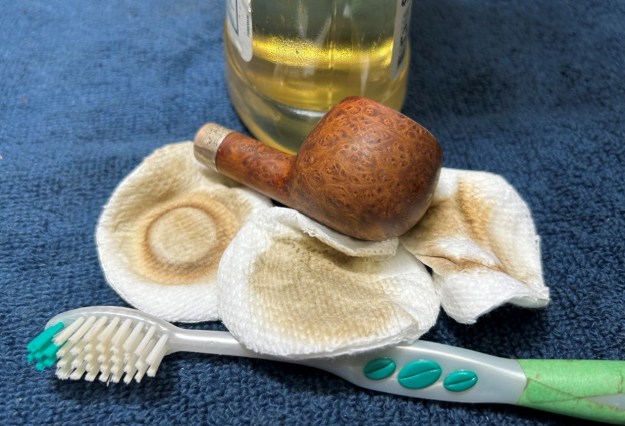 The last step of the cleaning process is to wash the inside of the stummel with some liquid cleanser and tube brushes. This is the culmination to a lot of hard work in getting the pipe clean. As you can see, this pipe still has some visible wounds.
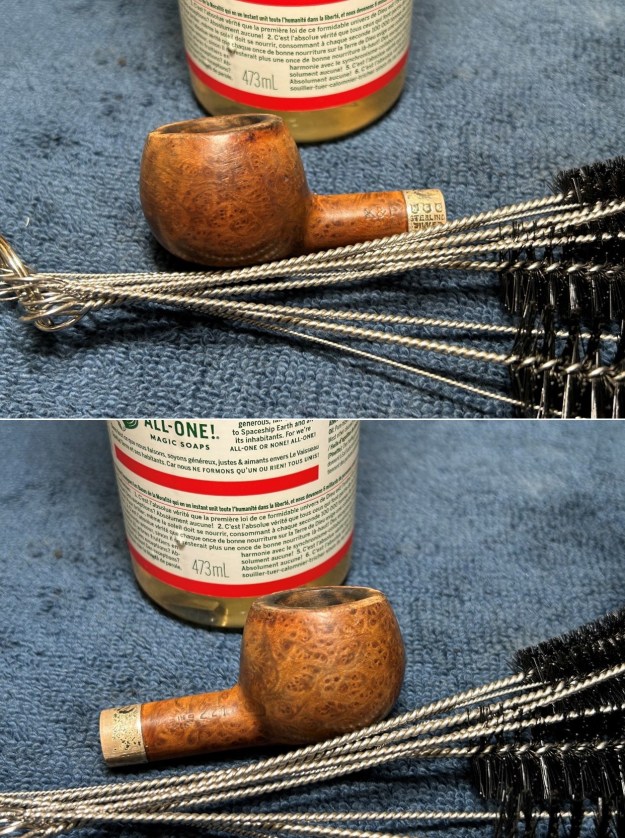
 The damage to the rim is significant. In order to minimize the burns and nicks on the rim, I ‘topped’ the pipe – that is to say, I gently, slightly, and evenly sanded the rim on a piece of 220-grit sandpaper. This effectively takes down the damage, without altering the look of the pipe.
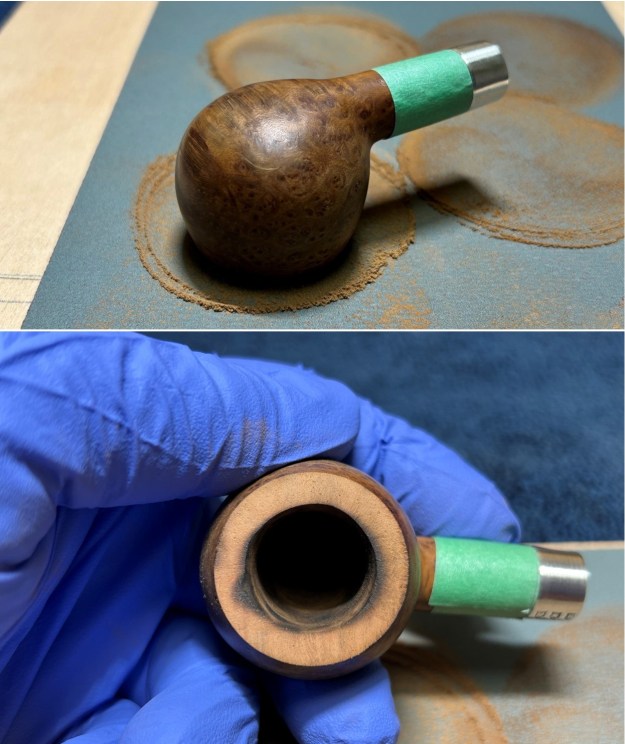 A notable burn remained on the rim, so I took some crystalized oxalic acid and dissolved it in warm water. I then took some cotton swaps, dipped in the solution, and rubbed the burned spot vigorously. The acid works well to alleviate superficial burns (burns where the integrity of the wood is still good).
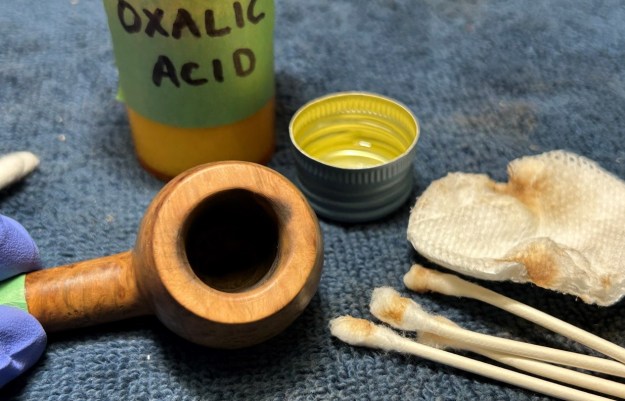 All the cleaning I did revealed an important problem. The photos do not show it well, but the previous owner reamed this pipe overzealously. The heel of the bowl was gouged out through reaming and is now very thin. I had to fill this.
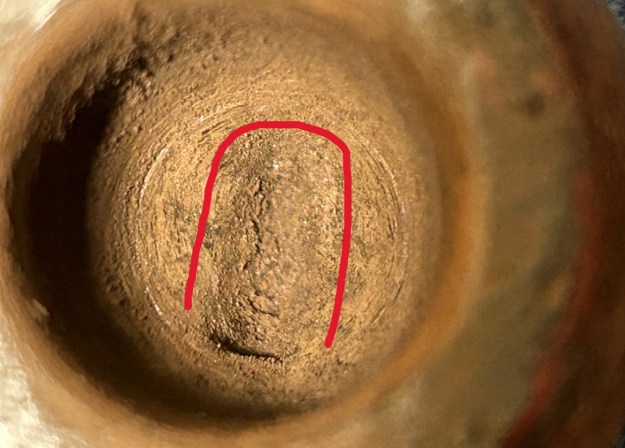
 To fill a gap like this, I use an epoxy adhesive that is extremely hard, resistant to high temperatures, and completely inert when cured. It works superbly. I filled the affected area with the epoxy and let it cure for a full 24 hours. The next day, I roughened up the epoxy’s surface for the next step. I thinly coated the inside of the bowl with a mixture of my wife’s homemade yogurt and activated charcoal. Once hardened, this provided a good, slightly rough surface for a new cake to build.
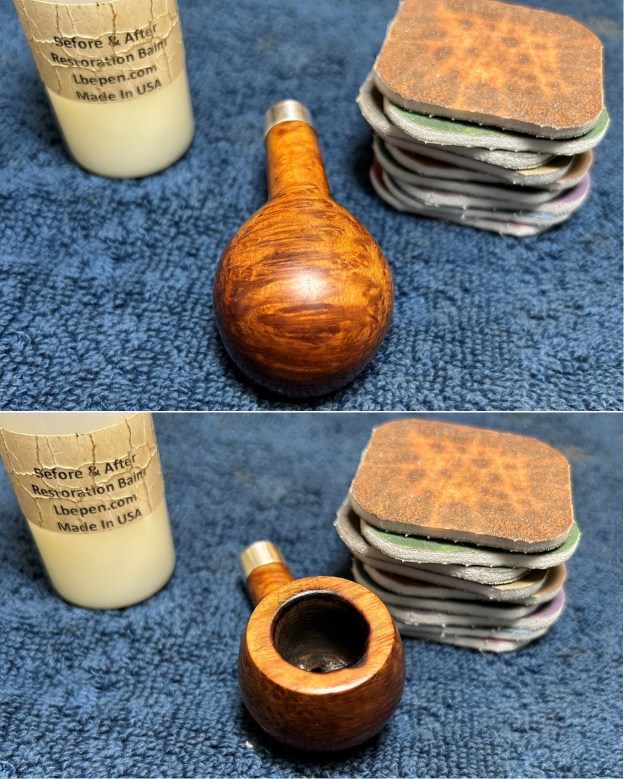
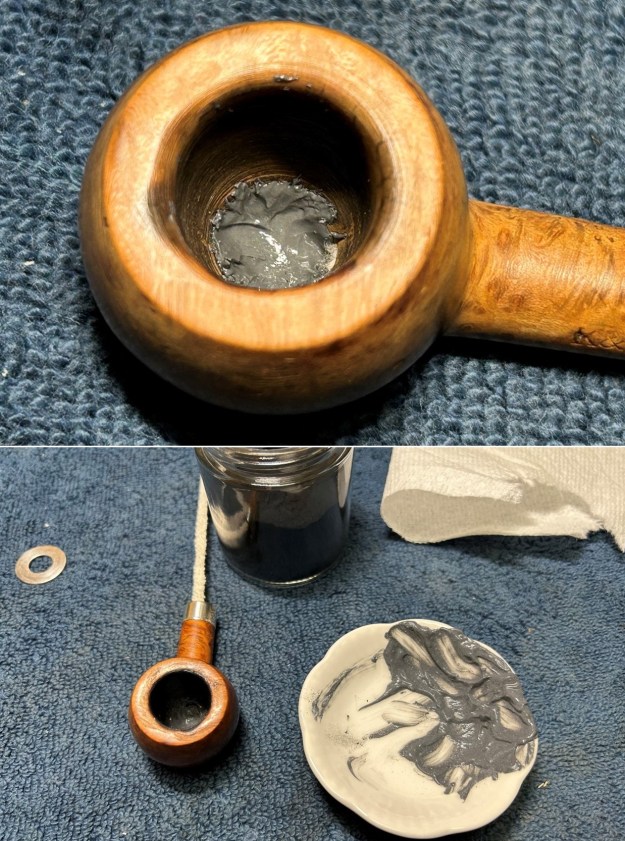 I used all nine micromesh pads (1,500 through 12,000 grit) on the outside of the stummel to finish it off. This sanding minimizes flaws in the briar and provides a beautiful smoothness to the wood surface. I rubbed some Before & After Restoration Balm into the briar and left it to sit for 20 minutes or so. The balm moisturizes the wood and gives a beautiful depth to the briar. I then buffed it with a microfibre cloth.
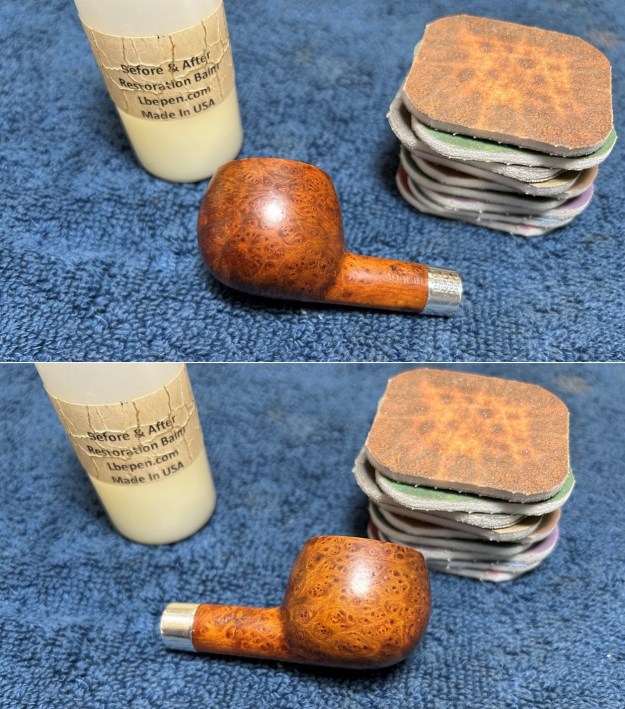
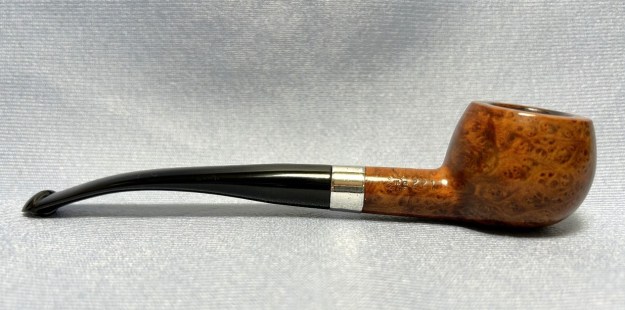
 The final step is buffing. I took the pipe to my bench buffer and carefully polished it – first with a white diamond compound, then with three coats of carnauba wax. Naturally, these finishing touches make the pipe look its best – the stummel sings and the stem glows.
All done! This Peterson 221 sterling silver prince was a lot of work, but it looks fantastic and is ready to be enjoyed again by its next owner. I am pleased to announce that this pipe is for sale! If you are interested in acquiring it for your collection, please have a look in the ‘Irish’ section of the store here on Steve’s website. You can also email me directly at kenneth@knightsofthepipe.com. The approximate dimensions of the pipe are as follows: length 6⅛ in. (155 mm); height 1⅛ in. (30 mm); bowl diameter 1½ in. (36 mm); chamber diameter ⅔ in. (17 mm). The weight of the pipe is 1 oz. (29 g). I hope you enjoyed reading the story of this pipe’s restoration as much as I did restoring it. If you are interested in more of my work, please follow me here on Steve’s website or send me an email. Thank you very much for reading and, as always, I welcome and encourage your comments.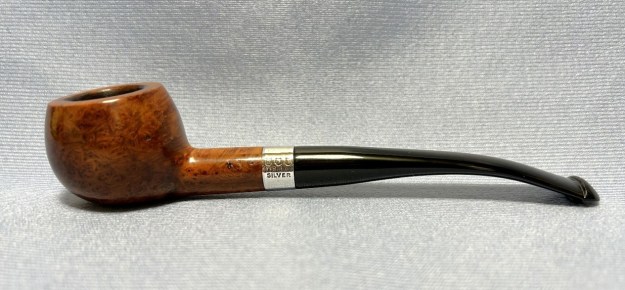

A marvelous refurbishment, I really enjoyed your detailed explanation of the process. I know the owner through BoB and he was kind enough to link your expose in our daily posting thread.
LikeLike
Dear Ross, thank you very much for your kind words. It was quite a job — but the results were worth it.
LikeLike