Blog by Kenneth Lieblich
This is the second pipe in a series of three that I was given by my cousin to clean up and bring back to life. This is a republic era K&P Irish Made X105 straight billiard from Peterson. It’s a handsome pipe, for sure, but there are lots of fills all over the bowl and it was in rough shape. It is important to note that this stem is not the original, but, after some back-and-forth with my cousin, we decided to leave the stem as it is.


 The markings are clear enough. On the left side of the shank, it reads K & P [over] Irish Made. On the right side of the shank, it reads Made in the [over] Republic [over] of Ireland. Near to that is the shape number, X105. There are also some maker’s marks on the ferrule. Quoting from a previous blog of Steve’s, regarding an Irish Made, “There is a nickel ferrule on the shank that is stamped with three symbols – a shamrock. a wolf hound and a tower. These makers marks put the pipe as pre-circa 1963.” That helps! On to the pipe work…
 It turns out that this stem is the dirtiest stem I’ve dealt with for quite a while. I don’t think it’s ever seen a pipe cleaner in its life until I got a hold of it. The thing was absolutely filthy inside, and it took ages and ages to clean out with pipe cleaners and lemon infused 99% isopropyl alcohol. In fact, it was dirty enough that I actually used some tube brushes as well (along with some detergent) to scrub out the insides and finally got it vaguely clean.


 Another thing you’ll notice is how badly chomped the button and bit are. It looked pretty bad, but I took my BIC lighter and tried to raise those dents with its flame. This didn’t work very well, if at all.
 The oxidization on the stem was pretty brutal, so I used some SoftScrub on some cotton rounds and scrubbed the dickens out of it for quite a while. The photo shows how much came off the initial scrubbing. I then threw it into the deoxidizing solution to sit overnight.
 The next day, with the stem nice and clean, I needed to address those dents on the stem. I applied a type of black cyanoacrylate adhesive (impregnated with carbon and rubber) to the damaged area. I sprayed these areas with an accelerant to cure the adhesive immediately.
 I then had to shape these repairs so that they would look great! I began by taking a needle file and shaping the hardened adhesive. Continuing, I used 200- and 400-grit sandpapers on the repairs to smooth them out. I finished up by using all nine of my MicroMesh pads to sand the entire stem. I also used some pipe stem oil to assist with the sanding and protect the vulcanite.

 The stummel was also pretty nasty. I begin by reaming it out. First, I took a drill bit and hand cranked (never with a drill) it into the shank to break up the incredibly hardened debris in there. Of course, I followed that up with cotton swabs and pipe cleaners and isopropyl alcohol. It took a lot of scrubbing to get it clean. I also used some soap and tube brushes to make it extra clean.
 I cleaned the outside wood with some Murphy’s and then I set the stummel up for a de-ghosting session. I took a couple of cotton balls, gently stuffed them into the bowl and into the shank, and saturated them with 99% isopropyl alcohol. I let that sit overnight, and the alcohol did its thing, leaching out more of the filth from the stummel.
 As the photos have shown, this pipe had a lot of fills, so I dealt with them, with a mixture of cyanoacrylate adhesive and briar dust. There was also a chunk missing from the rim, and I filled that up with the same. There was a lot of burning and damage to the rim which I addressed with my topping board and some sandpaper. This is always a balancing act: you want to make it look better, but you don’t want to take off too much.


 There was a crack in the shank, and a crack at the rim. Both of those required drilling before I could repair them. I took my micro drill bit and delicately drilled a hole through the briar right at the very end of the crack. This tiny hole – almost too difficult to see – serves as an endpoint for the crack, ensuring that it will not grow any further. I then carefully laid a thin bead of CA, glue along both cracks and let it cure.


 This pipe had obviously had a hard life, and one thing I noticed was that the bowl had quite a few craze lines on the inside. I wanted to fix them to make sure they weren’t a problem in future. Recently, I learned about a new mixture for a pipe mortar that I wanted to try inside this bowl. I found the mix on an old YouTube video, but I honestly can’t remember who the fellow was, otherwise I would credit him here. If anybody remembers who that was, please let me know. Anyway, I mixed up a combination of plaster of Paris, table salt, and activated charcoal. Once blended, I added a few drops of water to make a very thick paste. I then put a thin layer on the inside of the bowl and let it set overnight. It worked like a charm.
 The next step was to sand everything down. I started with some 220-grit sandpaper and sanded the repairs down so that they were level with the briar. I then took my nine micromesh pads and sanded the whole thing. Despite its fills, the pipe will be much improved once I’m done with it.

 Of course, I used my restoration balm and rubbed that into the wood to have its nourishing properties work on the wood. I left it set for 20 minutes or so and, while I was waiting, I decided to fix up the nickel ferrule that goes at the end of the shank. I used most of my micromesh pads to polish it up and it came out beautifully. I glued it back on and set the stummel aside.


 Off to my bench polisher! As usual, I used white diamond as my first compound and followed that with a few coats of carnauba wax. It provides just the sort of glam this pipe needs to pop!
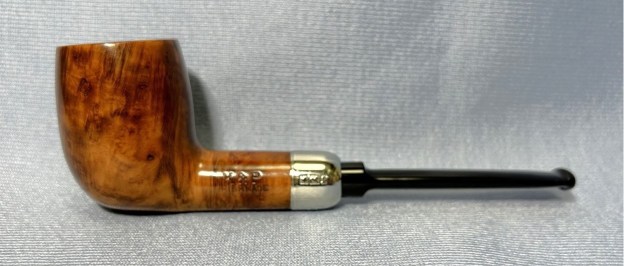
 This K&P Irish Made X105 straight billiard so much improved that I’m delighted and I’m sure my cousin will be too. I hope you enjoyed reading the story of this pipe as much I as I did restoring it. If you are interested in more of my work, please follow me here on Steve’s website or email me directly at kenneth@knightsofthepipe.com. Thank you very much for reading and, as always, I welcome and encourage your comments.


