Blog by Steve Laug
The next pipe on the table is an older KBB Pipe with a horn stem that a friend, Rob sent me. It has a nickel band on the shank and a nickel rim and wind cap. The briar has been stained with a dark purple stain and is a great contrast to the polished nickel and the horn stem. The finish was dirty and there are scratches in the finish. The nickel rim cap is dirty on the underside with tars and darkening. The hinge holding it on the cap is missing one of the anchors holding it in place. I am quite amazed that the hinge pin is not missing. The bowl has a moderate cake in the bowl and around the metal inner edge of the rim. It is quite dirty on the inside. The pipe is stamped on the left side of the shank and reads PALMYRA. On the polished nickel band it is stamped with KB&B in a cloverleaf over NICKEL PLATED on the left side. The horn stem is held in place by a threaded bone tenon that is excellent shape. The stem had tooth marks and chatter on the top and underside of the stem. The horn stem was worn and dry looking. Rob wrote me an email about the pipe asking if I would work on it. I have included the email below.
Hi Steve!
Greetings from Kamloops… hope you had a great holiday season. A while back, I picked up a KBB Palmyra on EBay (pictures attached) and I was looking into having it restored. It’s a cool little pipe with a horn stem… I think it’s 1920s era? I don’t mind fixing up estates now and again, but I’d like this one to be restored by someone with a little more know-how than me. It basically needs a thorough cleaning, minor repairs, and a repair to the hinge of the wind cap. Would you be interested in restoring it? And do you know what it might cost, offhand?
Have a great weekend, Rob
He sent the following photos which I have included below. They reveal the condition of the pipe and gave me a sense of what would be needed.


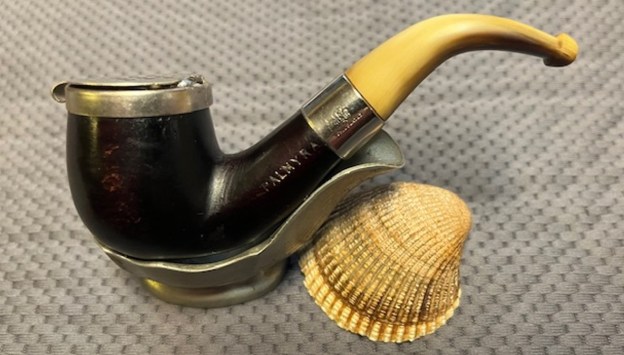
 When the pipe arrived yesterday I took it to the worktable. I took it out of the box and took photos of it before I started working on it. The pictures that Rob sent above told the story very clearly. The finish looked okay but there were some nicks and dents in the briar. The stain was a dark purple/oxblood colour that hid the grain but it is the classic stain that was on the bowl when it was made. The nickel on the band and rim edge were clean. The cap needed polishing and the inside of the cap was dirty with tars, oils and build up. The horn stem had tooth marks on the top and underside ahead of the button.
 I took a photo of the rim top and cap to show the condition. You can see that part of the hinge material is missing at the bottom edge of the pin below. I have inserted a red arrow in the photo below showing the missing hinge piece. I opened the cap and took a photo of the inside. The top of the cap is dirty as noted above and quite rough. The rim cap is also dirty and will need to be cleaned. I also took photos of the stem to show the tooth marks in the surface.
 I took a photo of the stamp on the shank side. There is some gold leaf still in the stamp that I would touch up after the clean up. I took a photo of the stem and bowl to give a sense of the size and proportion of the pipe.
 I decided to start with the stem work. I sanded out the tooth marks on the stem surface with 320-35000 grit sanding pads to remove the tooth marks in the surface of the stem. Once I was able to remove the marks in the stem surface and started polishing the horn surface. It looked much better.
 I polished the vulcanite stem with micromesh sanding pads – dry sanding it with 1500-12000 grit pads. I wiped the stem down after each sanding pad with Obsidian Oil and set it aside to dry.
 I polished it further with Before & After Pipe Polish – using both the Fine and Extra Fine Polishes. I gave it a rubdown with Obsidian Oil one last time and set it aside.
  I set the stem aside and turned my attention to the bowl. I removed the cap and the hinge pin from the one side of the cap to free it from the bowl so that I could work on it. I used a folded piece of 220 grit sandpaper to clean up the metal lined inner edge of the bowl. I also cleaned up the rim cap top at the same time.
 I scraped the bowl with a Savinelli Fitsall Pipe Knife. I removed all of the cake on the bowl walls. I sanded the bowl walls smooth with a piece of dowel wrapped with 220 grit sandpaper. The bowl was smooth and undamaged.
 I cleaned up the top of the wind cap with a worn 1200 grit micromesh sanding pad to remove the grime on the top of the cap. I also worked on the build up on the inside of the cap with the same piece of 1200 grit micromesh. It removed the grime but did not damage the polished nickel.
 I cleaned out the internals in the shank and the airway in the stem and shank with pipe cleaners and isopropyl alcohol. It was surprisingly clean and it took very few cleaners to leave it clean.
 I touched up the light spots on the bowl sides and on the joint of the shank and the bowl with a Mahogany stain pen. The colour matched perfectly. Once it had cured I would polish it and blend it further.
 I worked Before & After Restoration Balm deep into the smooth finish to clean, enliven and protect the briar. I hand rubbed it with my fingers and worked it into the finish then set it aside to dry for 10-15 minutes. I wiped it off with a soft cloth. I buffed the bowl with a cotton cloth to polish it. It really began to have a deep shine in the briar. I took some photos of the bowl at this point to mark the progress in the restoration. The grain on the bowl stands out with interesting lines moving across the sides of the bowl and the shank.

 I touched up the gold gilt in the stamping on the left side shank with Rub’n Buff Antique Gold. I worked it into the stamping with a tooth pick and buffed off the excess with a cotton pad. It looked quite good with the retouched stamp.
 Now it was time to work on the broken hinge on the cap. The right side of the hinge cap was present as was the hinge pin. The right side had broken off somewhere in the life of the pipe. I used a soldering iron and some solder wired to build up a cap over the left side end of the hinge pin. I opened the lid and soldered the end over the pin on the inside of the cap first. I closed the lid and built it up on the outside of the hinge.
 I used a small flat file to flatten out the hinge end on the inside and the outside of the cap. I finished it up with a Dremel and a sanding drum to further flatten it out.

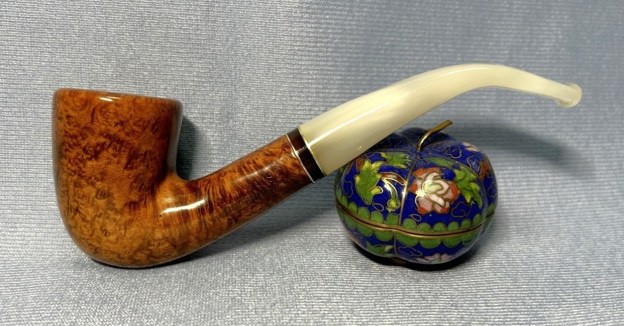
 I screwed the horn stem back on the KB&B Palmyra Bent Billiard and carefully worked the pipe over on the buffing wheel using Blue Diamond to lightly polish the stem. I buffed the bowl and stem to raise the gloss on the briar and the vulcanite. I gave the pipe multiple coats of carnauba wax. I buffed the entire pipe with a clean buffing pad to raise the shine. I hand buffed it with a microfiber cloth to deepen the shine. The finished KB&B Palmyra Bent Billiard is shown in the photos below. The purple/oxblood stains on the smooth Billiard shaped bowl works well with the polished nickel band and the polished horn stem. The dimensions of the pipe are: Length: 4 ½ inches, Height: 1 ¾ inches, Outside Diameter: 1 ¼ inches, Diameter of the chamber: ¾ of an inch. The weight of the pipe is 1.38 ounces/39 grams. This is an interesting pipe with the dark stain on the bowl, the gold stamp on the left side of the shank and shank, the nickel wind cap and band all work with the polished horn stem. I really like how well the parts work together. This one will soon be on its way back to Rob. I think he will enjoy himself with this beautiful little old timer. I look forward to hearing what he thinks of it once he sees it.
As always, I encourage your questions and comments as you read the blog. Thanks to each of you who are reading this blog. Remember we are not pipe owners; we are pipe men and women who hold our pipes in trust until they pass on into the trust of those who follow us.