Blog by Steve Laug
Sometimes I look at a pipe we purchased and wonder what we were thinking when we went for it. That was the case with this Danmore 3090 freehand. We purchased it from an online auction in Los Fresnos, Texas, USA on 01/10/2018. You can see from the fact that it has been sitting here in a bag since 2018. When Jeff received it, the pipe was in pieces and he put it together for these photos. The bowl was intact with no cracks or serious nicks. The horn shank extension had come unglued and looked like it might have some delaminating happening on the long portion that held the stem. The pipe was stamped on the underside of the shank with the shape number 3090 followed by Danmore [over] Handmade Denmark. The stem had a rubber tube fit on the end that had originally been in the shank extension but was now stuck on the stem. The stem itself had been chewed or broken off and was probably missing at least ½ inch of its length. It still had the Danmore Logo on the top of the taper but that was all it had going for it. The bowl was thickly cake and there was a thick lava coat on the rim top obscuring the edges of the bowl. It had obviously been someone’s favourite pipe and had been smoked to death. The finish was filthy with grime and hand oils ground into the smooth panels and the sandblast making it all almost smooth to touch. It was impossible to know if the rim top was smooth or sandblast as there was so much tar on it. The inside of the shank that held the extension was filled with tars and oils and the inside of the horn shank extension was the same. Jeff got some good photos of the pipe before he did his clean up work and I have to hand it to him it looked pretty interesting. The question in my mind really was whether it was redeemable. The bones were nice but what was underneath once it was cleaned remained a haunting question. 
 He took photos of the rim top and bowl and you can see what I mean by the thickness of the cake in the bowl and the lava on the rim top. It is so thick that it is flaking off in chunks only to reveal another layer! You can also see the broken off/chewed off condition of the stem in the photos he included.


 He included photos of the sides of the bowl and the contrasting patches on the bowl sides along with an interesting sandblast.
 The only thing that can be said is that the stamping on the underside of the shank is clear and readable as noted above and the Danmore D logo is very readable on the chewed off stem. You can also see the separation of the horn shank extension for the shank end in these photos. Lots of work to be done in the resurrection.
 The horn shank extension was originally lined with a Delrin or rubber liner to stabilize the horn from the inside. It would have been glued in place in the horn and not moved when the stem was removed. In the photo above and those that follow you can see that the liner piece has crept up the stem to where there is very little that is actually in the horn itself. I am hoping that once it is here I can work it off the stem and reinsert it in the horn again. We shall see.
 Jeff let the pipe fall back into its parts and took photos of it. You can see the bowl and its filthiness, the stem with the creeping rubber insert from the horn and the tired looking horn extension. In the second photo you can see the filth in the inside of the horn and into the shank itself… lots of work in cleaning it and not making things worse.
 I knew that the pipe was a Danish Made pipe but it has been awhile since I worked on a Danmore pipe. I turned first to Pipephil’s site (http://www.pipephil.eu/logos/en/logo-d2.html). There was a very short clip there with one photo of a pipe very different from the one I am working on. It simply states that the factory is closed and that the pipes are made by third parties. Not too much helpful information there that is for sure.
 I then turned to Pipedia (https://pipedia.org/wiki/Danmore) and was much more successful. The article is short and succinct but very helpful. I have included it below for ease of reference.
Danmore was founded by Hans Sørensen in the early 1970s, and produced pipes from that time until the early 1980s, at one point having up to 30 employees. The pipes were sold in the first Dan Pipe catalog. In the early 1980’s, however, production ceased in Denmark due to labor costs, and the company’s production was outsourced to Italy and Spain, and they began to also make pipecleaners and smokers articles.
Sørensen focused on the pipecleaner side of the concern, and eventually bought a share in the factory in the Far East making them. Today the company, owned by Hans’ sons Jesper and Lars Sørensen, no longer makes pipes, and instead makes only pipe cleaners under the name Danmore Hobby Aps, selling only to hobby and craftshops in Denmark and Scandinavia.
Hans Sørensen passed away in 2012. The Sørensen family continues to own the trademarks for the use of the Danmore name in relation to pipes, matches, and tobacco.
Now I knew that the pipe was made by Hans Sorensen and was made between the early 1970s and early 1980s when production ceased in Denmark due to labor costs. From that point on the pipes were outsourced to Italy and Spain. So, I guess the pipe was made during the 10 year or so window when the pipes were handmade in Denmark. All of that info makes me a bit more interested in resurrecting this pipe.
When it arrived here it was in a plastic sandwich bag and I promptly put it aside in a drawer of pipes to work on. Periodically I would take the bag out and dump out the parts and look it over. Everytime other than today I have just put it back in the drawer, shaking my head. I think it could be fixed but did I want to was the serious question that haunted me each time I looked at it. From 2018-2024 my answer was categorically, NOT INTERESTED! So, what changed today? Got me! Last evening, I took it out of the baggie and looked it over, put the pieces together and took some photos. Something about it caught my eye this time around and I wanted to see if I could bring it back to life. I sent Jeff a note and he sent me the photos above.
Jeff had done a great job cleaning up the pipe as usual. He reamed the pipe with a PipNet reamer and cut back the cake back to the bare briar. He cleaned up the walls with a Savinelli Fitsall Pipe Knife. He scrubbed the interior of the bowl and shank with pipe cleaners, cotton swabs and alcohol to remove the tars and oils. He scrubbed the exterior of the pipe with Murphy’s Oil Soap and a tooth brush to remove the grime from the finish. He worked on the rim top lava and darkening with the soap and tooth brush. He scrubbed the inside of the horn shank extension and the stem with alcohol and pipe cleaners. He scrubbed the exterior of the stem with Soft Scrub and then soaked it in Before & After Pipe Stem Deoxidizer. He washed it off with warm water to remove the Deoxidizer. The pipe looked far better when it arrived. 
 I took a photo of the bowl and rim top to show how good it looked. The sandblast rim top was clean and the inner edges aw also in good condition. The stain had faded some but it would not be too much to bring it back. The shank extension was very loose with nothing holding it in place in the shank. The stem was another story. The end had been either gnawed off or broken off and still smoked that way. It cleaned up well for sure – looked much better. It would need to be replaced.
 Though the photo below is a bit blurry the stamping is very clear on the underside of the shank. I removed the stem from the shank end and took a photo of the pipe and extension with the stem below to get a sense of what was there now.
 Now it was time to put the pieces back together again. For me this is the challenge that I enjoy. Will I be able to reconstruct the pipe back to functionality without changing the plan that crafted it originally? I love that challenge. In this case I decided to start with regluing and rebuilding the shank extension. I am very thankful that it was not delaminating. The horn was dry but still very stable which took away a very time-consuming part of the work. I worked on removing the old glue from the shank end and the tenon of the extension. I used a dental spatula and small blade to scrape the surfaces and then scrubbed them with 99% isopropyl alcohol and cotton swabs and pipe cleaners. I also worked on the airway in the mortise of the briar so that the extension would have a very clean surface to bond with.
 Once the mortise was dried out I used some all-purpose white glue and painted the inside of the mortise and the tenon on the extension with it. I pressed the parts together and held them with pressure until the glue cured. Once it had hardened sufficiently to take the pressure off and wiped off the excess glue that had squeezed out with a damp cotton pad. I took photos of the pipe at this point. I cleaned up the Delrin/rubber ring that fit in the shank end and gave it a thin coat of all-purpose glue. I pressed it into the shank extension end and set it aside to cure.
 Once the glue hardened I polished the joint of the horn extension and the briar with 320-3500 grit sanding pads. I wiped the horn down after each sanding pad with a cloth impregnated with Obsidian Oil. The horn began to take on a shine.
 I polished the smooth panels on the bowl sides and the horn shank extension with micromesh sanding pads – dry sanding with 1500-12000 grit sanding pads. I wiped the horn down after each sanding pads with Obsidian Oil. It began to take on a shine as I worked through the pads.


 I used a Walnut Stain Pen to touch up the spotty finish around the bowl and shank and on the faded rim top. It looked significantly better once the stain cured. The colour looked much better.
 I rubbed the briar down with Before & After Restoration Balm. I worked it into the briar with my fingertips and a horsehair shoe brush. The product works to clean, enliven and preserve the briar. I let it sit for 10 minutes while I worked on the stem. After the time passed I buffed it with a cotton cloth to deepen the shine. The briar really comes alive with the balm.

 I went through my collection of stems to find one that would work on the pipe. The one I found is identical to the broken one. It has the same shape as the broken one with the fishtail button. It was about ½ inch longer that accommodated the broken portion of the stem. It would need to be cleaned up and polished but it was a good match.
 I cleaned out the internals of the stem with alcohol and pipe cleaners. It smelled and looked much better.
 I started working on polishing the stem with my 320-2500 grit sanding pads. I was able to remove the scratches and light tooth marks and chatter on both sides ahead of the button. It looked much better at this point in the process.
  I polished the stem with micromesh sanding pads – dry sanding with 1500-12000 grit pads. I wiped the stem down after each sanding pad with Obsidian Oil.
 I polished it with Before & After Pipe Stem Polish – both Fine and Extra Fine. I gave it a coat of Obsidian Pipe Stem Oil. It works to protect the stem from oxidizing. I set it aside to dry.
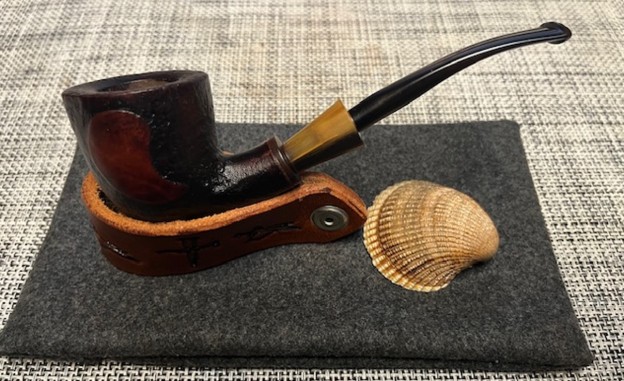
  This beautiful sandblast Danmore 3090 Freehand with a horn shank extension and a military mount stem turned out very nice. It came together amazingly well – far better than when I began. The mix of brown stains highlights the grain around the bowl sides and bottom. The rim top and edges look very good. The finish on the pipe is in excellent condition. I put the stem back on the bowl and carefully buffed the pipe with Blue Diamond on the buffing wheel. I gave the bowl and stem multiple coats of carnauba wax on the buffing wheel and followed that by buffing the entire pipe with a clean buffing pad. I hand buffed the pipe with a microfiber cloth to deepen the shine. The finished Danmore 3090 Freehand is very nice and feels great in the hand. Give the finished pipe a look in the photos below. It is a nice pipe whose dimensions are Length: 6 inches, Height: 1 ¾ inches, Outside diameter of the bowl: 1 ¾ inches, Chamber diameter: 1 inch. The weight of the pipe is 48 grams/1.69 ounces. Thanks for walking through the restoration with me as I worked over another beautiful pipe. This one will be going on the rebornpipes store, in the Danish Pipe Makers Section shortly. If you are interested in adding it to your collection let me know by message or by email to slaug@uniserve.com. Thanks for your time.
As always, I encourage your questions and comments as you read the blog. Thanks to each of you who are reading this blog. Remember we are not pipe owners; we are pipe men and women who hold our pipes in trust until they pass on into the trust of those who follow us.


