Blog by Steve Laug
I decided I needed a change of pace in my restoration/clean up work. I went through my pipes waiting in the queue and chose the last one from a group of four pipes that were given to us by a woman in Columbus, Ohio, USA. It had belonged to her Grandfather who lived from 1882 to 1977. There were four pipes that she sent us from his estate – the metal bowled apple, a cased meerschaum Bulldog with a broken amber stem, a Whitehall rusticated apple and a BBB Glokar Fraternity Pipe. The cased Meerschaum Bulldog is the last of the lot and one that should be fixable and clean up well. I could see that it was an old timer and that it had been one of her Grandfather’s favourites like the other three. The pipe was dirty and well used. The finish had deep grime ground into the smooth meerschaum rim cap and the sides of the bowl. The rings around the cap are dirty with grime in the grooves. It had a moderate cake in the bowl that flowed onto the rim edges and rim top as a thick cake. It hard to assess the inner and outer edge of the rim there were thick spots of grime on the cap and bowl sides that should come off with work. The stem was amber and had been cleanly broken in half about mid stem. It was screwed on to a metal threaded tenon in the shank. It had tooth marks and chatter on both sides ahead of the stem. Jeff took photos of the pipe before he started his cleanup work. He started with the black leather case which was in good condition though missing the pin in one of the hinges. He opened the case and took photos of the pipe sitting in the case.
 He took a photo of the label on the inside of the case. It read Genuine Meerschaum around the outside of the black and gold octagonal label. On the inside of the label it reads Real Amber.
 He took photos of the condition of the bowl and rim top. You can see the cake in the bowl and the lava on the rim top. There are also nicks and scratches around the top and outer edge particular o the front right side of the bowl.
 He took photos of the broken stem. You can see the break is about halfway down the stem and is clean with no rough edges on the pieces. When the two parts are put together the fit is very clean and smooth. The fit against the shank end is smooth and undamaged. It should clean up well.
 Jeff also took photos of the tooth marks and chatter on both sides of the stem ahead of the button. They are not deep but are very visible in both photos. Even these marks are not flaking or showing too much depth in the damage.
 He took photos of the bowl sides and heel to give a sense of the condition of the pipe before clean up. I think it will clean up well.
 Jeff cleaned up the pipe with his usual regimen and when I received it the bowl had been reamed and washed with Murphy’s Oil Soap and rinsed clean. He was able to remove the lava on the rim and the grime around the bowl. It looked much better. He cleaned out the inside of the shank and stem with alcohol and pipe cleaners. He carefully cleaned the pieces of the broken stem and the fit together was still smooth. The pipe was ready for the next step in the process. I took photos of the pipe when I brought it to the work table.
  I decided to start my work on this pipe by rejoining the two parts of the stem. I looked at putting a metal tube inside but the amber is brittle and the airway was not big enough to accommodate even the smallest tube I had. I chose inside to glue the parts together with clear rubberized CA glue. I carefully painted the ends of each piece and then pressed them together. They aligned well and I held them until the glue set. I set the stem aside and let the repair cure.
 I took the family to breakfast and when I returned I put the stem on the shank and took photos of the repaired stem in place. I still needed to sand and smooth out the repairs but you can see the overall look of the pipe.
 I removed the stem and set it aside. I turned my attention to the bowl. I polished it with micromesh – dry sanding it with 1500-12000 grit pads. I wiped it down after each sanding pad with a damp cloth to remove sanding debris. The bowl began to take on a rich shine. You can see the patina around the bow and the shank.


 Now it was time to wax the bowl. I melted some beeswax on the stove top and painted it onto the meerschaum bowl. I apply the wax quite heavily as I plan on heating the bowl and wiping it off. I worked it into the twin rings around the bowl cap with the pipe cleaner.

 I took a few photos of the heavily waxed bowl. I set it aside and called it a night. I would heat and polish it in the morning.
 This morning I used the heat gun to melt the wax on the bowl. I held it by the metal tenon and carefully moved it over the heat gun. The wax dripped back in the bowl and I also wiped it down with a paper towel. The patina really came alive. You can see it nicely developed on the shank and moving up the bowl sides to the cap. It looks very good at this point and will only look better with buffing and with use.
 I set the bowl aside and turned my attention to the stem. I used a folded piece of 220 grit sandpaper to blend the repairs into the surrounding amber. I wanted it smooth and with no lumps of glue on the crack or tooth mark areas. I started polishing the stem with 600 grit wet dry sandpaper. I was happy with how the shine was developing.
 I polished the amber with micromesh sanding pads – wet sanding with 1500-12000 grit micromesh pads. I wiped the stem down after each pad with a cloth impregnated with Obsidian Oil to further polish and give some teeth to the pads. It came out looking very nice.
 I polished the stem with Before & After Pipe Stem Polish – both Fine an Extra Fine. I rubbed them on with my finger tips and polished them off with soft paper towel. I finished by rubbing the stem down with some Obsidian Oil on a soft impregnated cloth. It looked better.
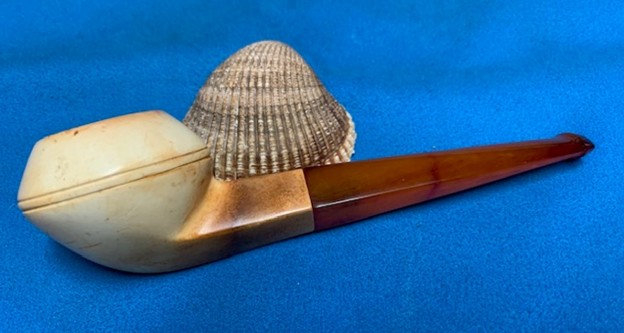
 I don’t know how many times I have said this but I love it when I come to the end of a restoration and all of the parts come together and the pipe looks better than when we started the cleanup process. I put the stem back on the Genuine Meerschaum Real Amber Cased Bulldog and carefully buffed the bowl with Blue Diamond on the buffing wheel. I gave the bowl multiple coats of beeswax as shown above and the stem multiple coats of Conservator’s Wax by hand and buffed it by hand with a soft cloth. I also buffed it again with a microfiber cloth to deepen the shine. The finished pipe is a real stunning example of a classic Meerschaum Bulldog with an Amber Stem. It is beautiful and comfortable in hand. There was developing patina around the bowl and shank and was darker on the shank and the rim top. Give the finish pipe a look in the photos below. I can only tell you that it is much prettier in person than the photos capture. The dimensions of the pipe are Length: 5 inches, Height: 1 ½ inches, Outside diameter of the bowl: 1 ¾ inches, Chamber diameter: ¾ of an inch. The weight of the pipe is .95 ounces/27 grams. This meerschaum pipe is a great piece of pipe history that is in great condition. Thanks for walking through the restoration with me as I worked over another beautiful pipe. I will be keeping this one in my collection and enjoying it. Thanks for your time.
As always, I encourage your questions and comments as you read the blog. Thanks to each of you who are reading this blog. Remember we are not pipe owners; we are pipe men and women who hold our pipes in trust until they pass on into the trust of those who follow us.


Hello Steve,
What a wonderful pipe and what a great job on the restoration !
Color me impressed 🙂
I wonder if a dab of Mark Hoover’s restoration balm could help rejuvenating my block meers ?
Kind regards,
Roland Borchers
LikeLike
Thanks Roland
It was an interesting pipe to work on. Marks balm works well in meers
Warm regards
Steve
LikeLike