Blog by Dal Stanton
This beautiful GBD came into my collection from the eBay auction block from a seller located in Cocoa, Florida, USA. When I saw it, I decided I wanted it, thinking I would add it to my own personal collection, but in the end I added it to the ‘For “Pipe Dreamers” Only!’ collection where Lowell saw it. Lowell became the very happy steward of a striking Poker, what I called, Refreshing a ‘Faux’ Mastro de Paja Poker in the write-up. It was not actually a Mastro de Paja, but the Poker was absolutely striking and Lowell has expressed his appreciation for this addition to his collection on several occasions. I’ve communicated with Lowell now and again on various FaceBook pipe man groups and when he messaged me about the GBD Constitution, it didn’t surprise me that it got his attention! He commissioned it and I’m thankful for his patience as the GBD worked its way up the queue and now is on my worktable, and it benefits the Daughters of Bulgaria – our work here in Bulgaria helping women and girls who have been trafficked and sexually exploited. Here are pictures of the GBD Constitution now on my worktable which I would call a briar Calabash shape.


 A very short history of GBD by Jerry Hannah is in a PDF file that Rebornpipes contributor, Al Jones, shared with me. The PDF is entitled ‘GBD Pipe Shape & Model Listings’.
The company was founded in Paris France in the 19th century by Ganeval, Boundier and Donninger who were no longer associated with the company by the turn of the century. By the time they left the GBD name was well established and thus retained. In 1903 an additional factory was built in England and ran by Oppenheimer. The Paris factory moved to Saint-Claude in 1952. Since 1981 the majority of GBD pipes come from the English factory. At about that same time GBD merged with Comoys, since then all production for both GBD and Comoy comes from a single factory.
Based upon information I’ve gleaned from communications with Al, this GBD is like others that I’ve restored that straddle the transition when the Cadogan takeover happened. From a previous communication I had with Al discussing the GBD Americana I previously restored (See LINK), he wrote:
Typically, the stamping used on pre-Cadogan pipes is the straight line COM, “London, England” stamp (see attached) combine with the brass rondell stem logo. Cadogan era pipes (made after 1981) have the round “Made in London” (with England under) COM, as shown on your pipe. But, they typically have stamped stem logos. I see these pipes occasionally, and my assumption is they were made after the merger, until the brass rondell inventory was exhausted. One common denominator on these pipes is a single letter. I have no idea as to what it may mean, but M is frequently used.
These pipes also had many more finish names, like your Americana, that were not scene before. Comoy’s started doing the same thing, adding lines and letters just after the merger. I’ll look forward to seeing the restored pipe, it looks like a good candidate.
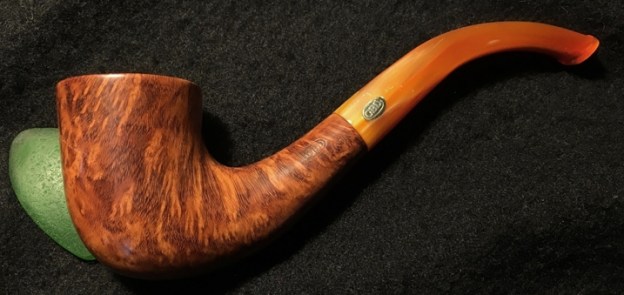
The GBD Constitution falls into the early 80s most likely since it still carries the brass rondel on the stem, which was used pre-Cadogan, but shows the post-Cadogan rounded MADE IN LONDON over ENGLAND. Al’s guess is that they used the brass rondels until the inventory was eventually exhausted after 1981. As Al said, GBD had many line names after 1981 and ‘Constitution’ is one of them. The one on my worktable doesn’t have the rogue ‘M’ but a rogue ‘L’ – I’m not sure what it signifies either. I’m open to input on this! I could not find the shape number 1978 in any of the random lists of GBD shape charts that I have. Even so, I’m calling this GBD a briar Calabash.
Looking at the pipe itself, the chamber has a light cake build-up with lava covering the rim. The briar on this stummel is beautiful and needs cleaning from usual wear. The acrylic stem is beautiful but has been scuffed up with some with minor tooth chatter. It also shows interesting looking sub-surface imperfections just above the GBD brass rondell. I call them imperfections – they look like cracks or bubbles. Perhaps sanding will address these….
I begin the cleanup of the GBD by reaming the chamber using the Pipnet Reaming Kit. I use 3 of the 4 blade heads available and then switch to using the Savinelli Fitsall Tool. I scrape the chamber walls further and then finish the chamber cake removal by sanding using 240 grade paper wrapped around a Sharpie Pen. Finally, I wipe the chamber with a cotton pad wetted with isopropyl 95% to remove the remaining carbon dust. After inspection of the chamber, I see no heating problems. I move on.

 Moving directly to cleaning the external surface, using undiluted Murphy’s Oil Soap with a cotton pad, I begin work on the stummel surface as well as the thick lava on the rim. I also use a bristled toothbrush and a brass bristled brush on the rim. I then take the stummel to the sink and continue to clean using anti-oil dish liquid soap with the bristled toothbrush to scrub the rim and shank brushes through the mortise and airway. After rinsing I go back to the table and take some pictures. The rim cleaned up beautifully.
 Next, to further clean the mortise, I use isopropyl 95% with cotton buds and pipe cleaners. It doesn’t take much and the buds and pipe cleaners are coming out clean.
 Looking now at the rim, it has a tight, classy internal bevel that looks good. I use both 470 and 600 grade papers to freshen it with crisper lines. I also lightly sand the rim with both grades of paper to freshen it. It’s in good shape and the grain will be looking good over the rim.
 The stummel is generally in good shape, but inspecting it closely, as expected with normal wear, there are fine scratches scattered over the surface. I take a picture of one such scratch below to understand what I see.
 To address these light scratches and to clean up the surface, I like using sanding sponges which are great for cleaning the surface but not very invasive. I use 3 sponges, from a coarser and medium grade to a light grade to sponge sand the surface. The results are good.
 Working now on the acrylic stem, I had a question about the kind of acrylic this GBD stem was. Being in the early 80s I didn’t think it was Perspex, the earlier clear acrylic that GBD utilized. If this is the earlier Perspex, then I would not use alcohol or isopropyl 95% to clean the airway which can craze or shatter the acrylic. After shooting a quick question to Steve, I was confirmed by him in my use of isopropyl 95% to work on this 80s vintage acrylic stem. It didn’t take a lot of work and pipe cleaners emerged clean.
 The bit has very mild tooth chatter, mainly on the lower side.
 I use 240 grade sanding paper first to sand out the tooth chatter on the upper and lower bit.
 I then use 470 and 600 grade papers to smooth the acrylic bit further.
  I expand the sanding by wet sanding the entire stem with 600 grade paper followed by applying 000 grade steel wool.
 I press forward using the full regimen of 9 micromesh pads on the acrylic stem. First, I wet sand using pads 1500 to 2400 then follow by dry sanding with pads 3200 to 4000 and then with pads 6000 to 12000. After each set of 3, as with vulcanite stems, I apply a coat of Obsidian Oil. The rich, swirling honey colored acrylic looks great, but something is bothering me.
 I saw this acrylic imperfection around the brass rondel previously but decided to let it go because I thought the sanding I applied would work it out. True, the coarser 240 grade sanding paper was only applied to the bit, not to this area. The problem with these imperfections is that it’s not clear that they are on the surface of the acrylic. I look at the area with a magnifying glass and probe lightly with a sharp dental probe to see if I can feel a surface disturbance and I don’t. The reality is that I could detour here and sand and be left with the same problems because they are deeper in the acrylic. How much sanding would it take and what is sacrificed in the rounding of the stem around the GBD roundel? Sometimes being somewhat of a perfectionist is a problem – not being able to let go of an imperfection! The following pictures shows the source of my consternation.
 I decide to do a compromise detour. I suspect that the bubbling or cracking in the acrylic is deeper than sanding can address, but I will test the impact of sanding with a light strategic sanding of this area above the rondell using 240 grade paper. I want to see if it makes a difference. If not, I will move on. The first picture shows some strategic sanding with 240 grade paper.
 Using the spittle approach to clean the area, I can see residual imperfections. After sanding a little more, I come to the quick decision that sanding will not fully address these imperfections. To remove them would require more sanding than this stem can muster.
 I’ll spare you the pictures, that resulted in the final picture below after again applying 600 grade paper, 000 steel wool and 9 micromesh pads 1500 to 12000 and Obsidian Oil. The result is that the detoured sanding may have reduced the presentation of the imperfections in the acrylic, but they are not fully removed. As with life and our imperfections, they go with us! I move on.
 The GBD Constitution stummel is waiting for attention. To further clean the briar surface and coax out the beautiful vertical flame grain, I take the stummel through the full regimen of micromesh pads. Sanding with pads 1500 to 2400 the process begins with wet sanding. This is followed by dry sanding with pads 3200 to 4000 and then with pads 6000 to 12000. The pictures show the progression – I like what I see! There is no doubt in my mind that this GBD Constitution Calabash comes off an upper shelf. The grain emerges through the micromesh process with no shyness!
 Next, to bring out the subtle natural briar hues in this already striking grain, I apply Before & After Restoration Balm to the stummel. I apply it on my fingers and work the Balm into the briar grain. It starts off having a thinner viscosity, like cream then gradually thickens into a waxier texture as it’s worked in. After applying it thoroughly, I set it aside to allow the Balm to absorb and do its thing – the picture below captures this. I let it set for 20 minutes or so and then wipe the excess Balm off with a cloth and then buff up the stummel with a micromesh cloth.
 After reuniting the stem and stummel, I apply Blue Diamond to the pipe. I mount a cotton cloth buffing wheel to the Dremel, set the speed to 40% full power and apply the compound.
 After finishing with the compound, I wipe the pipe with a felt cloth to remove the compound dust in preparation for applying the wax. I change to another cotton cloth buffing wheel and keeping the speed the same, I apply Carnauba wax to the GBD Constitution Calabash. After applying the wax, I hand buff the pipe with a microfiber cloth to raise the shine.
 My, oh my! This GBD Constitution Made in London England was eye catching before I began the restoration, now its simply amazing. I can’t get over the grain on this stummel. The flame of the grain is beautiful as it rises vertically toward the rim. The gentle sweep of the Calabash as it transitions from bowl, to shank, to stem, and to button, is very nice and cradles well in the hand. The only imperfection in this pipe are the small specks in the acrylic stem next to the rondell. Notwithstanding, a very nice pipe to add to the collection! Lowell commissioned the GBD Constitution Calabash benefiting the Daughters of Bulgaria – women and girls who have been trafficked and sexually exploited. As the ‘commissioner’, Lowell will have the first opportunity to acquire the pipe from ThePipeSteward Store. Thanks for joining me!


Nice job Dal! One thing that I would request, is to always show a close up shot of the nomenclature. 20 years from now, someone may be trying to find out the era, etc and that photo is always helpful (now and then!)
LikeLike
Al, I believe that Dal included photos of the stamping early in the blog…
LikeLike
Reblogged this on The Pipe Steward.
LikeLike