Blog by Dal Stanton
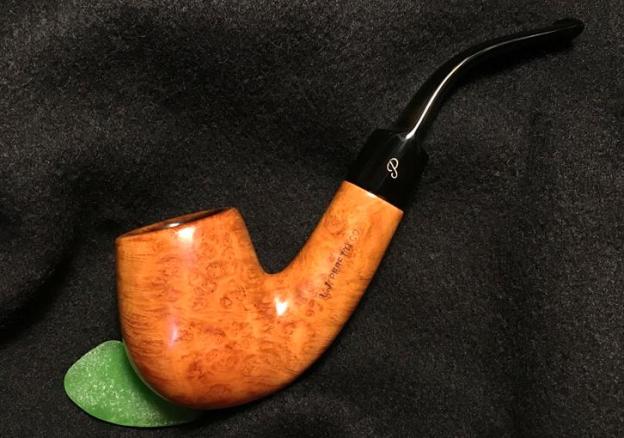
I have been placing several L. J. Peretti pipes in the hands of new stewards which brings me much satisfaction! The others were all Oom Pauls – classic Oom Paul’s and some slightly modified by Peretti to serve as Oom Paul sitters. After I was introduced to L. J. Peretti pipes and restored some that I added to my own collection, I started keeping my eyes open for these pipes because I discovered they were pretty good smokers and that the briar used to make them was not bad – actually, was quite good. When I saw the Peretti Lot of 10 on the eBay auction block with the seller’s location nearby Peretti’s home of Boston, I figured (correctly) that these all came from a Peretti collector who lived in Boston or near enough to know the Peretti story. The L. J. Peretti Co. is the 2nd oldest Tobacconist shop in the US – where custom blends are still created by hand. Here is the picture I saw on eBay.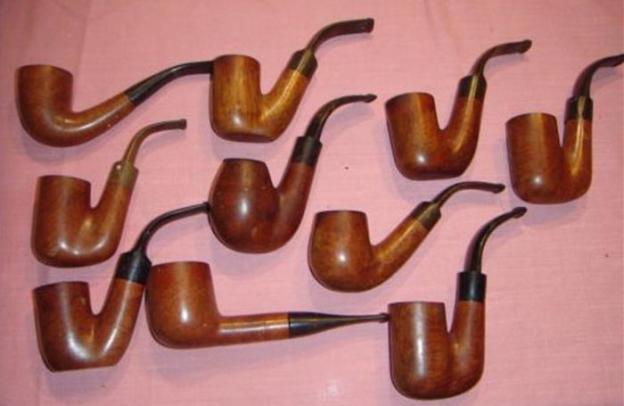 The Peretti on my worktable now is the Billiard Half Bent Saddle on the right, center in the picture above. Two things stood out when I cradled this Billiard in my palm for the first time. First, the stem has the classy cursive Peretti ‘P’ stamped on it. Only a few in the Lot of 10 had this stamp. Only hazarding a guess, but this may indicate a higher-grade line in the Peretti offerings – though I haven’t laid my eyes on anything that could confirm this, catalogues, etc. It is a classy touch to have the ‘P’ embedded on the stem. Secondly, this Billiard is a big boy! Just comparing him to the hefty Oom Pauls in the photograph above shows that this Billiard is not shrinking away in embarrassment! The bowl is full and the shank is long and broad. His dimensions are Length: 5 7/8 inches, Height: 2 inches, Rim Diameter: 1 5/16 inches, Chamber Diameter: 1 7/8 inches, Bowl depth: 1 3/4 inches. I also put him on the scale and he weighs 57 grams.
Our cousin, Stephen, who my wife and I visited while we were in the US some months ago, saw the Peretti Lot of 10 when I posted a picture of the 10 offering the Oom Pauls to new stewards to be commissioned. He responded but he wasn’t interested in an Oom Paul. He was drawn to the Half Bent Billiard because it reminded him of a pipe he had earlier in life. I was glad to restore the Billiard for Stephen because I remembered that during our visit to his home in Alabama, he saw my restored L. J. Peretti HUGE Bent Egg in my pipe pouch – also from the Lot of 10 pictured above – center, left and pictured below after being restored (See LINK for restoration), and Stephen tried to barter him away from me! Who could blame him?! I held firm and my Peretti Egg and I continue to have regular fellowship here in Bulgaria! Thank you, Stephen! Since Stephen commissioned this Peretti, he will have first dibs on it when I put it in The Pipe Steward Store. This pipe benefits our work here in Bulgaria helping trafficked and sexually exploited women and girls (and their children!) – the Daughters of Bulgaria. Bringing the Half Bent Billiard on my worktable here in Sofia, Bulgaria, I take some pictures to take a closer look as well as to assess what this Billiard’s challenges are.

 As with all his Peretti cousins in the Lot of 10, the L. P. Peretti Co. is stamped on the left side of the shank. Some of the other Perettis are without the ‘Co.’ As noted above, this Peretti also has the cursive ‘P’ stamped nicely on the stem. Only a few of the Perettis had this stamp in the Lot. This Billiard shares with all his cousins the thick cake in the chamber. It also has very thick lava flow on the rim. It is also most likely, as with the other Perettis, that there will be scorching damage underneath the lava. The briar surface is dirty – lots of grime, but this should clean up nicely, as with the other Perettis, this large patch of Billiard briar shows great promise. The stem is also showing deep oxidation and calcification on the stem – especially on the bit. As with all his cousins, the bit and button show a good bit of biting, clenching and the subsequent dents, chatter and button damage.
To start the restoration of this hefty Peretti Billiard Half Bent Saddle, I add the stem to a bath of Before and After Deoxidizer. This was the first time I used the Before and After product and I was testing it to see how it worked. The Peretti Billiard joined several pipes and their stems in the queue. After soaking for several hours, I fished out the Billiard’s stem and allowed the Deoxidizer to drain. I then wiped off the oxidation with a cotton pad wetted with light paraffin oil, Bulgaria’s mineral oil. One of the attributes of Before and After Deoxidizer is that it is stamp friendly, which proves to be the case with the Peretti ‘P’. 
 With the stummel now in hand, I use the Pipnet Reaming Kit to remove the very thick cake resident in the chamber. By removing the cake down to the briar gives it a fresh start and enables me to examine the chamber wall for damage. After putting down paper towel for easier cleanup, I start with the smallest blade. I use 3 of the 4 blades available in the Pipnet Kit. I then fine tune the reaming by using the Savinelli Fitsall Tool to scrape the chamber walls removing more carbon cake left behind. Wrapping a piece of 240 grit paper around a Sharpie Pen, I sand the chamber. Finally, I clean the chamber of the carbon dust using cotton pads with isopropyl 95%. The chamber walls look great – no problems. The pictures show the steps in the process.

 Now to the external surface. I use undiluted Murphy’s Oil Soap and cotton pads to scrub the grime – and there’s plenty of it. I also work on the crusty rim surface utilizing a brass brush and scraping with my thumb nail. I also employ a pin knife to help scrape the crust. What emerges is beautiful grain on the stummel – large swirling bird’s eye catches my eye. Surprisingly, a nice looking, slightly rounded rim emerges from underneath all the crust! The briar on the rim reveals that this was a nice-looking pipe at one time – I’m thinking it was on Peretti’s upper scale shelf. The scorching on the inside of the rim is significant and will need to be addressed.
 Next, the dirty job. Using pipe cleaners and cotton buds dipped in isopropyl 95% I attack the internals of the stummel. I also utilize a dental spatula to scrape the mortise walls. With a little effort the buds and pipe cleaners started coming clean. As I usually do with all my restorations, I follow this cleaning with a kosher salt/alcohol soak. I find that this additionally cleans the internal briar and freshens the internals. After putting the stummel in an egg carton to keep it upright and stable, I fill the bowl with kosher salt which leaves no aftertaste (as iodized salt does). I then fashion a ‘wick’ by stretching and twisting a cotton ball which is inserted down into the draft hole and mortise – as far down as I can manage. I then fill the bowl with isopropyl 95% alcohol until it surfaces over the salt. After a few minutes, after the alcohol has been absorbed, I will top the alcohol off again. I put the stummel aside and let it soak through the work day until I return home this evening.
 Later, when I arrive home from work, I’m always pleased to see the nasty results of the salt/alcohol bath. The salt has discolored, and the wick has absorbed the grunge. I thump the old salt into the waste, wipe the bowl with paper towel and blow through the mortise to dislodge any remnants of salt from the soak. To make sure all was clean, I ran a pipe cleaner through the draft hole and plunged a cotton bud in the mortise – both dipped in isopropyl 95%, and both came out clean. Done – always a nice place to be.
 I turn now to the chewed up and dented stem – oh my. The entire Peretti Lot of 10 I determined came from one steward. One of the ways I determined this was that all the stems were clenched the same way and therefore reveal the same forensics! I take a few pictures to show the problems with upper and lower bit and button. The first step I use is using flame to heat the vulcanite which expands it making the dents less severe and more easily sanded. I use a Bic lighter and paint the upper and lower bit areas. I concentrate on the button as well. After several cycles of ‘painting’ I have come to the point where the vulcanite is no longer expanding. It has helped but there remains some denting and bite marks. I pair the before and after ‘flame painting`’ pictures to let you compare. I think the button benefited most.

 Using 240 sanding paper, I sand both upper and lower bit and the button to see how much of the damage can be sanded out. The heating technique helped more than I realized – good news. The upper bit sanded out completely. The lower bit still shows two dents. Using the flat needle file, I worked on the button and refreshed the upper and lower button lips. The draft hole was dented too. I pull out the topping board with 240 paper on it and ‘top’ the button to flatten it out. I smooth out the draft hole using a rounded needle file. I take a picture to show the progress of the 240 paper and file work.

 When I look at the stem I see something I didn’t see before. A hole in the stem on the right at the base of the saddle. I’ve never seen this before. I’ll need to patch it as well. I wipe the stem with alcohol to clean the area where I will apply black CA glue to fill the dents. After clean, using a toothpick, I spot drop black CA glue on both dents on the lower bit. The toothpick allows me to control where and how much glue I apply. I wait an hour or so for the glue to set and then turn over the stem and spot drop glue on the ‘saddle’ hole. I set the stem aside for the patches to cure for several hours.
 With the stem patch curing, I turn again to the stummel and the rim. The scorched briar needs to be removed and topping the stummel will move in that direction. Like all the Peretti Billiard’s cousins in the Lot of 10, the left side seems to have borne the brunt. I’m hoping I only need to top a small amount and remove the remaining scorched wood on the internal rim edge by introducing a bevel. That’s the plan. Placing 240 grit paper on the chopping block, I top by moving the inverted stummel in a circular motion and evenly as possible.
 I stop to check a number of times how much progress has been made on removing the scorched briar.
 At this point, I’ve removed enough damaged surface via topping leaving a manageable internal ring of charred material that can be removed without taking more healthy briar. I use a rolled piece of 120 coarse sanding paper to cut an internal bevel and remove the scorched area. I also aim at balancing the round of the rim – it is slightly out of round because of the greater damage on the left side of the bowl where the former steward lit his tobacco. After cutting the bevel with 120, I give another very light topping with 240 grit paper to restate the rim line after the bevel.
 I follow the 240 topping board and 120 paper beveling by using 240 grade paper to erase the scratches of the 120 beveling. Then, I use 600 grade both to erase the scratches of the 240 on the bevel, but to top again lightly the stummel with the 600 grade paper to erase 240 scratches and to smooth.
 Finally, I introduce a very gentle external bevel around the rim using 240 then 600. I do this to soften the look of the rim and to give it more of a rounded appearance. I’m pleased with the rim repair. This Peretti Big Boy Billiard has already come a long way from the caked, scorched condition he arrived in! He’s looking good.
 Now to the briar surface – and there’s a lot of briar real estate on this stummel! I begin by wet sanding with micromesh pads 1500 to 2400. Then dry sanding, I use 3200 to 4000 and 6000 to 12000. I take a picture after each set of three. I enjoy watching the grain emerge on the Peretti Billiard through the micromesh pad cycles – it’s an amazing transformation. Along with most of his Peretti cousins, the briar seems to be a higher grade – no fills and the grain is beautiful.

 To maintain the rich natural briar look consistent with the Peretti hue template, yet to deepen and make the briar grain richer, I use Before and After Restoration Balm. I apply the Balm to my finger and then spread it over the stummel and work it in to the briar. The Balm begins as an oily liquid and then gradually grows firmer until it takes on the characteristics of a thick wax. After I work the Balm in well, I put the stummel on the stand to absorb the Balm for several minutes and take a picture. I then wipe the stummel with a clean cotton cloth to remove the Balm residue and buff up the surface. I put the stummel to the side and turn my focus again to the stem.
 After the black CA glue patches have thoroughly cured, I first use 240 sanding paper to do the initial removal of excess patch and blending. I continue to shape and fine tune the button lips with the 240 as well as remove the patch excess and smooth the saddle hole on the side. Then, to erase the tracks of the 240, I use 600 grade paper.

 To erase the scratches of the 600, I buff the entire stem with 0000 grade steel wool which leaves a good evenly prepared surface to begin the micromesh pad cycles. I like the way the chewed bit came out.
 Now, using micromesh pads 1500 to 2400 grade, I wet sand the stem. It was going so well until it wasn’t! After starting the second cycle dry sanding with pads 3200 to 4000, I see what I didn’t see before. As the lower bit was glossing up because of the micromesh sanding, a small dimple remnant of the lower bit dent became visible to me – ugh. When it comes to restoring pipes (and with many things in life 😊) I’m a stickler for detail and even though I’m well advanced in the stem finishing process, this dimple will not stand! I wipe the spot with alcohol to assure that it is clean and I spot-drop Special T CA glue on the dent. This glue is extra thick because I want the drop to stop on the spot and not run over the stem as thinner CA glue tends to do. I’ll spare you all the pictures of starting over filing, sanding, steel wooling and micromeshing pads catching this dimple patch up, so let it suffice to show the before and after, and then we move on. Starting with the completion of pads 1500 to 2400:
 The discovery. Before….
 And after….
 Now moving on to dry sanding with pads 3200 to 4000 and 6000 to 12000. To revitalize the vulcanite, after each cycle of three I apply Obsidian Oil. The stem looks great even though I encountered a significant detour along the way. I love the pop of vulcanite that has been fine-tuned with micromesh pads!
 The home stretch! As I reunite the half-bent saddle with the stummel to begin the compound buffing cycle I discover that the union between stem and stummel has loosened. As sometimes can happen during the cleaning process, the mortise can be opened, and the result is that the tenon is not as snug. To remedy this and to tighten the mortise/tenon union a bit, I use the flat end of a drill bit just a little larger than the diameter of the tenon draft hole. I heat the vulcanite tenon with a small flame and as it warms the vulcanite it becomes pliable and gradually I insert the drill bit into the airway. This expands the mortise a bit and hopefully, creates a better fit. The approach works perfectly even though it required two enlarging drill bits to provide a snug union.
  With stem and stummel reunited with a good fit, I mount a cotton cloth buffing wheel to the Dremel and set the speed to the slowest. Using Blue Diamond compound, I apply it to the stummel and stem using a slow, methodical, circular approach, not applying too much pressure to the buffing wheel, but allowing the speed of the Dremel and compound to do the work. With my wife’s assistance, I include a picture showing this below. After completing the Blue Diamond application, I mount another cotton cloth buffing wheel dedicated to the application of wax. After increasing the speed to about 40% of full power, I apply the carnauba wax in the same way as the compound. Afterwards, I use a microfiber cloth and give the pipe a brisk hand buffing to raise the shine.
 None of the Peretti pipes that I’ve restored thus far have disappointed. They arrived on my worktable in rough shape with scorching and chewed bits. This L. J. Peretti Co. Billiard Half Bent Saddle was no exception. The briar grain showcased in the large bowl reveals swirls of large bird’s eye pattern and horizontal straight grain in a whimsical contrast. The grain flow reminds me of pictures of Jupiter’s atmosphere intermingling! The distinctive Peretti “P” stamping stands out nicely imbedded in the glassy shine of the half bent saddle stem. Cousin Stephen commissioned this hefty Peretti Billiard and will have first dibs on it in The Pipe Steward Store. This pipe benefits women and girls (and their children) that we work with here in Bulgaria, who have been trafficked and sexually exploited – the Daughters of Bulgaria. Thank you for joining me!


Reblogged this on The Pipe Steward.
LikeLike