Blog by Kenneth Lieblich
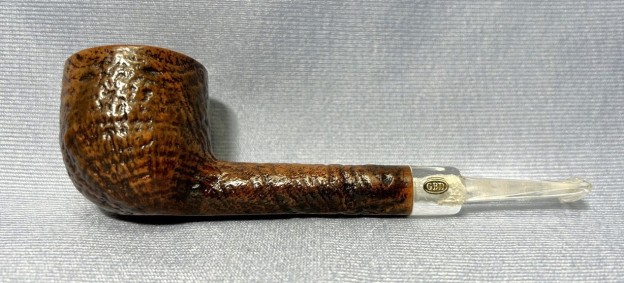
Here’s another terrific pipe from my gentleman customer in Washington. This is a GBD Prehistoric 9493 pot with a Perspex stem – well, it’s officially listed as a pot, but some (like Greg Pease) call it a long-shank pot, and I thought it was a lovat when I first saw it. I’m arbitrarily calling it a “lovat pot” – so there!
 I love GBDs and I was delighted to work on this one. However, there was one significant issue: a very thin, but very long, crack on the underside of the bowl. As the English say, I would have to use all of my “nous” to repair it without making it look like a dog’s breakfast.


 Let’s look at the pipe’s markings. On the underside, going from left to right, we see GBD in an oval (albeit very worn); next to that is the word Prehistoric; next to that are the words London England; and, finally, next to that is the shape number 9493. I wouldn’t like to hazard a guess on the specific age of this pipe, other than to say that the brass oval on the stem suggests that it (fortunately) predates the merger Comoy’s. This pipe is likely from the 1960s or 1970s.
 A page from a 1961 GBD catalogue shows our shape (if not the model). It reads, “#9493 – Large Pot, Long Shank, Flat Saddle Mouthpiece”. That matches our pipe’s description.
 Let’s start with the Perspex stem. As an aside, Perspex simply means a type of clear, cast acrylic. GBD has used it since the 1930s, apparently. As I’ve mentioned in previous blog posts on acrylic stems, they are tricky to get completely clean because the tobacco stains the material quite thoroughly. This one wasn’t too bad and I worked hard on this one – using dental tools, pipe cleaners, and alcohol. Having had some success with other acrylic stems, I also used SoftScrub on some pipe cleaners for further scrubbing. I was pleased with the results.
 There were a few tooth marks, etc. on the stem, and I addressed those by filling them with some clear cyanoacrylate adhesive. Once that had cured, I sanded the stem down – first with some sandpaper, then with my Micromesh pads and pipe stem oil. I was really pleased with the way it came out in the end. Lovely shine!

 On to the stummel, and the usual cleaning procedures were in order for this pipe. The bowl was quite wide and I used both the KleenReem and the PipNet to remove the built-up cake, and followed that with 220-grit sandpaper to remove as much as I could. I wanted to take the bowl down to bare briar. Unfortunately, there were many heat fissures on the inside of the bowl. I would address those later.

 I then proceeded to clean out the insides of the shank with cotton swabs, pipe cleaners, and isopropyl alcohol. There was quite a bit of filth inside this stummel – it took many pipe cleaners et cetera to clean it out. As usual, I followed that up by cleaning the insides with some soap and tube brushes. In fact, at that point, I took the opportunity to also use a toothbrush and gently clean the sandblast. Much improved.


 I decided to de-ghost the pipe in order to remove any lingering smells of the past. I thrust cotton balls into the bowl and the shank and saturated them with 99% isopropyl alcohol. I let the stummel sit overnight. This caused any remaining oils, tars and smells to leach out into the cotton. The bowl was nice and clean after this.
 Now on to the tricky business of repairing that long crack on the underside of the bowl. The technique I use for repairing these is one I learned from Steve long ago. It involves drilling a tiny hole at the very end of the crack to stop it from progressing any further in years to come. Now, it’s often challenging at the best of times to find the end of a crack on a smooth bowl, but it’s nigh on impossible on a sandblasted one! Nonetheless, I took my time and ever so carefully searched and found the ends of the crack. I took my micro drill bit and delicately drilled a hole through the briar right at both ends of the crack. I then carefully laid a thin bead of CA glue along the crack and let it cure. This bead of glue was placed with a needle-nosed nozzle, so that excess glue wouldn’t be an issue around the crack. I obviously didn’t want to sand the sandblast, so being extra careful with the glue was important.


 The next step was to sand the rim down. I started with some sandpaper on a wooden sphere and then used my nine Micromesh pads. On the rest of the stummel, I only used the last couple of pads, as I didn’t want to lose any of the beautiful blast. Where it was required, I touched up a couple of spots on the wood with my furniture pens.

 Of course, I used my restoration balm and rubbed that into the wood to have its nourishing properties work on the wood. I left it set for 20 minutes or so. While I was waiting, I took some of my pipe mortar and lined the briar walls with it. It was necessary for repairing the fissures inside the bowl. It’ll make a world of difference to the long-term viability of this great pipe. Afterwards, I rubbed down the stummel with a microfibre cloth.
 Then it was off for a trip to the buffer. A dose of White Diamond and several coats of Conservator’s Wax were just what this pipe needed. The handsome sandblast just popped and looked great.
 This GBD Prehistoric 9493 lovat pot is much improved. I’m delighted and I’m sure my customer in Washington will be too. I hope you enjoyed reading the story of this pipe as much I as I did in restoring it. If you are interested in more of my work, please follow me here on Steve’s website or email me directly at kenneth@knightsofthepipe.com. Thank you very much for reading and, as always, I welcome and encourage your comments.


