Tag Archives: cutting a tenon

Finding a Hidden Gem Underneath all the Grit and Grime


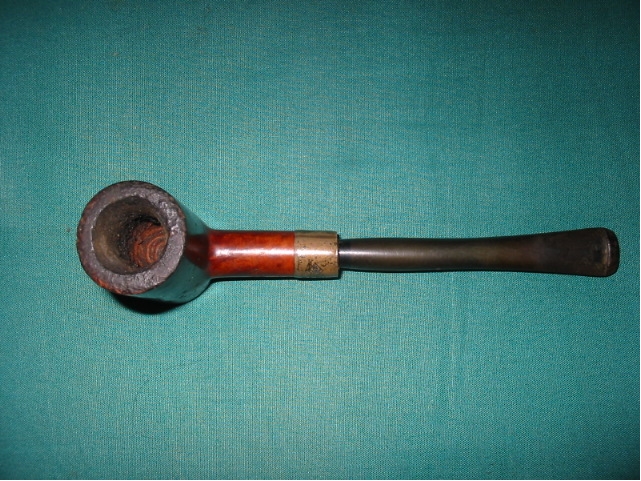
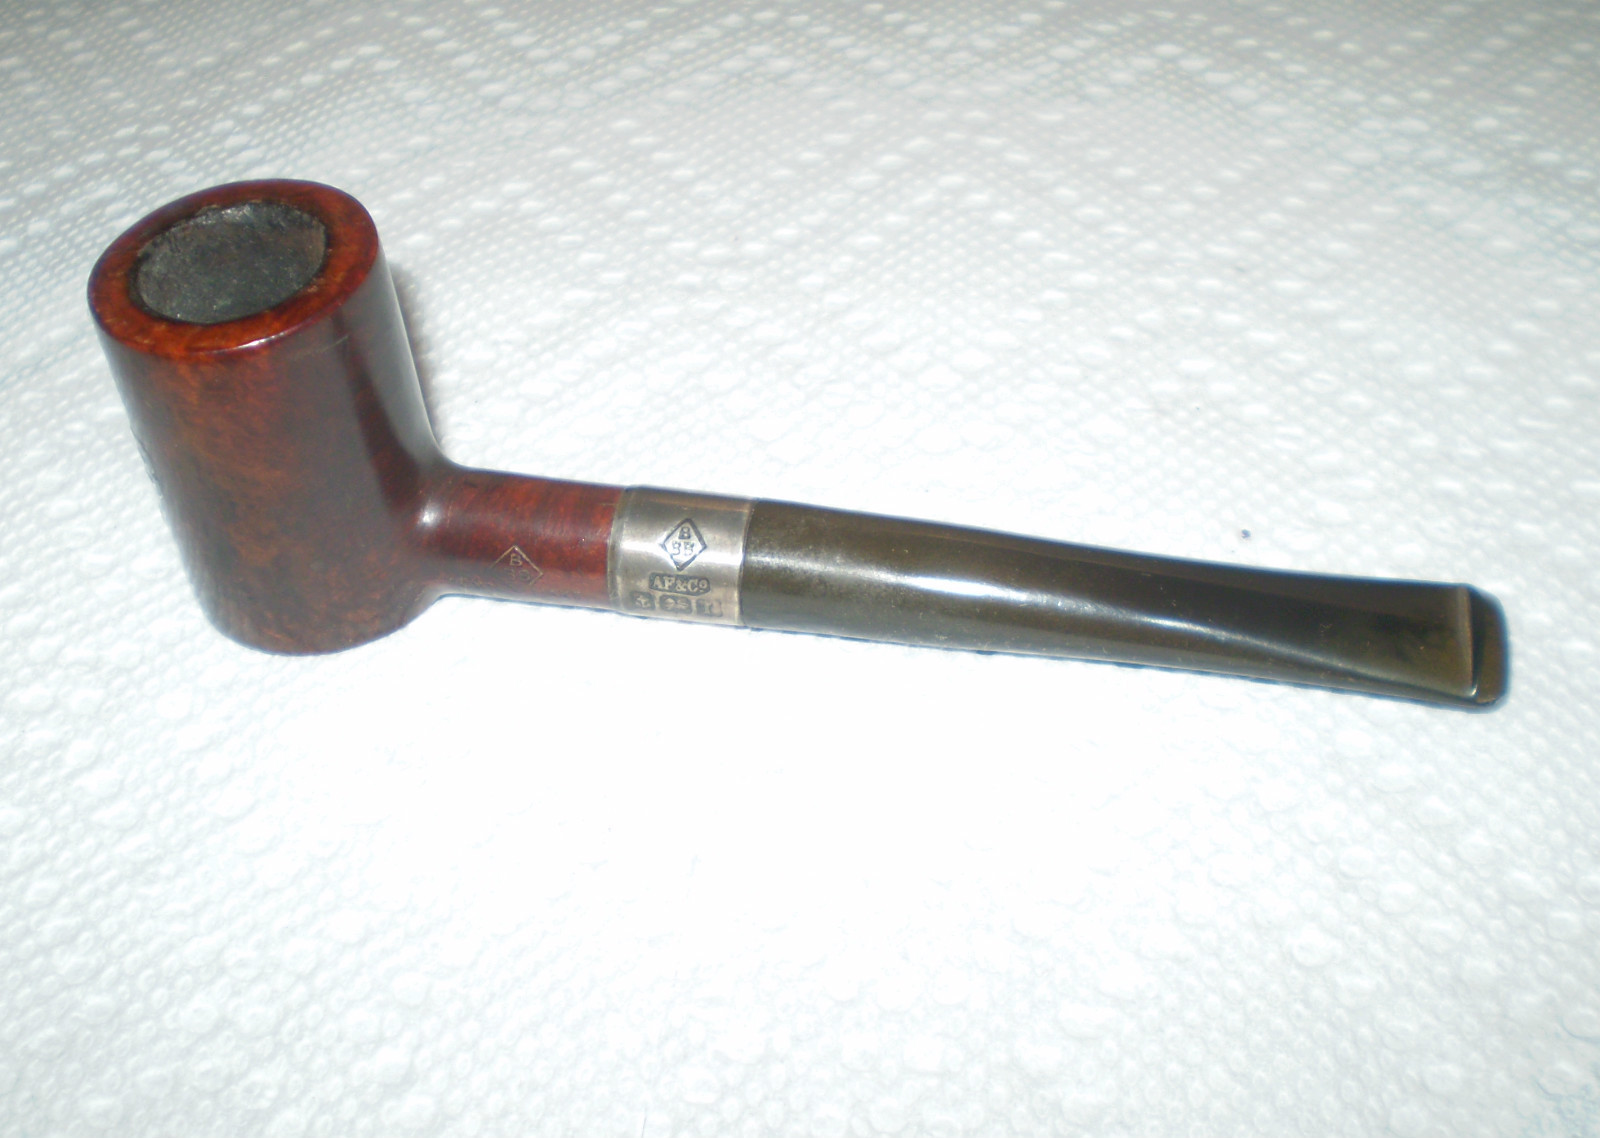
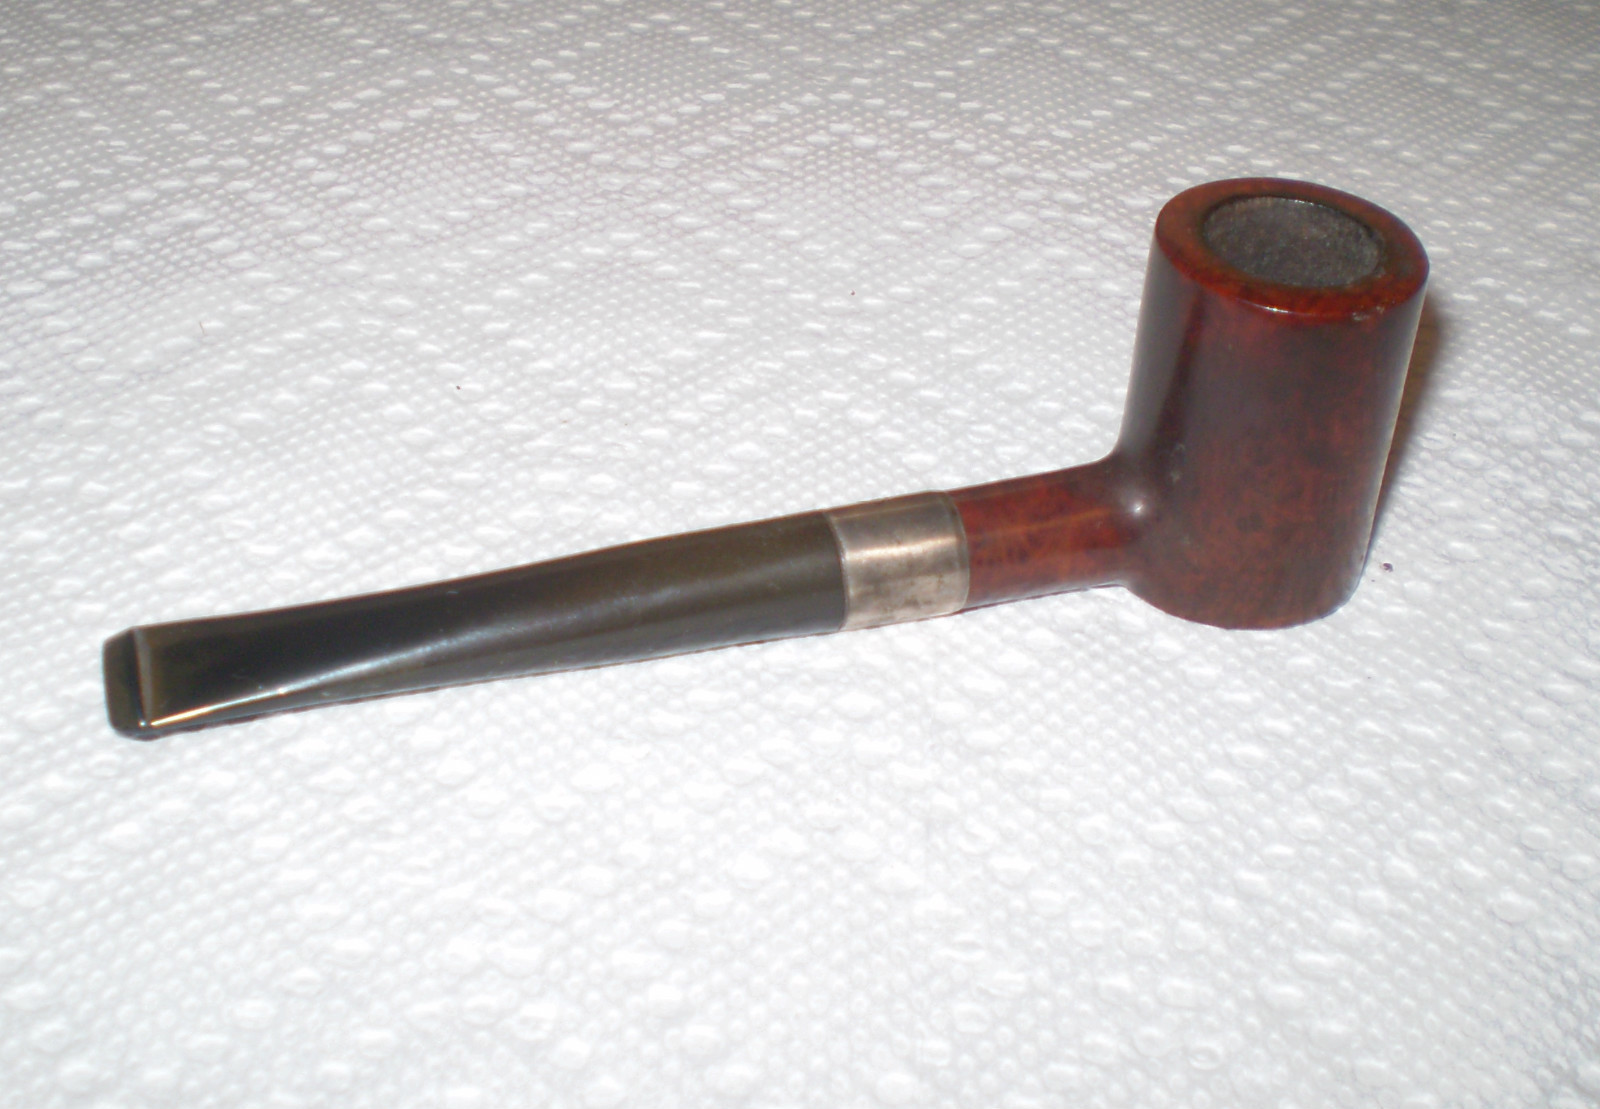
I went to work on the third pipe down in the far right column. It was one that I almost bypassed because of the shape it was in, but decided to take a chance and see what was underneath all of the mess. The stamping was long ago worn away by buffing. It had originally had a ferrule on the shank and that was missing. The bowl was badly caked and it was out of round from overzealous reaming. The finish was shot with thick black grime impregnated into the bowl finish all the way around. Underneath there appeared to be some nice grain. The missing ferrule left behind remnants of the glue that had held it in place. In the shank where the ferrule was missing were several fills – the only ones in the pipe. The size of the pipe is about a group 2 – kind of the classic size of an older billiard. The stem was missing so it would need to have one made to fit.

bowls1

Noname

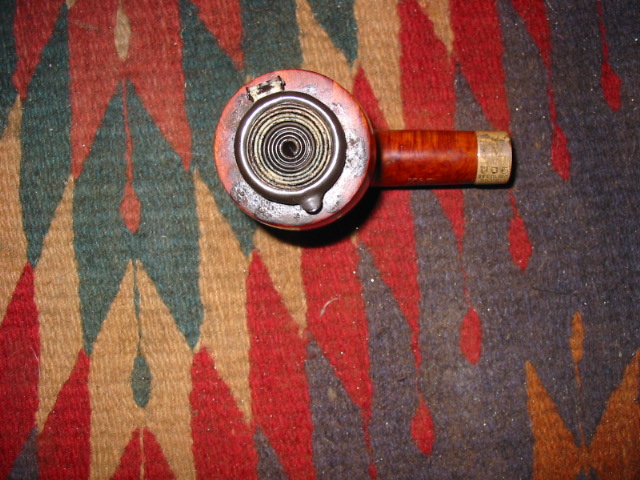
The next series of photos shows the build up on the outside of the bowl. Not only was it badly caked it also was covered with a grey/black grime that would be challenging.

IMG_1258

IMG_1259

IMG_1255

IMG_1256

IMG_1257

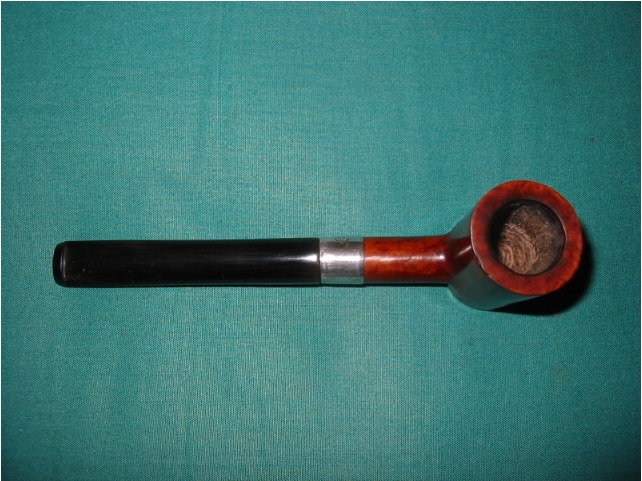
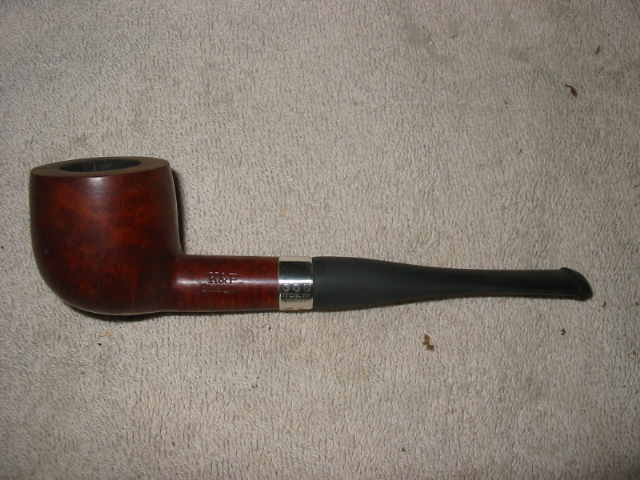
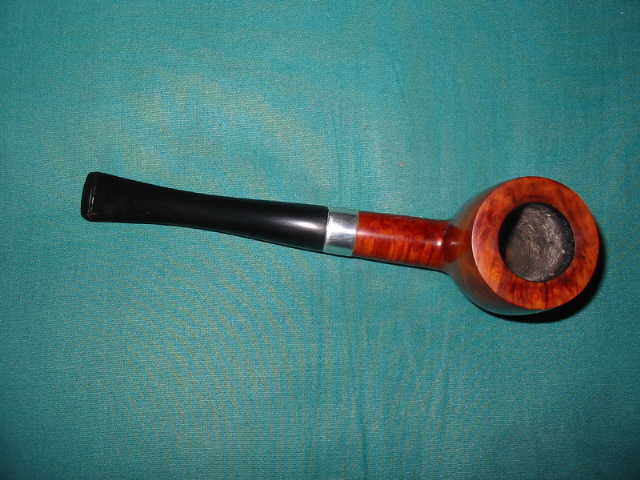
I used acetone and cotton pads to remove the external grime on the bowl (Photos 1 – 2 below). There was actually some nice grain underneath all the grime. I reamed the bowl with a PipNet reamer starting with the smallest cutting head and working my way up to the largest that would fit the bowl. I wanted to ream it back to bare wood so that I could work on the damaged inner rim (Photo 3 below). I topped the bowl to remove the damage to the top of the rim and clean up the outer edges of the rim. I used my normal method of a piece of sandpaper on a flat surface and pushing the bowl into the sandpaper and rotating it to remove the damaged briar (Photo 4 – 5). I also push a nickel band onto the shank part way. I would later need to heat it to get a pressure fit deep on the shank. This band would both strengthen the thin walls of the mortise at the end and also cover the only fills present on the pipe.

IMG_1260

IMG_1261

IMG_1262

IMG_1263

IMG_1264

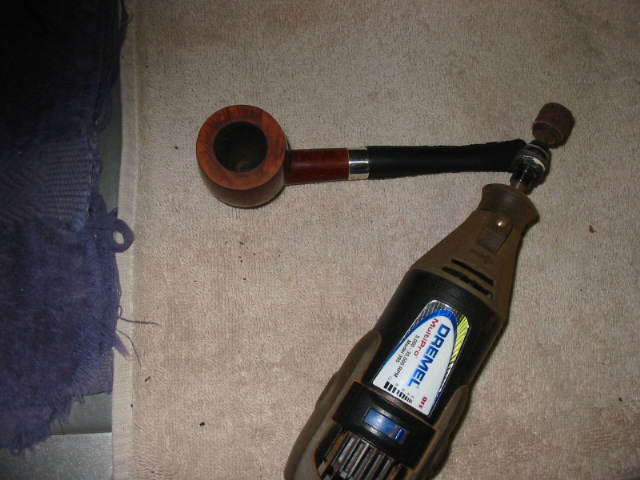
I used a Dremel with a sanding drum to work on the roundness of the bowl. I worked to even out the distance between the inner edge of the rim and the outer edge. Once this was completed I used sandpaper to smooth out the edge and give it a slight bevel (Photo 1). I wiped down the bowl and rim with acetone on a cotton pad to clean off the last of the dust and grime from the reaming and sanding (Photos 2 – 3).

IMG_1265

IMG_1266

IMG_1267

I set up the heat gun and turned it to the high setting. I held the band over the heat and rotated it to evenly heat the entire band (Photo 1). Once it was heated (just a few minutes) I then took it to the work table and pressed the band in place on a metal plate I use for setting the bands. Sometimes this takes several trips between the heat and the plate but this time one trip was all it took and the band was set (Photos 2 – 3).

IMG_1268

IMG_1269

IMG_1270

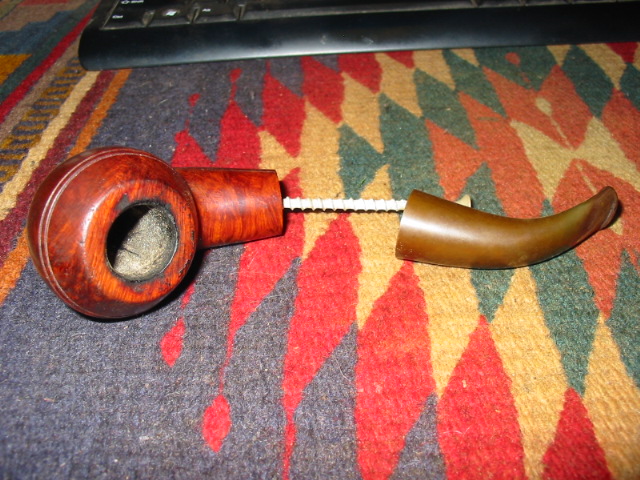
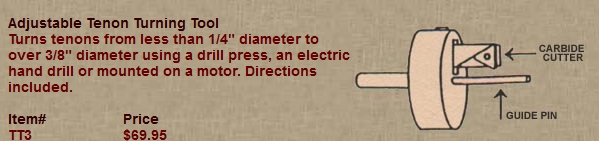
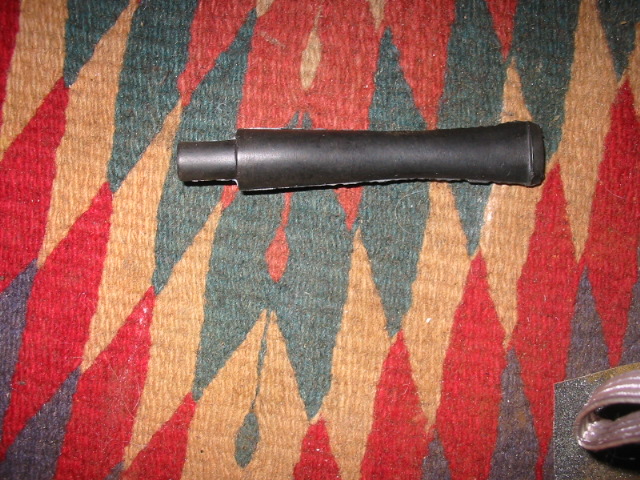
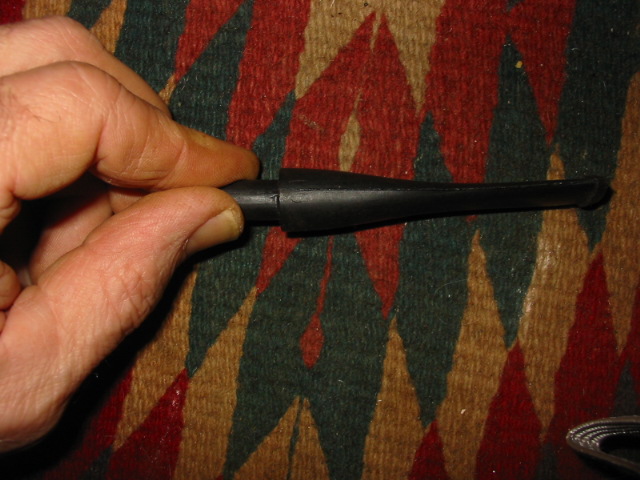
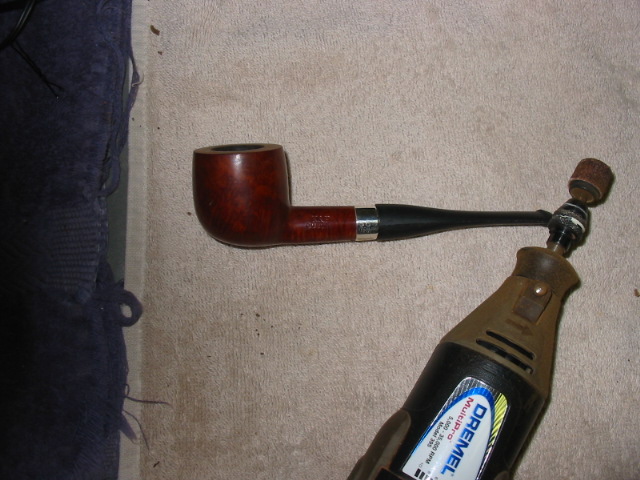
I used a PIMO tenon turning tool to turn the tenon to fit the mortise. I generally turn it until it is close and then finish the fit by hand with sandpaper (Photo 1). After sanding the stem fit quite well in terms of the tenon. It was snug and flush against the shank – no light showing through (Photos 2 -3). I used the Dremel with a sanding drum to remove the excess vulcanite on the stem and to shape it to match the diameter of the shank. I sand carefully with the sanding drum to bring it as close as possible to the size I want. You have to be careful and steady so that you do not nick the shank or the band while doing this. The finishing fit is done by hand with files and sandpaper (Photos 4 – 5).

IMG_1275

IMG_1276

IMG_1277

IMG_1278

IMG_1279

The next series of seven photos show the shaping process. I begin with a medium grit emery paper and sand out the scratches left behind by the Dremel. I shape the stem with this paper to the point where the flow and fit of the stem is what I am looking for (Photos 1 – 2). I then move on to 220 grit sandpaper and continue to remove the scratches and shape the stem (Photos 3 – 4). It then finish this shaping with a fine grit sanding sponge and polish out more of the scratches. Each grit of paper brings the stem closer to the finished shape (Photos 5 – 7).

IMG_1280

IMG_1281

IMG_1289

IMG_1290

IMG_1293

IMG_1294

IMG_1295

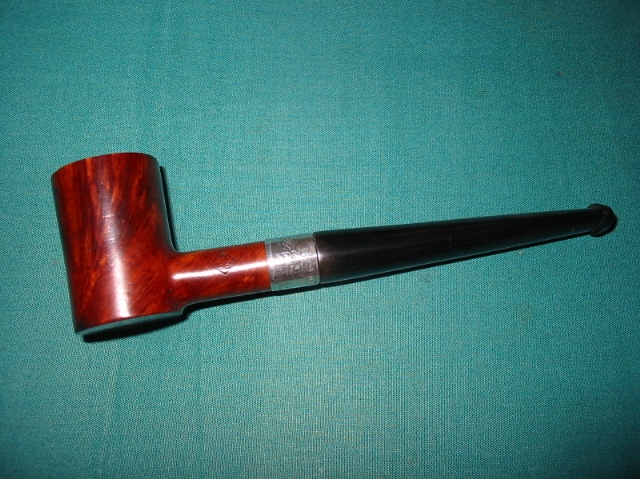
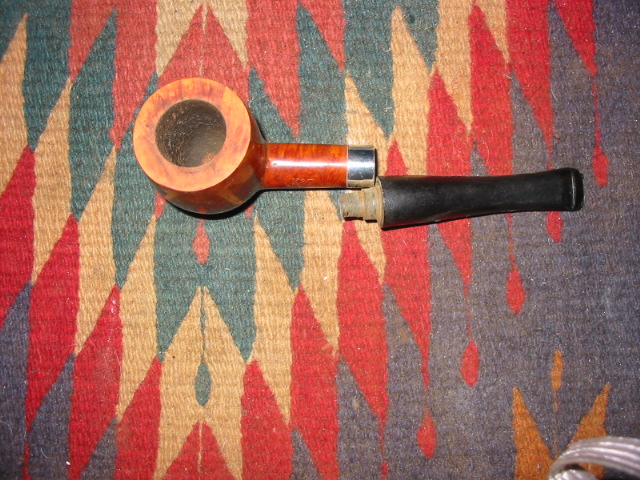
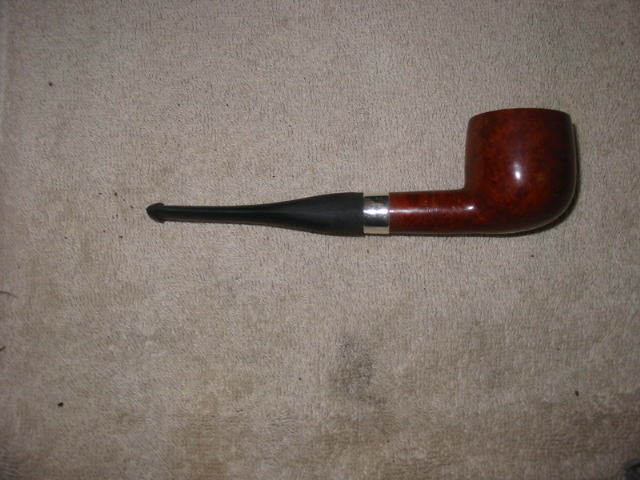
I apologize for the graininess of the next two photos but they show the bowl after I had stained it. I used a dark brown aniline stain thinned with one part alcohol. I wanted a rich reddish brown colour on this old timer so I thinned the stain to match the colour I wanted. I applied it to the bowl and rim, flamed it, reapplied it and flamed it again.

IMG_1299

IMG_1300

IMG_1301

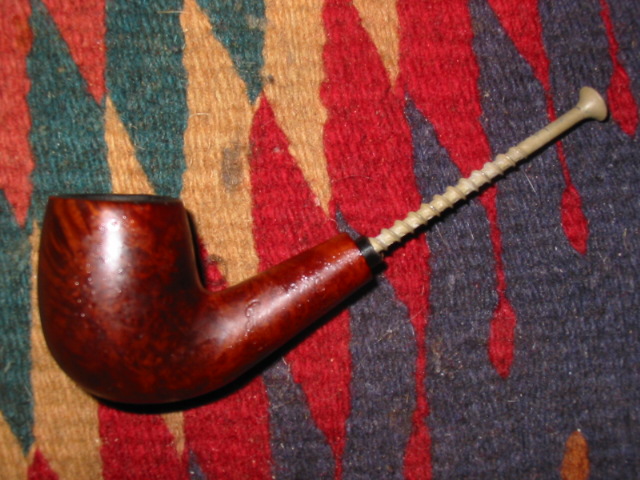
I worked on the stem with micromesh sanding pads. I also sanded the nickel band to bring out a polish to it as well. The next series of seven photos shows the progressive shine that comes to the stem with each successive grit of micromesh from 1500-12,000 grit. I wet sanded with the 1500-2400 grit and then dry sanded with the remaining grits.

IMG_1313

IMG_1314

IMG_1315

IMG_1316

IMG_1317

IMG_1318

IMG_1319

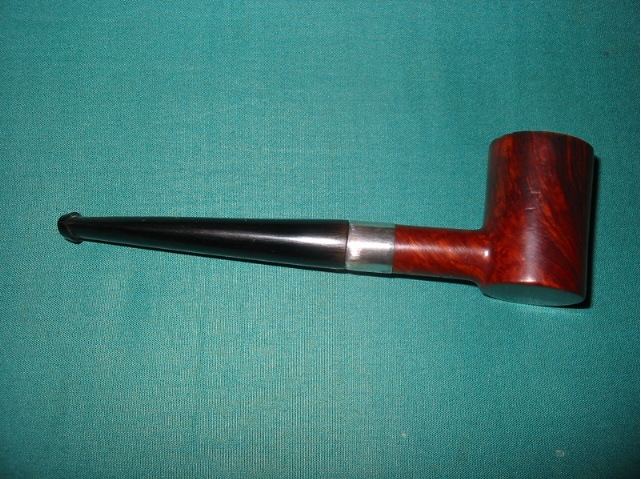
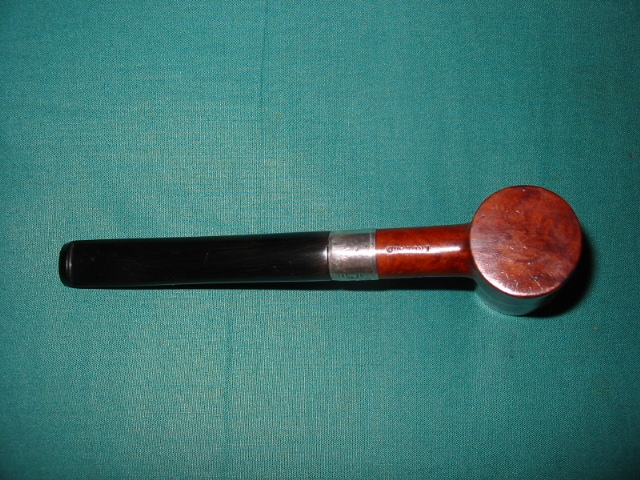
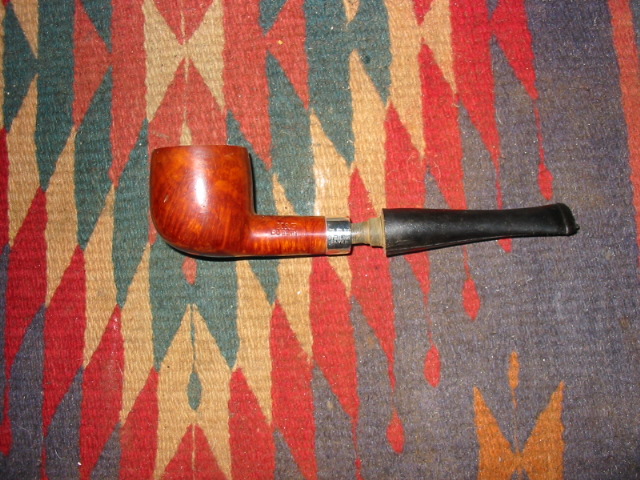
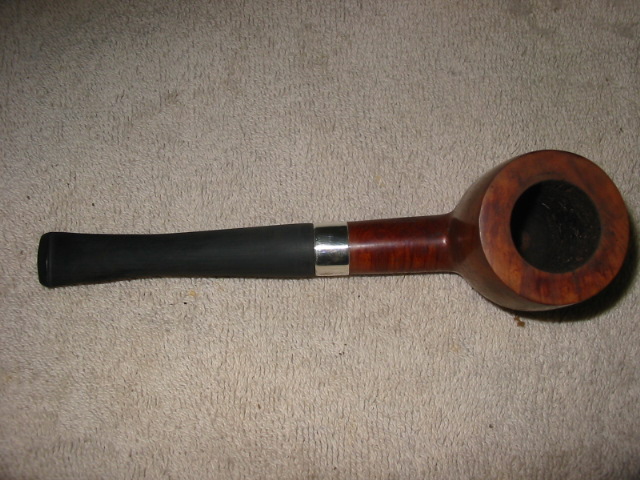
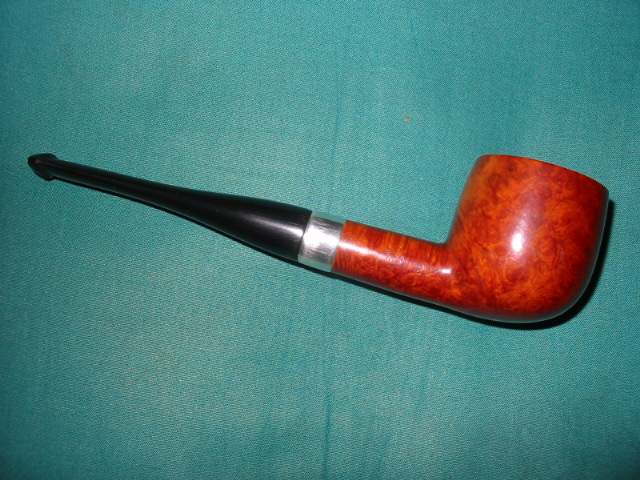
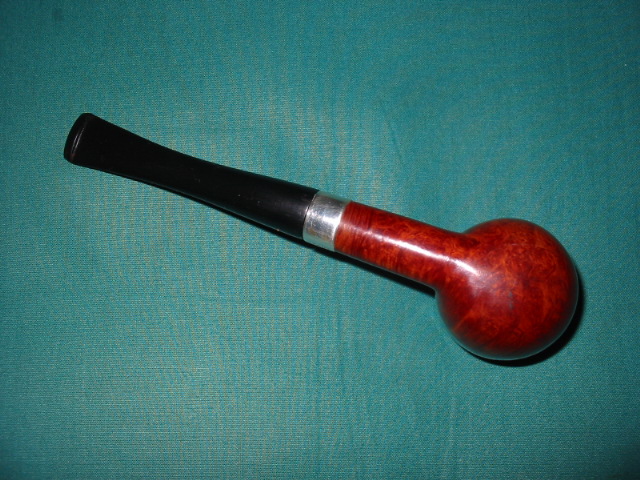
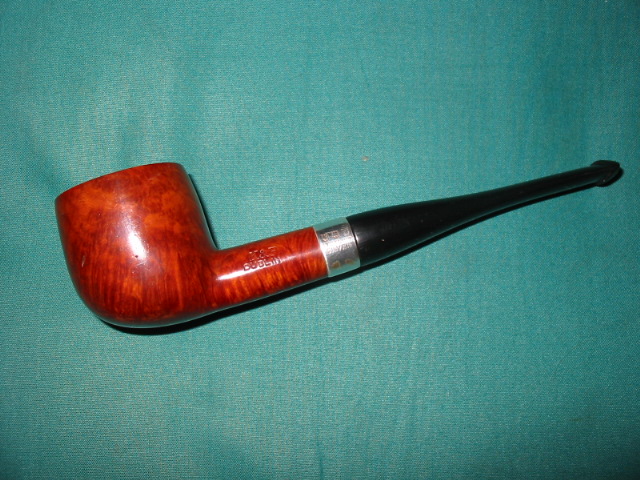
I sanded the bowl with the higher grits of micromesh and then buffed the pipe with White Diamond to give the entirety a rich shine. I applied several coats of carnauba wax and buffed it with a soft flannel buff. The stain really highlights some of the beautiful grain on this pipe. I am glad I took the risk to bring this one back to life.

IMG_1321

IMG_1322

IMG_1323

IMG_1324

Restemming and Reclaiming an Old, Unsmoked Rex Bulldog


This is the second of the old unsmoked pipe bowls I picked up on EBay. It is one that I can find absolutely no information on anywhere. Some have thought it was a Barclay Rex but I can find nothing that would link it to that shop in NYC. It is stamped Rex in cursive script on the right side of the shank and also stamped Rex over Sterling on the band. It has the look and feel of an older English-made pipe. But I am not sure. The seller said it was from the late 1800’s but all attempts to contact them on the source of that information have remained unanswered. So it remains a bit of a mystery to me. It is one though that I will continue to hunt down until I can come up with something. This shape is what is called in some of the older catalogues a Bulldog. I personally am not sure what to call it. It has the shape of a bulldog on the bowl and the double ring separating the bottom of the bowl from the cap. The shank however, is oval. It has a factory installed band on it that is also stamped Rex. The script on the shank is in gold leaf. The bowl is very clean. There was a small crack in the shank on the shank at about one o’clock looking toward the bowl. This may have been the reason for the band or the band may have been decorative. There was no stem with this pipe so I was not sure of the length of the stem to make for it. The drilling is very interesting. It is drilled like some of the calabash bowls or bowls that were screwed onto Bakelite shank and bases in the late 1800s. It is directly in the bottom of the bowl and seems to have a small hollow chamber under the hole. The airway meets it directly underneath. I have not seen this drilling on briar pipes of newer eras. The bowl is smooth inside and almost polished. The briar is quite nice and sports mixed grains from cross grain to birdseye to flame around the bowl. The double cut rings are clean and are not clogged with wax or dirt. There appears to be a thin coat of shellac on the outside of the bowl to give it a shine as it shines with or without the application of wax. The silver band is interestingly shaped as well. It is somewhat conical – wider toward the bowl side and narrower on the stem side. There is also a stepped down lip on both sides of the band. Where it is on the bowl is stepped down to a small ring around the shank. On the stem side it is also stepped down. This would make fitting a stem to the shank a challenge. It was not too badly oxidized so it would clean up very easily. The first series of five photos are those taken by the Ebay seller and give a good idea of the look and condition of the pipe. The one thing not clear to me was the size of the pipe. I took a chance on it as the apparent age and the assumed age stated by the seller made the likelihood of it being smaller was very high. When it arrived it was indeed quite small. The bowl and shank are roughly 3 inches long without the stem. The height of the bowl is 1 5/8 inches. The inside diameter of the bowl is ¾ inches and the outside diameter is 1 ¼ inches.

Rex1

Rex2

Rex3

Rex4

Rex5

Once I started working on it the first decision that needed to be made was on the type and length of the stem to be used. I fitted several oval stems to the bowl – a standard length billiard type stem, a thicker and a thinner oval Canadian stem and a Lovat style saddle stem. The longer stem did not work well with the longer shank on the pipe. The thicker Canadian stem also made the stem look quite chunky and large as did the saddle stem of the Lovat. The stem I settled on was the thinner Canadian oval. Even this one would require considerable thinning to make for a proper fit against the bevel of the band. The first photo below shows the two Canadian taper style oval stems. I chose the bottom stem in the photo.

IMG_0968

I used the PIMO tenon turning tool to turn the tenon so that it would fit in the shank. The next three photos show the initial fit of the stem. You will note in the photos the gap where the bevel of the band lies. I had to make a decision to either leave the gap or work on the stem size so that it fit against the bevel and thus was slightly thinner than the shank prior to the band.

IMG_0969

IMG_0970

IMG_0971

I decided to thin the stem to fit against the bevel. I used the Dremel with a sanding drum to bring it close to the finished size. I then sanded it with medium grit emery paper to smooth out the scratches and grooves from the Dremel. Once I had most of the scratches removed I sanded it with a medium grit sanding sponge to further shape the stem and remove excess material. The next series of three photos show the fit of the stem after it was sanded with the sanding sponge (pink square in the photos).

IMG_0997

IMG_0998

IMG_0999

At this point in the process I had to take it back and sand off some more material with 340 grit sandpaper. It still was too thick to fit well. I also had to finesse the fit against the band with needle files as in some places it was not quite straight. When I had it fitting well I moved on to sanding with a 1500 grit micromesh sanding pad (the next two photos). I also did a small repair on the crack in the top of the shank. I pried it open slightly and dripped some clear super glue into the crack. It did not go all the way through into the shank which was interesting. It seemed to be a surface crack. The repair worked well. I polished that portion of the shank with the 1500 grit micromesh sanding pad as well to remove the slight excess of glue left behind (third photo below).

IMG_1000

IMG_1001

IMG_1002

After the repair I continued sanding and polishing the stem with 1800-12,000 grit micromesh sanding pads. The next four photos highlight the sanding/polishing process. Notice the slight hip on the stem at the band edge. In the photos this appears to be more drastic than it is in actual life. The fit is more of a pinched look.

IMG_1003

IMG_1004

IMG_1005

IMG_1006

The final series of four photos show the finished pipe. I buffed it with White Diamond and then gave it multiple coats of carnauba wax. I really like the stem and fit against this long shanked “Bulldog” bowl. The pipe glows with an age and patina that calls out to be smoked. This is yet another who will soon fulfill the purpose for which it was made.

IMG_1297

IMG_1298

IMG_1299

IMG_1300

Pulling a Broken Tenon


Over the years I have had my share of broken tenons to remove. Some of them came from carelessness on my part but others I purchased that way. I took pictures of the process I use on two different pipes recently. The first was a little Barling with a broken tenon and a chewed stem. I ended up restemming this one. The second one was a Peterson 999 with a broken tenon that I hope to reuse the stem by drilling/tapping and inserting a new tenon to refit it.

Image

Image

Insert a screw part way into the airway on the broken tenon in the shank of the pipe. I use a dry wall or gyprock screw. I turn the screw in by hand. I do not want to expand the tenon at all I just want the screw to have a little bite to it so that I can use it to pull the tenon out by hand or with a pair of needle nose pliers. In this case in both pipes I was not able to pull out the tenon easily. Many times I am able to pull it out in a matter of seconds using this method. But both of these were exceptionally tight and immovable. I put them both in the freezer for an hour as I know that vulcanite and briar contract at different rates with a change in temperature. After an hour I removed the Barling from the freezer and was able to pull the broken tenon out very easily. I then unscrew the broken piece and lay it aside to use for a match on the new tenon I will cut as a replacement. It helps me to eyeball the fit. I also measure the mortise and set the tenon turner as closely as possible to the measurements. I then take the broken piece and slide it on the tenon turner to check the fit.

The tenon on the Peterson however, still did not budge after an hour in the freezer. I left it in for another half hour. Still it did not budge. I then dripped Isopropyl alcohol into the exposed mortise and hoped that it would work as a solvent to break the tenon free. I repeated this several times and left the pipe sitting with alcohol in it over night. The next morning the tenon still did not move.

ImageImage

I decided to not fiddle around with trying to pull the tenon. I used my small drill bit and began to drill out the tenon. I never start with the exact size of the tenon but rather work with the size of the airway and work my way up. I have found that in the process of working through the bits the tenon inevitably breaks loose or crumbles to pieces. In this case, by the time I got to the third drill bit, when I reversed it the tenon came out with the bit. You will notice that I also flattened the broken portion of the tenon on the stem so that the surface was flat and smooth. I wanted it to be ready for when I would drill it out or tap to receive the new tenon that I have ordered.

ImageImage

As I close this essay I want to just mention a couple of reminders:

  1. Do not turn the screw into the airway to deeply as it does expand the airway and can actually crack the shank on the pipe. BE CAREFUL and go slowly.
  2. Do not use a tool to turn the screw into the airway – do it by hand so you can feel the progress and the bite before damage is done.
  3. If the tenon is stuck and immoveable in the first try put the pipe in the freezer for an hour or more to expand and contract the tenon and mortise. This usually works to break it free.
  4. Should you have to drill it out – use a bit a little larger than the airway to begin the process and work your way up to larger bits. Do not use a drill bit that is the size of the mortise lest you damage the mortise.
  5. Use a T handle hand drill not a power drill to do this as you can easily drill right through the bowl and ruin the pipe.

The 1912 BBB Poker


Blog by Steve Laug

I picked up this old 1912 BBB Poker on EBay not long ago. It is stamped BBB in a diamond on the shank and on the underside England. The silver is hallmarked Birmingham 1912. It is a smaller group 1 or 2 sized pipe. In the pictures the military stick bit looked like it belonged. It looked like it was shipped that way from the factory. The grime on the silver and on the shank as well as the oxidation on the stem made it appear to be that style of pipe. When it arrived with the other 5 pipes that I bought with it I examined it a bit more closely. In the picture below you can see the roughness of the stem. It is definitely poorly cut. The closer I looked the more I realized that it was a poor replication of an older stem. A BBB pipe of this age came with a different style of military stem and it had an orifice button rather than a slot like this one. The stick bit was not original as it was a slotted bit and was not finished smoothly. There were lots of file marks on both sides of the stem. When I removed the stem I was even more certain that it was a poor copy. The one thing I was still thinking was that it was definitely spigot or military bit pipe.

ImageImage

Then I began to work on the shank and the band. Someone had darkened the end of the shank to make it look almost black like the tarnished silver band. Once I cleaned the silver and cleaned the shank I could see that it was not a silver end cap at all but a very typical BBB silver band. In the picture below you can clearly see the end of the shank showing as it sits inside the silver band. I used a 1500 micromesh pad to clean off the end of the shank and return it to wood. When I re-stained the pipe I would also re-stain the shank end to match. It was clear that I would need to do a bit of research on what kind of stem was originally on this poker style pipe if I was to restore it to its original glory.

Image

I have a copy of the BBB Catalogue reprint from Gary Shrier so I got it out and went to work researching the look of the missing original stem. It became clear rather quickly that the pipe shape I had originally came with a taper stem with an orific button. In the catalogue is the exact shape in the exact size. I could not believe it. I laid the bowl on the page and then traced out the shape and size of the stem. A part of my hobby refurbishing is collecting old stems. I buy them wherever and whenever I find them and stockpile them in an old coffee can in my office. I went and got the can and emptied it on my desk to sort through what I had. I have yet to organize them by size so it is a matter of dumping the can out and digging through them. Well, I found one in my can of stems that had the right orifice button and the correct taper so I turned the tenon and fit the stem to the pipe. I used my Dremel to remove excess diameter from the stem so that it was the same diameter as the shank and band.

I also had to clean up the bowl of the pipe as the top was pretty beat up and the inside rim had been chipped and cut as if it had been carelessly reamed with a knife. I steamed the dents from the rim and carefully did a minor topping on the bowl to bring the top back to smooth and the inner and outer rim to smooth. I also chamfered or beveled the inner rim to bring it back into round. There were also dents on both sides of the bowl so I steamed those out as well. I use a wet cloth and a hot butter knife (heated over a flame) to raise the dents. I finished the work on the pipe by re-staining the top to match the bowl then buffed it and gave it a final polishing with White Diamond and then several coats of carnauba wax.

Here are pictures of the finished pipe. Other than being in colour it is a perfect match to the one in the catalogue.

ImageImageImageImage

Edit – 24 Feb. 2013 – I just came across an old BBB poker on eBay that is similar to the one above. I did some research on the stem on the one above and restemmed it. The one in the eBay photos is a newer version of the same pipe number. I have attached two photos below for sake of comparison.

BBB Poker BBB Poker 2

Fitting a pipe with a new stem – photo essay


Blog by Steve Laug

I picked up this pipe bowl – a Pete 207 – an early Peterson from the late 40s. It was in need of a stem. I have a couple of cans of stems that are precast blanks. They need to have the tenons turned to make them fit correctly.

ImageImage

I have a PIMO tenon turning tool like the one pictured in the diagram below. I have to drill the stems to fit the guide pin as they are generally very small. Once that is done with a bit on my cordless drill I then put it on the tenon tool and adjust the carbide cutter to the diameter tenon I want to cut. I always start large and work my way down. I have found that trying to cut too much off at once causes the tenon to chip or break. So I start large and work my way down until it fits the mortise. I found this YouTube link that gives a video presentation of the process so I have included that as well for your information http://www.youtube.com/watch?v=drKxzteEEPk A quick look at the video will show you the process I use in turning the tenons. I generally turn the tenon until it is close to fitting and then finish the fit by hand. I have found it is better to proceed by hand from that point so as I don’t take off too much of the vulcanite and have a loose fit on the tenon. I will show that process from the point the tenon has been fit in this pictorial essay.

Image

Below is a stem blank that I picked up online from Pipe Makers Emporium. I have several coffee cans full of different sizes of blanks. I sort through them to find one that is close to the outside diameter of the shank. I find that it is not too difficult to get the two to match with a lot of sanding and fine work.

ImageImage

Below is a picture of the bowl prepped and ready for the new stem. I cleaned the top and polished the silver band as I want nothing in the way of a tight fit for the stem. You will also notice in the photo that the tenon is partially turned for a fit. I stopped at this point to show the process. The large portion still remaining on the tenon shows the first turn of the tool to take off the first portion of vulcanite. I keep the tool turning so that the carbide blade removes the face of the stem as well so that the seat will be straight and flush at the union of stem and shank. I find that when I do this at the beginning of the turn it give a good clean finish. The step down in the tenon shows the next portion removed. I have adjusted the tool to take off that portion. After this photo I finished turning the tenon.

ImageImage

The PIMO tenon tool took a bit of work for me to figure out the adjustments as I purchased the tool second hand without the instructions. The fellow I bought it from gave me some quick lessons on how to adjust it. He even threw in the hex keys!! So needless to say, I learned by trial and error how to adjust the cutting head and keep it straight for a straight cylinder cut on the tenon. Since then I have it has been pointed out to me that Kurt Huhn of Pipe Makers Forums has noted the tricks I learned the hard way.

ImageImage

I will try to capture the trick in my own words, combining what I have learned the hard way with Kurt’s recommendations. The first step in the process is to adjust the cutting head. Start by removing small portions at a time. To deep a cut makes the cutter wobble and give an uneven tenon. To adjust the cutting head insert the adjustment hex key (larger hex screw on the tool) and the lock key (smaller hex screw) into their set screws. Do not turn them, just insert them. Push in lightly on the adjusting key and pull up slightly. Loosen the lock key a quarter or half turn. While maintaining the up and in pressure on the adjusting key turn it in increments of a half turn (think half hour on a clock). With steady pressure on it by pulling it up, the arm with the carbide cutting head is not loose and wiggling as it is adjusted. If it is loose while adjusting it, you will get non-cylindrical tenons regardless of the number of turns from zero. Do not let go of the adjusting key, tighten the lock key while the pressure remains on the adjusting key. Pull the adjusting key straight out, being careful not to turn or press down on it. Trim the stem and repeat as you need to get a good tight fit on the tenon.

The next sequence of photos shows the tenon finished and the fit clean and tight. I hold it up to the light to make sure that there is no light showing between the stem and shank. Also note the Dremel with the sanding drum in the photo. I use that to bring the outside diameter of the stem to a close match to the shank. I run the Dremel at the middle speed to allow me more control of the tip as I take off material. If I run it too fast I find that it takes off too much. Too slow and it leaves a chunky beat up finish that takes a lot of sanding to smooth out. As can be seen from the photos there is not much material that needs to be removed for a smooth fit.

ImageImage

In the photos above I have used the Dremel and removed material to the point that the stem and the shank are almost level. I did it in stages with the stem on the shank and rotating the pipe to keep the perspective round and even. Once I got it to the stage above I move to my table and continue the rest of the work by hand. Sand paper in a variety of grades starting with 180 allows me to work the remainder of the material off and to get the scratches and grooves from the Dremel worked out of the stem.

Each of the next seven photos shows the progress of the stem toward the finished product with the different sand papers. Once I have removed the majority of scratches and grooves left by the Dremel with the 180 grit (pictures 1 &2) I move on to using 220 grit and 240 grit to take down more material. Care must be exercised to not scratch the band or the shank. The idea is to leave the shank exactly like it was without scratches or marks (pictures 3,4,5).
ImageImageImageImageImage

Pictures 6, 7 & 8 show the stem after using 1600 grit wet dry sandpaper. Each sanding step removes more material and evens the flow of the stem to shank. It also removes scratches and prepares the stem for the finish sanding.

ImageImageImage

The last four pictures show the pipe after sanding with micromesh pads – 1800, 2400 and 4000 grit. Generally each of the pads progressively polishes the stem. Any places that still show scratches send the stem back to the 600 wet dry sanding or even further depending on the depth of the scratches. When the polish is clean and smooth I take the stems to my buffer and buff with white diamond that raises a deep reflective finish on the stems.

ImageImageImageImage