What Happened to Santa’s Pipe?


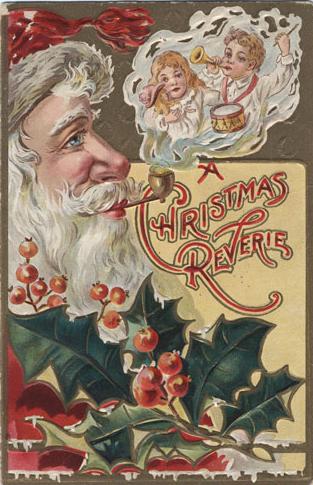
I love the look of old Santa Claus carvings, especially when they include the pipe in his mouth or hand. To me they are a part of the image and mystique of the jolly, old gent. I can almost smell the aromas in the wreath of smoke that encircles his head. Whether you call him Sinterklaas, Saint Nicolas or Father Christmas, it is getting harder to find Santa with a pipe in the politically correct climate of the world in which we live. If you are like me, you have seen endless Santas with apples and oranges, dolls and toys in his hands or a finger next to his nose but rarely a pipe in his mouth. Over the years I have collected a few older figures that I put out each Christmas as part of our celebration and decoration. I also have some older Christmas books from the time I was a child (somehow the books are getting older every year!). These picture him with a pipe in his hand. I remember telling my kids stories of Santa and his pipe. But these days he is sans pipe! Every Christmas I am on the lookout for some of these old Santas – either carved or cast, in photos or cards to add to the collection. Here is an old one that I have in my collection.

Image

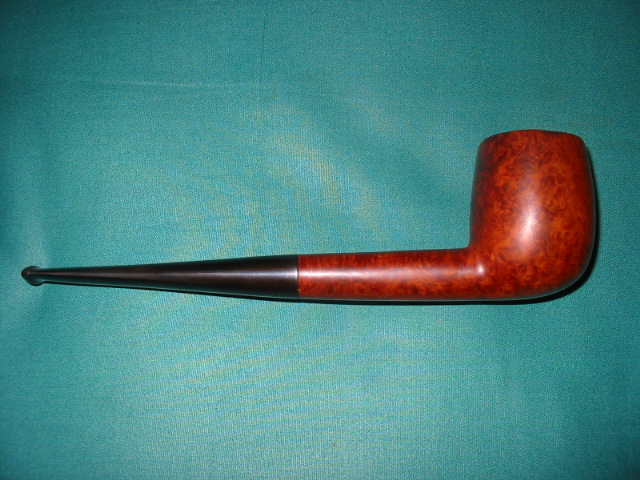
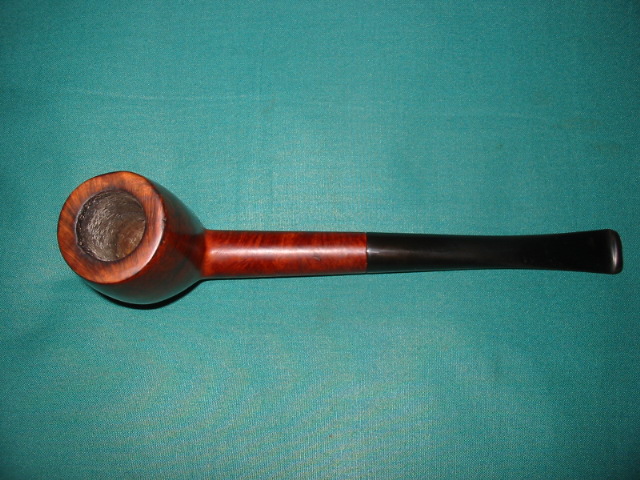
With that information as a back drop for this blog post I want to talk about a discovery my wife and I made last week. Over the past three weeks we were travelling in Alberta, Canada for my work. It is a fall routine for me, having done the same trip five times now. This time we drove over 3000 kilometres and visited many of the towns in the province from the south along the US border to the northern part of the province. We met with individuals, businesses, churches and groups who were, or might be, interested in the work of the Foundation that I work for. We stayed in homes of friends and supporters in each city. It was a great trip for us; the first time my wife has joined me on this jaunt. Each small town and city we visited we made it a point to take some time to walk through small antique malls and second hand stores to look for estate pipes and pipe related items (ostensibly this was my reason).

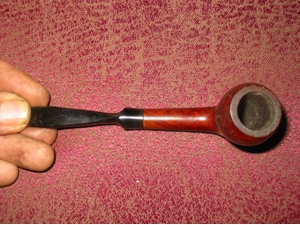
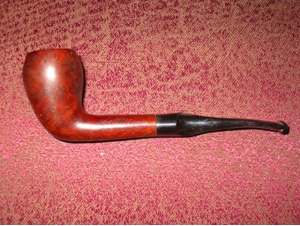
On this trip I found several older pipes but what was really interesting was a find in a little shop called Holly Berries we visited in Grande Prairie, Alberta. It was a Christmas shop. Maybe it was the snow storms we drove through and the quiet prairies of the North Country that put us in a Christmassy mood but we were in that mood. We went through the front door of that great little shop and walked through the normal assortment of Christmas decorations and ornaments, looking and commenting on what we were seeing. They had the usual ones available for purchase – angels, stars, Christmas slogans. The place smelled very inviting with a mulled cider and fresh baking scent throughout the shop. The garlands of fir and pine – artificial but nice nonetheless – added to the festive spirit. Christmas carols and songs were playing in the background and we easily slipped into the nostalgia of Christmas past, present and future. We wandered around the shop picking up and looking at small and large pieces – crèches, shepherds, wise men, and Santa Claus. It had all the trinkets and adornments that decorate homes during the Christmas season. It was an interesting place to spend some time.

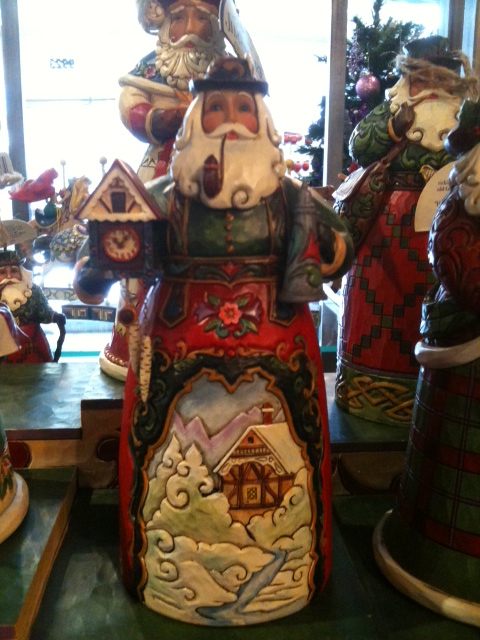
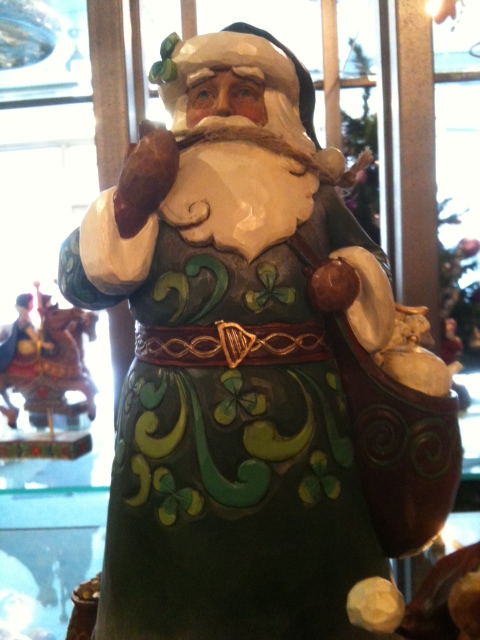
My wife turned toward the tree ornaments while I went off on my own to look at some of the carvings. In the centre of the shop I came across a display of carved and cast Santas that were different from the run of the mill Santas that are on the market today. This display was full of carved Santas smoking a pipe! I could not believe it and commented to the shop keeper that it was a pleasure to see the Santa Claus of my youth with his pipe and not in the new and politically correct pipeless posture. She laughed and said that the works were highly collectible (the prices on them would agree, though I see that on the website they are considerably cheaper). The figures are carved by Jim, then artisans produce clay molds, cast the figures in Polyresin and then they are hand painted and finished by artists using folk art techniques developed by Jim Shore. The attention to detail and ensures that the figures look and feel like real wood and have a quality that is unique to each piece. Here is his website with more information on his work http://www.jimshore.com/content/

I took a few pictures with my iphone so that I could keep a memory of what I saw. Below are the two figures that I really liked. To give you an idea of the size of these figures I have included the measurements. They are 10.25 inches tall, by 5.5 inches wide, by 6.5 inches long. By no means small, these figurines each have a personality that is unique and timeless. It is great to know that in this day and age there are some who still maintain the old memories and images of our folk story figures. There is nothing like seeing the merry twinkle in the eye of Santa and a puff of his pipe to remind you of the days of your youth and memories of seasons of family and friends.

ImageImage

Refurbished Sir Wilkens Danish Made


I had this old Danish shaped pipe in my box for refurbishing for some time. I had never heard of the brand but I liked the shape of this particular pipe. It is delicate looking and yet feels comfortable in the hand and mouth. The grain is not remarkable but it is good. It is stamped made in Denmark and I would call it an acorn shape. I always like to do a bit of detective work on the brands I come across and have done a fair bit of research on the web to find out any information. Nothing was found on the web. The stem is a modified saddle bit, pinched at the sides from the top and bottom views but generally tapered to the saddle. It is a slightly bent stem. The bowl was dirty and caked with what smelled like an aromatic tobacco – very vanilla smelling. The stem had a coating of some kind of sticky substance – like scotch tape that had been applied with a price tag. The finish was dirty and the grain appeared smudged beneath the finish. The rim was tarred but not scorched. This was going to be an easy clean up.

Image Image

I reamed and cleaned the bowl to remove the thick cake. I also filled the bowl with cotton bolls and isopropyl alcohol and let it sit over night to leach out the tars and oils. In the morning I wiped down the outside with alcohol to remove a bit of the darkened finish and grime. I then buffed it and polished it with White Diamond to bring back the shine. I cleaned the stem with isopropyl alcohol to remove the sticky residue on it and then cleaned the inside of the stem with pipe cleaners and alcohol. I buffed away the slight oxidation. I then took the pipe to my buffer and gave it a final buff with White Diamond and then multiple coats of carnauba wax.

Image ImageImage

Any help on identifying the maker of this pipe would be appreciated. You can post responses here. Thanks ahead of time for your help.

GBD 9438 Tapestry – Stem Repair


Al Jones

Well, I fell prey to yet another GBD 9438 in Tapestry finish on Ebay. Yes, another chair leg stem, my fourth this year. However, this time I made a somewhat foolish offer on this particular pipe using my Ebay Android phone app. Using the phone, I completely missed that the seller stated a piece was missing from the stem and the large detailed photograph of the damaged area.

When the pipe arrived, the briar looked in great shape but the damage loomed large. In the ad, the seller offers that he could do the repair for an additional $15. I was skeptical, but curious as to how he might accomplish this feat. The seller replied that Walker Briarworks did his repair work. I did contacted Dave Wolfe at Walker and was not surprised to learn a $15 repair was not an option. Unfortunately, neither was getting a new stem made and transferring the brass rondell. Dave told me that vulcanite stock in that diameter (22 mm) was no longer available.

So, it appeared the repair was left to my own hands. I considered trying to patch it with Superglue, but as you can see, the missing piece was quite large. I didn’t think it could be done nor be durable enough.

I decided the best way to repair the pipe was to cut off the broken button and reshape a new one. I made the cut with a hobby saw and there was no turning back.

Using a small, flat blade needle file, I made a cut on both sides of the stem for the crease. Than, using a heavier metal file I carefully carved out a new button. I went back to the flat needle file to remove some of the heavier file marks. I used both files to shape the button into a “football” shape. additional flat, tapered shape needle files were used to open up the stem hole.

Using some 600 grit wet paper, I sanded out the file marks from the stem. Next the stem was polished with increasingly finer grades of wet sand paper, advancing from 800>1000>1500 and 2000 grit papers. I then polished the stem on the buffer with some Tripoli rouge. I used the final two grades of micro-mesh (8000 and 12000) to bring up the shine. The last steps were to buff the stem with White Diamond rouge followed with a final polish using automotive plastic polish.

The bowl was soaked with Everclear and sea salt and the shank cleaned with alcohol and bristle pipe cleaners. I buffed the bowl with Tripoli, White Diamond and then several coats of carnuba wax. The briar was also polished by hand with Paragon wax.

The finished pipe came looks great and should offer many more years of service.

Refurb on the London Made


I finished up the refurb on a London Made billiard. It is a big pipe 7 1/2 inches long. This one was by far the worst one in the lot of three large pipes that I had in my box to refurbish. The rim was in very rough shape with burn marks on the right hand side and dents and scuffs from banging out the dottle. The bowl was heavily caked and the stem and shank were virtually plugged with tars.

I reamed the bowl and cleaned the shank with pipe cleaners, cotton swabs and a shank brush and isopropyl alcohol. Then I gave the bowl an alcohol bath over night. The next morning I took it out of the bath, dried it off with a soft cloth. Once it was dry I sanded the bowl with micromesh sanding pads (1500-6000 grit) until it was smooth. I wiped it down with a cotton pad and some isopropyl to clean off the sanding dust and any remaining oils from my hands. I restained it with an oxblood aniline stain thinned with isopropyl alcohol.

I went to work on the stem after that. The stem was in bad shape. There was a very deep cut mark on the top of the stem about a 1/4 inch from the button. There was also a bite through hole on the underside of the stem. I cleaned and sanded the stem until it was black once again. I left the area around the button, on top and bottom, a bit rough and then filled the cut on the top with krazy glue. I greased and inserted a pipe cleaner in the slot and then filled the hole with krazy glue. Once the glue was completely dry I sanded the two fills I made with sand paper – 400, 600 grit, and then micromesh sanding pads from 1800-6000 grit. (I have read of concern by different folks on how the super/krazy glue can melt or cause damage on vulcanite. I have now been using this process for several years and never had a problem. I have used it on both vulcanite and Lucite. In the past weeks I have also used it on a nylon stem without any probems.)

I took the pipe to my buffer and finished the refurbishing with a buff of White Diamond to polish the finish on the bowl and the stem. I gave the entirety several coats of carnauba wax and buffed it with a clean flannel buff to give it a shine.

Here are the pics of the finished pipe (once again I forgot to take pictures of the pipe before I worked on it). Thanks for looking. ImageImageImageImageImage

All the King’s horses, and all the King’s Men… A Petersen adventure — Gan Barber


When I bid on this pipe, I hoped that the damage was just a matter of some superficial checking. Whether it was from a defect in the briar or poor smoking technique, I assumed that with a little work, this Petersen Sherlock Holmes could be restored to its former glory once again.

As it appeared on EBay


I’ve repaired a variety of bowls damaged by overheating or hidden fissures that cracked when smoked, but this particular pipe proved much more challenging. The front lip was compressed from hammering out spent dottle, so it was obvious that this pipe had seen its fair share of abuse. I placed the bowl in an alcohol bath for several hours to clean out the fissures and soften the heavy cake. I thought that once I reamed it out and wire brushed the cracks, I would have a better idea of the repairs needed.

Unfortunately, the only thing holding this pipe together wasthe cake, and as soon as I started to ream it……….

A combination of the bowl walls being left thin due to the heavy rustication, and the previous owner’s penchant for smoking tobacco as if it were lava (must have loved the taste of burning wood), had caused the briar to burn through in several places.

The charring was significant, but the pieces were sound, and the fractures well defined, so I decided to see what could be done with such a hopeless mess……..

Back into the alcohol bath went all the pieces to further clean the broken edges and soften what remained of the cake. I left them to soak overnight and then gave them each a thorough scrubbing, scraping and wire brushing to prepare them for re-assembly. In the meantime, I cleaned up the stem with an Oxy-Clean soak and some scrubbing with #0000 Steel wool.

Using JB Kwik as a bonding agent, I began by fitting the two lower pieces back onto the stummel. I worked in pairs to assure proper alignment. Once the epoxy has set, there is no way to make adjustments to the fit, so by working in layers I had a better chance to get it right.

Before the epoxy hardened, I did some work with a toothpick on the exterior of the bowl to remove and blend the squeeze out. Once the epoxy had completely cured, I used a dremel with a small sanding drum to grind down the excess and smooth the joints on the inside of the bowl. Using the same process, I re-fitted the top two pieces.

After the initial bonding and detail work on the epoxy, the pipe still had a long way to go.

There was a sizeable hole on the left side where the briar was very thin and had been destroyed by fire. After some more work with the dremel to clean up the inside the bowl, I used the JB Kwik to build up the weakened areas, letting it flow through and fill the hole. I then added more JB Kwik to the areas on the outside of the bowl that revealed any cracks, low areas, or fissures.

Once the epoxy had fully cured, I used the Dremel to smooth the inside of the bowl, and then applied two coats of pipe mud. Made from cigar ash, this mud filled all the imperfections and created a strong protective covering over the epoxy patches. Though JB Kwik is highly resistant to heat, and rated as non-toxic, it seemed prudent to keep it well covered until a good cake can be re-established in the bowl.

I used a small rusticating tool, made from a Phillips head screwdriver, to blend in the patches on the bowl exterior, then finished preparing the briar for staining with a vigorous scrub using a brass wire brush.

To blend in the patches and color the bowl, I chose Feibings Cordovan dye and applied it liberally with the applicator. I used a torch lighter to burn off the alcohol really set the stain. I then gave it a buff with red Tripoli, to see how well it all blended and to clean up the stem.  Granted, the Cordovan dye is much darker and deeper than the original coloring, but it was my only option in order to hide all the body work required to make this Petersen look like a pipe again.

I haven’t finished working on the stem or waxed the bowl yet. I think I’ll wait until the pipe mud has hardened and see how it smokes before investing any more time into this project. The bowl feels substanial and solid, so I’m not worried about structural failings. Being that it’s no longer a 100% briar pipe, I’m curious to see how well it performs……..

Thanks for looking.

-Gan

Photo Essay on Opening a pipe for an easier draw – Al Shinogle


Blog by Al Shinogle

I came across this great photo essay on the web on how to open a pipe for an easier draw. It was written by Al Shinogle from the Denver, Col. area so I called him and asked his permission to post the article on the blog. I want to thank him for the informative essay on this topic and for his willingness to have it available on this blog.

A how-to photo essay on a controversial subject

If you want a topic that will cause a lot of controversial discussion, one couldn’t find a better one than opening a pipe’s airways. Battle lines will be drawn quickly. Smokers
who fall into the “ONLY A MORON WOULD CHANGE THE WAY THE PIPEMAKER MADE IT” vs. the “OPEN IS THE ONLY WAY AND YOU’RE AN IDIOT IF YOU DON’T GET IT” groups. Even within the pipemakers themselves there is a lot of debate on this subject.

Are there lots of pipes that smoke very well with small diameter airways? Yup, no doubt
about that.

Will every pipe that is opened turn into a great smoker? Nope, can’t say they will. As we know, there are so many variables in smoking. Bowl size, age/cure of the bowl, the kind, cut and humidity of the tobacco just to name a few. We have all gotten rid of a “poor” smoking pipe only to have the new owner say that it was the best pipe they ever had.

So what does this “opening the airway” do? First off, think of the airway as a soda straw.
You suck (create a vacuum) on one end and fluids will flow up the straw. By increasing
the diameter of the straw, the same amount of “suck” (vacuum) will increase the amount
of fluid. You have probably noticed the difference between using a stirring straw and a
drinking straw. That is what we are looking at, opening the airway to get more smoke
with the same or less effort i.e. an easier draw.

Ok, so we get more smoke per draw, is there anything else it does? Many of the Open
Pipe Followers, believe that the pipe smokes cooler. I believe they are correct, since a
larger amount of air is drawn into the bowl for a shorter amount of time, the burning
doesn’t have to increase much to get the proper smoke. I realize that this is a subjective
thing.

Also many believe that the pipe will stay lit longer. Again a very subjective thing that one
cannot accurately measure. But I have noticed the same thing.

A drier smoke, again many (me included) have noticed that tobaccos tend to smoke dryer
in an open pipe. Perhaps the moisture doesn’t collect as easily.

Now on the negative side. And yes there are always side effects. Opening the airway can
increase the bits of tobacco that get lodged in the airway. So one may have to use a pipe
cleaner more often to dislodge an errant bit of tobacco, especially if one uses a finer cut
tobacco. Different packing techniques can vastly reduce this small problem. Putting a bit
of thicker cut tobacco on the bottom of the bowl will totally eliminate this issue.

So what is this Opening the Airways thing?

First off, this author falls in the middle of the pack on this subject. I have some tighter
draw pipes that smoke outstandingly. I have left them alone. But I have also had some
pipes that have been drastically improved by opening the airways. When one decides to delve into this process…be aware…one can take wood out, but one cannot put it back. So easy is the word.

Starting off….”Most” pipemakers tend to drill the shank airways (the shank is the part of
the pipe between the bowl and the bit, some may call it the stem. A rose is a rose).
Somewhere between 3.5mm to 4mm (for us Yanks  .138 to .157 in.). Then the bit is drilled starting around 3mm (.118) then down to 2mm (.078).

Some makers go larger than this from the start. Alberto Bonfiglioli ‘s pipes are certainly
on the larger size. My favorite pipemaker, Polo Becker tends to be drill his slightly larger.
Those that believe an open pipe is the key, believe in opening the shank from 4.3 mm to
4.7mm (.171 to .187). While this humble pipe smoker has opened up a few pipes that
large, I find that I tend to stop around the .170-ish and find that perfectly adequate. To
each his own, your results and mileage may vary.

OK, since if you have read this far, and not pitched your pipe at the computer screen. I
assume you at least want to give this concept a shot. What are the tools one needs to do
this? Minimal, you probably have most of everything now. But I will assume that you are
starting from scratch.

Drill bits. I have a small set of new sharp bits dedicated for this. Why risk an expensive
pipe by using some cheap-ass bits that you have dulled by drilling metal. Invest a few
bucks in some new sharp bits reserved just for this. I use a series of “Numbered” bits. The sizes are from a #29 (.136) to a #13 (.187). See the chart below.


One does not have to have every size, when increasing the diameter one starts small and works their way up in increments. The ones in yellow are the ones I use the most often. I start with the smallest bit that will go thru the existing hole and then work up from there skipping a size or two at a time.

I ONLY use a T-handle for this…DO NOT DO THIS WITH A POWERED DEVICE.
Fastest way I know to add an unwanted extra airway or create a hole that is out of round
(I know, you could start a whole discussion on why oval holes smoke better than round
holes). With a T-handle, this entire process can be done in 15 to 20 minutes. One will need a T-handle (if you have a shop vise you can clamp the bit in the vise and hand rotate the bowl, either way works well).

To enlarge the bit opening, I use a 2/0 (00) tapered reamer. Those can be ordered from
various places online. My favorite is:
http://www1.mscdirect.com/CGI/NNSRIT?PMPXNO=1702357&PMT4NO=62256300

That pretty much is the tools required, Now for the process.

First off, remove the bit and give your pipe a good cleaning, set the bit aside for the
moment. With the bowl in hand, we need to determine how much can we open the airway and be safe. Straight pipes are easy; hopefully the hole is near the center of the shank. But bent pipes are a different animal; it is possible (probable) that the airway does NOT follow the center of the wood. But how do you know?? What I do is insert a 1/8 in. brass rod into the shank all the way to the bowl. Then set a #13 (.187) drill bit on the side of the bowl parallel to the brass rod to see if there is any area that could cause a problem. See pic. 1 and 2 below.


Note in the bent pipe, that the airway gets very close to the surface of the wood at the top
of the shank, in this case I would not go all the way to a #13. But would back off to a
maximum of about a #17 (.173). Could one go larger…sure, but I tend to be more
conservative…. Remember, one can’t put back what one takes out.

Select the smallest bit that will easy push thru the existing airway. If it is a used pipe, you
will be “cutting some crud” that has accumulated in the airway. (Remember I said start
by giving the pipe a good cleaning)…if you missed that step, you will have more crud at
this point.

Now go one size larger than the bit used in the previous step, put it in the T-Handle (or
mount in vise), and gently twist it into the shank. 


“Drill” the shank until you can see the point of the bit in the bowl.


Now you see my warning to NOT USE A POWERED DEVICE. One could easily run
thru the bowl and either gouge the inside of the bowl…or run all the way thru (a real
bummer for resale).

Now, continue up thru the drill bits, a step or two at a time. I tend to skip every other one
until I have reached the largest size that I want to drill. Cleaning out the residue with a
pipe cleaner at every step.

Once I have drilled the largest hole I want and cleaned out the residue. I will wet a big
fluffy pipe cleaner with my favorite alcohol (or pipe sweet) and swab out the newly
drilled hole getting the hole very wet. Then set it aside for a few minutes. Great time to
relax and light a pipe.

Once you have your pipe lit and have enjoyed a few puffs. Now take a dry cleaner and
run thru the shank to soak up any of the alcohol or Sweets still in there. Use the wet
cleaner to clean off any residue from the last drill bit you used, and gently run it back thru
the drilled hole again. Then follow that with a wet cleaner. This will take care of any
remaining residue.

Set the bowl aside, as we are done with it.

Now for improving the bit.

Take the tapered reamer and mount it either in the T-handle or the vise. The 2/0 reamer
measures .110 on the small end to .140 on the large. The reamers can be either a straight
flute like the picture or a spiral flute (sort of looks like a drill bit. I find no advantage or
disadvantage to either…either will work fine).


Now we need to determine how far can we ream out the hole (FROM THE MORTISE
END). I lay the reamer against the bit and measure how far I can safely insert the reamer.
Straight bits are not a problem. 


But bent bits are a different story…. Holes out the side of a bit tend to be frowned upon.
So take the time to measure correctly, you will only get one chance at this…..


Note, I do know of guys who will heat bend a bent bit straight before reaming, then
rebend it back. I have done it….and found it not needed…but it can be done, feel free to
try it.

Back to point, I mark the reamer as to how far I can ream. And gently twist the reamer
into the bit. Removing it often to clean the flutes of residue. This is important, once the
flutes fill, they will no longer cut cleanly. 


Once you have reamed to the desired depth, clean the bit well (residue could be built up
inside the airway).

Once it is well cleaned. Remount the bit to the bowl and be ready for a vastly improved
smoke.

I suggest if you have some flake or “coin” tobacco, place some UNRUBBED, into the
bottom of the bowl and then fill the bowl with your favorite tobacco (using the “Frank”
packing method or Fred Hannah’s “WAD” method is great), light up and sit back and
enjoy.

You will note that your puffs will be shorter, as the volume of smoke has increased.
Smoke well…. and often.

Another on the unique and unusual side – a piece of history


I like the unusual and unique in briar pipes. In fact if it is a bit of an oddball or one that I have not seen before over the past 30 some years I want it. I will often be the only person bidding on these pieces on EBay but I usually get them for a pretty good price. This one has to be one of my favourites – an Italian Folding Pocket Pipe. I have no idea of the age of it but from many signs of stem and button shape I am guessing it is older. I am fairly certain it is a Savinelli but I have really no idea if that is so. It is stamped Made in Italy. The stem is in great shape. The bend is 90 degrees and there are no wrinkles or collapsing of the airway at all. There are no problems. The button is in great shape and is a hole or orific button. There are no bite marks or chewing on the stem.The bowl was clean though used. It had been smoked more than other folding pipes that I have picked up. I have since smoked it and see why. It is a great smoking pipe.

The finish was dirty and once I cleaned it off I needed to restain it. I did so with a medium brown aniline dye. The sandblast or possibly a rusticated finish that looks like a blast is very clean and unworn. The rim on the bowl was intact and without damage. I buffed the pipe and stem with Tripoli and White Diamond and then gave the entirety multiple coats of carnauba wax. The walls are thin but the finish seems to dispense the heat very well when smoking. It is one that I pick up often to carry with me on a walk or hike.

Here are some pictures of the finished pipe.

A Creative Pipe Maker’s Anonymous Attempt at a Cool, Dry Smoke


This is another interesting piece of pipe history. I seem to have trouble passing up odd and creative pipe making attempts. I have no idea who designed or made this one or what the patent information is as there is absolutely no stamping or identification on the pipe itself. I remember seeing one on EBay awhile ago but somehow missed keeping the information. If anyone has any information on it please leave a comment in response to this post.

The pipe itself was in rough shape when I got it. The stem is chewed up badly and I have not taken the time to rework the stem. It is the dreaded nylon stem so it always leaves me cold in wanting to work on it. It is probably the most unforgiving stem material there is in my opinion. You can sand and sand it and it does not seem to change the damage. The heat gun and boiling water do not seem to lift the dents and tooth marks at all. What is there seems to be permanent. The bowl was badly caked – in fact so badly caked that it had a split in the side of the bowl. The finish is strange – best I can say about it almost little worm trails in the briar. The stem was stuck in the shank. I thought at first it was a screw tenon it was so tight. Under the stem was the flat base with what looked like an adjustment screw of some kind. It was also stuck tightly.

I reamed the bowl and found that the draught hole was in the bottom of the bowl – like a calabash. I opened that with a dental pick and cleaned it out. I packed the bowl with cotton bolls and filled it with isopropyl alcohol. I use 99% as it has little water content and seems to work well in drawing out the oils and tars. It took quite a bit of alcohol as it filled the reservoir below the bowl. I put a pipe cleaner in the stem and laid it aside overnight. My hope was that the alcohol would not only draw out the tars and oils but loosen the adjusting screw on the bottom of the shank as well as the stem.

In the morning I removed the cotton bolls. They were almost black with the tars and oils that they drew out. The stem was actually loose – that happens so little that I was surprised when I turned on it and it came out. I was expecting a screw tenon and found that it was not at all. It was an aluminum tenon made to hold a Medico style paper filter. The one in the tenon was almost black with grime and now it was soggy as well. I am still trying to figure out the airflow on this pipe. I also was able to turn the adjusting screw under the stem and it came out as well. I expected that it would adjust the airflow somehow (kind of like a Kirsten). But it was not an adjusting screw at all; instead it was a stinger like apparatus with a long twisted blade on it. Now the airflow was becoming clearer. The smoker pulled the air through the bowl down through the air hole in the bottom of the bowl. Once there it entered the chamber that ran the length of the shank and bowl and contained the twisted stinger. That apparatus would pick up the liquids and oils of the tobacco. The smoke would go up through a hole in the top of the chamber and enter the shank where the paper filter would trap the remaining debris of the smoke (and in my opinion whatever flavour still remained) before delivering it out the slot at the end of the stem.

I cleaned out the chamber and the shank by filling them with isopropyl and plugging the holes and shaking the fluid for several minutes. I would unplug and dump the dirty alcohol down the drain. I repeated this until the fluid came out clear. Then I cleaned the chamber and shank with a shank brush and bristle and ordinary pipe cleaners and more isopropyl alcohol until they came out clean and fresh. The stinger soaked in alcohol and I scrubbed it with 0000 steel wool until it shone. The stem needed a lot of cleaning though it was more dirt and grime that came out rather than tars. I was able to polish the tenon inside and out and clean up the stem. The dents and tooth marks I left alone. One day I will have to work them over and see if I can remove them. But not that day!

I scrubbed the outside of the bowl with a bristle tooth brush and Murphy’s Oil Soap to remove all of the grime from the bowl surface. I cleaned out the crack in the bowl with my dental pick. I then wiped it down with acetone and restained it with a medium brown aniline stain, flamed it and then buffed it with Tripoli and White Diamond. Once it was polished and clean I coated it with several coats of carnauba wax and then buffed it with a clean flannel buff.

I finished up the pipe and put it back together. I added a pipe softee bit to cover the bites and dents on the stem and make it more comfortable in the mouth. I packed a bowl of nice Virginia in it to try it out. I decided to leave out the paper filter and just smoke it as it was. It was an interesting and cool smoke though it pretty much removed the flavour of the Virginias that I chose to smoke. This one will sit in the cupboard as a memorabilia item but will not enter the rotation.


Here are the pictures of the process of repair. I patched it with black super glue and built up the angle of the stem to give a clean flow. I filled the dents and bite throughs on both sides of the stem. I sanded and sanded with 240 grit sandpaper and micromesh 1500 through 12,000 grit. Then gave it a coat of Obsidian Oil and finally several coats of wax. The last four photos show the final product.

Dr. Grabow Colour – Damaged and Reborn


Blog by Steve Laug

I have had this old Dr. Grabow Coloured pipe for a long time. It had damage to the colour coat and to the rim. I kept putting off doing anything with it as I could see no way of repairing the colour coat. It had the nylon stem as well with the Medico filter system. It was a screw mount tenon. The stem was covered with tooth marks and I just did not want to do anything with it… until yesterday.

Yesterday morning I took the pipe out of the box of pipes for repair and wiped it down with some acetone to see if I could clean up the bowl. At this point it was my plan to find some of the same coloured paint and respray the paint on the bowl to fix the spots where it was scratched off. I put the pipe bowl in my pocket and took a trip to Walmart to see if I could match the yellow colour of the paint. I went through about 6 or 7 different yellow colours and none matched. I stuck it back in my pocket and headed home. By this point I had decided to strip the bowl back to the wood and see what was under the paint. I had always heard that the bowls used in these pipes were pretty devoid of grain and had many fills so I figured what did I have to lose on stripping the paint.

I dropped the bowl in the alcohol bath for several hours while I was working on other things around the house. My hope was to loosen the paint coat not dissolve it into the water. Isopropyl should not dissolve the paint but it would certainly soften the paint and penetrate under the paint coat through the scratch marks in the surface. After I removed the bowl from the bath I used a sanding pad with medium grit and rubbed it across the painted surface and the paint began to peel back very easily. The next series of three photos show the effect of the paint coming off with a very light sanding.

I continued to sand the paint coat until it was gone. The next series of four photos show the bowl after the sanding. The paint coat is gone; all that remains is the light coating of yellow haze that will come off with a quick acetone wash. Once the paint was gone I was left with a pretty bland block of briar. There were fills around the front of the bowl and the sides. The shank, right side had a large fill that extended most of the length of the shank. The rim was in great shape with no dents of burns. The inner bevel on the rim was in great shape. I reamed the bowl to clean up the inside and the softened cake. It came out smooth and fresh. I cleaned the shank to remove and of the remaining tars and oils.

Once I had the internals cleaned up I washed the bowl down with a cotton pad and acetone. This removed the remnants of the yellow paint. It is amazing to me to see the amount of yellow colouration that came off with the acetone. The wood had quite a bit of yellow pigment on the surface of the bowl. I washed it down until the pads remained white. I sanded the tooth chatter and marks on the nylon stem (did I ever tell you how much I hate these nylon stems?? No? Well they are truly a pain). I was able to get the majority of the tooth marks out with emery cloth and then 240 grit sandpaper. I attached the stem to the bowl to have a look at what I had to work with  and where I should go with the finish work.

The fills seemed pretty disguised in the light colour of the briar so I decided to do a bit of an experiment. With a pipe of this calibre what do you have to lose? I stained it with a black aniline stain, flamed it and stained it a second time. My hope was that the fills would be hidden well by the stain coat. At first glance they seemed to remain hidden under the stain. I took the pipe to the buffer once it was dry and buffed the bowl with Tripoli to give it a shine and polish. As I did that the fills really stood out. The matte finish of the black hid them but the shine made them stand out. In the second photo below you can see the round fills on the front of the bowl. The one on the shank also stood out a bit.

The next series of photos show the pipe after a buff with Tripoli and White Diamond. The fills on the front now appeared to be a pinkish/red colour under the black coat. The one on the shank also looked pinkish/red. In the second photo below you can see where I restained the fill area on the shank. It was a large fill shaped almost like a moustache. Once it was dry I buffed it again with a light touch. The fills were just too obvious and ugly in my opinion. I even tried giving the pipe a top coat of dark brown stain to see if that would hide them. It did not. So I set the pipe down and went to supper. While I was eating I thought about the possibility of rusticating the bowl and giving the pipe a whole new look.

I took out my modified Philips screwdriver that I use for rustication and went to work on it. The screwdriver has the x pattern and a point. I used my Dremel to cut out the point and create four points with the remaining tip. It has a handle which I pad with a thick cotton cloth so that I can push it into the wood and minimize the discomfort on my palm from pressing. 

In the picture above you can see the work of rustication. The picture below shows the red coloured fills on the front of the bowl that made the decision to rusticate pretty easy for me.

I worked my way around the bowl as is seen in the next series of photos. I worked the front and then the bottom of the bowl and worked my way up each side of the bowl. In this case I decided that I wanted to see what the pipe would look like with a rusticated bowl and a smooth shank so I left the shank untouched with the rustication until I had finished the bowl.

The next three photos show the rusticated bowl and smooth shank look of the pipe. It just did not work for me. I did not like the look. As an aside – one of the great things with the rustication tool I use is the ability to use it in tight spaces and leave the surrounding surface untouched. By the way you will also note the photos that I left the rim smooth as well. 

The next two photos show the putty fills that were used. They seemed to have been white putty that was chalky when I scratched into it during the rustication process. You can see the location and the size of the fills in these photos. I am glad that I decided to rusticate this bowl.

I wrapped the shank and stem junction with a cellophane tape in multiple layers and extended onto the shank a quarter inch. I wanted to make a smooth band that would not be rusticated and match the smooth rim that I was leaving. The tape gave me an edge so that I would feel that as I twisted the tool in rusticating the shank. I also would give an edge to put the teeth of the tool against when I twisted it into the wood of the shank. The next series of photos show the rusticated shank. On the first one you can see the size of the fill on the right side of the shank. It also was the same white putty. As I hit it with the rusticator it left a white chalky residue. You can also see the intent of the band on the shank and the rim of the bowl being left smooth and what that would look like in contrast with the rough finish.

When I had finished the rustication I removed the tape guard and then sanded the band to get it smooth and to bring out the grain with dark undercoat.

Once that was complete I stained the pipe with a black aniline stain. I applied it heavily and then flamed it. The flaming sets the stain deep in the grooves and recesses of the rustication. I gave the rim and the band a coat of black as well. Once it was on I rubbed it off with a soft cloth to get the effect that is visible in the pictures below.

Once the stain was dry I worked on the smooth areas of the bowl – the rim and the band – with micromesh pads from 1500-6000 to polish them and smooth them out. I also worked on the nylon stem. It was a pain. The material scratches no matter what you do to it. And as I learned a long time ago it does not work to buff it as it has a very low melting point. So I sanded it with increasing grits of wet dry sandpaper – 400 to 600 grit and water and then sanded it with wet micromesh pads from 1500-12,000 to remove the scratching. I polished it on the buffer with blue polishing compound and a verrrrry light touch to give it a shine. I had waxed the smooth surfaces and the stem with carnauba and then wiped the pipe down with a cloth impregnated with Briar Wipe. Here is the finished pipe. I think the experiment worked!

Reworked Jobey Shellmoor Apple


This is one I wish that I had remembered to take a picture of before I started working on. But I did not. Sometimes when I am in a hurry I forget to take the photos and this was one of those cases. I was on my way out the door so I took this pipe out of my box of pipes to refurbish, quickly reamed the bowl and threw the stummel in the alcohol bath and the stem in a bath of Oxyclean. You will have to take my word for it – it was a mess. Probably the worst looking mess I had in the box. The bowl was caked with a dark, tarry cake that smelled like roses. The blast was so clogged with grit and grime that you could not feel texture anymore. It was smooth and muddy black looking in colour. The rim was thick with tars and lava build up and the stem was a dark and deep brown from the heavy oxidation. I pretty much figured I would be working on this one for a while to clean it up. After I dropped it in the bath I went off to work and promptly forgot about the pipe altogether. In fact it was two days before I remembered I had left it there.

I went to my work table and took both jars that held the baths. I opened the lid not sure of what I would find when I removed the pipe parts. I took the bowl out first and dried it off with a cotton cloth I have here. Then I took the stem out of the Oxyclean bath. The water had grown cold and dark tea coloured and I wondered what I would find. I dried off the stem with a cotton cloth and put them both on the work table. I was amazed at the work the baths had done to both of them. I reamed the bowl back to bare wood so start over and then wiped the bowl down with acetone on cotton pads. The first four pictures below show the bowl and stem after the bath and the reaming. I then went to work on the inside of the shank and bowl and the inside of the stem. I used both cotton swabs as pictured below and also a series of shank brush, bristle pipe cleaners and regular pipe cleaners all dipped in isopropyl to clean out the shank and stem. I went through quite a pile of both to clean out all the dark tars and oils from inside the shank and stem. The aromatic that had been smoked in this one still survived the two + days in the alcohol and Oxyclean baths and the floral scent remained – not a Lakeland like floral more of a Mixture 79 floral smell. Once the swabs and cleaners were coming out white the smell was gone from the stem and shank.

I scrubbed the exterior of the bowl one last time with a soft bristled brass tire brush to clean out any remaining grit in the sandblast finish. Once it was clean I wiped it down one last time with acetone before I was ready to stain it. I used a dark brown aniline stain to cover the bowl. I flamed it to set the stain and gave it a second coat, flamed it again and then took it to the buffer and buffed it with a Tripoli buff. The stain was still too dark to my liking and also too opaque (though they are dark photos 1-3 below give a pretty accurate picture of the colour of the pipe after staining and buffing). I took it back to my work table and wipe the bowl down with acetone on a cotton pad to lighten the stain. The fourth photo below showing the underside of the bowl gives you an idea of what the stain looked like when I was finished with the wipe down.

I worked on the scratches and tooth marks on the stem with emery cloth (medium grit) first. I worked until they were gone and then used a medium grit sanding pad and a fine grit sanding pad to remove the scratches left behind. I switched to 240 grit sandpaper and took out the rest of the scratches and marks. I buffed the stem with Tripoli and White Diamond and then used micromesh pads on it. I started with the 1500 and 1800 grit sanding pads and then applied a coat of Obsidian Oil. I let it soak in and then rubbed it down with a soft cloth. I then used the rest of my micromesh pads from 2400-12,000 grit to finish sanding the stem. I rubbed in some plastic polish and wiped it off and then buffed the stem with some Blue polishing compound on my buffing wheel. The finished pipe was given multiple coats of Halcyon II wax on the bowl and carnauba on the stem. The colour of the bowl is precisely what I was aiming for and the stem just glows. I am not sure my photos capture the reflective quality of the buff but it is pretty amazing in person.