Blog by Al Shinogle
I came across this great photo essay on the web on how to open a pipe for an easier draw. It was written by Al Shinogle from the Denver, Col. area so I called him and asked his permission to post the article on the blog. I want to thank him for the informative essay on this topic and for his willingness to have it available on this blog.
A how-to photo essay on a controversial subject
If you want a topic that will cause a lot of controversial discussion, one couldn’t find a better one than opening a pipe’s airways. Battle lines will be drawn quickly. Smokers
who fall into the “ONLY A MORON WOULD CHANGE THE WAY THE PIPEMAKER MADE IT” vs. the “OPEN IS THE ONLY WAY AND YOU’RE AN IDIOT IF YOU DON’T GET IT” groups. Even within the pipemakers themselves there is a lot of debate on this subject.
Are there lots of pipes that smoke very well with small diameter airways? Yup, no doubt
about that.
Will every pipe that is opened turn into a great smoker? Nope, can’t say they will. As we know, there are so many variables in smoking. Bowl size, age/cure of the bowl, the kind, cut and humidity of the tobacco just to name a few. We have all gotten rid of a “poor” smoking pipe only to have the new owner say that it was the best pipe they ever had.
So what does this “opening the airway” do? First off, think of the airway as a soda straw.
You suck (create a vacuum) on one end and fluids will flow up the straw. By increasing
the diameter of the straw, the same amount of “suck” (vacuum) will increase the amount
of fluid. You have probably noticed the difference between using a stirring straw and a
drinking straw. That is what we are looking at, opening the airway to get more smoke
with the same or less effort i.e. an easier draw.
Ok, so we get more smoke per draw, is there anything else it does? Many of the Open
Pipe Followers, believe that the pipe smokes cooler. I believe they are correct, since a
larger amount of air is drawn into the bowl for a shorter amount of time, the burning
doesn’t have to increase much to get the proper smoke. I realize that this is a subjective
thing.
Also many believe that the pipe will stay lit longer. Again a very subjective thing that one
cannot accurately measure. But I have noticed the same thing.
A drier smoke, again many (me included) have noticed that tobaccos tend to smoke dryer
in an open pipe. Perhaps the moisture doesn’t collect as easily.
Now on the negative side. And yes there are always side effects. Opening the airway can
increase the bits of tobacco that get lodged in the airway. So one may have to use a pipe
cleaner more often to dislodge an errant bit of tobacco, especially if one uses a finer cut
tobacco. Different packing techniques can vastly reduce this small problem. Putting a bit
of thicker cut tobacco on the bottom of the bowl will totally eliminate this issue.
So what is this Opening the Airways thing?
First off, this author falls in the middle of the pack on this subject. I have some tighter
draw pipes that smoke outstandingly. I have left them alone. But I have also had some
pipes that have been drastically improved by opening the airways. When one decides to delve into this process…be aware…one can take wood out, but one cannot put it back. So easy is the word.
Starting off….”Most” pipemakers tend to drill the shank airways (the shank is the part of
the pipe between the bowl and the bit, some may call it the stem. A rose is a rose).
Somewhere between 3.5mm to 4mm (for us Yanks .138 to .157 in.). Then the bit is drilled starting around 3mm (.118) then down to 2mm (.078).
Some makers go larger than this from the start. Alberto Bonfiglioli ‘s pipes are certainly
on the larger size. My favorite pipemaker, Polo Becker tends to be drill his slightly larger.
Those that believe an open pipe is the key, believe in opening the shank from 4.3 mm to
4.7mm (.171 to .187). While this humble pipe smoker has opened up a few pipes that
large, I find that I tend to stop around the .170-ish and find that perfectly adequate. To
each his own, your results and mileage may vary.
OK, since if you have read this far, and not pitched your pipe at the computer screen. I
assume you at least want to give this concept a shot. What are the tools one needs to do
this? Minimal, you probably have most of everything now. But I will assume that you are
starting from scratch.
Drill bits. I have a small set of new sharp bits dedicated for this. Why risk an expensive
pipe by using some cheap-ass bits that you have dulled by drilling metal. Invest a few
bucks in some new sharp bits reserved just for this. I use a series of “Numbered” bits. The sizes are from a #29 (.136) to a #13 (.187). See the chart below.
One does not have to have every size, when increasing the diameter one starts small and works their way up in increments. The ones in yellow are the ones I use the most often. I start with the smallest bit that will go thru the existing hole and then work up from there skipping a size or two at a time.
I ONLY use a T-handle for this…DO NOT DO THIS WITH A POWERED DEVICE.
Fastest way I know to add an unwanted extra airway or create a hole that is out of round
(I know, you could start a whole discussion on why oval holes smoke better than round
holes). With a T-handle, this entire process can be done in 15 to 20 minutes. One will need a T-handle (if you have a shop vise you can clamp the bit in the vise and hand rotate the bowl, either way works well).
To enlarge the bit opening, I use a 2/0 (00) tapered reamer. Those can be ordered from
various places online. My favorite is:
http://www1.mscdirect.com/CGI/NNSRIT?PMPXNO=1702357&PMT4NO=62256300
That pretty much is the tools required, Now for the process.
First off, remove the bit and give your pipe a good cleaning, set the bit aside for the
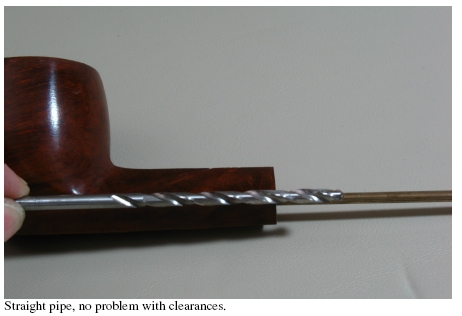
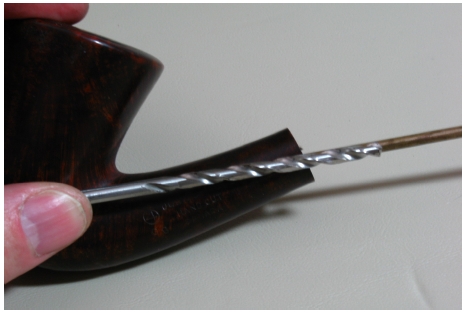
moment. With the bowl in hand, we need to determine how much can we open the airway and be safe. Straight pipes are easy; hopefully the hole is near the center of the shank. But bent pipes are a different animal; it is possible (probable) that the airway does NOT follow the center of the wood. But how do you know?? What I do is insert a 1/8 in. brass rod into the shank all the way to the bowl. Then set a #13 (.187) drill bit on the side of the bowl parallel to the brass rod to see if there is any area that could cause a problem. See pic. 1 and 2 below.
Note in the bent pipe, that the airway gets very close to the surface of the wood at the top
of the shank, in this case I would not go all the way to a #13. But would back off to a
maximum of about a #17 (.173). Could one go larger…sure, but I tend to be more
conservative…. Remember, one can’t put back what one takes out.
Select the smallest bit that will easy push thru the existing airway. If it is a used pipe, you
will be “cutting some crud” that has accumulated in the airway. (Remember I said start
by giving the pipe a good cleaning)…if you missed that step, you will have more crud at
this point.
Now go one size larger than the bit used in the previous step, put it in the T-Handle (or
mount in vise), and gently twist it into the shank. 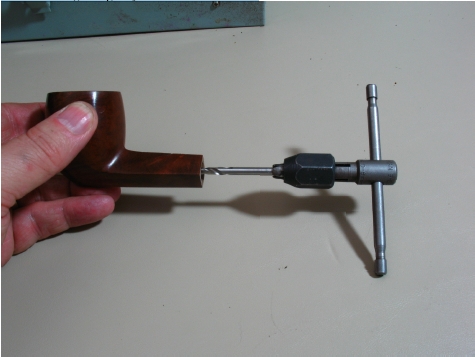
“Drill” the shank until you can see the point of the bit in the bowl. 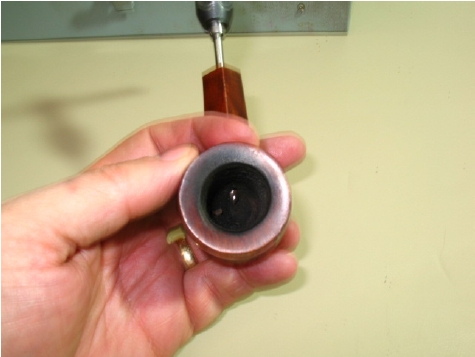
Now you see my warning to NOT USE A POWERED DEVICE. One could easily run
thru the bowl and either gouge the inside of the bowl…or run all the way thru (a real
bummer for resale).
Now, continue up thru the drill bits, a step or two at a time. I tend to skip every other one
until I have reached the largest size that I want to drill. Cleaning out the residue with a
pipe cleaner at every step.
Once I have drilled the largest hole I want and cleaned out the residue. I will wet a big
fluffy pipe cleaner with my favorite alcohol (or pipe sweet) and swab out the newly
drilled hole getting the hole very wet. Then set it aside for a few minutes. Great time to
relax and light a pipe.
Once you have your pipe lit and have enjoyed a few puffs. Now take a dry cleaner and
run thru the shank to soak up any of the alcohol or Sweets still in there. Use the wet
cleaner to clean off any residue from the last drill bit you used, and gently run it back thru
the drilled hole again. Then follow that with a wet cleaner. This will take care of any
remaining residue.
Set the bowl aside, as we are done with it.
Now for improving the bit.
Take the tapered reamer and mount it either in the T-handle or the vise. The 2/0 reamer
measures .110 on the small end to .140 on the large. The reamers can be either a straight
flute like the picture or a spiral flute (sort of looks like a drill bit. I find no advantage or
disadvantage to either…either will work fine). 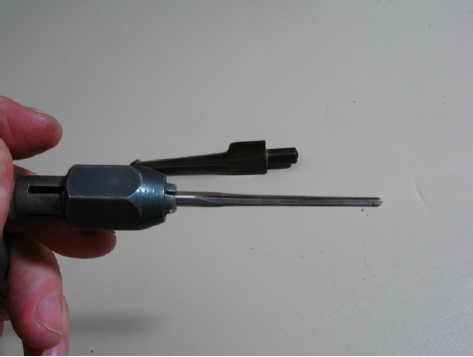
Now we need to determine how far can we ream out the hole (FROM THE MORTISE
END). I lay the reamer against the bit and measure how far I can safely insert the reamer.
Straight bits are not a problem. 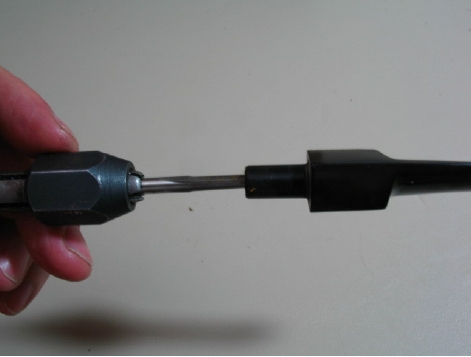
But bent bits are a different story…. Holes out the side of a bit tend to be frowned upon.
So take the time to measure correctly, you will only get one chance at this….. 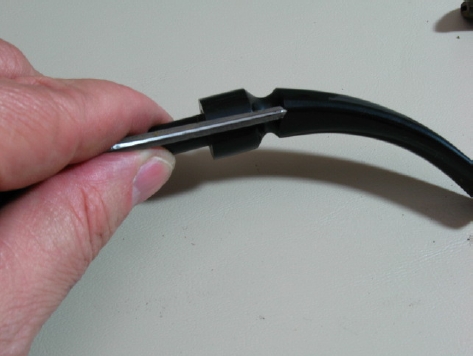
Note, I do know of guys who will heat bend a bent bit straight before reaming, then
rebend it back. I have done it….and found it not needed…but it can be done, feel free to
try it.
Back to point, I mark the reamer as to how far I can ream. And gently twist the reamer
into the bit. Removing it often to clean the flutes of residue. This is important, once the
flutes fill, they will no longer cut cleanly. 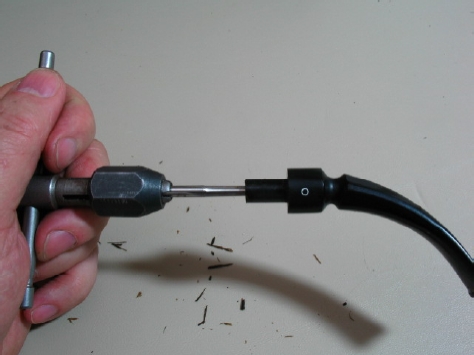
Once you have reamed to the desired depth, clean the bit well (residue could be built up
inside the airway).
Once it is well cleaned. Remount the bit to the bowl and be ready for a vastly improved
smoke.
I suggest if you have some flake or “coin” tobacco, place some UNRUBBED, into the
bottom of the bowl and then fill the bowl with your favorite tobacco (using the “Frank”
packing method or Fred Hannah’s “WAD” method is great), light up and sit back and
enjoy.
You will note that your puffs will be shorter, as the volume of smoke has increased.
Smoke well…. and often.


