Blog by Steve Laug
The pipes that I will be posting over the next few days from this lot that Jeff and I purchased are fascinating pipes. They were quite stunning but altogether unknown to me. I did not recognize the name of the maker. All the pipes were unsmoked other than the Stanwell Pipe of the Year. We purchased them from a fellow in Kalundborg, Denmark on 02/03/2024. He said that they were all unsmoked and when they arrived they were. They were relatively clean and merely dusty with a little light debris on the stem surfaces. The shapes, sandblasts, shank extensions, and stems were all unique and very well done. The pipes were very beautiful and I could not wait for Jeff to refresh them a bit and get them up to me to do my part. Here are some of the photos of the pipes that we purchased provided by the seller. Here is a photo of the pipe that was sent to us by the seller. It is the one that I chose to work on next. It is a beautiful sandblast plateau rim top Acorn with a Bamboo Shank and fancy vulcanite saddle stem. The plateau rim top is thin and the bowl sides and culminate on the thin edge. The blast is very well done. The stem is also well cut and other than dusty and lightly oxidized is in great condition. The bowl is unsmoked. The bowls all have a carbon bowl coating that is well done on the walls of the bowl. The pipe is stamped on the underside of the Bamboo shank with the etched name of Dominik. I am looking forward to working on it as it will take very little work and will be a fun break.
 I am including what I learned when I worked on the first pipe of this brand. When I started I knew nothing about the carver other than he did beautiful work so I turned to Pipedia to see what I could find (https://pipedia.org/wiki/Dominik_Pipes). There was a listing for Dominik Pipes. He is a Polish Carver and I have included the short article in its entirety below.
Dominik pipes are made by Dominik Kobryń. His journey with pipes began in 1993 at a flea market, where he bought his first pipe. From that time his collection has grown a lot. He made his first pipe in December 2016. Dominik credits Wojtek Pastuch as his mentor, and is very grateful for that!
Dominik uses briar from Mimmo Romeo. He makes his stems by hand, mainly from Ebonite and Cumberland rods, but occasionally acrylic. He focuses on unique pipes that are well done technically.
From there I clicked on a link at the bottom of the page that took me to his Pipe sales website (http://www.dominikpipes.com/). Interestingly the site contained almost word for word the information that I had found on Pipedia.
My name is Dominik Kobryń. My journey with pipes began in 1993 on a flea market, where I bought my first pipe. From that time my collection has grown a lot.
I made my first pipe in December 2016. Wojtek Pastuch has taught me a lot about pipemaking and I am very grateful for that!
I use briar from Domenico Romero (Mimmo). I make stems by hand, mainly from ebonite rods and cumberland, sporadically acrylic. I pay much attention to create unique pipes, well done technically.
If you are interested in my work do not hesitate to contact me.
I have been following Wojtek Pastuch for some time now and really like what he is doing. It is fascinating that Dominik considers him his mentor. In chatting with Jeff, he sent me a link to Dominik’s Facebook page (https://www.facebook.com/dominikpipes). It is worth a look to see his current pipes.
Now it was time to “work” on the pipe. For his part, Jeff had simply rinsed the pipe off with warm water and dried it. He soaked the stem in deoxidizer to remove the grime and the light oxidation near the shank joint. The pipe came here a few days ago and it is beautiful. The bowl shows the blast on mixed grain, while the rim top is plateau briar. The three-knuckle bamboo looks very good. The bamboo is joined to the briar bowl and the shank end is capped with a black acrylic spacer. The stem has a vulcanite tenon. I tried to capture the beauty in the photos that follow. 
 I took photos of the plateau rim top and bowl along with both sides of the vulcanite stem to show the condition of the pipe. It is clearly unsmoked and new.
  I took a photo to try to capture the etching of Dominik on the underside of the shank in an oval. It is very readable in person but is curved around the shank bottom and it hard to capture in a photo. I also removed the stem from the shank and took a photo of the parts of the pipe.
 The bowl was in excellent condition so skipped ahead to applying the Balm to the briar. I rubbed the briar and the bamboo down with Before & After Restoration Balm. I worked it into the briar with my fingertips and a horsehair shoe brush to work it into the nooks and crannies of the sandblast finish. The product works to clean, enliven and preserve the briar. I let it sit for 10 minutes then I buffed it with a cotton cloth to deepen the shine. The briar really comes alive with the balm.

 I polished the short vulcanite saddle stem with micromesh sanding pads – 1500-12000 grit pads. I wiped it down with Obsidian Oil after each sanding pad. I used Before & After Pipe Polish – both Fine and Extra Fine to further polish the stem.
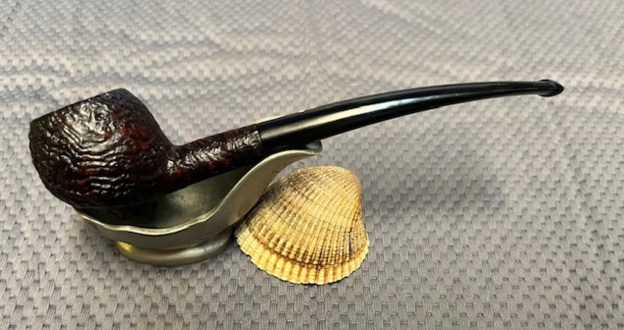
 This Sandblast Dominik Plateau Rim Top Acorn with a Bamboo Shank and Short Saddle Stem has a beautiful, unique Sandblast finish that is deep and craggy. The rich dark finish highlights some great grain around the bowl and shank. It has some great rugged sandblast that I am enjoying looking at on the Dominik pipes I have picked up. The polished bamboo and the short vulcanite stem add to the mix. I put the stem back on the bowl and lightly buffed the pipe with Blue Diamond on the buffing wheel being careful to not buff the stamping and have a lighter touch on the briar. I gave the bowl multiple coats of Conservator’s Wax and the stem multiple coats of carnauba wax on the buffing wheel and followed that by buffing it with a clean buffing pad. I hand buffed the pipe with a microfiber cloth to deepen the shine. The finished Dominik Plateau Rim Top Acorn with Bamboo Shank is quite stunning and feels great in my hand. Give the finished pipe a look in the photos below. The dimensions of the pipe are Length: 6 inches, Height: 2 inches, Outside diameter of the bowl: 1 ½ inches, Chamber diameter: ¾ of an inch. The weight of the pipe is 1.02 ounces/28 grams. Thanks for walking through the restoration with me as I worked over another beautiful pipe. I will be adding to the rebornpipes store in a new section for Polish Pipe Makers. If you wish to add it to your collection let me know. Thanks for your time.