Blog by Paresh Deshpande
The next pipe that I chose to work on is a pipe from the lot of 50 odd pipes that Abha, my wife, had cleaned up for me way back in early 2018.
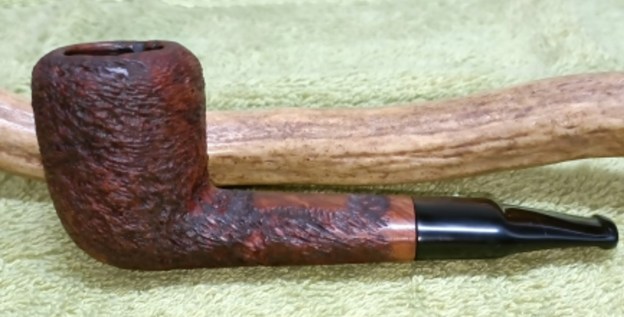
It’s a beautiful Dublin shaped pipe with an oval shank and a short saddle stem. The pipe has rustications that are somewhat similar to the micro rustications seen on BRAKNER pipes, but not as fine, much more widely spaced and uneven in orientation. It is stamped on the upper flat surface of the oval shank as “MAJESTIC” over “BRUYERE”. The oval upper stem surface bears the letters “C.G.F” in a rhombus. I had never worked on this and of pipe before and was keen to understand more of this brand. My first visit to unearth the mystery of this pipe to pipephil.eu and pipedia.org did not yield the answers that I was looking for except on pipedia.org which had few pictures under the name MAJESTIC; one picture was that of C.G.F PARIS and another one was that of A. Pandevant & Roy. Given below is the link to the webpage.
https://pipedia.org/wiki/File:2070-01.jpg
 The name A. Pandevant & Roy immediately brought back recollection of the research that my friend Dal Stanton aka The Pipe Steward had done on this pipe maker way back in 2019. It makes for a very informed read and his research of this brand has been included in pipedia.org, a remarkable and praise worthy achievement for sure. I implore readers to read through this research, the link to which is given below.
I have reproduced excerpts from the write up as condensed on pipedia.org (https://pipedia.org/wiki/A._Pandevant_%26_Roy_Co.)
- Pandevant & Roy Co. of Paris had its beginning in 1884 and disappeared with the commencement of WWII in the late 30s or early 40s. “E.P.C.”, “La Savoyarde”, “MAJESTIC”, “La Parisienne” and “E.P.” were registered trademarks of the company.
Note: The follow example and the information for this article is courtesy of Dal Stanton, The Pipe Steward
Thus, from the above information, it is evident that the pipe currently on my work table is from the stables of A. Pandevant & Roy Co. and definitely pre dates to early 1940s when the company became one of the many victims of World War II.
Initial Visual Inspection
As expected, my wife had not taken any “Before” pictures of the pipe prior to working her magic on this pipe and here I am talking about the year 2018 and even today she conveniently forgets to take pictures of the pipes that she works on initial cleaning. However, she did enclose a note with each pipe giving out the issues that need to b addressed and the note with this pipe pointed out to a through hole in the stem’s bite zone.
Initial Cleaning By Abha…
The initial cleaning on this pipe was done by Abha, my wife (she has cleaned up around 40-50 pipes and these have now reached me for further restoration). She reamed out the complete cake and further smoothened out the chamber walls with a folded piece of 220 grit sand paper. She further cleaned out the internals of the shank with pipe cleaners and alcohol and cotton buds. She followed the internal cleaning of the shank with external cleaning of the stummel using Murphy’s Oil soap and hard bristled tooth brush and dried it with paper napkins and cotton cloth.
Next she cleaned out the internals of the stem air way and immersed it in “Before and After Deoxidizer” solution along with the stem of other pipes in line for restoration. Once the stem had soaked overnight, she cleaned the stem under running warm water and scrubbed the raised oxidation from the stem surface using scotch brite pad. She further removed the oxidation by scrubbing the stem with 0000 grade steel wool and applied a little olive oil to rehydrate the stem.
Once The Pipe Is On My Work Table…
The overall condition of the pipe is very encouraging without any major damage to the stummel. The only damage visible is on the stem where a chunk of button along with a portion of the bite zone is missing. The stummel surface appears dull and lifeless. Here are a few pictures of the pipe as it sits on the work table.

 Detailed Inspection
The chamber walls are nice clean and fresh. There are no ghost smells and the rusticated rim top surface is clean and undamaged. The rusticated stummel surface is without any fills or dents or dings. The only issue that I see is the dull and dry appearance of the stummel. This stummel will turn out beautiful and the rustications will stand out once I have polished the surface. The mortise and shank internals are nice and clean.
 The vulcanite saddle stem on this pipe is where there is max damage and would take a considerable time and work to repair. To start with, the step tenon end has a chunk of vulcanite missing (encircled in green) and would need to be rebuilt. The lip on the upper stem surface has deep tooth indentation (encircled in red) while the bite zone of the lower surface has been completely chewed off and there is no button/ lip (encircled in red). These issues would need to be addressed. The stem stamping is slightly worn out with the letter C being more worn out than the other letters.
 The Process
I started the process of restoration of this pipe by cleaning the internal and external surfaces of the stem even though Abha had cleaned them earlier as the pipe had been lying around for more than five years! Using anti oil dish washing soap, I cleaned the external surface with a Scotch Brite followed by 0000 grade steel wool. The stem airway was cleaned using the soap and thin shank brush. Continuing with the stem repair, I inserted a triangulated index card covered in transparent tape in to the slot. The tape prevents the mix of superglue and charcoal from sticking to the index card. I mixed superglue and activated charcoal powder and generously applied it over the bite zone, including over the buttons, on either surfaces of the stem and set it aside to cure. I shall rebuild the step end of the tenon once these fills are cured and completely hardened.
 While the stem repairs were set aside to harden, I decided to freshen up the already clean stummel surface. To enliven the briar wood, I rubbed a little quantity of “Before and After” balm in to stummel surface and set it aside for 20 minutes for the balm to be absorbed in to the briar. Thereafter I hand buffed it with a microfiber to deepen the shine. The stummel looks nice and vibrant.

 While I revitalized the stummel surface, the stem repairs had cured sufficiently to allow me to work on rebuilding the broken step tenon end. I tightly wound a transparent tape around the tapered end of a pipe cleaner and inserted it in to the airway from the tenon end. The rounded pipe cleaner will help in achieving a better thickness and shape profile of the tenon end while the triangular shaped index card that I used for the slot helped in achieving the desired V shape and horizontal thickness of the slot. Using a mix of CA superglue and food grade activated charcoal powder, I rebuilt the tenon end. I made sure that the fill is in excess of the requirement as that would provide me with more material to work on and shape the tenon end. I set the stem aside for the fills to cure overnight.
  By next afternoon, the stem and tenon rebuild patches had cured perfectly and was fit to work on. I moved ahead with the process of filing and shaping the button end with a flat head needle file. For a better blending, I further sanded the entire stem with 320. I used a folded piece of 320 grit sand paper to sand the tenon end patch and achieve an even match with the rest of the tenon surface. I shaped the opening of the rebuilt tenon for smooth and even airway surface using a round needle file and topped the tenon face on a piece of 220 girt sand paper to achieve a perfect seating of the step tenon into the mortise.
 I covered the slightly worn out stem stamp with a tape to protect it and wet sand the stem progressing through 400, 600, 800, 1000, 1500 and 2000 grit sand paper. I wiped the stem after each grade of sandpaper to view the progress being made and also identify areas on the stem surface that were still covered with traces of oxidation. I wiped the stem with EVO at the end of 2000 grit sanding and set the stem aside.
 I followed it up with dry sanding the entire stem using 3200 to 12000 grit micromesh pads to completely smooth out the surface and bring out the deep black shine of the vulcanite.
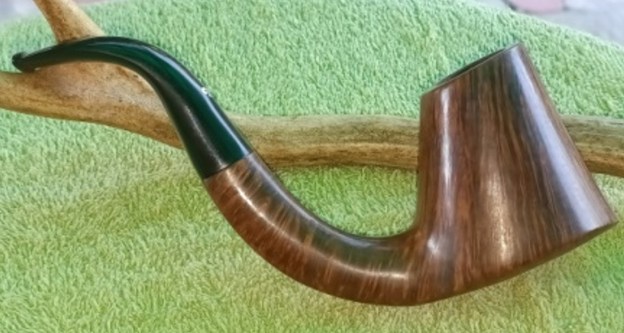
I have reached the stage in this project which can be considered as the home run. I polished the entire stem with blue diamond using a cotton wheel mounted on to my hand held rotary tool. The blue diamond compound helps to eliminate the minor scratches that remain after the use of micromesh pads. I completed this project by hand polishing the stummel with Halcyon II wax. I rubbed this polish deep into the rustications and after a couple of minutes, vigorously hand buffed the stummel with a microfiber cloth to a deep shine. I polished the stem with carnauba wax using my hand held rotary tool. This is a gorgeous looking pipe and I consider myself fortunate to have the opportunity to work on this beauty and it is ready for the next pipeman or pipewoman who wish to carry forward the trust in this pipe till it is time to pass it on to others. If this pipe calls out to you or to someone that yo care for, please feel free to either get in touch with Steve or send me a mail on deshpandeparesh@yahoo.co.in. Here are a few pictures of the completed pipe for you to appreciate while I take the opportunity to thank you each of you for sparing your valuable time in joining me on this journey.


