Blog by Steve Laug
The next pipe on the work table is a change of pace for me. It was purchased as one of three pipes off eBay on 07/28/2023 from Niles, Michigan, USA. It was one of three House of Robertson pipes – two billiards and a pot. They are all classic shaped pipes. The name House of Robertson is roughly hand-etched on the left side of the shank with an engraving tool. The pipe is a well shaped saddle stem Billiard with the bottom of the shank flat and the pipe sits nicely on the desk top like a sitter. The bowl has some interesting grain on it – birds’ eye on the sides of the bowl and shank and cross grain on the front and the back of the bowl. The bowl is thickly caked with some lava overflow on the rim top. The outer and inner edges of the rim look to be in good condition. The pipe was dirty but underneath all of the grime it appears to be in excellent condition. It is definitely an interesting pipe and should clean up very well. The fit of the stem to the shank was good. The saddle stem was oxidized and calcified. There are light tooth marks and chatter on both sides near the button. Jeff took photos of the pipe before he started the cleanup. 
 Jeff took photos show the condition of the bowl and the stem. The photos of the bowl and rim show the cake in the bowl and the lava overflowing onto the rim top. The grain on the top of the bowl and the inner and outer edge of the rim looks really good. It was hard to know what the edges and top really looked like until we cleaned it. The saddle stem was oxidized, calcified and had tooth chatter and marks on both sides of the stem near the button.

 The photos of the sides and heel of the bowl show some stunning and unique grain all around the pipe. The finish makes the grain really stand out on the bowl and shank.
 The next photo shows the etched name on the left side of shank on the shank. It reads House of Robertson.
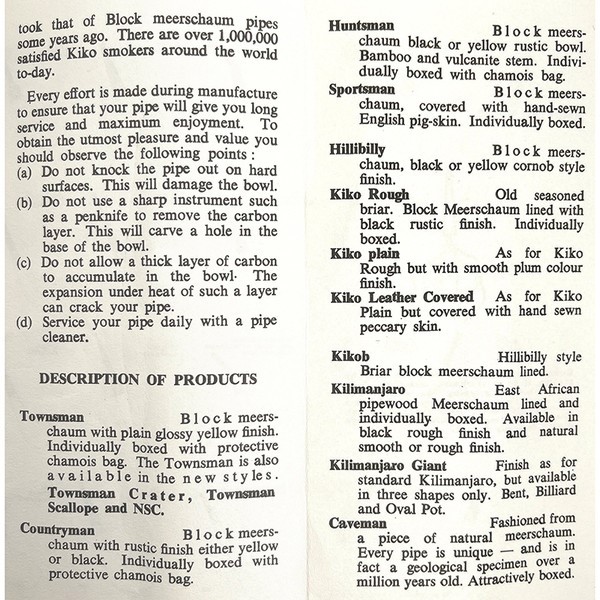
 I am including the information that I found when I received my first of the House of Robertson Pipes. I found a link on Pipedia that gave me the only information I could find on the brand. I include that in total as it is interesting to read.
“House of Robertson” was in business for many years, but alas, closed their doors in 1999. They were located in Boise, Idaho. They are noted for making rather large and interesting pipes. Thayne Robertson was a Master Mason, AF & AM, and started the shop about 1947 and his son Jon started working there in 1970 when he finished college, along with Thayne’s daughter. Thayne and his son started making the big pipes at that time, and made them together until 1987 when Thayne passed away. Jon kept the store and his sister moved on to other things. The House of Robertson appears to have closed around 1999 (https://pipedia.org/wiki/Robertson).
Since then I have worked on a lot of House of Robertson pipes and have been able to track down more information. I am including a link to a Catalogue that I picked up on eBay. Click on the link and have a look at this interesting book of information on the brand and the pipe maker himself (https://rebornpipes.com/2022/12/11/a-house-of-robertson-catalogue-filled-with-great-examples-of-thayne-robertsons-work/).
I am also including a biography of Thayne Robertson that I found on Facebook from a fellow in Boise, Idaho. It is an interesting read into the mind of the pipe maker. Make sure to take time to read it (https://rebornpipes.com/2021/10/31/house-of-robertson-pipes-boise-pipe-carver-thayne-robertson/).
Now it was time to work on the pipe itself. When it gets to Vancouver it my turn to contribute to its restoration. Jeff did a great job cleaning the pipe on the inside and outside. He reamed the bowl with a PipNet pipe reamer and cleaned up the remnants with the Savinelli Fitsall Pipe Knife. He scrubbed out the mortise and the airway in the shank and stem with alcohol, cotton swabs and pipe cleaners. He scrubbed the exterior of the bowl with a tooth brush and Murphy’s Oil Soap to remove the dust in the rustication on the bowl and shank as well as the smooth portions. He rinsed it under running water. He dried it off with a soft cloth. Once the dust and debris were removed the finish was dull but appeared to be in excellent condition. He soaked the stem in Before & After Pipe Stem Deoxidizer and rinsed it under warm water to remove the deoxidizer gel solution. I took photos of the pipe to show its condition before I started my work on it.
 I took a photo of the bowl and rim top to show how well it had cleaned up. There is some rim darkening but you can see the interesting grain on the top of the bowl. The stem tooth marks and chatter are very light.
 I took a photo of the engraving on the left side of the shank. It is clear and reads as noted above. I also took the stem off the pipe and took a photo of the parts to give a sense of the proportions of the pipe. It is a beauty.
 I worked on the darkening of the inner edge of the rim and the darkening on the rim top with a folded piece of 220 grit sandpaper. It looked much better when finished.
 I polished the rim top with micromesh sanding pads – dry sanding with 1500-12000 grit pads. I wiped the bowl with a damp cotton pad after each sanding pad. The surface began to take on a nice shine.


 I worked Before & After Restoration Balm deep into the smooth finish to clean, enliven and protect the briar. I hand rubbed it with my fingers and worked it into the finish then set it aside to dry for 10-15 minutes. I wiped it off with a soft cloth. I buffed the bowl with a cotton cloth to polish it. It really began to have a deep shine in the briar. I took some photos of the bowl at this point to mark the progress in the restoration. The grain on the bowl stands out with interesting lines moving across the sides of the bowl and the shank.

 I set the bowl aside and sanded the stem with the 2 inch square 320-3500 grit sanding pads. I wiped down the stem after each sanding pad. I was able to remove the tooth marks and chatter on both sides with the pads. The stem looked very good.
 I polished the vulcanite stem with micromesh sanding pads – dry sanding it with 1500-12000 grit pads. I wiped the stem down after each sanding pad with Obsidian Oil and set it aside to dry.
 I polished it further with Before & After Pipe Polish – using both the Fine and Extra Fine Polishes. I gave it a rubdown with Obsidian Oil one last time and set it aside.
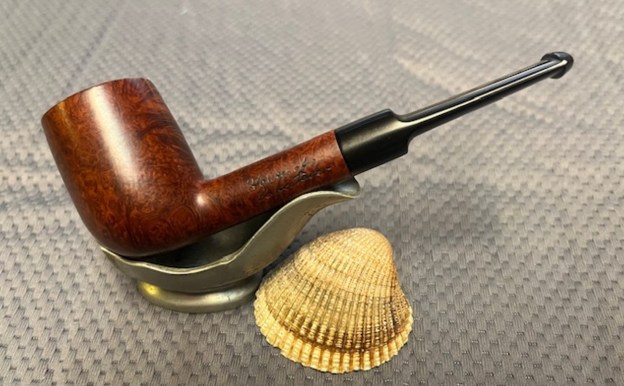
  I put the House of Robertson Saddle Stem Billiard back together and worked the pipe over on the buffing wheel using Blue Diamond to lightly polish the stem. I buffed the bowl and stem to raise the gloss on the briar and the vulcanite. I gave the pipe multiple coats of carnauba wax. I buffed the entire pipe with a clean buffing pad to raise the shine. I hand buffed it with a microfiber cloth to deepen the shine. The finished HOR Billiard is shown in the photos below. The medium brown stains on the smooth Billiard shaped bowl works well with the rich black of the vulcanite stem. The dimensions of the pipe are: Length: 5 1/4 inches, Height: 1 5/8 inches, Outside Diameter: 1 1/4 inches, Diameter of the chamber: 3/4 inches. This is an interesting piece of briar, cross grain and birdseye on the bowl and shank. The patterns on the sides are almost circular. I really like how the briar and the vulcanite work well together. This one will soon be on the rebornpipes store. If you are interested in adding a House of Robertson to your collection this may well be the one for you. Thanks for walking with me through the restoration process.