Blog by Steve Laug
Jeff and I love picking up freehand pipes that are unusual or have unique grain around the bowl. This particular pipe came to us from a lady in Cleveland, Ohio, USA on 04/09/2022. We purchased her husband’s estate pipes from her and there were some very nice ones. The pipe was stamped on the underside of the shank and read Wenhall [over] Dane Craft [over] E. The shape and the unusual stem combination are familiar with other freehands in this series. It is an unusual piece with some grooves in the bowl sides and a “nose” on the front of the bowl at the heel. These make it very comfortable in the hand. It has some nice straight grain on the bowl sides and shank. The finish was dirty with hand oils and grime ground into the finish. The plateau rim top had lava from the bowl and darkening in the rough finish. The inner edge of the rim also has thick lava and a thick cake lining the bowl walls. The stem is different in that it is one that I would expect on a Danish Made Celius pipe or possibly some of the British style Hardcastle freehands. The chairleg style stem seems to be made of high-quality vulcanite as it is not oxidized. The stem has tooth marks on the top and underside ahead of the button and a hole in the top surface. The pipe is very dirty but you can see the beauty through the grime. Jeff took some photos of the pipe before he worked his magic in the cleanup process.  Jeff took some close up photos of the plateau rim top and inner edge of the bowl to give an idea of the filthy condition the pipe was in when he received it. I am sure glad that this was one that he worked on. The bowl has a thick cake and the plateau rim top is almost filled in with the lava overflow at the back of the bowl. The stem was lightly oxidized and had tooth marks and chatter on both sides. There was also a bite through on the topside of the stem ahead of the button. There was a calcification on the surface of the stem and some minor oxidation.

 Jeff took photos of the sides of the bowl and heel to show the grain around pipe. You can see the grime and the oils in the finish that are ground into the bowl. You can also see the scratches and nicks in the finish.
 The next series of photos capture the stamping. The stamping is faint on the edges but together you can see that it reads Wenhall over Dane Craft over the letter E. The last photo in this series shows the fit of the stem to the dirty shank. There is a gap that should disappear with cleaning.
  I remembered working on a Wenhall Dane Craft Freehand in the past so I turned back to a previous blog I had written on that one (https://rebornpipes.com/2018/06/18/new-life-for-a-wenhall-dane-craft-b-freehand/). I reread the blog and was reminded of the background information on the brand that I had researched prior. It is a beautiful pipe. I quote from that blog below.
In the back of my mind I remembered a connection between Wenhall and Karl Erik pipes. I could not remember the details of the connection but I remembered there was one. I’ll tell you what, even that is pretty good for this old bird. I looked it up on the pipephil pipes, logos and stampings website and found nothing on that site that linked the two. I turned to Pipedia and looked it up in the Pipe Makers list that is included there. I found the link to Wenhall pipes that I was looking for. Here is the link, https://pipedia.org/wiki/Wenhall. It was a short article but it made a lot of connections to names that I was familiar with from working on pipes. I include the majority of the article because of the pertinent information that it provides.
Wenhall Pipes Ltd. was a distribution company out of New York City.
By the end of the 1970’s Wenhall approached Michael Kabik and Glen Hedelson, at that time operating from a farm house in Glen Rock, Maryland to create a line of freehands called Wenhall. The situation was favorable, because Kabik & Hedelson had ended their cooperation with Mel Baker of Tobak Ltd. to produce the famed Sven-Lar freehands shortly before.
Upon Wenhall’s offer the partners got a bank loan and set up a studio of 2000 square feet in a fairly new industrial park in Bel Air, Maryland and took on the name Vajra Briar Works. Wenhall initially wanted 500 pipes a week! But Kabik & Hedelson doubted that they could move that much product and told them they would produce 250 pipes per week. Happily, some of the old crew from Sven-Lar joined them at Vajra Briar Works, and thus they rather quickly met the production demands.
Furthermore during this time, Wenhall requested to create a line of pipes consisting of 12 different shapes. The line was called “The Presidential” and, while they repeated the same 12 shapes for this series, each one was freehand cut. Although they came up with interesting designs, mainly developed by Hedelson, especially Kabik was never really happy with the line or the concept, but, by this time, they had nine people on full-time payroll.
The stint with Wenhall lasted a couple of years, at which time they asked them to join Wenhall in a move to Miami, Florida. But by this time Kabik and Hedelson felt very uncomfortable with the owners of Wenhall and decided that they’d rather close the shop than make the move. Time proved that decision very wise, as Wenhall folded shortly after the move. All the same they had to close Vajra, but scaled down to the two of them and moved the operation to the farm house Glen was currently living in.
I could see the link to Michael Kabik and Glen Hedelson and the Svenlar line of pipes that I have worked on in the past. The problem was that these were American made pipes and I was pretty sure that they would have been stamped accordingly. Even though they were Danish style I don’t know if they would have stamped their pipes Danish Craft. The next short paragraph made the link to Karl Erik that I was looking for.
Presumptively for a shorter period only Wenhall had pipes made in Denmark by Karl Erik. (BTW K.E. Ottendahl ceased all sales to the USA in 1987.)…
The article went on to tie the pipes to some Italian makers as well. I stopped reading at this point and tried to summarize what I had found out so far. I knew that the pipe I held in my hand was made between the late 1970s and 1987. It possibly could have been made by Michael Kabik and/or Glen Heldelson or even by Karl Erik. Something about the flow of the shape and the way the bowl flows with the grain reminds me a lot of Karl Erik pipes that I have worked on. Either way the pipe is between 36-53 years old and in great condition for an older piece.
Jeff had reamed the bowl with a PipNet pipe reamer and followed up with a Savinelli Fitsall pipe knife to remove the cake. He scrubbed out the mortise and the airway in the shank and the stem with alcohol, cotton swabs and pipe cleaners. He scrubbed the exterior of the bowl, rim, shank and stem with a tooth brush and Murphy’s Oil Soap to remove the oils and tars on the bowl, rim and shank. He rinsed it under running water. He dried it off with a soft cloth. The lava mess on the rim was thoroughly removed without harming the finish underneath it. Without the grime the finish looked really good. He soaked the stem in Before and After Pipe Stem Deoxidizer. He rinsed it under running water and dried it off with a clean cloth. He cleaned out the airway with pipe cleaners and alcohol. When it arrived here in Vancouver it was very clean. I took photos of the pipe to show its condition before I started my work on it. It really is quite a beauty. 
 I took close up photos of both the rim top and the stem. Jeff had been able to get the grime and lava out of the plateau on the rim top and it looked pretty incredible. There was some darkening on the high spots on the plateau and lighter brown colouring in the valleys and crevices particularly on the back side of the bowl. The stem looked very clean. The tooth marks and chatter were very visible and would need to be addressed. The tooth hole on the top of the stem will need to be repaired.
  The stamping was still readable and curved around the underside of the shank. It reads as noted above. I also took a photo with the stem removed to give an idea of the perspective and design of the pipe.
 I turned to work on the pipe. I started with the darkening on the plateau rim top. I used a brass bristle wire brush and worked over the plateau rim. It looked much better. I worked in some Murphy’s Oil Soap with the brass brush and rinsed it off with warm running water. It look significantly better one it was rinsed and dried off.
 I polished the briar bowl with micromesh sanding pads – dry sanding with 1500-12000 grit sanding pads. I wiped the bowl down after each sanding pad with a damp cloth to remove the debris from the sanding.


 I worked some Before & After Restoration Balm into the grooves and crevices of the plateau rim top and the smooth finish of the bowl and shank with my fingers and a horsehair shoe brush. I want the product to go deep into the finish because it works to clean, enliven and protect the briar. Once I was confident that it was deeply worked into the blast I wiped it off and buffed it with a soft cloth to polish it. The pipe really began to have a rich shine. I took some photos of the bowl at this point to mark the progress in the restoration. The grain really stands out in the photos below.

 I set the bowl aside and turned to work on the stem. I decided to address the bite through in the top of the stem. I cleaned out the hole with alcohol and then greased a pipe cleaner with Vaseline and inserted it beneath the hole. I filled in the hole with black CA glue. I sprayed it with accelerator to cure it. I removed the pipe cleaner and filled in the remaining small pinholes with more CA glue. I set the stem aside to let the repair cure.
 Once the repair had hardened I used several small files to flatten the repairs and the marks on the underside as well. I smoothed out the surface with 220 grit sandpaper and blended them into the surface of the stem. I started polishing the stem with 600 grit wet dry sandpaper.
 I polished the vulcanite stem with micromesh sanding pads – wet sanding it with 1500-2400 grit pads and dry sanding with 3200-12000 grit pads. I wiped it down with Obsidian Oil after each sanding pad.
 I polished it with Before & After Pipe Polish – both the Fine and Extra Fine polishes. I gave it a final coat of oil and set it aside to dry.
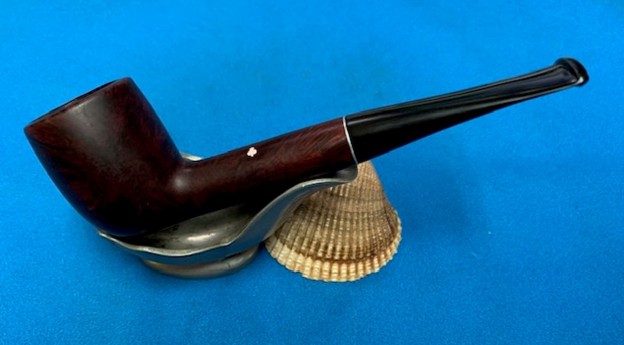
 I polished bowl and the stem with Blue Diamond to polish out the remaining small scratches. I gave the bowl and the stem multiple coats of carnauba wax and buffed the pipe with a clean buffing pad to raise the shine. I hand buffed the pipe with a microfiber cloth to deepen the shine. The pipe polished up pretty nicely. The medium brown stain worked really well with the black vulcanite stem. The darkened plateau really sets of the pipe and gives it a unique look. The finished pipe is shown in the photos below. The dimensions of the pipe are Length: 6 inches, Height: 2 ½ inches, Outer diameter of the bowl: 1 ¾ inches, Chamber diameter: 7/8 inches. The weight of the pipe is 56 grams/1.98 ounces. I will be putting this unique freehand on the rebornpipes store in the Danish Pipemakers Section. If you are interested in adding it to your collection please let me know. Thanks for walking through this restoration with me as I worked over this beauty.
As always, I encourage your questions and comments as you read the blog. Thanks to each of you who are reading this blog. Remember we are not pipe owners; we are pipe men and women who hold our pipes in trust until they pass on into the trust of those who follow us.