Monthly Archives: June 2018

Refreshing a Pair of NOS Peterson’s Silver Caps from 2000


Blog by Steve Laug

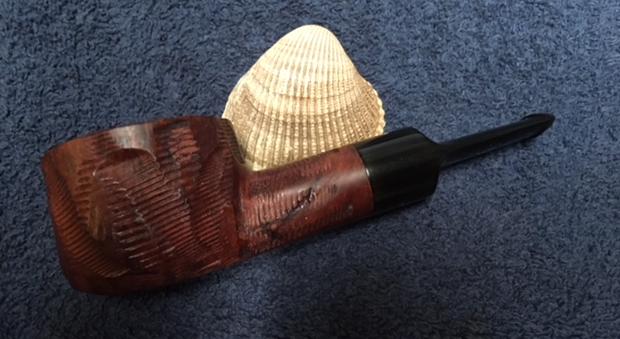
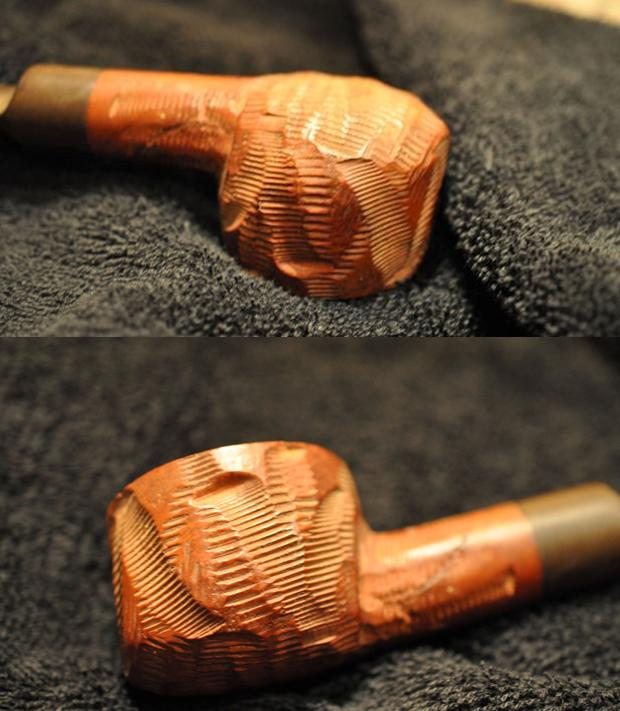
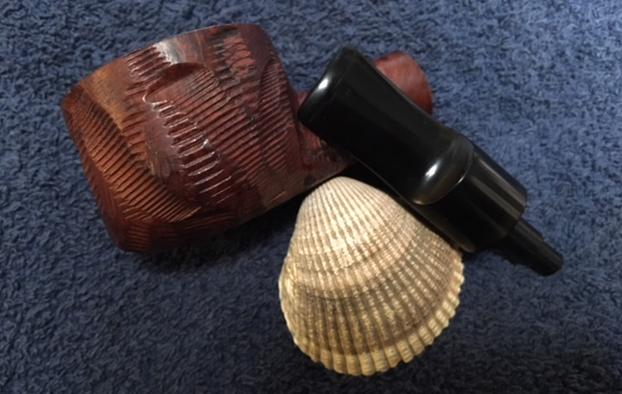
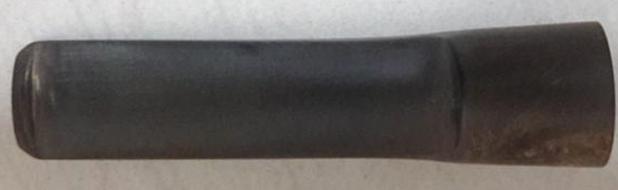
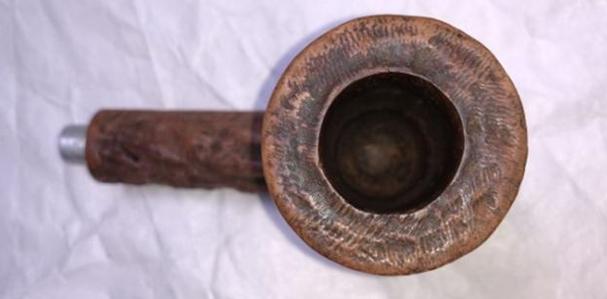
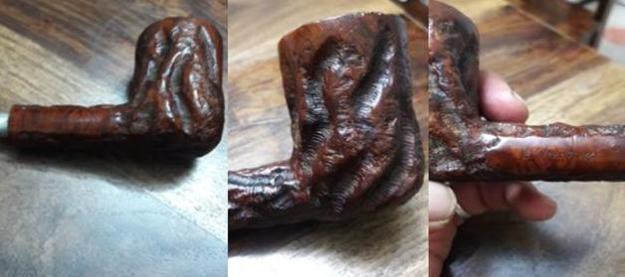
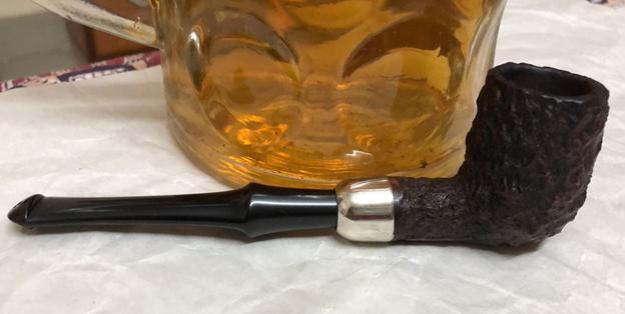
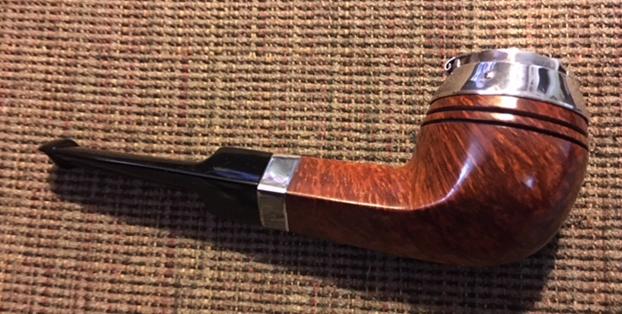
Not too long ago I went for coffee with a friend of mine who used to own a pipe shop. He had some pipes to sell and wanted me to have a look. The first of the pipes was a pair of Peterson’s Silver Caps from 2000. These were brand new pipes – unsmoked and really never put out in his store. They were still in their original boxes. One of the boxes had the $600 price tag still intact on the end. The pipes included a 106 Billiard and a 150 Bulldog. Each pipe was boxed and included the original Peterson’s of Dublin Established 1865 Pipe Sock in the box. These pipes are both clean and unsmoked. The only issue with them was that the silver rim cap, band and P on the stem were tarnished and blackened from sitting. The Bulldog had a P-lip style stem while the Billiard had a fishtail stem with a removable adapter in place in the tenon so that it could be smoked with the Peterson’s 9mm filters that were included in the box.
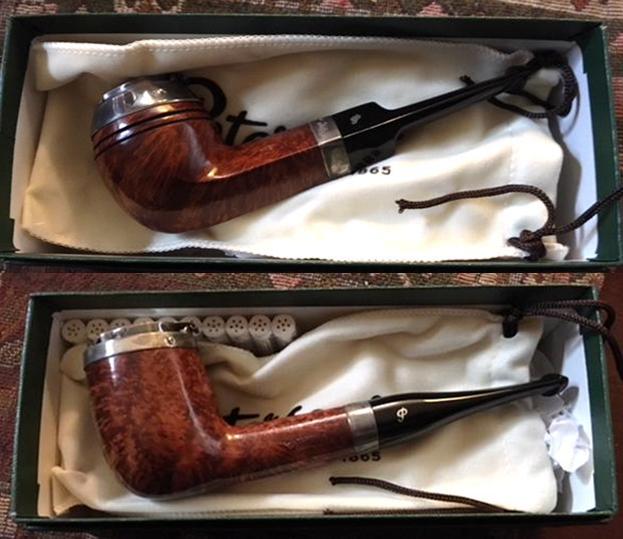
I took each pipe out of the box and took pictures of it to show its general condition. The Bulldog was first. You can see the finish is flawless with some nice grain around the bowl. The silver cap and band are tarnished but undamaged. Both have hallmark stamps on them so I should be able to identify the year of manufacture of the pipe. The silver P on the left side of the saddle stem is also tarnished but undamaged. When I opened the cap the bowl inside was polished and smooth. It was indeed unused. The stem was flawless and there was no oxidation or discolouration to be detected. There were no marks on the stem also showing that it was unused. The airway in the shank and the stem were clean and polished. It is stamped on the left side of the shank Peterson’s with the old forked P arched over Dublin. On the right side it has the shape number 150 and reads Made in the Republic of Ireland. The pipe is a beauty and the silver will really stand out once it is polished and cleaned. 
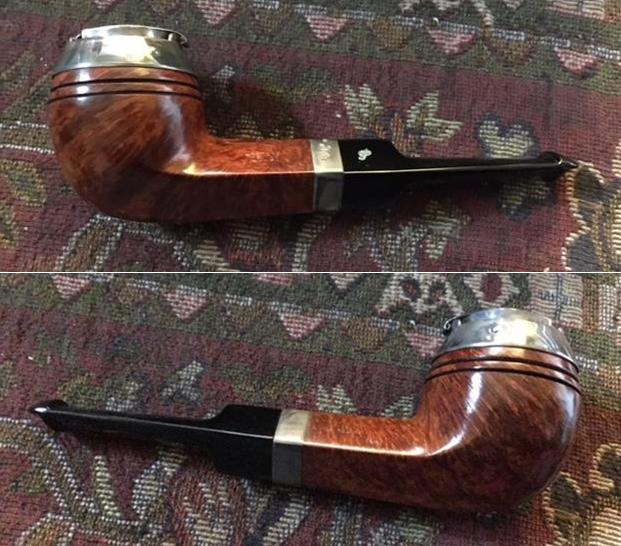
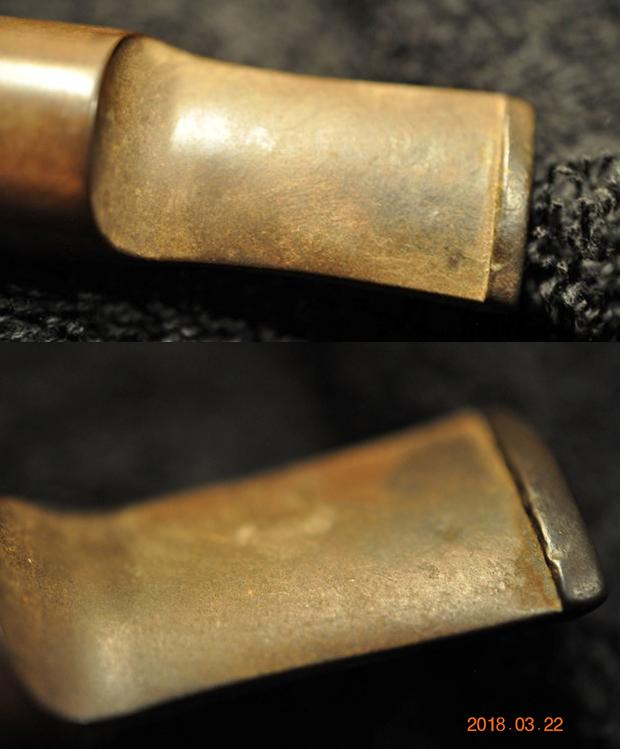
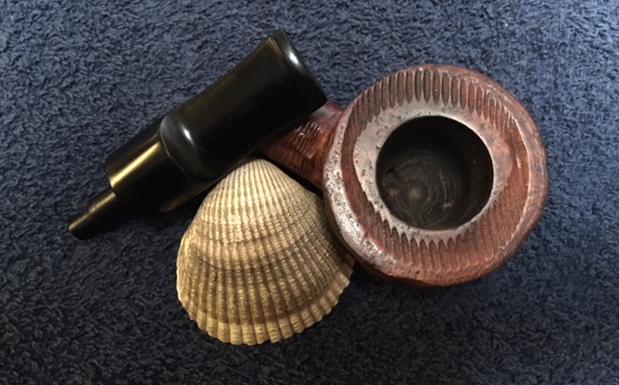
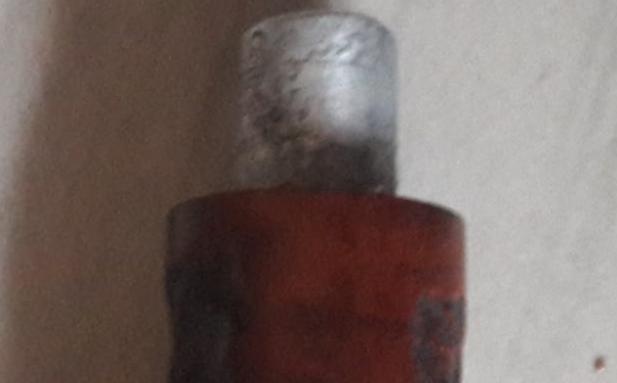
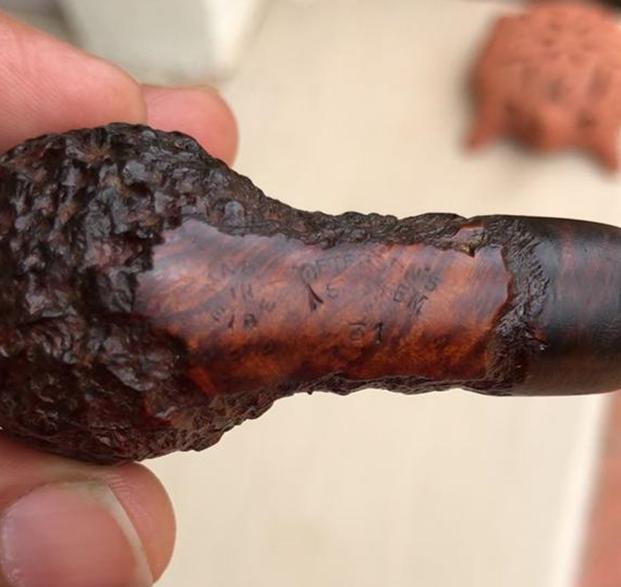
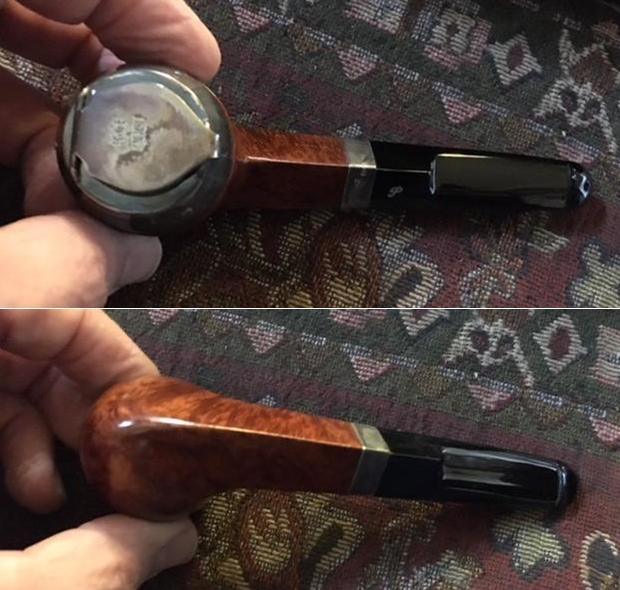
I took some close up photos of the rim cap and the stem to show the condition. You can see the tarnish on the rim cap and the deep shine on the stem. The cap also bore hallmarks that I would be better able to read when I had cleaned up the silver. The band also bore hallmarks that would be readable as well.
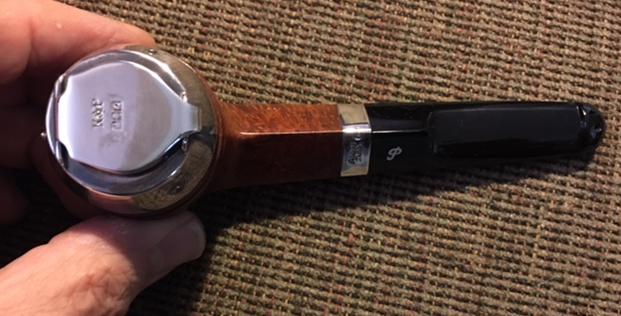
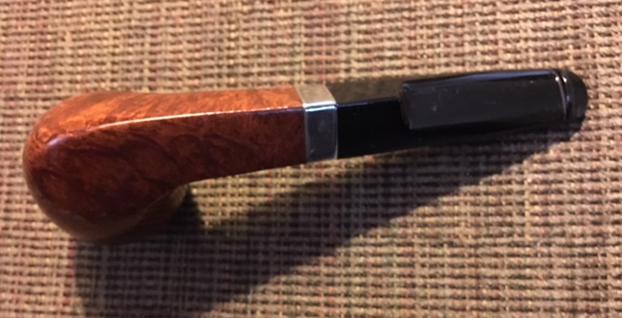
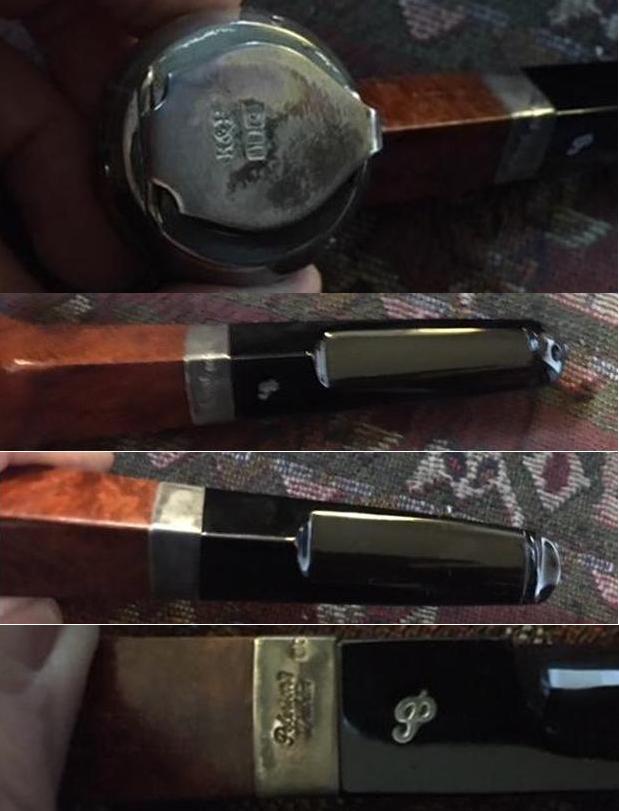
The Billiard was second. You can see the finish is flawless with some nice grain around the bowl. The silver cap and band are tarnished but undamaged. Both have hallmark stamps on them so I should be able to identify the year of manufacture of the pipe. The silver P on the left side of the tapered fishtail stem is also tarnished but undamaged. When I opened the cap the bowl inside was polished and smooth. It was unused as well. The stem was flawless and there was no oxidation or discolouration to be detected. There were no marks on the stem also showing that it was unused. The airway in the shank and the stem were clean and polished. It is stamped on the left side of the shank Peterson’s with the old forked P arched over Dublin. On the right side it has the shape number 106 and reads Made in the Republic of Ireland. This pipe is a beauty as well and the silver will really stand out once it is polished and cleaned.  
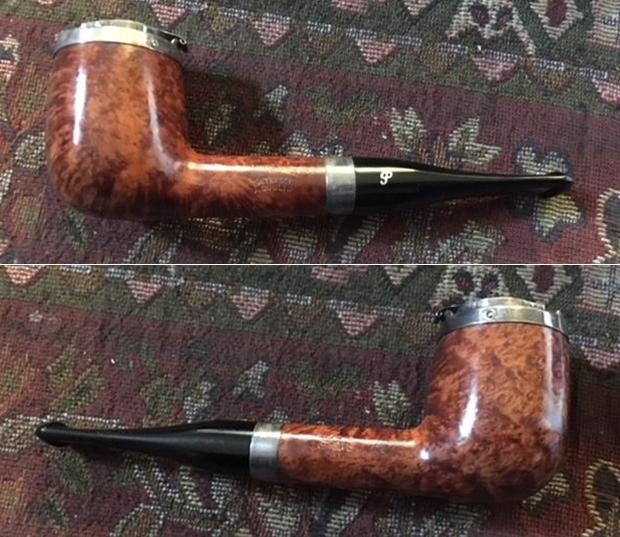
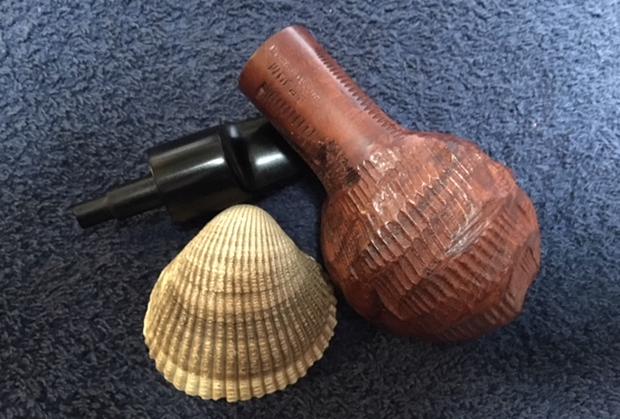
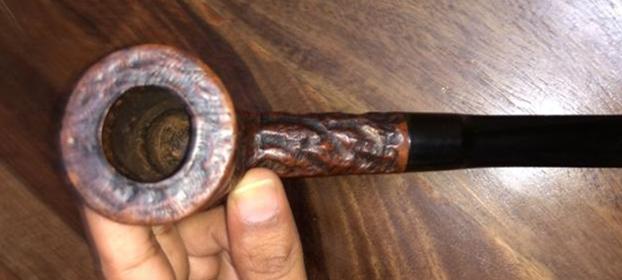
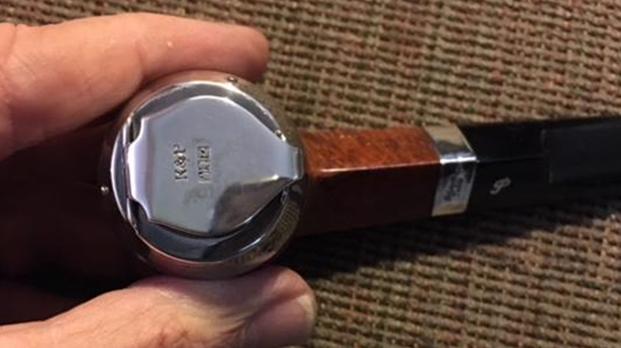
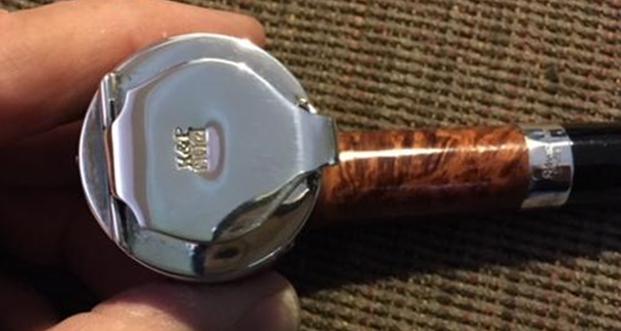
I took some close up photos of the rim cap and the stem on the billiard to show the condition. You can see the tarnish on the rim cap and the deep shine on the stem. The cap also bore hallmarks that I would be better able to read when I had cleaned up the silver. The band also bore hallmarks that would be readable as well.
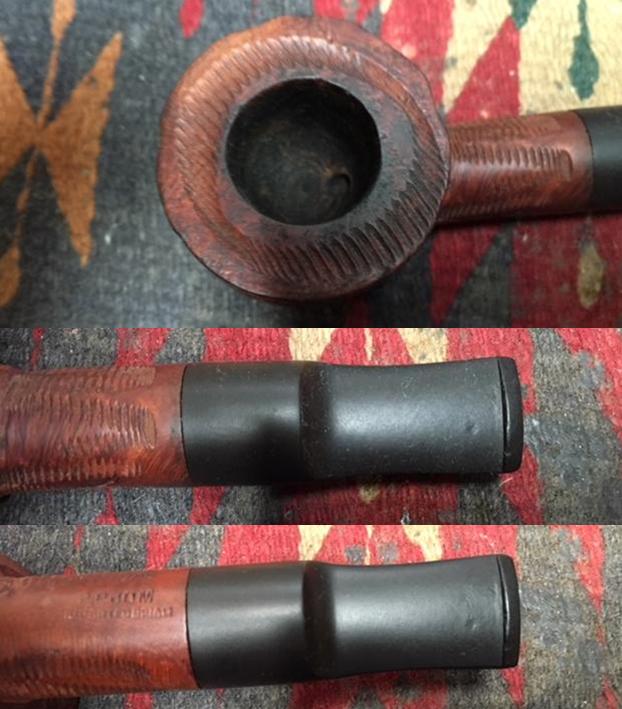
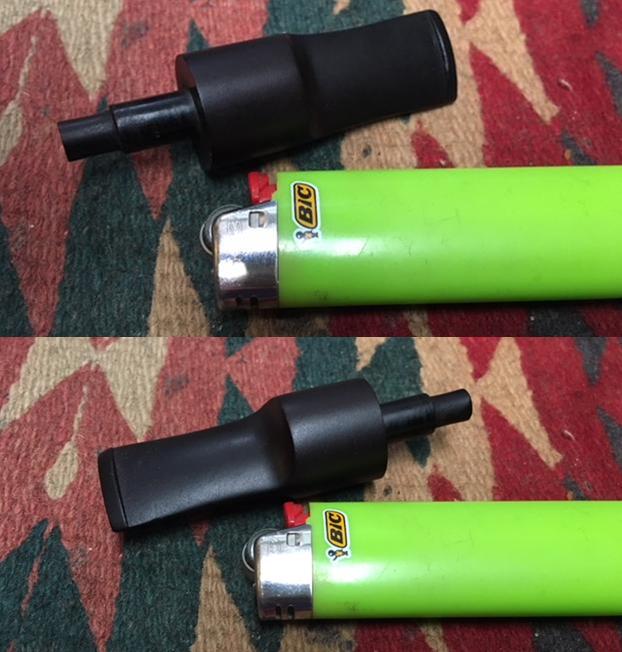
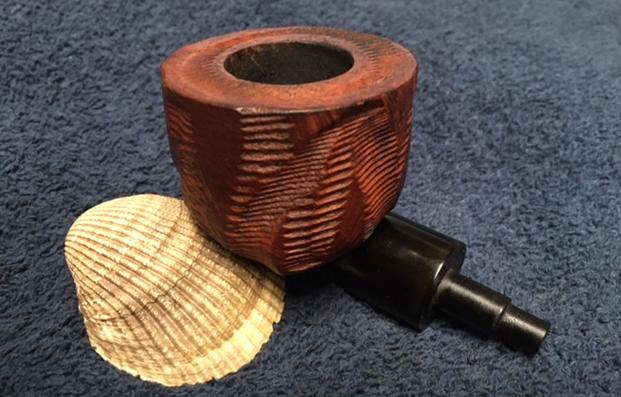
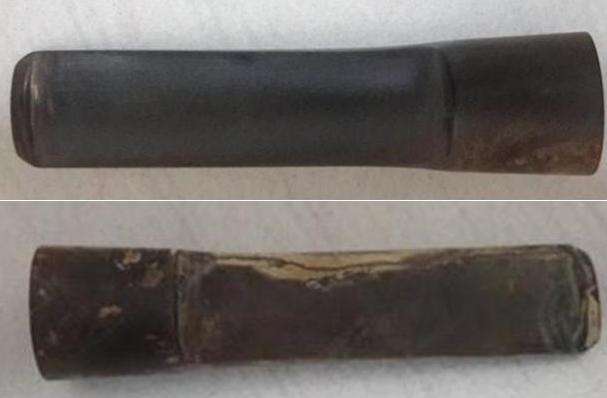
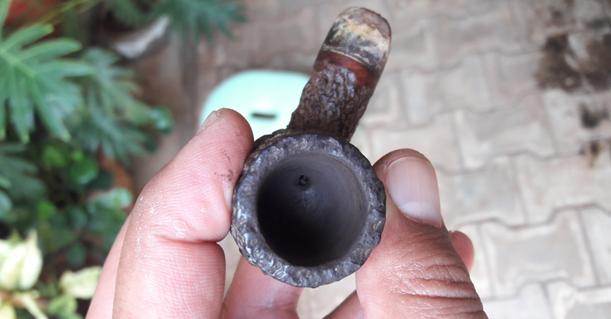
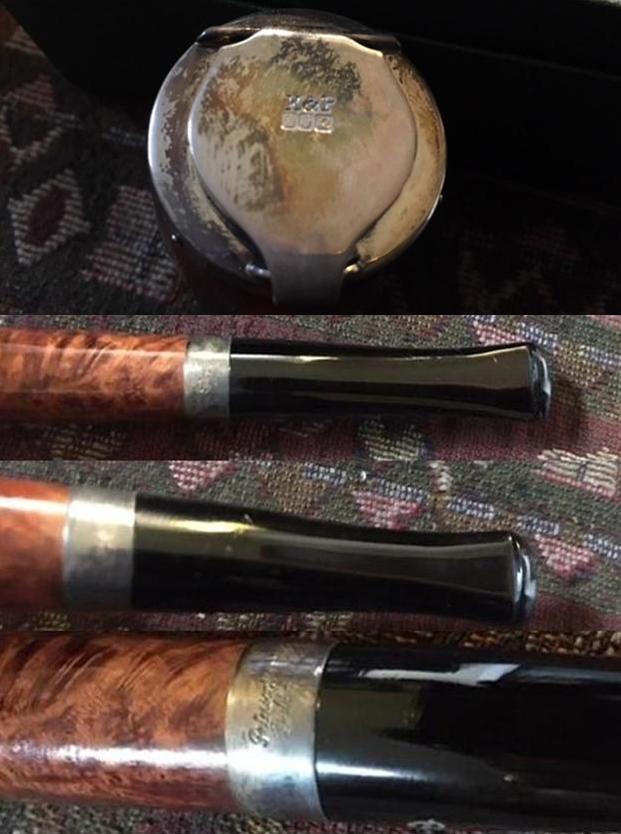
The Billiard came with an adapter in the tenon that was removable allowing the pipe to be smoked with or without the 9MM Absorba Filters. The pictures below show the adaptor in and out of the tenon. 
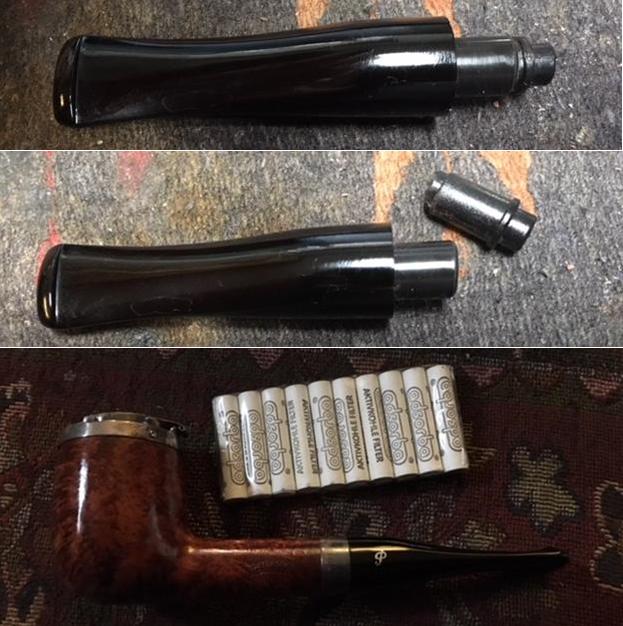
I polished the silver on both pipes with a jeweler’s polishing cloth that removes tarnish and protects silver. I worked over the bands and caps on both pipes as well as the silver P on the stems.
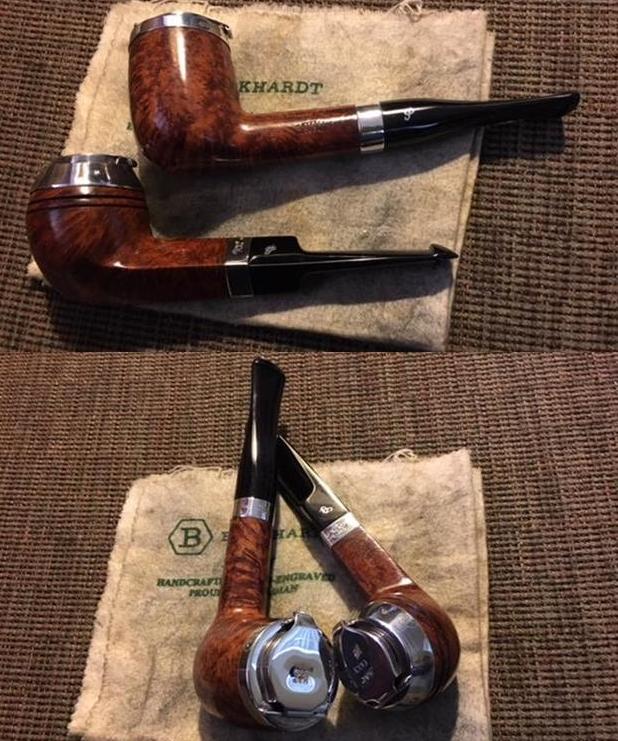
I did some hunting for information on the pipes in a Peterson’s Catalogue I have on rebornpipes (https://rebornpipes.com/2015/05/15/a-beautiful-peterson-of-dublin-pipe-catalogue/). I have copied several pages from the catalogue for use here. The first page shows the Silver Cap series. The two pipes in this blog are Natural Finished pipes – shape number 150 and number 106. I have circled both of them in the picture below.
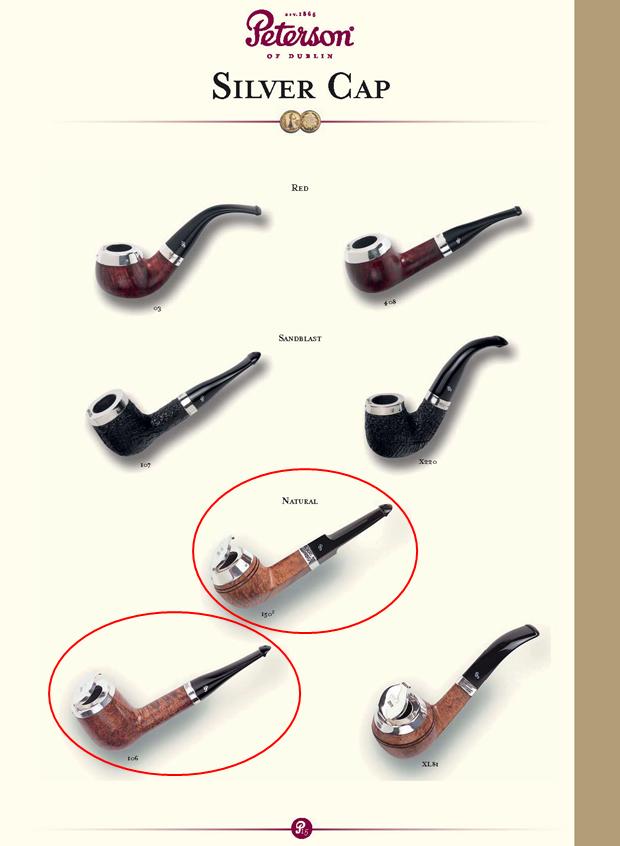
The second page I have included is a hallmark chart below that helps date the pipes. Both pipes have the standard Peterson’s Hallmarks. On both pipes each hallmark is the same. The first mark is the Hibernia which identifies the country of origin as Ireland. The second mark is the Crowned Harp mark is the fineness mark which denotes the quality of the silver as 925. The third mark is the date mark which in this case is the cursive Q identifying the year of manufacture as 2000.
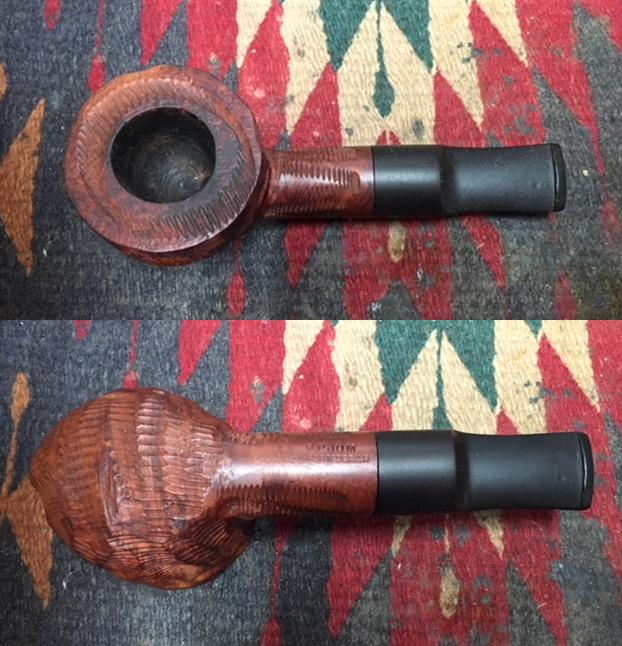
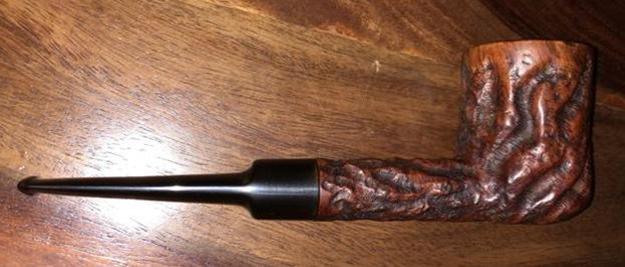
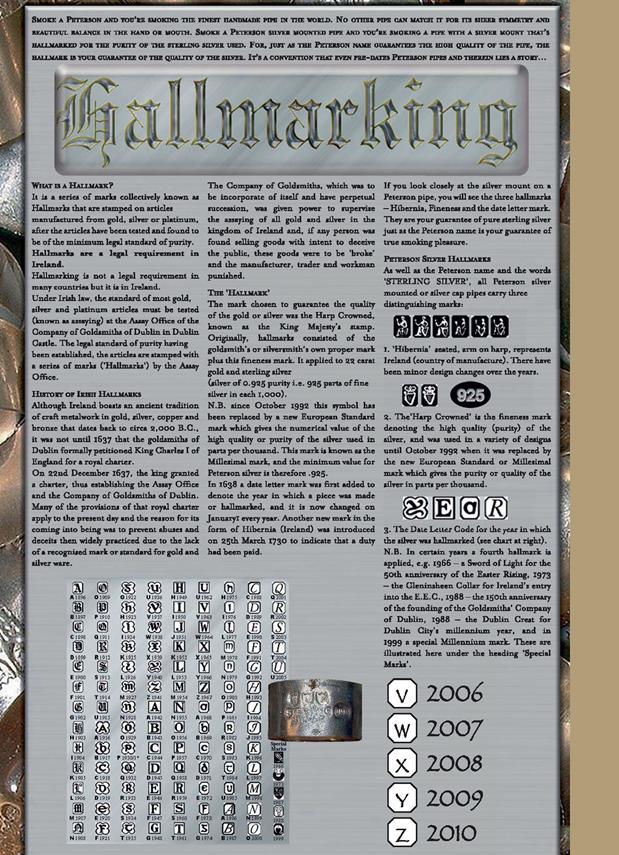
Here are photos of the finished pipes. The first is the Dublin Silver Cap 150 Bulldog. The first picture shows the box end with the shape number and the pipe shop price of the pipe new. The dimensions of the pipe are: Length: 5 1/2 inches, Height: 2 inches (including the cap) Diameter of the Bowl: 1 ¼ inches, Diameter of the Chamber: 3/4 inches. This is a beautiful pipe and will be going on the rebornpipes store. If you are interested in adding it to your collection have a look there. 
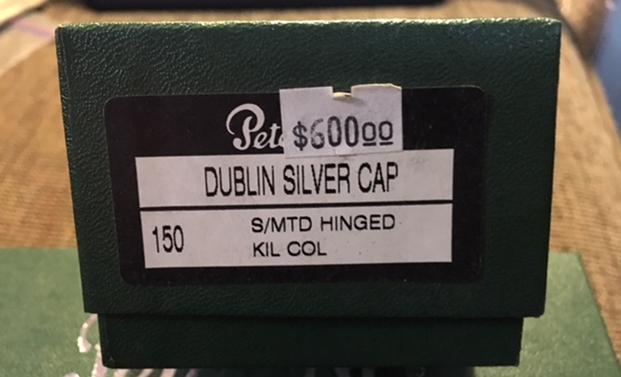
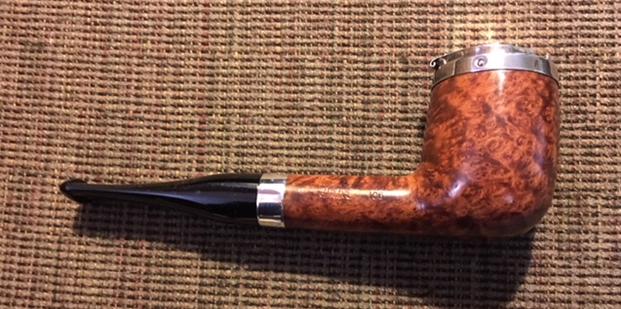
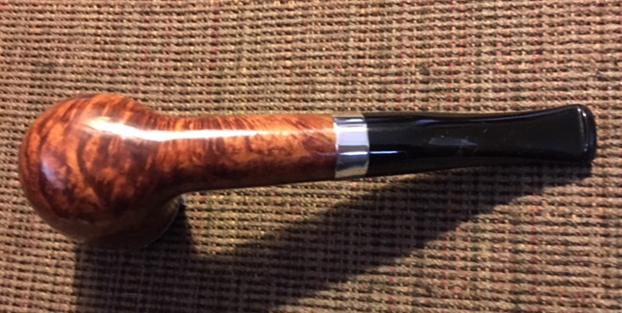
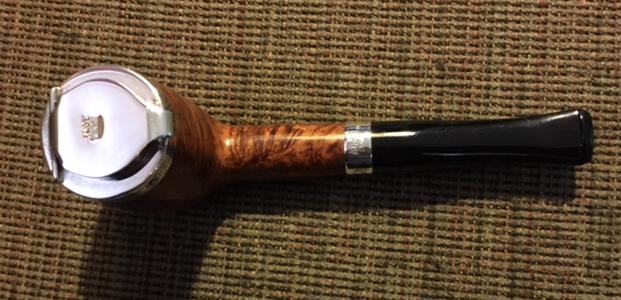
The second pipe is the Dublin Silver Cap 106 Billiard. The first picture shows the box end with the shape number and the pipe shop price of the pipe new. The dimensions of the pipe are: Length: 6 inches, Height: 2 1/8 inches (including the cap) Diameter of the Bowl: 1 1/2 inches, Diameter of the Chamber: 3/4 inches. This is another beautiful pipe and it will also be going on the rebornpipes store. If you are interested in adding it to your collection have a look there. 
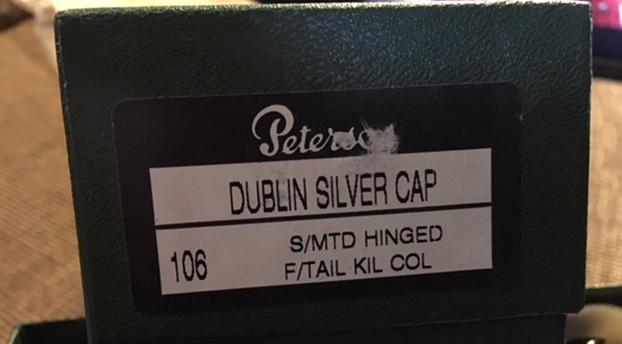
Both of these are beautiful pipes and will be worthy additions to a Peterson’s Collector’s rack. They have stunning grain and polished silver. The combination looks really good with the black of the stem and silver inset P on the left side of the stems. They are new old stock (NOS) and have never been smoked or even handled much since 2000. If you would like to add one of both to your collection let me know via email to slaug@uniserve.com or send me a message on Facebook. Thanks for looking.

Breathing New Life into a B.P. Jum War Club


Blog by Steve Laug

In one of the boxes of pipes that my brother Jeff sent me was a large, hefty carved pipe that was stamped BP Jum. It had a carved finish very similar to the carving on Custombilt pipes made by Tracy Mincer. The shape is also similar to the CB pipes. It is a large pipe – 5 ½ inches long, 1 ½ inches tall, outside wall diameter 2 inches and the chamber diameter 1 inch. The shank diameter is 7/8 inches. The stem is 2 ¼ inches long. The briar was very dirty with grit and grime in the depths of the carvings. The rim top was also dirty with lava and tars in the carving of the rim. There was cake built up on the walls of the bowl. The briar has a log of putty fills underneath the rustication with a large one on the left side of the shank. The stem was oxidized and dirty and there were tooth marks and chatter on both the top and underside of the stem near the button. The internals of the both the airway in the stem and shank and the mortise were very dirty with tars and oils. Jeff took photos of the pipe before he started his cleanup work on it. Jeff took photos of the rim top and inside of the bowl to show the condition. You can see the cake – not terribly thick but still visible and flaking nonetheless. It was not hard but was flaky and soft. He also took photos of the sides and underside of the bowl and shank. I have included those here. There was a smooth portion of briar on the underside of the shank that was stamped BP JUM over IMPORTED BRIAR. There were fills in the shank that are visible in the photo below.He took photos of the stem to show the tooth marks and the oxidation on the stem.I did some research to try to find out information on the BP Jum brand. There was a lot of conjecture as to whether the brand was made by Tracy Mincer of Custombilt fame. There is no definitive proof other than the common shapes, sizes and look of the pipes. Bill Unger, of Custombilt fame and author of a history of the brand, mentions BP Jum but cannot definitively connect the two. So the maker remains a mystery that is still unsolved. Do any of you reading this have information on the brand? Send me a message or an email if you can help. Thanks ahead of time.

Jeff had reamed the bowl with a PipNet pipe reamer and followed up with a Savinelli Fitsall pipe knife to remove the cake. He scrubbed out the mortise and the airway in the shank and the stem with alcohol, cotton swabs and pipe cleaners. He scrubbed the exterior of the bowl, rim, shank and stem with a tooth brush and Murphy’s Oil Soap to remove the oils and tars on the bowl, rim and shank. He rinsed it under running water. He dried it off with a soft cloth. The lava mess on the rim was thoroughly removed without harming the finish underneath it. Without the grime the finish looked good. The stem would need to be worked on. I took photos of the pipe to show its condition before I started my work on it.   I took close up photos of the rim top that shows the clean bowl and the small nicks and dents in the smooth portion of the finish. The stem was clean and Jeff had used Before & After Deoxidizer to soak and remove much of the oxidation. He rinsed out the inside of the stem and rinsed off the exterior as well. The photos of the stem show the tooth marks and chatter on both sides.The BP JUM stamp is very clean. You can see the putty fills on the left side of the photo as well as on the shank sides and the bowl itself. I used a Mahogany stain pen to touch up all of the fill areas on the pipe and blend them into the texture of the briar.I used a folded piece of 220 grit sandpaper to sand out the nicks and damage on the smooth parts of the rim. I polished them with micromesh sanding pads – wet sanding with 1500-2400 grit pads and dry sanding with 3200-12000 grit pads. I wiped the rim down after each sanding pad to remove the sanding dust. I rubbed the bowl down with Before & After Restoration Balm to deep clean the briar and particularly the sanded areas. The product works to clean, enliven and protect the briar. I hand rubbed it with my fingers and wiped it off with a soft cloth. I buffed the bowl with a horsehair shoe brush to polish it. The briar really began to have a rich shine. I took some photos of the bowl at this point to mark the progress in the restoration. I used clear super glue to fill in the large fill on the left side of the shank. I scored it with a knife to match the marks in the rustication. I stained the fill with a mahogany stain pen to match the briar and rubbed the area down with the balm to blend it.I waxed the cleaned and polished bowl with Conservator’s Wax and worked it into the rusticated finish. I buffed it with a shoe brush and a soft cloth. The bowl is finished other than the final buffing that I will do once the stem is finished. I set the bowl aside and turned my attention to the stem. I used a Bic lighter to paint the tooth marks with the flame and try to lift them. I was able to remove the lighter tooth chatter and lift the deep tooth marks partially. I sanded the stem and the surface of the button with 220 grit sand paper to remove the remaining tooth marks and reshape the surface and edges of the button. There were two tooth marks that were too deep and did not lift when heated. I filled them in with clear super glue. Once it had cured I sanded it down with 220 grit sandpaper to blend it into the surface of the vulcanite. I polished the stem with micromesh sanding pads – wet sanding with 1500-2400 grit pads and dry sanding with 3200-12000 grit pads. I wiped the stem down after each pad with a damp cloth to remove the sanding dust. I used the Before & After Pipe Polish to remove the small minute scratches left in the vulcanite. I finished by wiping the stem down with a final coat of Obsidian Oil and set it aside to dry. I polished the stem and bowl with Blue Diamond to polish out the remaining small scratches. I gave the bowl multiple coats of Conservator’s Wax and the stem several coats of carnauba wax and buffed the pipe with a clean buffing pad to raise the shine. I hand buffed it with a microfiber cloth to deepen the shine. The pipe polished up pretty nicely. The finished pipe is shown in the photos below. It is an interesting looking pipe that may have been carved by Tracy Mincer. It certainly bears a lot of resemblance to Custombilt/Custom-Bilt pipes.The dimensions are Length: 5 ½ inches, Height: 1 1/2 inches, Outside diameter of the bowl: 2 inches, Chamber diameter: 1 inch. I will be adding it to the rebornpipes store shortly. If you are interested in adding it to your collection email me at slaug@uniserve.com or send me a message on Facebook. Thanks for walking through the restoration with me as I worked over this BP Jum.


Restoring my grandfather’s Custom-Bilt pipe


Blog by Paresh Deshpande

Now that the WDC Bulldog with Bakelite stem and gold band has been sent to Mr. Steve along with one Linkman’s with Pat Number and one Barling Ye Olde Wood, I suddenly feel relieved off the pressure of messing up with the restoration of these sentimentally valuable old pipes of my grandfather. It always pays to have someone experienced to fall back on in case something goes awry, the way it did with the WDC mentioned above. I am sure that those of who have previously read about the restoration of the Pete System # 31 will be curious to know what exactly went wrong with the WDC that I have mentioned it twice!!! Well, I definitely intend to share this story with you, but all in good time!!!!!

The next pipe from the collection which I decided to work on was a huge Custom-Bilt briar pipe. The large size of the bowl, thick shank and large saddle stem, lends this pipe a weight which I particularly enjoy holding in my hand.The pipe has deep and large vertical rustications along the entire length of the shank and height of the bowl. Within these large vertical rustications are very thin, closely stacked horizontal lines which give this pipe its unique appearance and are its trademark!!! I absolutely loved this pipe. These large rustications end half a centimeter below the outer rim of the bowl giving it the semblance of a rim cap. The rim top is covered with the same thin, closely stacked lines as seen between the vertical rustications.The pipe is stamped on the left side of the shank as “Custom-Bilt” on a plane surface. There is also a five-pointed star on the right side of the shank where the shank and stem meet (this star was revealed later after cleaning the pipe!!!).I searched the internet for information in order to date this pipe. Pipedia has  a lot of information about this pipe and just typing in Custom-Bilt in the search bar of the site will reveal the required information. There is an interesting review given by Richard Esserman  on a book written by   William E. Unger, Jr., PhD, which deals with the study of Custom-Bilt pipes. The author authoritatively states, after a lot of research and study that the stamp as seen on this particular pipe dates it from between 1938 – 1946!Initial inspection of the pipe revealed the following:

There is a thick layer of cake in the bowl. Though the cake appears thin, the sheer size of the bowl makes it appear so.The rim is covered in the overflow of lava, dirt and grime. The outer edge of the rim appears to be in good condition with no damage. The condition of the inner edge will be determined only after removing the cake.

The large vertical rustications are filled with dust, oils, dirt and grime to such an extent that the horizontal lines lying within are barely visible. Same goes for the rim top.  The stem is firmly stuck to the shank and will not budge. However, there is only one light bite mark below and above the stem near the lip. This is a big surprise since all the other pipes are heavily chomped up!THE PROCESS

Before I could start the work of cleaning the pipe, I kept it in the freezer overnight so as to separate the stem from the shank. Come morning, I removed the pipe from the freezer and tried to remove the stem, but it still did not budge! I let it rest outside for an hour and after applying considerable force, the stem came free, revealing an aluminum tenon fixed permanently into the shank.My first impression was that of having broken and ruined the stem. Further examination of this protrusion confirmed two airways, a larger one above a smaller one, both with the same draught hole at the other end.There is also a gap between the end of this aluminum protrusion and the airway hole inside the stem. This gap is covered in oils, tars and gunk. My guess is that the smoke drawn is swirled and the turbulence results in a cool and dry smoke. Any confirmed inputs will be highly appreciated.Using a Kleen Reem pipe tool, Abha, my wife removed all the thick cake from the bowl. She further cleaned the bowl down to the bare briar using a knife that I have especially fabricated for cleaning pipes. It may not be as classy as a Savinelli Fitsall knife, but performs efficiently to our satisfaction.A sanding down of the insides of the bowl by a 220 grit sand paper made the inner surface of the bowl nice and smooth. Abha had sanded down the inside of the bowl down to its briar. On close scrutiny of the insides of the bowl, I saw what appeared to be cracks in the bowl and that had me in sweats!!! Immediately forwarded pictures of the same to my mentor and Guru, Mr. Steve who laid my fears to rest by assuring these were not cracks and that further sanding should take care of these things. These lines which appeared like cracks disappeared after sanding down with a 220 grit sand paper.Thereafter, using Murphy’s oil soap ( undiluted ) and a hard bristled toothbrush on the exterior of the bowl, shank and rim, the pipe was thoroughly cleaned and rinsed under running tap water. I immediately wiped it down with a soft cloth. The long vertical rustications and the horizontal lines within were now clean and the briar looked clean and solid. I then left the briar to dry out. This product, I find to be very easy to use and the results are really amazing. The briar takes on a new look and a new shine. While the briar was drying out, I turned my attention to the stem. Since there is only one small, light bite mark on both the sides of the stem near the lip, I felt that it can be addressed by holding it over a Bic lighter and during sanding down using a 220 grit paper followed by micromesh sanding pads. Since there is no stamping on the stem, the work progressed relatively faster. After a 220 grit sanding, I wet sanded it with 1500 – 3200 micromesh sanding pads and dry sanded with 3400 – 12000 grit sand paper. In between each micromesh pad, I wiped it down with extra virgin olive oil, which I find is a perfect substitute for Obsidian oil which is not available in India and olive oil also tastes great! The stem is now nice and shiny. However, the light bite marks on both upper and lower sides can still be seen even after the using the Bic lighter and the sanding down process. This should have been addressed right at the beginning by either filling it with black super glue (which I do not have) or by using activated charcoal as suggested by my Guru, Mr. Steve. Well, this was a lesson learnt during this project.

Once the briar had dried out completely, I rubbed in Before and After Restoration Balm deep into the rustications as well as the rim top. The bowl was then wiped vigorously with a soft cloth and buffed with a horse hair shoe brush. The result is very pleasing and satisfying to the eyes! I am happy with this progress. This balm is a fantastic product for infusing a new life into the briar and giving it a new lease of life.While on a FaceTime call with Mr. Steve, I had conveyed that I do not have a buffing wheel and other waxes. He advised me to use boot wax which is readily available with us, it being an inescapable requirement in my profession and believe you me, it works wonders. I can rely on his vast experience to come up with such simple, uncomplicated and practical solutions, specifically tailor-made for you. Thank you, Sir.

The finished pipe is as shown below. I enjoyed working on this large Custim-Bilt pipe belonging to my grandfather. There are still a number of pipes which I have to work on and the next one is an old Stanwell, de-Luxe # 482 with Regd number 969-48 and a KRISWILL “CHIEF” #20. I have to work really hard and fast so as to complete as many pipes as possible before my leave ends!!!!

Restoring My Grandfather’s Peterson’s System “31” Made in Eire Billiard


Blog by Paresh Deshpande

Over the past few months I have restored quite a few of Paresh’s Grandfather’s pipes. They have been both fun and challenging with the variety of issues each one presented. Throughout the process Paresh and I have corresponded and talked about procedures and methodology of the restorations and I encouraged him to give it a try. His family had passed on a large collection of his Grandfather’s pipes to him so it seemed to be a natural thing in my mind that he does the cleanup work on as many of them as he could. It just seemed fitting that the grandson does the restoration and then enjoy the pipes. He took me up on it and asked that I walk him through the process. We have talked a few times via FaceTime, linking India and Canada, to assess and plan the restoration. I asked Paresh to write some blogs on the work he is doing. Here is the first of those blogs. Welcome to rebornpipes Paresh. It is great to have you here. We look forward to seeing more of your work. — SteveWork had come to a halt on the WDC with the gold band “Bulldog” due to an extended curing time on the repairs to the stem as well as non-availability of Steve till 28 May ’18 to further guide me  on the complicated (…by my standards!!) stem restoration. I decided to tackle a relatively straight forward restoration, as it appeared to my untrained eye, of a Pete system “31”, Made in Eire.

VISUAL EXAMINATION

The “31” is a beautiful little pipe with a lovely rusticated pattern. At the shank end, it has a nickel ferrule bearing three shields with the inscriptions ‘K ‘&’ ‘P’ respectively over “PETERSON” over “DUBLIN”.The smooth surface on the underside of the shank is stamped with the words “MADE IN EIRE” within a circle; the word “IN” being in the centre. Right of the COM stamp is “PETERSON’S” over “SYSTEM” OVER “31”.The “P” in Peterson’s is the ‘old style’ lettering that used a forked tail. This pipe can easily be dated to the 1938 – 41 period when Peterson’s stamped their pipes with COM stamp “MADE IN EIRE”. Secondly to quote from thepetersonpipeproject.blogspot.in, an authority on the dating of Peterson’s pipes states, “From the beginning of the Patent Era until somewhere in the early 1930’s Peterson used the ‘old style’ lettering that used a forked tail “P” in Peterson.

The bowl was filled with cake and overflowing lava on the rim top, though not very heavily, which was a surprise, since all my grandfather’s pipes restored by Steve and I till date were heavily caked.The rustications were filled with dirt and grime coming from being uncared for and unused in storage since the late 1960’s giving it a very dull and dusty look. The ferrule was oxidized and discoloured and came off of the shank easily, giving rise to fears of hidden surprises underneath on the shank end. However, no such surprises were in store for me this time! The stem was very heavily oxidized, giving it a dirty greenish colour. The stem has a permanently fixed long, protruding rubber tube/nozzle extending well past the draught hole. The edges of the P-lip are perfect, however, there are a few light bite marks on the stem. The only issue I foresee having to deal with is the foul smell! I hope that when the cake is removed, the smell too will disappear.

THE PROCESS OF RESTORATION

As is the un-written understanding between Abha, my wife, and myself, Abha started work on the bowl (……she hates dealing with the stems!!!!) by reaming it with a Kleen Reem tool and a vintage British Buttner pipe reamer. Within no time the cake was reamed out of the bowl and Abha proceeded to sand it down using a 220 grit to bare briar wood. In spite of removing the cake, the foul smell still persisted.While sanding down the chamber with a 220 grit sand paper, the exposed briar revealed the letter ‘P’ stamped on the bottom of the bowl near the draught hole!!I searched the internet for information since I had never read of a Peterson’s to sport such a stamp. Unable to find any related information, I sent pictures of the same to Steve of rebornpipes fame. He too had not seen such stamping before. I request, if any one has any information or knowledge to share, please do so.

Thereafter, I started work on the internals of the pipe. The draught hole was blocked to the extent that a bristled pipe cleaner could not pass through. I tried to blow through the lip of the stem, but air would not pass through. The reservoir was filled with tar, grime and gunk and so was the stem. It is amply evident from this pipe and all other pipes belonging to my grandfather that he did not like to clean his pipes and hence the large collection of Barlings, Charatan’s, WDC’s, GBD’s, Kriswills and other Danish brands.I completely cleaned the reservoir and mortise using alcohol, pipe cleaners, shank brush and qtips. Using a dental spatula, I scraped out all the accumulated tar, oils and gunk out of the reservoir till bare briar was visible under torchlight and all pipe cleaners/cue tips came out clean.To get rid of the foul smell, the bowl was treated with kosher salt and alcohol overnight. After cleaning it thoroughly, the pipe now smelt fresh.Thereafter, I cleaned the bowl with Murphy’s oil soap and a hard bristled toothbrush, thoroughly cleaned the bowl deep into its rustication and rinsed it under running tap water. I dried the pipe bowl completely using a soft cotton cloth and left it to dry completely overnight.Next morning, I rubbed a Before and After Restoration Balm with my fingers and worked it deep into the rustication. After a few minutes I cleaned and polished it using a soft cotton cloth. The briar really began to look good. I further buffed it using a horse hair shoe brush till the bowl began to shine a bit. Finally, I rubbed a tiny amount of HALYCON II WAX on the bowl and waited a few seconds. Thereafter, using a microfiber cloth and plenty of muscle power over a prolonged period of time, I was finally satisfied with the way the bowl looked at this stage (pics).With the bowl finally finished, I turned my attention to the stem. A stated earlier, the stem was clogged to such an extent that air did not pass through it. I cleaned it out using alcohol, bristled and regular pipe cleaners. I used a Bic lighter to raise the light bite marks. Using a 220 grit sand paper, I completely removed the oxidation from the vulcanite surface. Thereafter, I went through the micromesh sand papers, wet sanding it with 1500 to 3200 and dry sanding with 3600 to 12000 grit paper. I rubbed extra virgin olive oil in between each.The stem now has a nice shiny and smooth black surface which looked classy and beautiful with the rusticated bowl. The finished pipe is shown below. This will definitely find a place of pride in my collection and remind me of the memories of my GRAND OLDMAN. I  am most grateful to Steve Sir for guiding me through this project and always suggesting alternate and practical methods since I have huge handicap of materials and equipment, being either unavailable or being un-economical as I am just pursuing this as a hobby and restoring the memories of my grandfather whilst smoking these inherited pipes!

I shall be grateful and obliged to be made aware of my mistakes and scope for improvement in both, the write up as well as the procedures and methods adopted during the refurbishing of the pipe.DIMENSIONS OF THE PIPE
Length:                         5  ¾ inches
Bowl height:                1  ½ inches
Bowl depth:                 7/8 inch
Bowl inner diameter: 7/8 inch