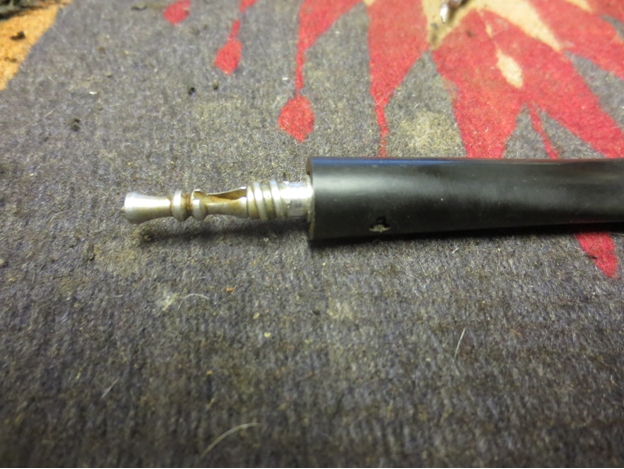
I have run into a challenge when seeking to restem several older Kaywoodie and Dr. Grabow pipes. The challenge was whether to keep the pipe original (my natural inclination) or to drill out the mortise and install a push stem. If I was going to keep it more original then the issue was how to move the stinger/tenon apparatus from a broken or damaged old stem to a new one. In the original stem the threaded tenon fit perfectly into the mortise on the bowl. The alignment was tight against the shank and the diameter of the old stem worked. Worst case scenario I could realign the stem and the fit would be fine. So the question for me in restoring these pipes was how to move the tenon/stinger apparatus from the old broken stem to the new one. From reading various forums on Kaywoodies and Dr. Grabow pipes I had learned that you could heat the tenon and adjust an overturned stem. After thinking about this for a bit I wondered if heating the tenon might also let me remove it from the old stem. For the purpose of this essay I used an older Dr. Grabow Regal Adjustomatic stem as the experiment for moving a tenon/stinger apparatus to a new stem. I have written about the full restoration of this pipe in an earlier article (https://rebornpipes.com/2014/09/14/rebuilding-a-dr-grabow-regal-adjustomatic-patent-billiard/). 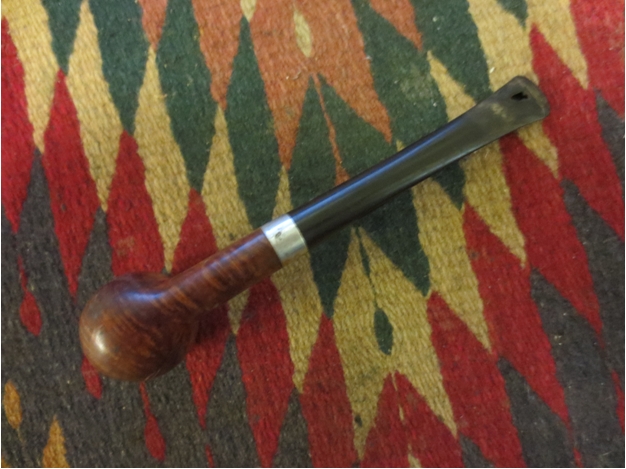 The stem I wanted to use for a replacement was an old Kaywoodie stem. It too had a metal tenon and stinger. The stem/stinger from the Kaywoodie would not fit the bowl as the threads were different from those found in the shank/mortise of the Grabow. I heated the stinger on the Kaywoodie stem with a Bic lighter until it was loose and I was able to carefully work it out of the end of the stem with a pair of needle nose pliers. It was pressed into the hole in the stem and was grooved to give some bite to the piece when it was glued in the stem. I could have used a heat gun to loosen the glue but decided to work with minimal tools this time to try and remove it. The lighter worked very well and within a few moments I had the metal tenon and stinger removed from the stem (Photo 1).
  I used the same process to heat the Grabow stinger/tenon with the lighter as well and tried to work it out of the stem with the needle nose pliers. I was able to move it very slightly but was unable to pull it out of the stem. I decided to use the mortise in the shank to help me remove the part from the old stem. I reheated it and screwed the tenon into the shank of the pipe and twisted and pulled on the stem. It came out about a third of the way. I reheated it and repeated the process until I was able to work it all the way out of the stem. In the photo below the KW stinger/tenon and stem are shown in the front and the Grabow stinger/tenon and stem in the back of the photo next to the lighter. The Grabow apparatus was smooth and held in place by friction and light glue. The stinger end was also removable from the Grabow tenon (Photo 3).
 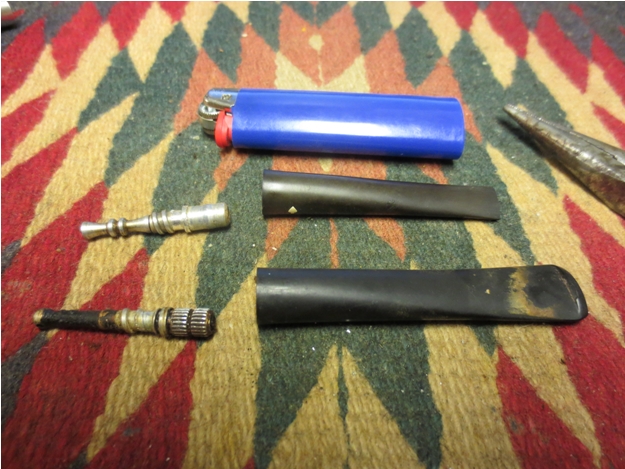 The diameter of the insert on the Grabow tenon was slightly larger than the one on the KW stem. In experimenting I found that it was one drill bit size larger. I used that drill bit with a cordless drill and opened the hole in the KW stem to receive the Grabow tenon. I also had to drill the hole a little deeper into the stem to account for the added length of the end of the Grabow insert (Photo 4).
 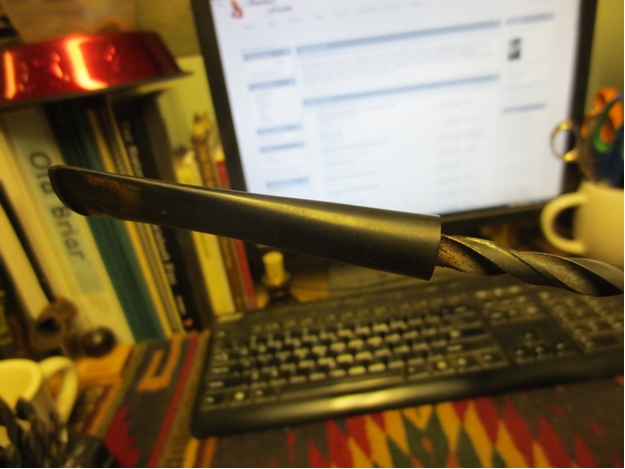 In redrilling the KW stem I removed the inset that had held the lip on the original tenon insert. In order for the Grabow tenon lip to fit correctly against the stem when fully inserted I would need to make allowance for that inset once again. I used a sharp knife and beveled the inner edge of the airway on the stem at a sharp angle and worked on it until the insert fit tight against the end of the stem when inserted (Photo 5).
 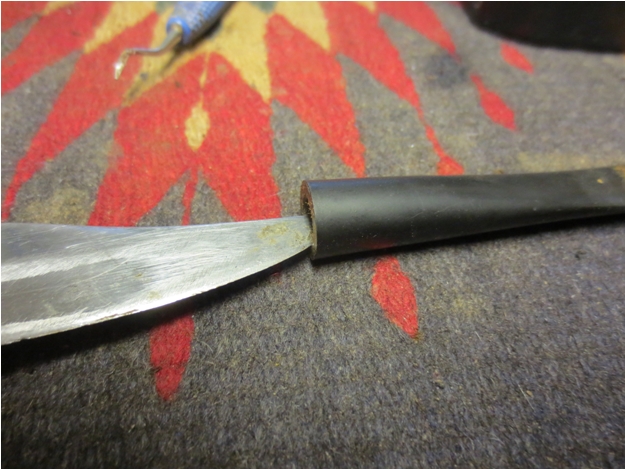 I pressed the insert into the stem to check on the depth of the hole and the fit against the stem. I always do this before I glue it in place and make more work for myself if it is incorrect. Once I was certain that the fit was correct I removed the tenon and put a thin coat of all purpose white glue on the end and screwed it into the mortise on the shank. This would allow me to adjust the stem and line it up before the glue set. I pushed the stem onto the glued end and lined it up. When the glue had set I unscrewed the stem and tenon and cleaned up the end of the threaded tenon and inserted the stinger (Photos 6 & 7).
 The next photo shows the two stems – the KW stem with the Grabow stinger/tenon in place sitting next to the old Grabow stem. All that remained at this point was to work on the diameter of the stem itself and make the transition from the shank to the stem seamless (Photo 8).
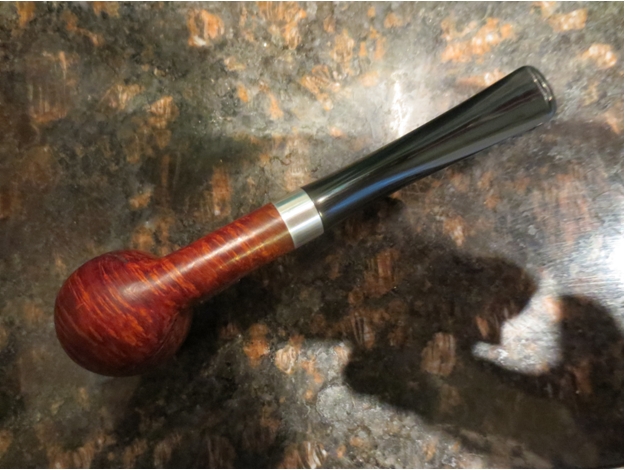
  I have included the next two photos (Photos 9 & 10) of the finished pipe to show the entire pipe once the new stem was in place. The stem fit well in the shank – tight against the metal mortise with no gap. The new stem fit as well as the old one but had no bite marks or holes. Over all the process of moving the metal fitment was quite simple. It was a matter of heat, drilling and pressure to put the old tenon in a new stem. A bit of sanding and polishing and the new stem was good to go and the old pipe was back into service.
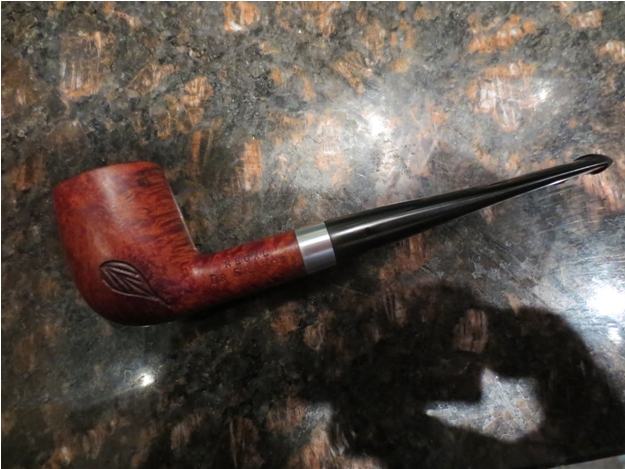
Transferring a Stinger/Metal Tenon Apparatus from One Stem to Another
1 Reply
