Blog by Steve Laug
The next pipe on the work table is smaller cherry red Peterson’s Bent Billiard pipe that we purchased from and our connection in Copenhagen, Denmark on 01/26/2023. It was stamped Killarney in script on the left side of the shank. On the right it is stamped “A Peterson’s Product” [over] Made in the Rep of Ireland (in two lines) [over] the shape number 65 near the bowl/shank junction. It has a smooth, shiny red finish with great grain around the bowl and shank that is covered with a lot of oils, debris and grime. There was a thick cake in the bowl with remnants of tobacco stuck on the walls. There was a lava overflow on the rim top and edges. The top and edges of the rim were well hidden under the tars and lava. It appeared that there was a beautiful pipe underneath all of the buildup of years of use. The stem was a Peterson’s style Fishtail stem that did not fit fully against the shank. There was a gap and the stem would not fit snug. It was oxidized and calcified toward the end with some tooth marks and chatter. The button edges were quite clean. Jeff took photos of the pipe before he started his cleanup work on it.
 Jeff took photos of the bowl and rim top to show the thick, hard cake in the bowl with remnants of tobacco stuck on the walls of the bowl. There was a lava build up on the top of the rim and the edges of the bowl. The rim top looked pretty good but it was hard to know for sure if there was damage under the thick lava. Only clean up would tell the full story. Jeff took photos of the top and underside of the stem showing the tooth chatter, scratching, calcification and oxidation on the stem surface and wear on the edges of the button.

 Jeff took photos of the sides and heel of the bowl to show the condition of the finish. You can see the grime around the sides of the bowl and shank. Even under the dirt and debris of the years it looked very good.
 Jeff took photos of the stamping on the sides of the shank. The stamping was readable as you can see from the photos. It read as noted above.
 I am including the information from Pipedia’s article on Peterson pipes. It is a great read in terms of the history of the brand (https://pipedia.org/wiki/Peterson).
I turned to “The Peterson Pipe” by Mark Irwin and Gary Malmberg to get some background on the Kilarney Pipe. On page 306 it had the following information on the pipe.
Kilarney (1949-) Entry line with smooth finish and P-Lip mouthpiece. May have either a K or P stamped on the mouthpiece; may have aluminum singer (not to be confused with the tenon extension tube found on straight System pipes). 1949-c.1957 examples made for the US market may have any of the following COM stamps: MADE IN IRELAND (forming a circle), “A PETERSON’S PRODUCT” over MADE IN IRELAND or LONDON MADE over ENGLAND. Some early specimens stamped KILLARNEY over NATURAL (a higher grade) have MADE IN IRELAND (forming a circle). Examples c. 1986-90 feature a nickel band, which was replaced in ’91 with a shank extension of nickel band with black acrylic inlay. Fishtail mouthpiece from ’86 although P-Lip is sometimes seen. For the current German market, the Killarney is stamped CONNEMARA
I knew that I was dealing with a pipe made 1991 due to the stamping on the shank and the shank extension of a nickel band with black acrylic inlay. It has the “P” stamp on the stem side and a P-lip mouthpiece. Now it was time to work on the pipe.
Jeff had done a great job cleaning up the pipe as usual. He reamed the pipe with a PipNet reamer and cut back the cake back to the bare briar. He cleaned up the walls with a Savinelli Fitsall Pipe Knife. He scrubbed the interior of the bowl and shank with pipe cleaners, cotton swabs and alcohol to remove the tars and oils. He scrubbed the exterior of the pipe with Murphy’s Oil Soap and a tooth brush to remove the grime from the finish. He worked on the rim top lava and darkening with the soap and tooth brush. He scrubbed the inside of the stem with alcohol and pipe cleaners. He scrubbed the exterior with Soft Scrub and then soaked it in Briarville’s Pipe Stem Deoxidizer. He washed it off with warm water to remove the Deoxidizer. The pipe looked far better when it arrived. 
 I took some close up photos of the rim top and also of the stem surface. I wanted to show what an amazing job Jeff did in the cleanup of the rim top. The rim top and inner edge had some slight darkening on the top. The edges of the bowl looked very good. I also took close up photos of the stem to show the condition of the vulcanite. It was quite clean and there were light tooth marks on the button and on the stem.
 One of the things I appreciate about Jeff’s cleanup is that he works to protect and preserve the nomenclature on the shank of the pipes that he works on. The stamping on this one was very faint to start with so I was worried that it would disappear altogether with the cleanup. He was not only able to preserve and maintain its condition in the process. I took some photos to show the clarity of the stamping. I have noticed that many restorers are not careful to protect the stamping in their cleaning process and often by the end of the restoration the nomenclature is almost destroyed. I would like to encourage all of us to be careful in our work to preserve this as it is a critical piece of pipe restoration! I took the stem off the shank and took a photo of the pipe.
 I polished the rim top and edges of the bowl with micromesh sanding pads – dry sanding it with 1500-12000 grit sanding pads. I wiped it down with a damp cloth after each sanding pad to remove the dust. The briar was really shining by the final pad.
 I rubbed the bowl and rim down with Before & After Restoration Balm. I worked it into the surface of the briar with my fingertips to clean, enliven and protect it. I let the balm sit for 10 minutes and then buffed with a cotton cloth to raise the shine. I really like watching the Balm do its magic and bring the briar alive.

 I set the bowl aside and turned my attention to the stem. I “painted” the stem with the flame of a Bic lighter to lift the tooth marks. I was able to lift all but two – one on the top and one on the underside. I filled those in with clear CA glue. I sanded the repairs with 220 grit sandpaper. I started the polishing with 600 grit wet dry sandpaper.

 I touched up the “P” logo on the left side of the saddle stem with white acrylic fingernail polish. I let it dry then I polished off the excess with a worn 1500 grit micromesh sanding pad. Once the excess was removed the stamp looked much better. There were some weak spots on the leg and tail of the “P” stamp.
 I polished the stem with micromesh sanding pads – wet sanding with 1500-12000 grit pads. I wiped the stem down after each sanding pad with Obsidian Oil.
 I polished it with Before & After Pipe Stem Polish – both Fine and Extra Fine. I gave it a coat of Obsidian Pipe Stem Oil. It works to protect the stem from oxidizing. I set it aside to dry.
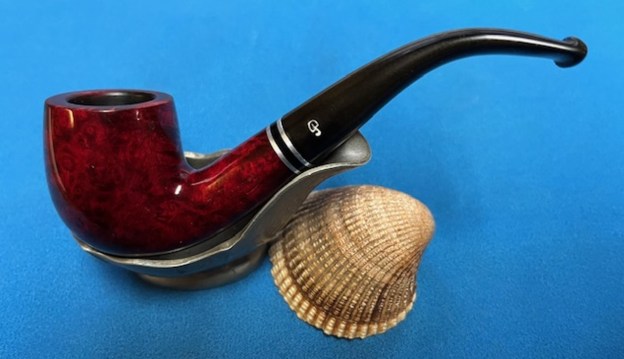
 Once again at this point in the restoration process I am excited to be on the homestretch. I look forward to the final look when the “A Peterson’s Product” Killarney 65 Bent Billiard with a taper stem is put back together, polished and waxed. I put the bowl and stem back together. I lightly polished the bowl and stem with Blue Diamond to polish out the scratches in the briar and the vulcanite. I gave the bowl and the stem multiple coats of carnauba wax. I buffed the pipe with a clean buffing pad to raise the shine. I hand buffed it with a microfiber cloth to deepen the shine. The pipe polished up pretty nicely. The depths of the rustication really pop with the wax and polish. The shiny black vulcanite stem is a beautiful contrast to the browns of the bowl and thick shank. This Republic Era Peterson’s Killarney 65 Bent Billiard was another fun pipe to work on. It really is a quite stunning piece of briar whose shape follows the flow of the briar. The pipe feels great in the hand will be better when warmed up while smoking. The finished pipe is shown in the photos below. The dimensions of the pipe are Length: 5 inches, Height: 1 ½ inches, Outside diameter of the bowl: 1 1/8 inches, Chamber diameter: ¾ of an inch. The weight of the pipe is 1.09 ounces/31 grams. I will be putting it on the rebornpipes store in the Irish Pipemakers Section if you would like to add it to your rack and carry on the previous pipeman’s legacy.
As always, I encourage your questions and comments as you read the blog. Thanks to each of you who are reading this blog. Remember we are not pipe owners; we are pipe men and women who hold our pipes in trust until they pass on into the trust of those who follow us.


