Blog by Dal Stanton
The Lot of 66 that I acquired last year continues to yield pipes to my worktable that are very collectible. Robert fares from the US state of North Carolina and he has seen many of my online posts on Facebook Groups – The Gentlemen’s Pipe Smoking Society and The Elite Pipes & Tobacco Groups. This is the fellowship and camaraderie I have discovered in these groups among other pipe men and women which many find to be very rewarding. With the internet being world-wide, the fellowship and relationships cross geopolitical borders and often the ‘Fellowship of the Pipe’ breaks down walls that are created because we live in a broken world. I’ve commissioned pipes from “For ‘Pipe Dreamers’ Only!” that have gone all over the world and it’s been enjoyable to correspond with those who have received pipes from my worktable. Robert saw an eye-catching Canadian and commissioned it and this unbranded, Made in London England is now on the worktable. Here are the pictures Robert saw. 

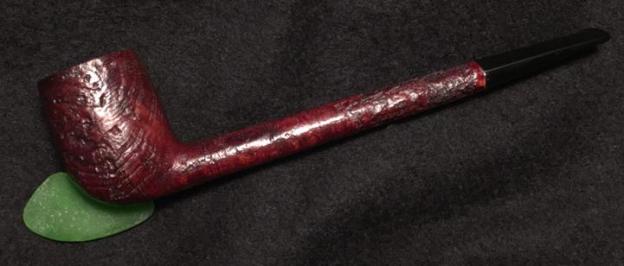
 Unfortunately, this Canadian has no identifying nomenclature other than MADE IN LONDON [over] ENGLAND. Yet, the ‘flavor’ of the pipe has a quality classic feel to it. The blasted surface is eye catching showing very distinctive grain in 3-D. This is not a poorly crafted pipe.
 Along with the attractive blasted finish, another reason this Canadian got Robert’s attention was the size: Length: 7 inches, Height: 1 3/4 inches, Bowl width 1 3/16, Chamber width: 3/4 inches, Chamber depth: 1 9/16 inches. It’s a long Canadian of 7 inches which is what everyone wants in this shape family. Working on a Canadian, I always find helpful Bill Burney’s Shapes Guide Pipedia article to understand the differences among the Canadian cousins. The oval shank and tapered bit identify the Made in London England as a straight up Canadian.
 Looking at his condition, the chamber has a light layer of cake but the rim along with the entire external surface look great – but a good cleaning will refresh the blasted surface. The stem has some oxidation and tooth chatter to address. For all that I see, this restoration should be straight forward.
I begin by adding the Canadian tapered stem to a soak of Before & After Deoxidizer with other pipes’ stems that are in queue for restoration. Before doing so, I use a pipe cleaner dipped in isopropyl 95% to clean the airway of the stem not only to clean the stem but also to keep the Deoxidizer from being contaminated. After soaking for some hours, I drain off the Canadian stem and wipe off the raised oxidation using a cotton pad wetted with light paraffin oil – Bulgaria’s version of mineral oil. The Deoxidizer does a good job of raising the oxidation. After cleaning the stem of the Deoxidizer, I still detect some deep oxidation. To deal with this I sand the stem first with 240 grit paper, also sanding out tooth chatter on the bit and button. I follow by wet sanding with 600 grit paper to erase the 240 grit scratches. I believe the oxidation has been removed.
 I put the stem aside for now and pick up the long, lanky Canadian stummel and begin by removing the light cake in the chamber. I put down paper towel to help in cleaning. Using the Pipnet Reaming Kit, starting with the smallest blade head and moving to the larger using 2 of the 4 blades available in the Kit. I follow this by using the Savinelli Fitsall Pipe Tool to scrape the chamber wall and to reach down into the chamber getting the harder to reach angles. Finally, to bring out fresh briar in the chamber, I complete the reaming by sanding the chamber wall with 240 grit paper wrapped around a Sharpie Pen which gives some leverage. To clean the carbon dust left behind I wet cotton pads with isopropyl 95% and wipe the chamber. With a clean chamber, I’m able to inspect its condition and I see no crack or heat fissures. It looks good!


 Next, I turn to the external blasted briar surface and clean using undiluted Murphy’s Oil Soap and cotton pads. I also use a bristled tooth brush to scrub the textured surface. There isn’t a lot of grime. The pictures show the progress.
 Turning now to the internals of the Canadian stummel, my main arsenal are shank brushes to reach through the long shank. I dip the shank brushes as well as pipe cleaners and cotton buds into isopropyl 95% to clean the airway. It doesn’t take too long.
 With the stummel clean, I now continue work on the stem. I begin by wet sanding using micromesh pads 1500 to 2400, following with dry sanding using pads 3200 to 4000 and then 6000 to 12000. Between each set of 3 pads I apply a nice coat of Obsidian Oil to revitalize the vulcanite stem. In the interest of full disclosure, after the completion of the first set of 3 micromesh pads, I detected oxidation at both upper and lower right-angle mergers of the stem and button. I backtracked and used a flat needle file to sharpen the button lips – upper and lower and removed the residual oxidation. I’m sparing you of the pictures that repeated the 240, 600 grit papers, 0000 steel wool and repeat of pads 1500 to 2400. On we go!

 Turning back to the Canadian stummel, next I apply Before & After Restoration Balm to the blasted briar surface to recondition and revitalize it. I like the Restoration Balm because it takes the briar where it is and deepens it – the change is subtle but noticeable. I’m anxious to see what the Restoration Balm does with a blasted surface. Most of my experience using it has been with smooth briar. I squeeze some Balm on my finger and work it into the briar surface. I make sure to work the balm into the nooks and crannies of the textured blasted surface. With the amount of briar real estate of this Canadian it takes 3 ‘squeezes’ of Balm to cover the surface adequately. After applying the Balm, I let the stummel rest for 10 minutes allowing the Balm to do whatever it does! I take a picture before application, during the 10-minute rest and after. You be the judge!
 After rejoining the Canadian stem and stummel, I mount a cotton cloth buffing wheel on the Dremel, set the speed at 40% of full power and apply Blue Diamond compound to both stem and stummel. Since I live in an apartment on the 10th floor of a former Communist blok apartment building and have limited space, one of the advantages I’ve discovered by using a Dremel as my main workhorse tool for buffing and drilling is that the buffing wheels are very small – about an inch in diameter. This allows me to surgically apply compounds and wax. This is especially helpful for a blasted or rustified surfaces like I’m working on now. I’m able to pivot the buffing wheels orientation to move along with the grain and not against it. This helps in spreading wax without it getting bogged up on the rougher surface. After completing the application of Blue Diamond compound, I buff the pipe well with a felt cloth to remove the compound dust before waxing. Next, I mount another cotton cloth buffing wheel onto the Dremel, maintain 40% full power speed, and I apply several coats of carnauba wax to the blasted Canadian briar surface and vulcanite stem. I finish the restoration by giving the pipe a hearty hand buffing using a microfiber cloth.
The grain on this blasted Canadian Made in London England is exceptional. Though it has no branding, I’m guessing it was produced in a factory producing other classic English pipes like GBD or BBB. This pipe demonstrates the classic long lines of a Canadian and therefore it is most definitely a keeper and will be a great addition to one’s collection. Robert commissioned this Canadian from For ‘Pipe Dreamers’ Only! and will have first opportunity to acquire it in The Pipe Steward Store. This Canadian benefits our work here in Bulgaria with the Daughters of Bulgaria – helping women and girls who have been trafficked and sexually exploited. Thanks for joining me!


