Blog by Paresh Deshpande
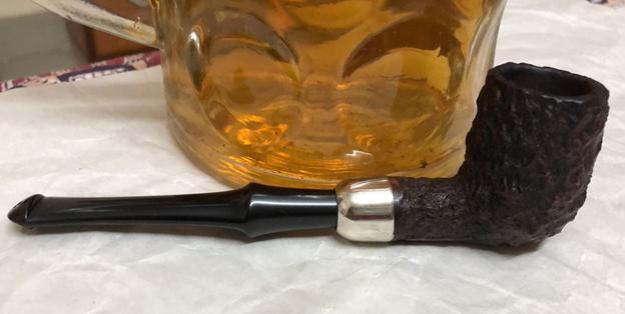
After having worked on my grandfather’s old 1938-1946 era Custom-Bilt large billiard pipe (https://rebornpipes.com/2018/06/02/restoring-my-grandfathers-custom-bilt-pipe/), I was keen to work on a second Custombilt in the collection. This particular pipe was a sitter with ¾ bend to the stem. It has a very interesting shape. Being at the bottom of the learning curve on identification of pipe shapes and restoration, any help in accurate description of the shape of this pipe would be highly appreciated!!!!
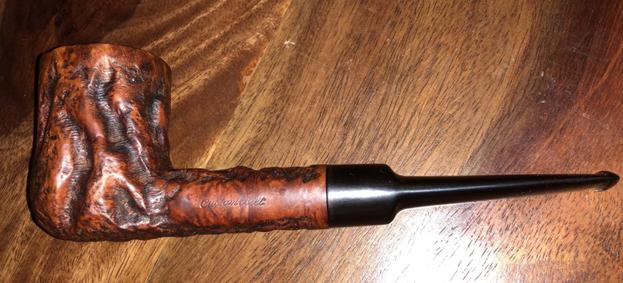
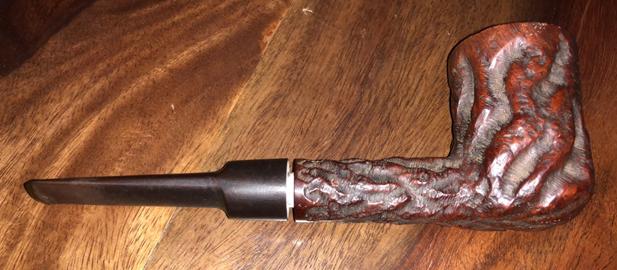
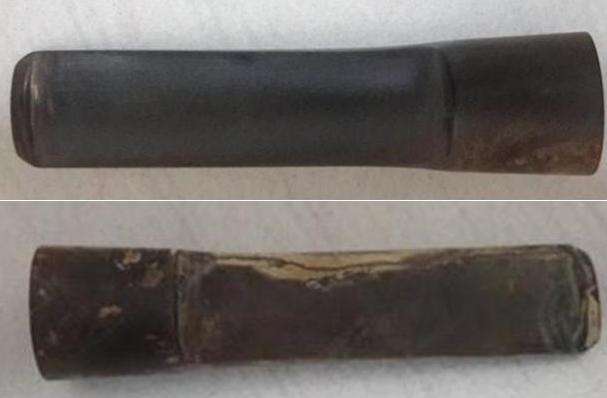
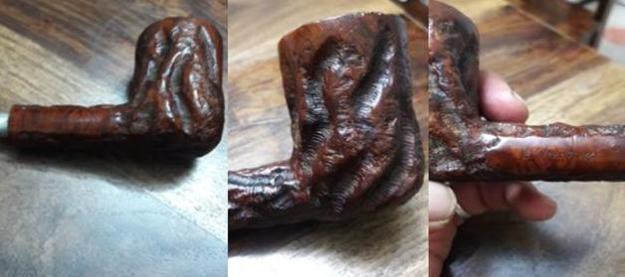
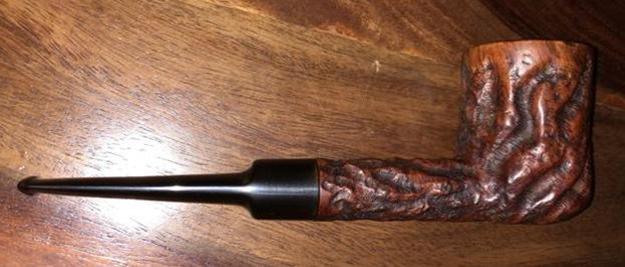
The pipe has thin (as compared to the thick rustication on the 1938-46 Custom-Bilt that I had previously worked on) wavy and haphazard rustication starting from the bottom of the bowl and extending upwards to the rim. These wavy, haphazard upward sweeping rustications give the impressions of flickering flames of fire. These flaming rustications at the back of the bowl reach nearly the outer edge of the rim from either side of the bowl and progressively lower down towards the front of the bowl.  The shank has four prominent rustications extending from the bowl towards the end of the shank forming four distinct plain panels, one each on the top, bottom, left and right side of the shank. The left and right panels house the stampings on the pipe while the top and bottom panels are blank highlighting the beautiful cross grains.
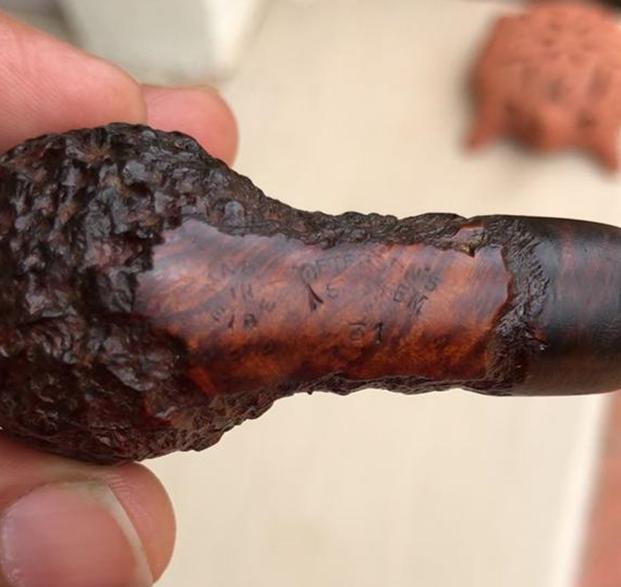
Under all the dust, dirt, oils, tars and gunk of all the years, stamping on the pipe can be read as “Custombilt” in cursive hand over “ORIGINAL” in block letters on the left side panel of the shank. The letter ‘C’ meets the ‘U’ nearly half way up from the bottom of the ‘U’. The right side panel of the shank bears the stamp # “633”. The stem is bereft of any stamping.  While restoring the first Custom-Bilt from my grandfather’s collection, I had visited Pipedia for collecting information and dating of Custombilt pipes (https://pipedia.org/wiki/Custom-Bilt). There is an interesting review given by Richard Esserman on a book written by William E. Unger, Jr., PhD, which deals with the study of Custom-Bilt pipes. I have reproduced some interesting excerpts from the webpage:
“The book opens up with an intriguing statement that unfortunately is never fully followed up: Before beginning this history, I need to emphasize an important fact and to ask the reader to keep it firmly. Spelling-Custom-Bilt, Custombilt, and other variations-is extremely important to the various aspects of the following discussions. It was not, however, important to many people in the company’s early days.
Perhaps the reason for this is that briar pipes were simply viewed solely as smoking instruments-even as a “longer term” disposable item (perhaps like a good pair of shoes). I would suggest that Tracy Mincer would be shocked that these pipes are being collected today.
Tracy Mincer started the original Custom-Bilt pipes it appears in 1934. Bill meticulously details the start of the Company, how it was financed, the changes in the original ownership, how the company distributed its product, the manufacturing process, certain patented items, and other interesting stuff.
Mentioned briefly in this chapter was the fact that Custom-Bilt was producing big, carved pipes using Algerian briar for production up to WW II. One important employee, Hetzer Hartsock, stated:
I can tell you something about that rough texture that Custom-Bilt had. One reason rough textured was used was not only for looks but it could hide flaws in the briar. [The process gave] A very uncontrolled cut. Then he [Tracy] would buff it out. [page 25]
In 1946, the name was changed to Custombilt after Mincer began an association with Eugene J. Rich, Inc. There were some big changes in advertising and distribution. The slogan “AS INDIVIDUAL AS A THUMBPRINT” began at this time as well.
In the early 1950’s, Tracy Mincer developed severe financial problems that caused him to stop making the Custombilt, and he lost the name. In 1953, Leonard Rodgers bought the company and emphasized tobacco pouches and butane lighters. (However, it appears Mincer was working on his new pipe, the Doodler.) In 1968, Rodgers sold the Company to Consolidated Cigars.
In the early 1970s, Wally Frank Co. bought the Custombilt trademark and began to produce their version of the pipe in 1974 or 1975.
Hollco Rohr owned the Weber pipe factory, located in New Jersey, and produced the Custombilt pipes there. In 1987, the pipes were made out of the Butz-Choquin factory (France) and then Mexico until the late 1990s. Currently, the Custombilt name is owned by Tobacalera of Spain.
The Pipes
Most Custom-Bilt pipes that you see at a pipe show have somewhat big, chunky bowls with rough carving or gouges. It is very rare to see a completely smooth piece. In today’s market, the pipes are still considered to be on the large side but are not true giants. It should be noted that in the early days when the Custom-Bilt pipes were first being produced, these bowl sizes were considered very large and massive. The size of the average pipe was a group 3 or 4 sized Dunhill.
The first thing that Bill addresses in his chapter on pipes is the quality of the bowls in the early years. Rick Hacker, in his Rare Pipes book, suggests that Mincer bought blemished bowls from other companies and used the wood-working router to get rid of the blemishes. According to an important employee, Hetzer Hartsock, “Tracy used a very choice Algerian briar, and they were bigger blocks than what the other companies were using.”
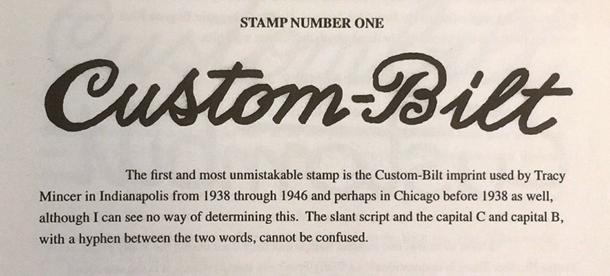
William E. Unger, Jr., Ph.D. (“Bill”) has studied the stampings on a large number of Custombilt pipes and based on this extensive study conclusively dates Custombilt pipes. There is a picture of a stamp which resembles the stamping seen on my pipe, and is reproduced from Pipedia in the picture below. From the above details gleaned from Pipedia and the above stamp, it can be safely inferred that this pipe dates to the 1970s era. This also coincided roughly with the time when my grandfather quit smoking and I was waiting in the wings to make my debut into this wide and beautiful world in a few years time!!!!!! From the look on the pipe, it appears that my grandfather never believed in cleaning his pipes and believed in just keep using the pipe and once it fouled up, simply keep it aside and buy new one!! Thus, the reason for the large collection of pipes that I have inherited from him.
I had loved the first Custom-Bilt that I had worked on for its size, feel in the hand, its rustic looks and wide rustications and I love this Custombilt for its size, shape, the heft and the gorgeous beautiful flaming rustications!!! Well, have I fallen in love with Custombilts???? Maybe!!!!!!
INITIAL VISUAL INSPECTION:
Having admired the beautiful rustication, the shape/ size and safe in the knowledge that I will get to smoke it in the years to come; I proceeded to carry out a detailed examination of the condition of the pipe and the work that will be required during the process of restoration. Any follower of Mr. Steve’s blog will recollect the 10 steps elucidated by him for beginners in pipe restoration and I sincerely follow it. It helps a person to assess the condition of the pipe, what are the issues that needs to be addressed, what processes will be involved and while appreciating these facts, formulate a broad action plan for the entire restoration.
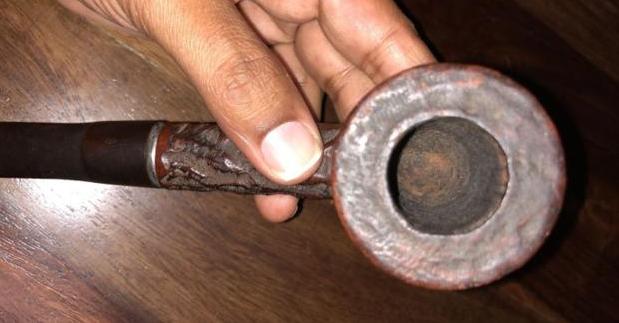
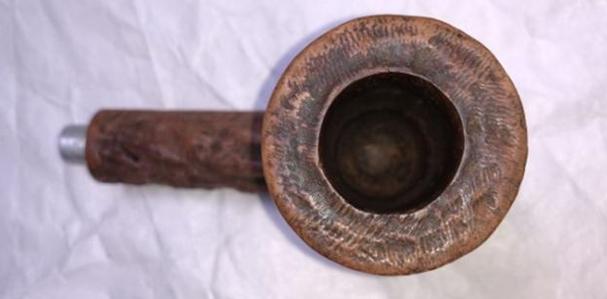
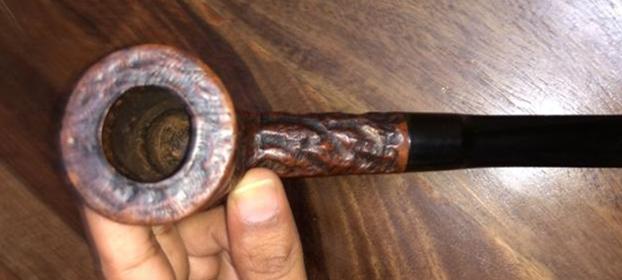
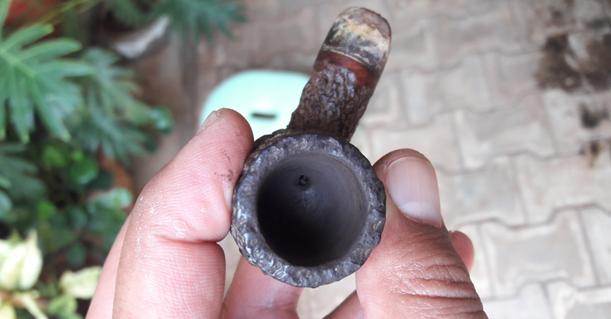
The bowl has a relatively thin layer of cake (…which subsequently proved incorrect!!!) which will have to be reamed out. The condition of the insides of the bowl needs to be appreciated thereafter. The pipe was used to smoke an aromatic tobacco since the smell was not offensive, but rather somewhat sweet. I believe that once the bowl is reamed to its bare briar, the smell will be taken care of!! As seen in the above picture, the outer edge of the rim is perfectly rounded with no damage whatsoever. However, there appears to be a small chip to the inner edge of the rim on the left side in the 9 ‘O’ clock direction. The exact extent of the damage or otherwise, can be appreciated only after the bowl has been reamed. It could be addressed/ minimized, if need be, by creating a slight bevel on the inner edge.
The airflow is restricted and required considerable effort to blow through the pipe. The airway in either the stem or shank could be blocked or the mortise could be clogged. Blowing separately through both, stem as well as the shank, I realized that both are blocked/ clogged. The draught hole is right at the bottom of the bowl and there is no reservoir/ sump as in the Pete system pipes. A pipe cleaner could not pass through the draught hole as expected. This needs to be addressed.
The bowl and shank are covered in dust, dirt, oils, tars and grime. The stamping, though readable, is covered in the tars, oils and grime. The rustications on the bowl and shank have turned black due to accumulation of dirt, oils and tars of more than 48 years of its existence. The rim, however, is clean and free of any overflowing lava.
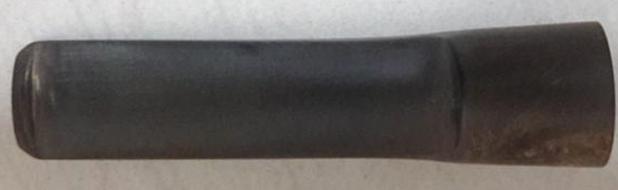
 The stem is free of any serious damage, tooth chatter or bite marks. The oxidation was light and just a firm rub with a moist Mr. Magic clean sponge, removed a great deal of oxidation from the stem. Overall, this pipe and stem was not very heavily abused.
 THE PROCESS
This time around Abha, my wife, was not around to help me with the bowl and this, I definitely missed!!! Using a Kleen Reem pipe tool, I completely removed the cake from the bowl. The quantity of carbon cake that was removed from the bowl belied my initial appreciation about thin layer of cake. The bowl now looks huge!!! Another observation I had was that the cake was very dry and tightly packed. Using an improvised and fabricated knife, I scraped all the remains of the carbon from the stummel down to its briar and finished with sanding the interiors of the stummel using a 220 grit sand paper. I wiped the interiors of the stummel with cotton swabs dipped in Isopropyl alcohol (99.9%). The interiors are now looking clean, smooth, solid and fresh.
 Once the cake was completely removed, the small chip on the left of the inner edge of the rim in 9 ‘O’ clock direction, though visible, was not alarmingly large or prominent. The rim top slopes inwards and a bevel would not really look good. I was not sure how much sanding would be adequate and also since it does not look bad, I decided to lightly sand it using micromesh pads, wet sanding using 1500 to 3200 grit pads and dry sanding it with 3400-12000 pads.
  Any advice or suggestions pertaining to the issue of this chip is most welcome and will definitely teach me a thing or two.
The next issue that required to be addressed was that of the restricted airflow!!! I started with the cleaning of the interiors of the shank and what a mess it was! Using hard bristled pipe cleaners, shank brush and alcohol, I cleaned out the mortise. With a dental spatula, I scraped out most of the gunk and tars which had moistened due to alcohol. I used the drill tool in the Kleen Reem pipe tool with a pipe cleaner embedded in the slot in the head of the drill tool, dipped in alcohol to clean the airway in the shank and also the draught hole. With the help of q-tips and pipe cleaners dipped in Isopropyl alcohol, I cleaned the internals of the shank and scrubbed the inner walls of the mortise to remove the last remnants of the oils, tars and gunk. At this stage, the airway in the shank was clean, the draught hole was clean and opened out and the mortise was free of all the accumulated tars and oils and gunk of the past!!
With the internals of the stummel and shank cleaned and freshened up, I turned my attention to the exterior of the bowl. Using Murphy’s oil soap and a toothbrush, I cleaned the exterior of the bowl while paying more attention to the cleaning of the flaming rustications, which I had so come to love! I gave a very deliberate scrub to the bowl and into the rustications to remove all the dust, dirt and grime that accumulated over the years. I purposefully avoided brass brush/ steel wool while cleaning so as not to damage the thin horizontal rustications within the flaming vertical rustications. Once the cleaning with the oil soap was done, I rinsed it under running tap water and wiped it dry with a soft cotton cloth. I took care that the water does not enter into the chamber and the shank. The bowl now has a nice, beautiful, clean and robust look to it. 
 I set the bowl aside to dry out and turned my attention to the stem.
Thankfully, this stem does not have any deep tooth/ bite marks or tooth chatter nor does it show any deep and stubborn oxidation. The wet Mr. Magic Cleaner had almost completely removed the oxidation. Using a 220 grit sand paper, I gently removed the minor tooth chatter that was visible. I folded a fresh piece of the grit paper into a sharp edge and sanded the button to give it shape. I wiped the stem down with a moist cloth to remove the sanding dust and applied a thin coat of Extra Virgin Olive oil and rubbed it into vulcanite with my fingers. I let it rest for a few minutes and wiped it off with a soft cloth. Once I was satisfied that the excess oil has been removed, I went through with the complete set of micromesh pads, wet sanding with 1500 to 3200 grit pads and dry sanding with 3400 through to 12000 grit pads. I rubbed extra virgin olive oil into the stem after sanding by each micromesh pad. In my exuberance to finish the pipe, I completely missed out on taking pictures at this stage. However, in the subsequent pictures of the completed pipe, you shall be able to appreciate the shining stem!!!!
I cleaned the internals of the stem using hard bristled pipe cleaners and alcohol. After considerable attempts at cleaning, the pipe cleaners finally came out of the other end. The air now passed through the stem freely. I further cleaned the internals of the stem till the pipe cleaners came out clean through the other end. Thereafter, I rubbed Extra Virgin Olive oil deeply into the stem and set it aside to be absorbed by the vulcanite.
Turning my attention the bowl the next morning, I liked the clean, fresh look of the bowl. Once again I gave it a good clean up with a dry soft cloth to remove any dust/dirt that might have settled on the bowl overnight. Thereafter, I rubbed a small quantity of “ Before and After Restoration Balm” into the bowl ensuring that it reaches the rustication also. I am truly amazed at the spread of this balm! Just a small quantity quickly spreads and is sufficient to coat the entire bowl when rubbed with the fingers. The product was further rubbed into the rustication when buffed, using a horsehair shoe brush. I let it rest for a few minutes to let the balm work its magic on the briar. The transformation is amazing!! Once this was done, it was back to using muscle power to enhance the shine and beauty of the rustication by prolonged rubbing with a soft cloth followed by a microfiber cloth. These rustications give an impression of shimmering flames leaping upwards!!! I was very pleased with my efforts……I know it is akin to blowing my own trumpet, but I do believe that if the notes are correct and melodious, please blow it. The finished bowl is shown below. 
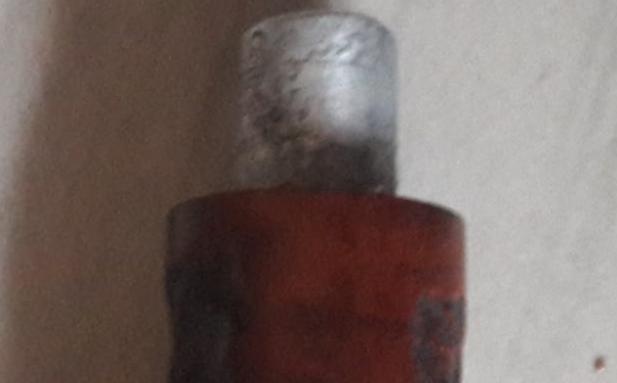
 Finally when I fixed the stem into the shank, I realized with a cringe that due to the cleaning of the mortise, the fit was not snug, it was way too loose! I had read somewhere that holding the tenon to a Bic lighter flame, increases the girth of the tenon which in turn ensures a snug fit into the mortise. Sounds easy enough but doing it for the first time and that too with a pipe you have come to love and admire….. is not easy. However, I took the plunge knowing very well that even in the case I mess it up, Mr. Steve of rebornpipes would bail me out. I have realized that one needs to have that kind of back up so that the journey is smooth, insightful and free from fears of failure, and that in essence is what Mr. Steve is to me as my Guru. Thank you Sir once again!!
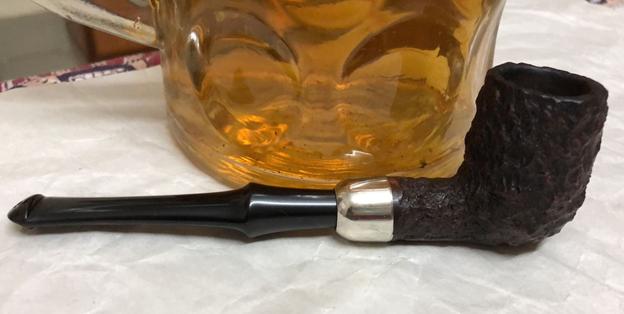
Well, to cut the long story short, I heated the tenon over the flame of a Bic lighter continuously turning it around. I stopped when the tenon felt slightly soft and pliable to the touch and set it aside to cool down with a pipe cleaner inside, praying for it to set perfectly into the mortise and not break/ crack. After the tenon had completely cooled down, I again attached the stem to the shank and, what a relief, the fit was nice and snug with just the right kind of noises!!! The finished pipe is shown below. This project was fun filled and a great learning experience. Thank you for sharing your valuable time with me while reading this post. And lest I forget, thank you Mr. Steve for providing me with invaluable guidance and a canvas for essaying my journeys.