Blog by Steve Laug
The next pipe on my work table is a real mystery to me. The stamping is unreadable, except for a B on the heel of the bowl. The pipe has some amazing grain around the bowl and shank and is well laid out to follow the grain. It has a double shank or stacked shank. The top portion or shank is where the stem fits in the mortise on the end. The airway in that portion of the shank drops to the second part of the shank at the bowl shank union. The second part of the shank has two chambers. The bottom one goes from an under-bored bowl bottom to the opening on the shank end. There is a plug at that point. The air drops moisture in that part of the shank and cools. It is circulated into the second chamber (also with a plug at the end) and then up into the top part of the shank. The smoke is drawn into the twisted and turned airway from the bowl bottom and then drawn along the bottom chamber to the end then up into the second chamber and finally into the airway in the top part of the shank and into the mouthpiece. The design is definitely made to create a very cool smoke. Because my words may not capture the look of this pipe very well I am including the next four photos to unpack the words that I have written above.
 The pipe was in decent condition. The bowl had been recently reamed and there was tobacco debris in the bowl bottom. The rim top had some burn damage and darkening on the back inner edge. The shank (top and lower with two chambers) was dirty and need a thorough cleaning. There were scratches on the shank and bowl sides and the finish was dirty. There was some staining on the shank end ahead of the vulcanite band on the shank. The two vulcanite pins in the lower shank were also oxidized. The stem had some tooth marks and chatter on both sides ahead of the button. It was oxidized and there was some calcification on the surface. The logo on the top of the stem was a diamond and the inside of the diamond was damaged. It appeared to have held a squiggly line – perhaps emulating the airflow through the pipe. I took closeup photos of the bowl and stem for you to see a bit of what I see here.
 I removed the stem from the shank and took a photo of the part to give a sense of the flow of the pipe. It is truly a unique pipe and the grain shows well in the photo.
 I dribbled alcohol around the pie/plugs in the lower portion of the shank. It took some time and I wiggled the pins until they came free. I took photos of the pins and of the shank. I cleaned them up and then pushed them into the shank end and took photos of the pipe at this point.
 I cleaned out the mortise and the three airways in the shank and the one in the stem with pipe cleaners and cotton swabs. It was quite dirty but once cleaned smelled better. I apologize for the photo of the stem cleaning as it is blurry but you can still see the grime on the pipe cleaners in the photo.
 I worked on the stains along the inner edge of the shank ahead of the vulcanite band. I was able to sand it out with 220 grit sandpaper and started polishing it with 600 git wet dry sandpaper. I also sanded out the deep gouges along the grooves between the upper and the lower parts of the shank. They cleaned up very well.
 I polished the briar with micromesh sanding pads – dry sanding with 1500-12000 grit sanding pads. I wiped the bowl down after each sanding pad with a damp cloth to remove the sanding debris. The bowl began to take on a rich glow.


 I rubbed down the bowl and shank with Before & After Restoration Balm. It is a paste/balm that is rubbed into the surface of the briar. The product works to deep clean the finish, enliven and protect the briar. I worked it into the briar with my finger tips. I let it sit for 10 minutes then wiped it off with a soft cloth then buffed it with a cotton cloth. The briar really began to have a deep shine in the briar and the grain shines through. The photos I took of the bowl at this point mark the progress in the restoration. It is a gorgeous pipe.

 I set the bowl aside at this point and turned my attention to the stem. The Diamond logo is strange and looks damaged but it appears to have a squiggle from one corner to the next. The surface is chipped. I sanded out the tooth marks and chatter on both sides of the stem ahead of the button. I also sanded the rest of the stem to remove the oxidation that was present. I started polishing the stem with 600 grit wet dry sandpaper. I filled in the pits in the diamond log with clear CA Glue and sanded that repair smooth at the same time. I did not want to further damage the log so I proceeded cautiously. The stem is looking better.
 I polished the stem with micromesh sanding pads – 1500-12000 grit sanding pads and water to wet sand the stem. I wiped it down after each sanding pad with Obsidian Oil on a cotton rag after each sanding pads. I know that many say Obsidian Oil does nothing for acrylic stems, but I find it does two things – first it gives some protection to the stem from buildup and second it give the sanding pads bite in the polishing process.
 I have found that Before & After Fine and Extra Fine stem polish works well to remove the fine scratches in the vulcanite. I rub the Fine Polish on the stem and wipe it off with a paper towel and then repeat the process with the Extra Fine polish. I finish the polishing of the stem down with a final coat of Obsidian Oil and set the stem aside to let the oil absorb. This process gives the stem a shine and also a bit of protection.
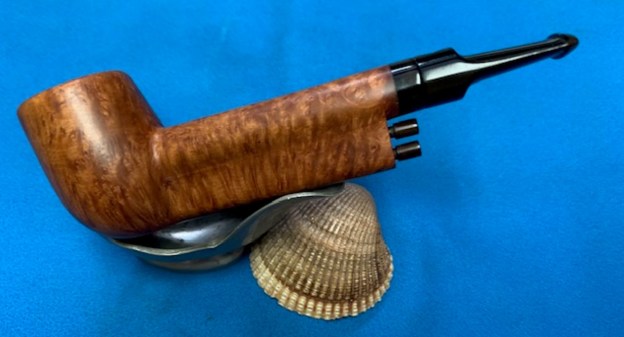
  The final steps in my process involve using the buffer. I buffed the bowl and stem with Blue Diamond to polish out the light scratches in the briar and the vulcanite. I gave the bowl and the stem multiple coats of carnauba wax. I have found that I can get a deeper shine if I follow up the wax buff with a buff with a clean buffing pad. It works to raise the shine and then I hand buff with a microfiber cloth to deepen the shine. It is always fun for me to see what the polished bowl looks like with the polished stem. It turned out to be a nice pipe. The mix of grain around the bowl sides and shank looks great. The vulcanite saddle stem works well with the pipe. The Mysterious No Name Stacked Shank System Lovat feels great in my hand. It is a well-balanced pipe. Have a look at it with the photos below. The dimensions are Length: 5 ½ inches, Height: 2 inches, Outside diameter of the bowl: 1 ¼ inches, Chamber diameter: ¾ of an inch. The weight of the pipe is 1.34 ounces/38 grams. It is a very unique system style pipe that I cannot find any stamping on and no information. Is it possible that any of you can help me out with some identification advice on this one? It would be much appreciated. Thank you.
As always, I encourage your questions and comments as you read the blog. Thanks to each of you who are reading this blog. Remember we are not pipe owners; we are pipe men and women who hold our pipes in trust until they pass on into the trust of those who follow us.


 ADDENDUM MYSTERY SOLVED: I posted this blog on FaceBook in the Tobacco Pipe Restorers Group. I received and answer from James Connelly with a photo. He has the pipe in the photo below. It includes the original box. I have included that photo below. It shows the pipe in its box along with a diagram on the airflow from the bottom of the bowl to the mouth piece. It is indeed the shape that I expected from my clean up work on the pipe.
 He also included a link to a write up on Pipedia on the brand (https://pipedia.org/wiki/Gerrard). It is a short read but very interesting. I have also included two photos from the article.
Gerrards Three-Way Pipes were custom made by a gentleman in Hagerstown, MD named E.E. Lushbaugh. He called it the “Gerrard Three-way pipe”.


