Blog by Steve Laug
The pipe was purchased on 02/02/22 from an online auction from a seller in Colts Neck, New Jersey, USA. It is a smooth finished Sasieni Stack with a unique shape and smooth finish. It has a Fantail stem that is unique to the Sasieni Fantail line. It is stamped on the left side of the shank next to the bowl/shank junction and has the football shaped Made In London stamp vertically. That is followed by Sasieni [over] Fantail. On the right side of the shank it is stamped London Made and the shape number 93. The stamping around the shank end near the stem reads PATD-170067. The pipe is very dirty with grime ground into the finish of the tall bowl. The bowl was thickly caked with an overflowing lava coat on the top of the rim. The edges looked to be in good condition though I would not know for sure until the bowl and rim had been reamed and cleaned. The stem was oxidized, dirty and had light tooth chatter and marks on the top and underside near the button. The stem had a very lightly stamped “F” on the left side of the fantail stem. The fit of the stem in the shank was tight and clean. The pipe had promise under all of the grime and dirt. Jeff took some photos of the pipe before he started the cleanup work. 
 Jeff took some close up photos of the rim top and the bevelled inner edge of the bowl to give an idea of the condition the pipe when he received it. I am sure glad that this was another one that he worked on. The bowl has a thick cake and the rim top and a lava overflow at the back of the bowl. The stem was lightly oxidized and had tooth marks and chatter on both sides.

 Jeff took photos of the sides of the bowl and heel to show the finish around pipe. You can see the grime and the oils in the finish that are ground into the bowl. You can also see the scratches and small nicks in the finish.
 The next series of photos capture the stamping. The stamping is clear and readable as noted above.
  I have included a screen capture of the pertinent section of the Sasieni section of PipePhil’s Logos and Stamping website and included the link should you want to look at on the site. (http://www.pipephil.eu/logos/en/logo-sasieni2.html). The second pipe in the photo below shows a pipe with the same stamping as the one that I am working on. It reads Sasieni Fantail, London Made, PAT D -170067. The difference is the location of the Patent stamp. On the one that I am working on is around the shank end.
 I turned to Pipedia and found a patent diagram for the Fishtail stem that Doug Valitchka posted (https://pipedia.org/wiki/Sasieni). I have included that document below. It was filed in 1953 and received the patent July 21, 1953. Which helps to date this pipe as post patent.
  That helps to cinch the dating of this pipe as Family Era pipe made somewhere between 1946–1979. The change of “Sasieni” script without the fish-tail initiated by Alfred Sasieni occurred after Second World War. This puts the date of the pipe between 1946 and 1979 – a large spread.
Jeff had cleaned up the pipe with his usual penchant for thoroughness. He reamed the pipe with a PipNet Pipe Reamer and cleaned up the remnants with a Savinelli Fitsall Pipe Knife. He scrubbed the bowl with undiluted Murphy’s Oil Soap with a tooth brush. He rinsed it under running warm water to remove the soap and grime. He cleaned out the inside of the shank and the airway in the stem with alcohol, cotton swabs and pipe cleaners. He soaked the stem in Before & After Deoxidizer and rinsed it off with warm water. I took photos of the pipe once I received it. 
 I took close up photos of both the rim top and the stem. Jeff had been able to get the grime and lava out of the plateau on the rim top and it looked pretty incredible. There was some darkening on the high spots on the sandblast rim top and edges. The stem looked very clean. The tooth marks and chatter were minimal and should be easy to remove.
  The stamping on the shank sides was faint but still readable as noted above. I also took a photo with the stem removed to give an idea of the perspective and design of the pipe.
 Now it was time to do my work on the pipe. I polished the bowl and rim top with micromesh sanding pads using 1500-12000 grit sanding pads and wiping it down after each sanding pad with a damp cloth to remove the sanding dust and debris.


 I worked some Before & After Restoration Balm into the finish of the bowl and shank with my fingers. I want the product to go deep into the finish because it works to clean, enliven and protect the briar. Once I was confident that it was deeply worked into the finish I wiped it off and buffed it with a soft cloth to polish it. The pipe really began to have a rich shine. I took some photos of the bowl at this point to mark the progress in the restoration. The grain really stands out on the pipe in the photos below.

 I set the bowl aside and turned to work on the stem. I painted the tooth marks with the flame of a lighter to lift them. All of the came up slightly. I filled in those that remained with some black rubberized CA glue. I set it aside to cure. Once it had hardened I flattened out the repair areas with a small file. I sanded the repairs with 220 grit sandpaper to blend them into the surface of the stem. I started polishing with 600 grit wet dry sandpaper.


 I polished the vulcanite stem with micromesh sanding pads – wet sanding it with 1500-12000 grit pads. I wiped it down with Obsidian Oil after each sanding pad.
 I polished it with Before & After Pipe Polish – both the Fine and Extra Fine polishes. I gave it a final coat of oil and set it aside to dry.
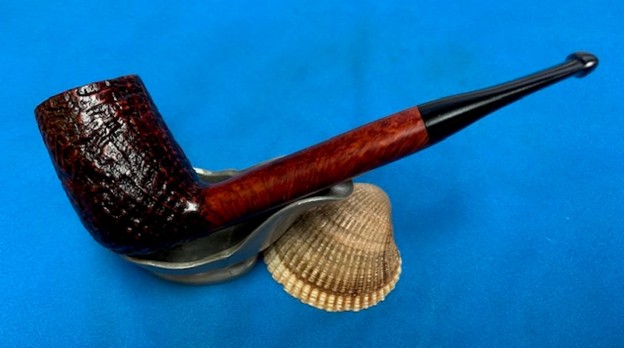
  This Sasieni Fantail 93 Stack is a beautiful looking pipe. I put the stem back in place in the shank and buffed the bowl and stem lightly with Blue Diamond on the buffing wheel. I gave the bowl and stem multiple coats of carnauba wax on the buffing wheel. I buffed the pipe and stem with a clean buffing pad to raise the shine. I hand buffed the bowl with a microfibre cloth to deepen the shine. The finished pipe is shown in the photos below. The contrast of the dark brown and a medium brown that shines through give the finish a rich patina. The Sasieni Fantail London Made 93 Stack has some amazing grain around the bowl sides and shank. The bowl has been cleaned and the entire pipe is ready to smoke. The stem is in great shape with a few small nicks in the surface of the top and underside. It is a beautiful pipe, just a little big for my liking or I would hang on to it. The dimensions of the pipe are Length: 6 inches, Height: 2 ¼ inches, Outer diameter of the bowl: 1 ¼ inches, Chamber diameter: ¾ inches. The weight of the pipe is 1.59 ounces/45 grams. I will be putting it on the rebornpipes store soon in the British Pipemakers Section. If you are interested in adding it to your collection email me at slaug@uniserve.com or send me a message on Facebook. Thanks for looking.
As always, I encourage your questions and comments as you read the blog. Thanks to each of you who are reading this blog. Remember we are not pipe owners; we are pipe men and women who hold our pipes in trust until they pass on into the trust of those who follow us.