
Blog by Steve Laug
 The next pipe on the table is a Rusticated Ser Jacopo Canadian that is proportionally well done. Jeff and I purchased a group of pipes on 04/26/2022 from a woman who contacted us from Cleveland, Ohio, USA. They had belonged to her husband’s father. We spent time chatting with her and arrived at a price and she sent the pipes to Jeff. It included 28+ pipes including this one.
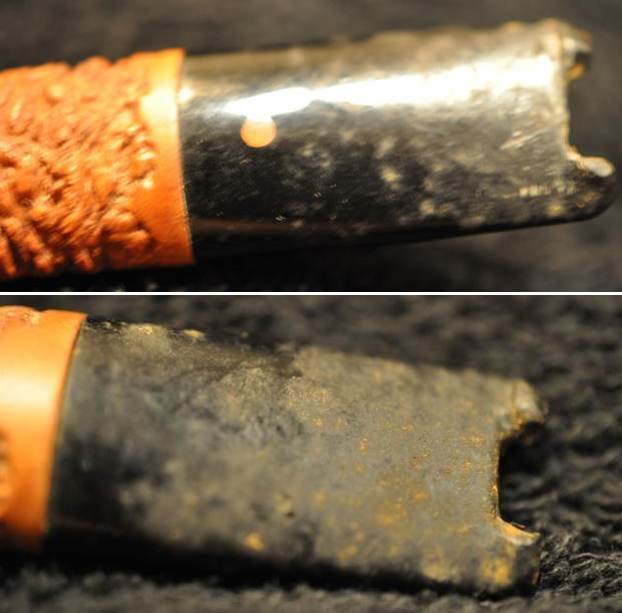
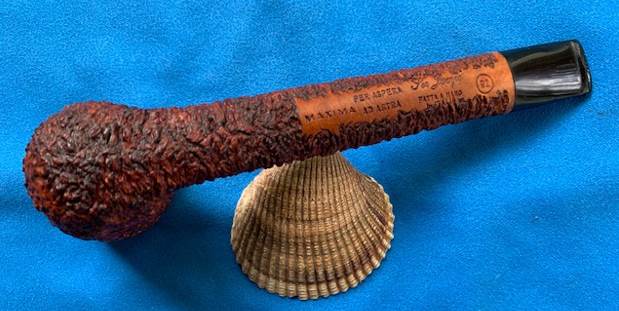
This Ser Jacopo Canadian is stamped on the underside and Maxima followed by Per Aspera [over] Ad Astra. That is followed by Ser Jacopo [over] Fatta A Mano [over] Italia. A circle R2 follows that next to the bowl/shank junction. On the top of the stem is a single coral dot. The finish was very dirty with spots of grime and debris ground into the rustication. The bowl had a thick cake in the bowl and heavy lava overflowing onto the rim top. The rim top appeared to have some burn damage on the inner edge of the bowl. The outer edges looked good. The acrylic stem was a disaster. It was gnawed off with only two points remaining on either side. The externals were filthy with calcification, oxidation and tooth marks and chatter on both sides ahead of what remained of the ruined button. Jeff took photos of the pipe before he started his clean up work on it.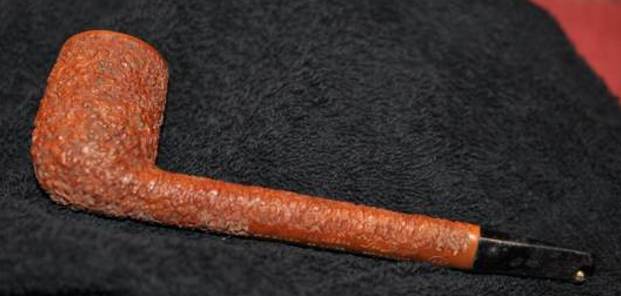
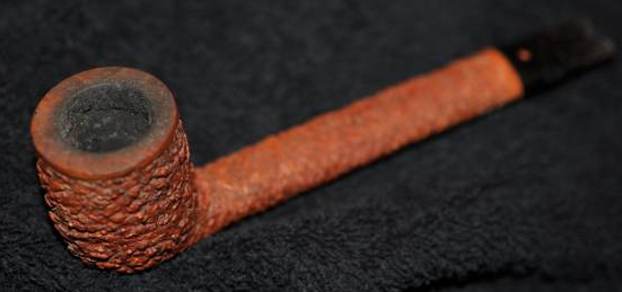 He took photos of the bowl and rim top to show the condition. You can see the thick cake in the bowl and rim top and edges. The lava is so thick that is hard to know what the edges and top look like underneath. The stem was heavily oxidized, calcified and the end of the stem and most of the button had been gnawed off. Overall the pipe is a real mess.
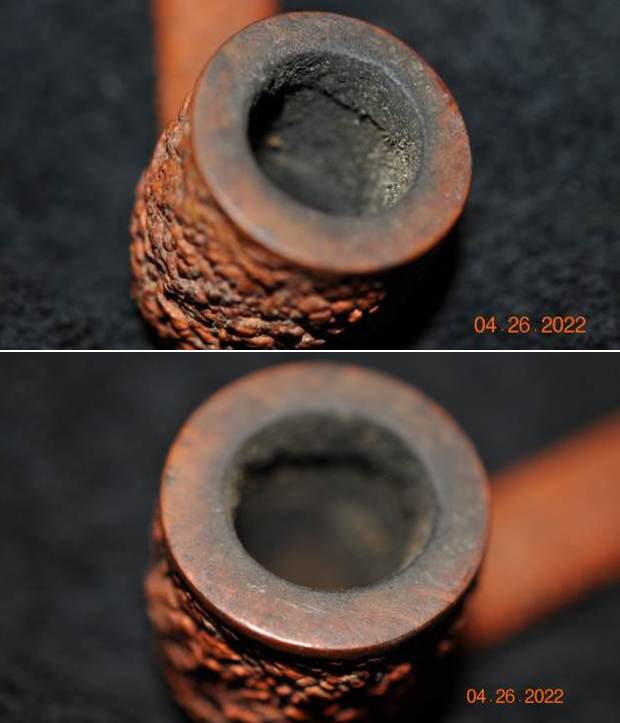
 Jeff took photos of the rusticated finish around the bowl sides and heel. It was nice looking if you can see through the grime ground into the surface.
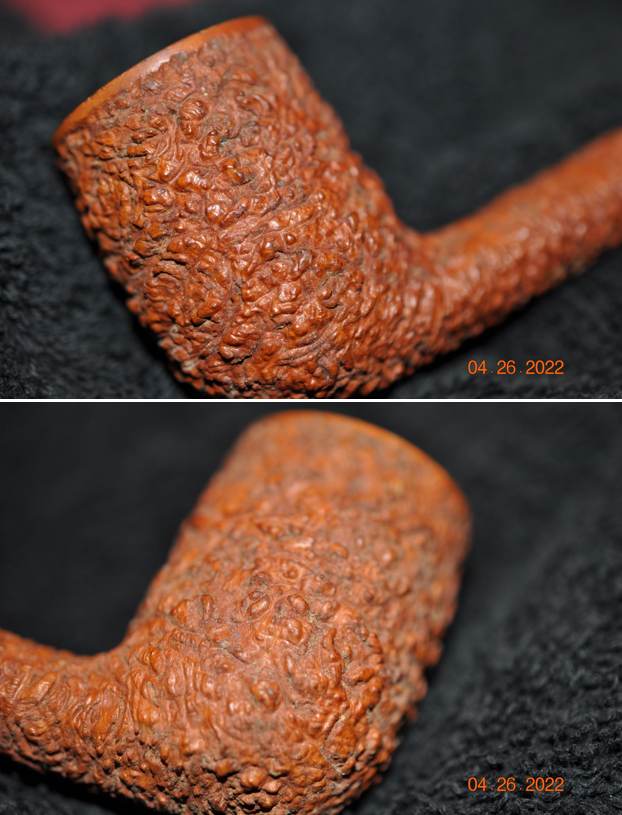
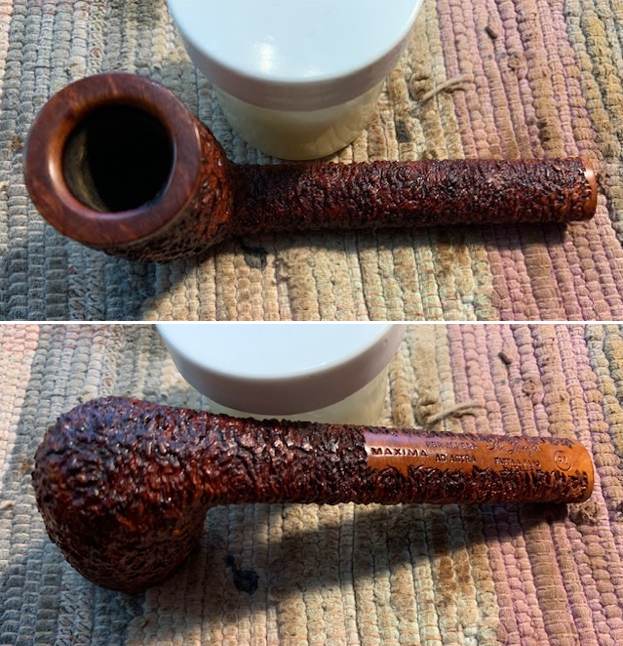
 He took photos of the stamping on the underside of the shank. The stamping is clear and readable. It reads as noted above.
 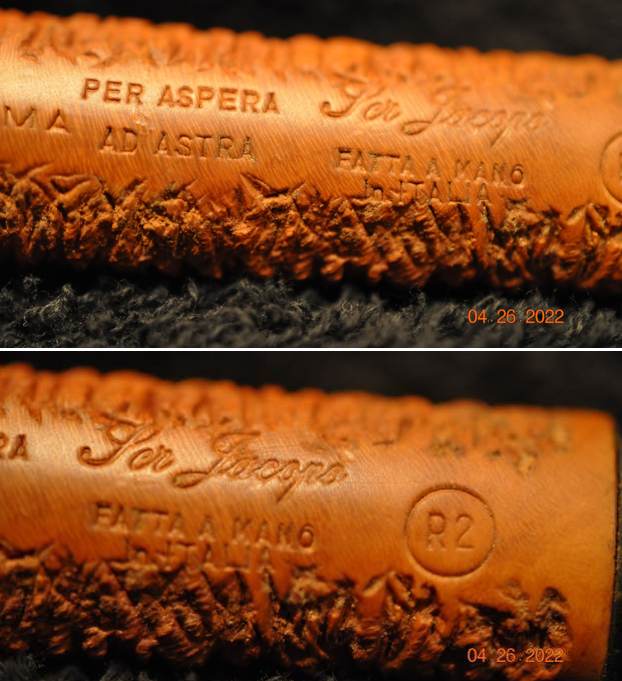 I turned to Pipephil (http://pipephil.eu/logos/en/logo-s5.html) to remind myself of the background of the brand. I also wanted to see what the single Coral dot meant on the stem. I knew that the Coral dot was on the older pipes but that was all I knew. I include a screen capture of the section on the brand below. The third photo below shows a similar Coral dot on the stem.
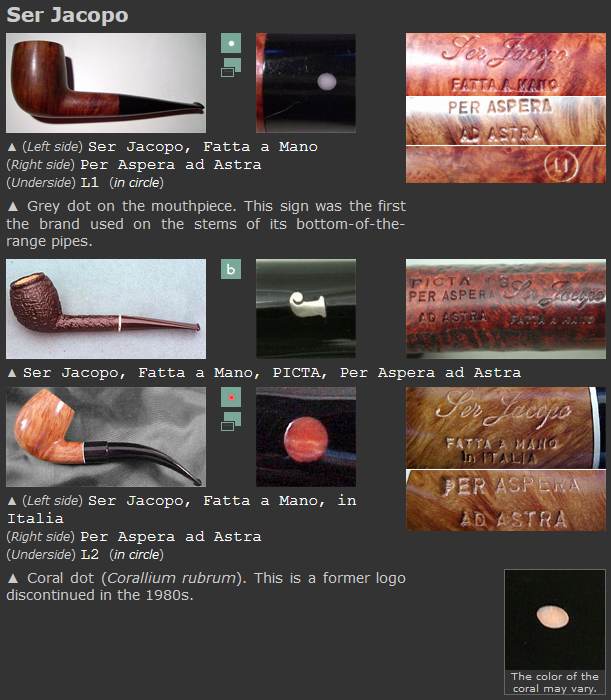 I am also including the information that I found there in the sidebar on PipePhil. I quote that below. I have highlighted the R2 designation below in red.
Founder of the brand in 1982: Giancarlo Guidi (1943 – †2012). Production (2006): ~ 6000 pipes/year. Ser Jacopo seconds: Gepetto.
Finish mark: Rusticated pipes: R1 (dark brown) R2 (light brown); Sandblasted pipes: S (black), S1 (dark brown), S2 (light brown), S3 (tanshell); Smooth pipes: L (red), L1 (acceptable grain), L2 (nice grain), L3 (exceptional grain).
I then turned to Pipedia (https://pipedia.org/wiki/Ser_Jacopo) to read some more about the brand and see if there were more details regarding the single Coral dot. I quote below.
Ser Jacopo (provided by Marble Arch Ltd., US importer and distributor of Ser Jacopo)
Smokingpipes.com has an excellent concise history available on their website Ser Jacopo History at Smoking Pipes.com
Ser Jacopo, better to say Ser Jacopo dalla Gemma, was started by Giancarlo Guidi in 1982 upon leaving Mastro de Paja.
Giancarlo Guidi and Bruto Sordini broke away from Mastro de Paja in 1981 in pursuit of their own company. Ser Jacopo was named after an Italian nobleman. Guidi and Sordini, having taken part in creating the now infamous Pesaro “school” of pipe making, wanted to expand further. To accomplish this, Ser Jacopo focused their efforts on the pairing of the briar with a seemingly endless variety of mounts. Through the use of precious metals and stones, horn, and exotic woods Ser Jacopo pipes are given unique characters that many collectors find quite aesthetically pleasing. Although Ser Jacopo pipes borrow heavily from classical shapes, they are indeed quite unique in style.
In addition to creative mountings, Ser Jacopo is also well known for making themed pipes, and the most famous of these themes is perhaps the Picta Series, where pipes are modeled after pipes seen in pictures by and of famous artists, such as Vincent Van Gough.
Ser Jacopo makes multiple grades of pipes, with the “entry” level being the Geppetto brand, and the highest grade being the “Gem” series.
The small Ser Jacopo shop produces approximately 6000 pipes per year. The pipes are known for using outstanding Italian briar, which is well seasoned. The pipes have earned a well-deserved reputation for having excellent smoking qualities, equal or better than any other fine Italian pipe maker (or, for that matter, any other pipe maker in the world).
Giancarlo Guidi passed away on August 6, 2012, leaving behind a great legacy. He was 64 years old.
Nomenclature – the section on the nomenclature helps understand the stamping on the underside of the shank. It is helpful and really quite interesting.
The standard nomenclature found on Ser Jacopo pipes is as follows:
Ser Jacopo Fatta A Mano In Italia Per Aspera Ad Astra – Fatta A Mano translates to “Made By Hand”. Per Aspera Ad Astra is a Latin phrase found on Ser Jacopo pipes and is the Ser Jacopo motto. It translates to “To the Stars Through Travails”, meaning that success comes through hard work. In the Summer 1997 Pipes and Tobaccos article Giancarlo Guidi translated this as “through a difficult way until the stars are reached”.
Ser Jacopo Pipes are generally found in one of three finishes (rusticated, sandblast, smooth) designated by a letter and number code:
R1: Rusticated, dark brown or plum finish.
R2: Rusticated, light brown finish.
S: Sandblast, black
S1: Sandblast, dark brown
S2: Sandblast, light brown
S3: Sandblast, tanshell
L: Smooth, red, usually with silver trim
L1: Smooth, flame grain, various finishes
L2: Smooth, straight grain, various finishes
L3: Smooth, straight grain extra, discontinued
Dating Pipes
 In the photo to the left you can see the development of the stem inserts on the pipes.
Top: Early Red Coral Logo Middle: Coral Logo with Silver Ring Bottom: Modern Day Silver J Logo – Courtesy of Mike Ahmadi
Ser Jacopo pipes is somewhat difficult, because Ser Jacopo does not generally use date codes (the exception being the Diamond Gemma series pipes, which are dated coded). Early pipes (from 1983 to 1997) featured a red coral dot on the mouthpiece, sometimes found encircled in a silver ring. This was discontinued and changed to a sterling silver letter “J”. On the Gemma series of pipes, the mouthpiece logo is a precious stone surrounded by an 18k gold ring.
The pipe I am working on is one of the early pipes (1983-1997). It is a lovely pipe with a deep and unique rustication. Now it is time to work on the pipe and bring it back to life.
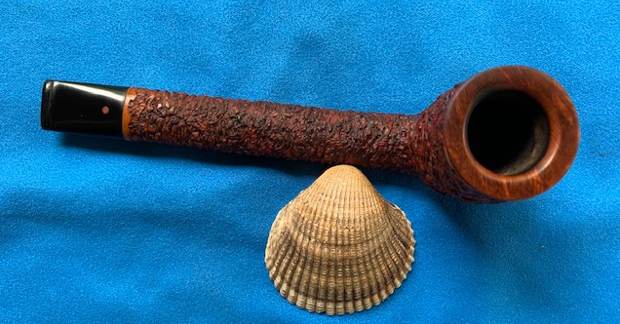
Armed with that information I turned to work on the pipe itself. Before he sent it to me, Jeff had done an amazing job cleaning the pipe. It almost looked like a different pipe after his work. He reamed the pipe with a PipNet pipe reamer and removed the rest of the cake with a Savinelli Fitsall Pipe Knife. He scrubbed the bowl with undiluted Murphy’s Oil Soap and a tooth brush. He rinsed it under running warm water to remove the soap and grime. The finish looked very good and the rugged finish felt good in the hand. He cleaned out the inside of the shank and the airway in the stem with isopropyl alcohol, cotton swabs and pipe cleaners. He soaked the stem in Briarville’s Pipe Stem Deoxidizer and then rinsed it off with warm water. He scrubbed the stem with Soft Scrub and a tooth brush and rinsed it off with warm water. It looked amazing when I took it out of the package of pipes he shipped me. I took photos of the pipe before I started my part of the restoration work. 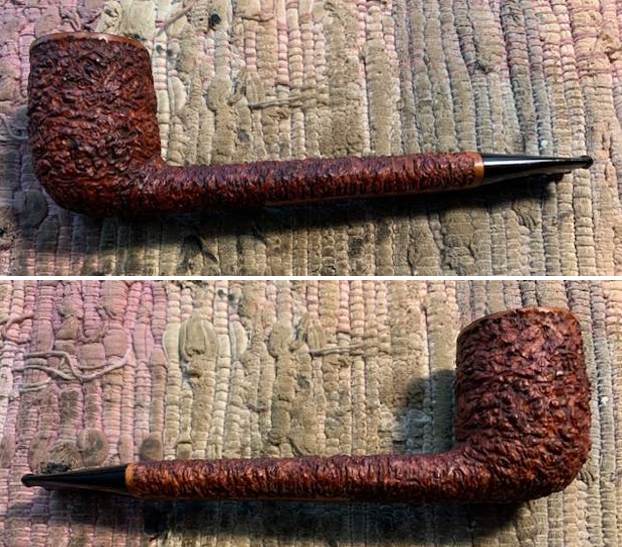
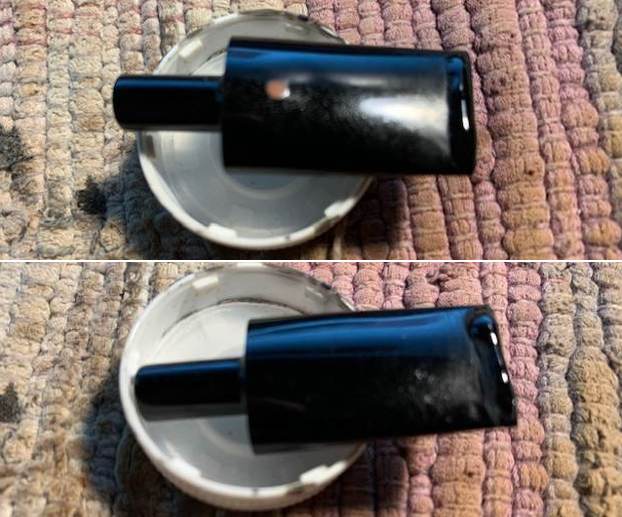
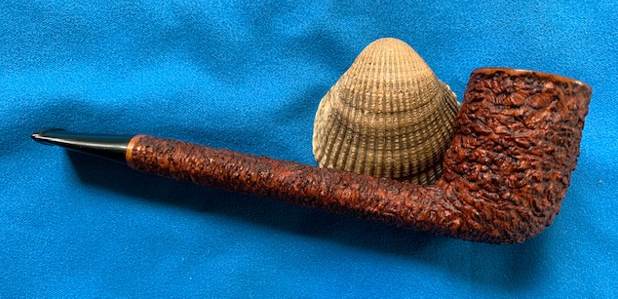
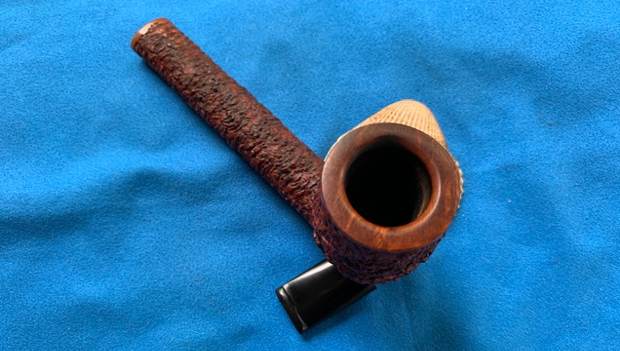
 The rim top was cleaner and the inner edge of the bowl showed burn damage on the front right and back left. There was some chipping and damage around entire edge. The rim top and outer edge actually looked to be in good condition. The bowl was slightly out of round. The stem surface looked good with the oxidation gone and large chunk of the button missing. It was odd in that it was an even break on both sides and almost like a slot had been cut leaving behind two small thin posts on each side.
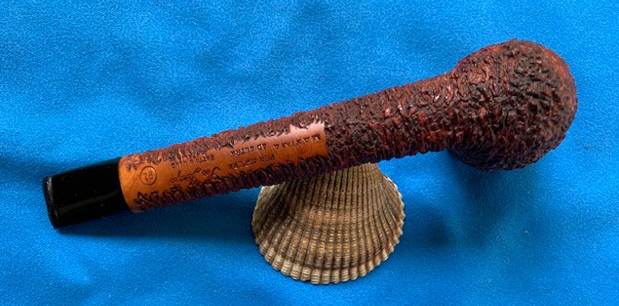
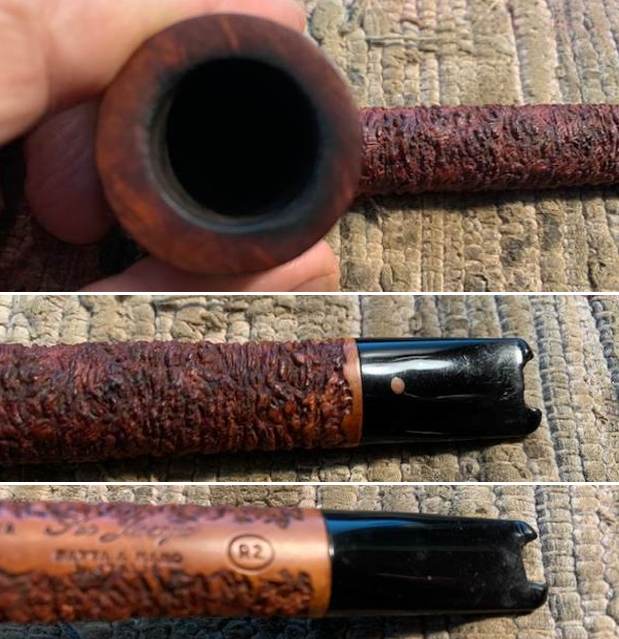 I took a photo of the stamping on the underside of the shank. It is faint but is still readable as noted above.
 I took the stem off the shank and took a photo of the parts of the pipe. The overall look of the pipe is quite nice. The stem is quite stubby and short so that gave me an idea that I would explore later in the restoration.
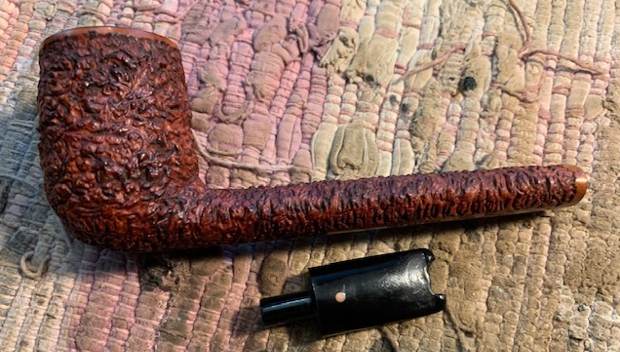 I started my portion of the work on this pipe by addressing the damage to the rim top and the inner edge of the bowl. I worked over the rim top with 220 grit sandpaper to remove the damage and the darkening. I used a folded piece of 220 grit sandpaper to smooth out the inner edge and give it a slight bevel to deal with the chipping and cutting that was present. It cleaned up remarkably well. With polishing and buffing it would look even better.
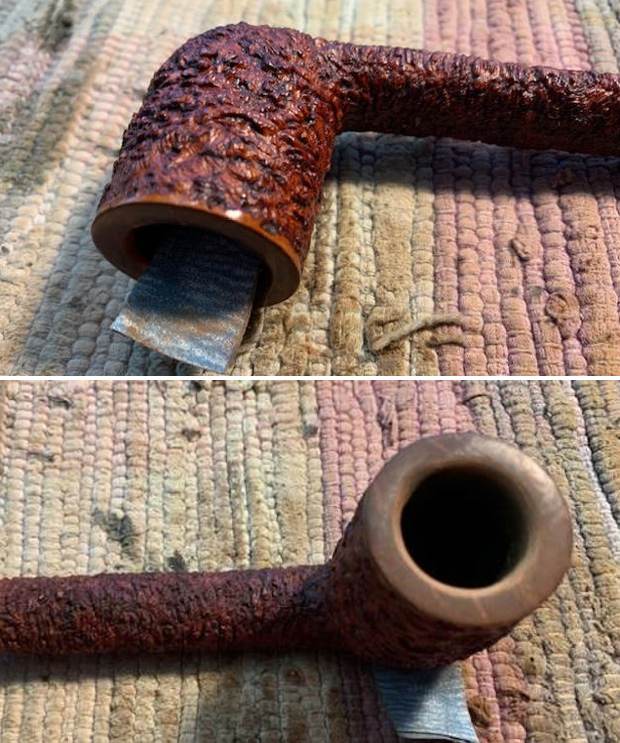 I polished the smooth rim top with micromesh sanding pads – dry sanding with 1500-12000 grit sanding pads. I wiped the briar down with a damp cloth after each pad to remove the debris and sanding dust.
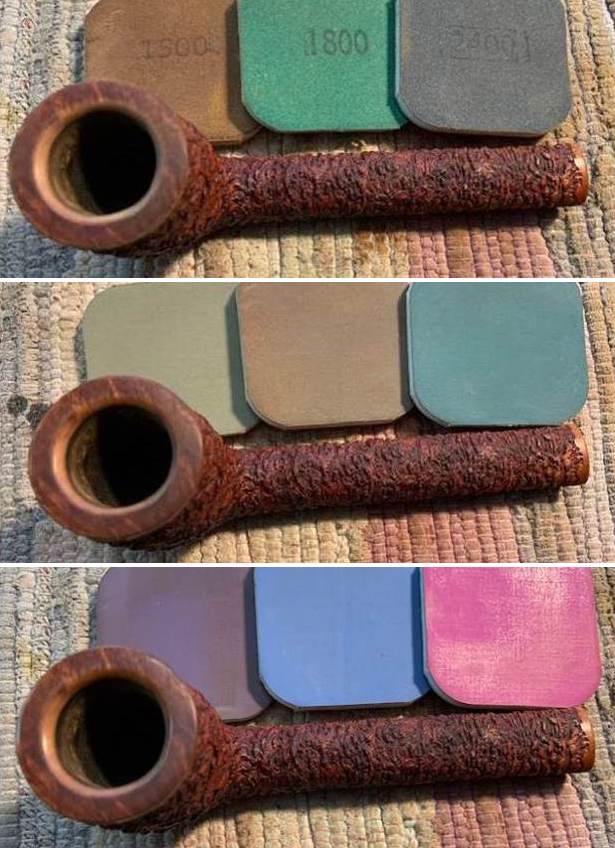 The bowl looked very good at this point so I rubbed it down with Before & After Restoration Balm. I worked it into the surface of the bowl and shank with my fingertips and a horse hair shoe brush to clean, enliven and protect the briar. I let the balm sit for about 10-15 minutes and buffed with a cotton cloth to raise the shine.
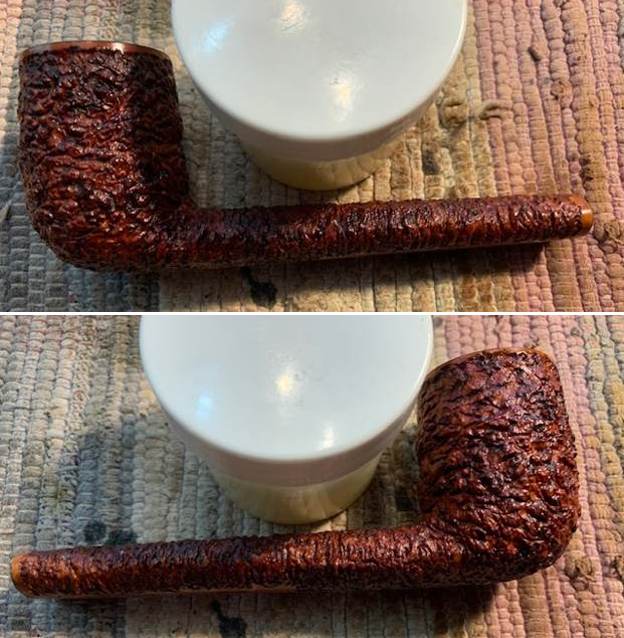
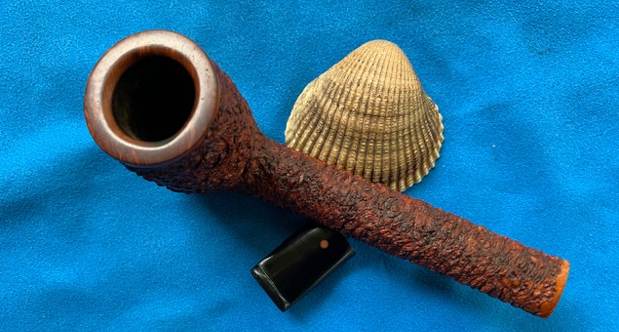
 I buffed the bowl with a shoe brush to raise the shine on the bowl. It is a really nice looking pipe with a finish that has a look like cut glass to me. The rich brown of the stain vary through the layers of the rustication. It is very nicely done.
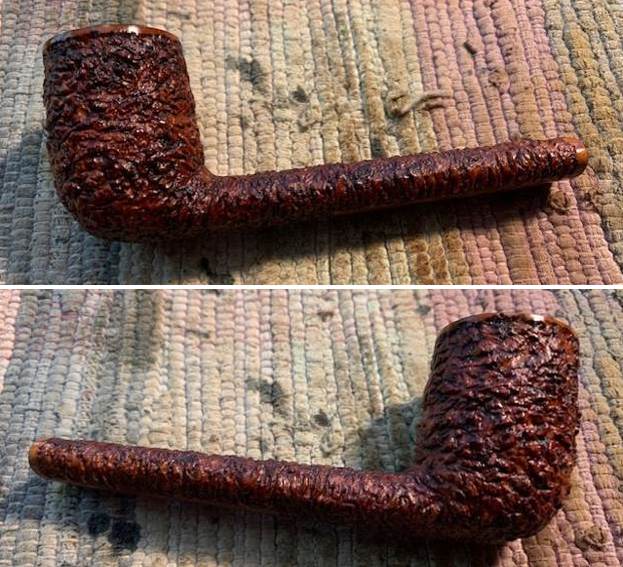
 I set the bowl aside and turned my attention to the stem. I cut of the two pegs that remained of the button and flattened the end of the stem against a topping board and 220 grit sandpaper. Surprisingly, it did not shorten the stem significantly. I did not feel that the pegs provided enough body to support a repair so I opted on shortening the stem and rebuilding the button with rubberized black super glue. I layered the repair on slowly, letting each layer cure before adding the next one. Once the repair cured I would need to reshape the button with files.
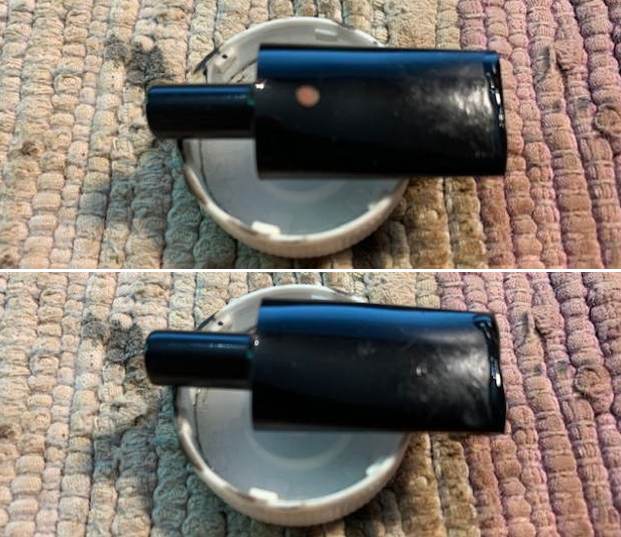
 I reshaped the button and the edge with a small file. The repaired button was beginning to look good at this point. I touched up the edge surface with CA glue to smooth and fill it in. Once the glue cured I sanded it with 220 grit sandpaper to continue the shaping. I repaired and resanded until I was happy with it. I started the polishing process with 400 grit wet dry sandpaper.
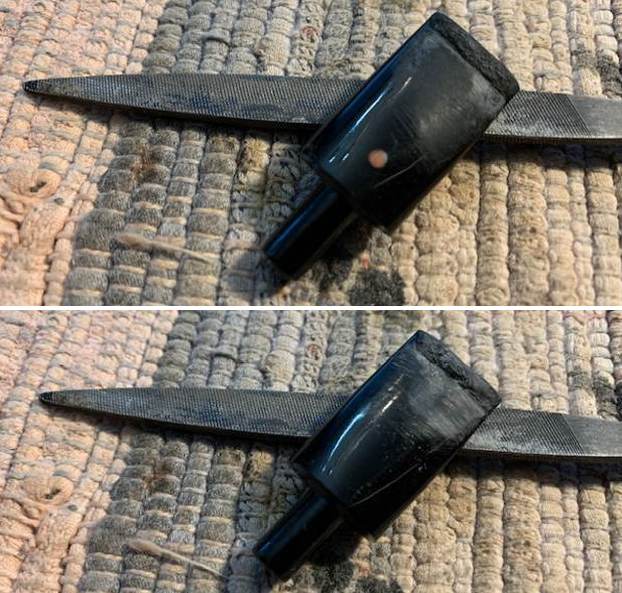
 I used a small pottery shaping saw to cut the slot in the end of the stem and shape it. It is getting closer and closer to being finished.
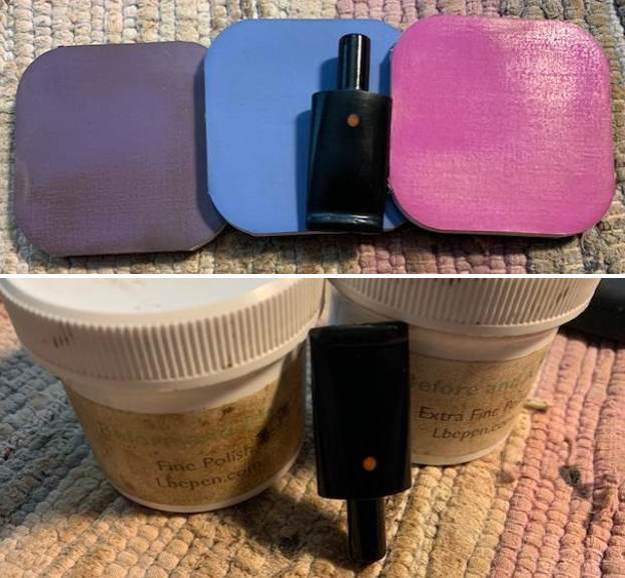
 I sanded the button surface some more with 220 grit sandpaper to further shape it. I filled in the air-pockets with superglue and let it cure until dry. Once it cured I started the polishing with micromesh sanding pads – dry sanding with 1500-12000 grit pads. I wiped the stem down after each pad with some Obsidian Oil. I polished it further with Before & After Stem Polish – both Fine and Extra Fine. I wiped it down a further time with Obsidian Oil and let it cure.
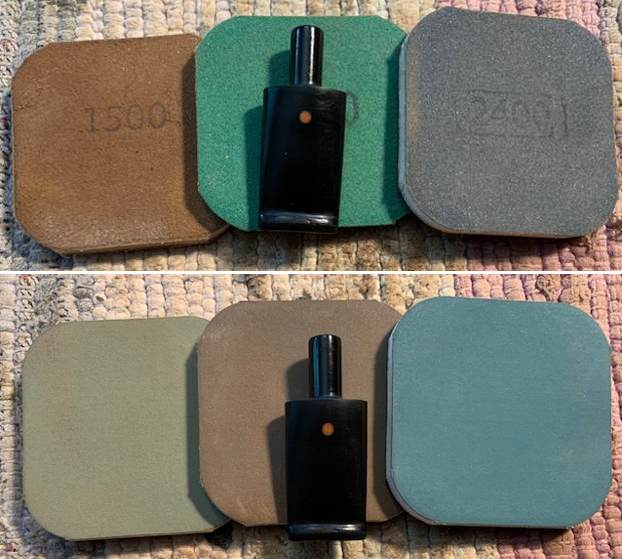
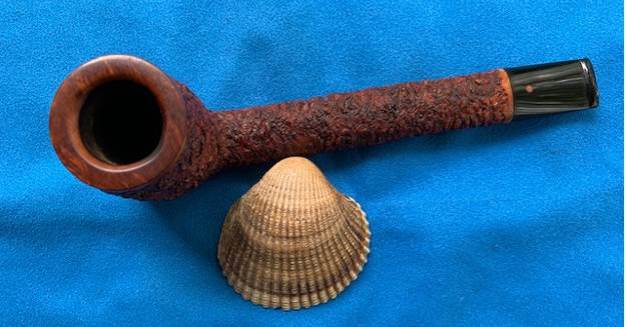
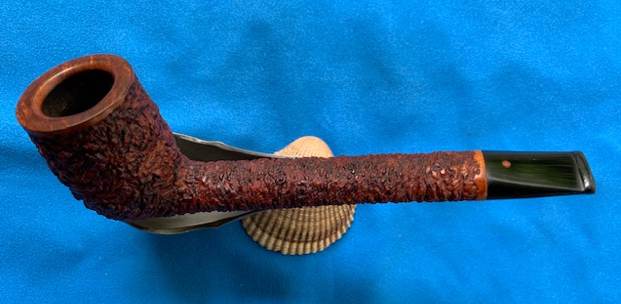
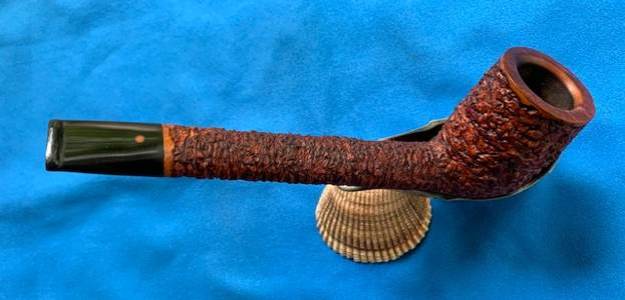
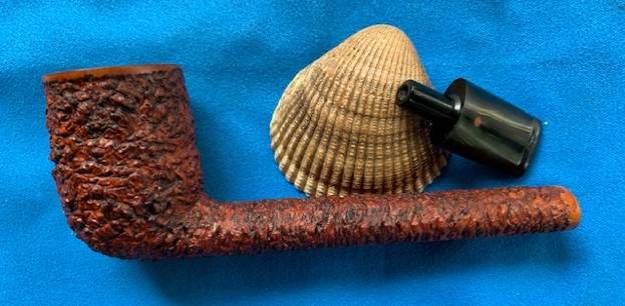
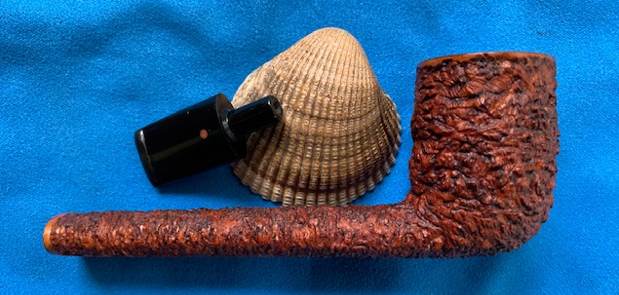
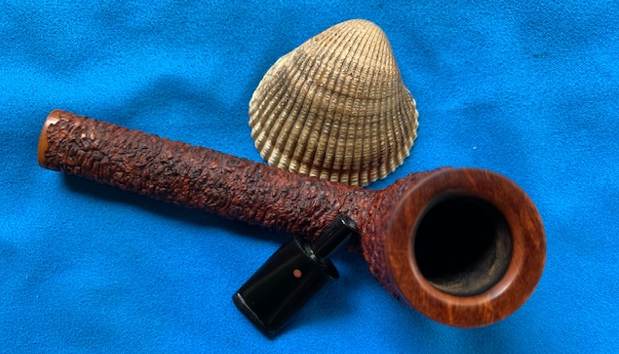
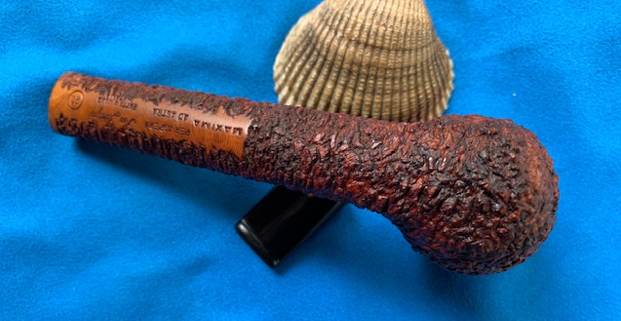
 This Beautiful Rusticated Ser Jacopo Maxima R2 Canadian with a Coral Dot is a great looking pipe now that it has been restored. The rich and unique rusticated works well with the polished, repaired and rebuilt vulcanite stem. I put the stem back on the bowl and carefully buffed the pipe with Blue Diamond on the buffing wheel using a light touch on the briar. I gave the bowl multiple coats of Conservator’s Wax and the stem multiple coats of carnauba wax on the buffing wheel and followed that by buffing the entire pipe with a clean buffing pad. I hand buffed the pipe with a microfiber cloth to deepen the shine. The finished Ser Jacopo Maxima Canadian is a large pipe that I am sure will be a great smoker. Give the finished pipe a look in the photos below. The dimensions of the pipe are Length: 6 ¼ inches, Height: 1 ¾ inches, Outside diameter of the bowl: 1 ¼ inches, Chamber diameter: ¾ of an inch. The weight of the pipe is 43 grams/1.52 ounces. I will be holding on to this one for awhile to test out the durability of the button rebuild. I take a moment to remind myself and each of us that we are trustees of pipes that will outlive us and the lives of many other pipe men and women who carry on the trust of their care and use. Thanks for reading this blog and my reflections on the pipe while I worked on it.
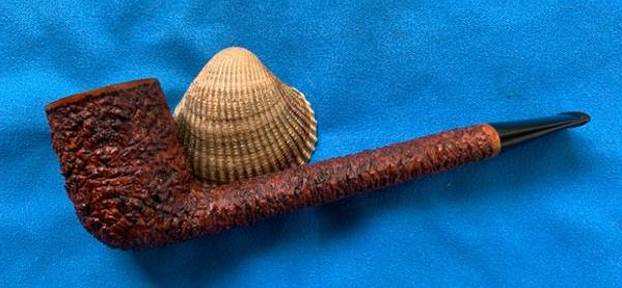

Wow! I am always impressed by the restoration work you guys do but I’m especially blown away by this one. Well done!
Sidenote, if you guys need any help repatriating some of those pipes to the Cleveland area, be sure to let me know. 😉
LikeLiked by 1 person