Blog by Anthony Cook
I recently completed work on this meerschaum-lined Le Duc pipe. It has a paneled bowl and a shape that sits somewhere between a squat egg and an elongated apple. It’s stamped simply, “LE DUC” on the left side of the shank and “1” on the right side, which I assume is the shape code. The stem is horn with an aluminum tenon and a twisting, screw-in stinger. This pipe presented me with a number of firsts. I had never worked with panels, meer-linings, or horn stems. So, I knew this one would be fun.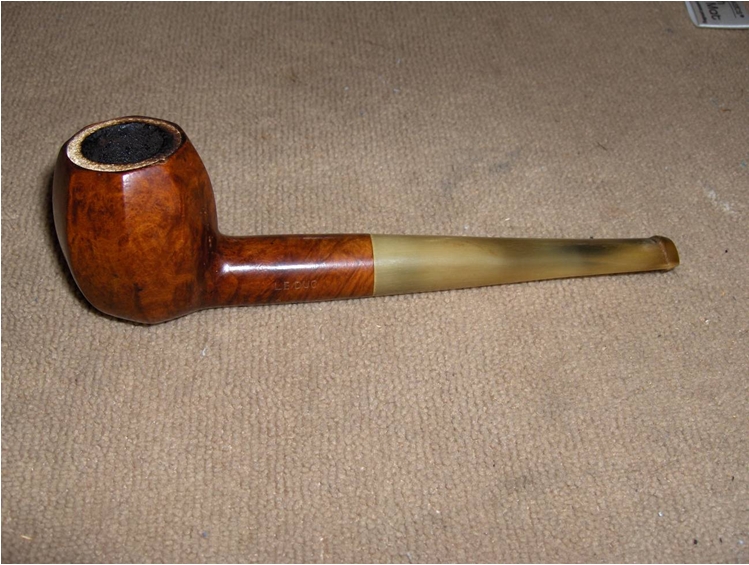 It’s been difficult to dig up anything conclusive on the history of the Le Duc brand. Both Pipephil and Pipedia come up empty, and a Google search reveals very little more other than a couple of links to an estate pipe that was once available for purchase from Amazon and eBay (the same pipe at both sites). That pipe is the only other example of a Le Duc that I have been able to find. The previous owner of this one did mention that it was from the Netherlands. So, it’s possible that it’s somehow associated with Gubbels.
I posted pictures of the pipe on Pipe Smoker Unlimited and asked if anyone had any more information. General consensus was that it is a French-made pipe, but that’s about as far as it went. Due to some slight shaping errors that I found in both the stummel and stem, I’m willing to bet that it’s somebody’s seconds brand. Though, I’m not quite willing to bet all of my marbles on a particular country of origin yet. So, if anyone out there has any insight into the brand, please don’t hesitate to let me know in the comments section.
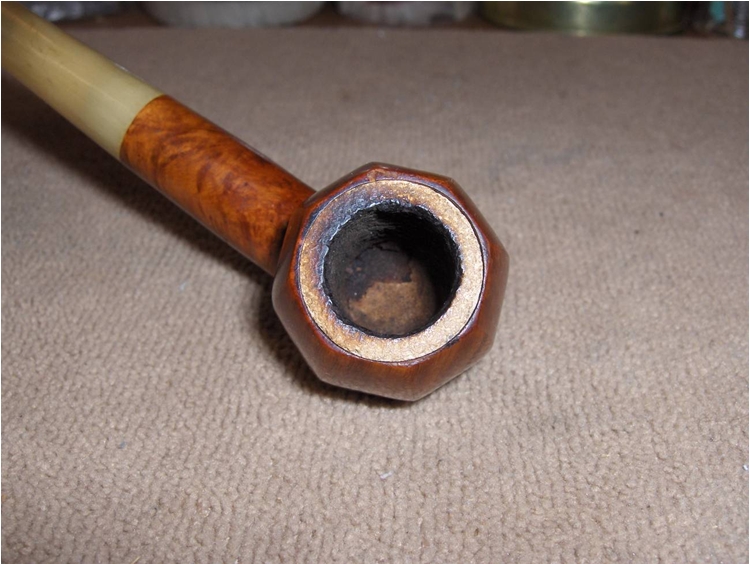
There were a few small scratches and dents on the surface of the lacquer-coated stummel. The worst of which was a series of more than a dozen nicks on one back panel. The narrow surface of briar around the rim was lightly scratched, but didn’t appear to be charred. A thin layer of old tar covered both the meer and the briar on the back of the rim.
The chamber was lightly caked, mostly in the top two-thirds. The meerschaum lining was by and large intact, but roughly a third of it had been broken out of the heel of the bowl around the draft hole. A crack in the remaining meer ran around the circumference of the heel and I could not for life of me figure out what was holding the rest in. I planned to eye this area with suspicion while I worked.
Some light chatter was present on both sides of the stem and there were a couple of shallow tooth impressions on the top. Someone had also chosen to add a dash of white paint to the bottom of the button, apparently for contrast and flair.
Overall, things could have been better, but I’ve seen much, much worse. The photos below should give you a better idea of the condition of the pipe when I started work.
 (By the way, that dark spot in the photo above is not a natural coloration. It’s tar build-up showing through the translucency of the horn. More on that later.)
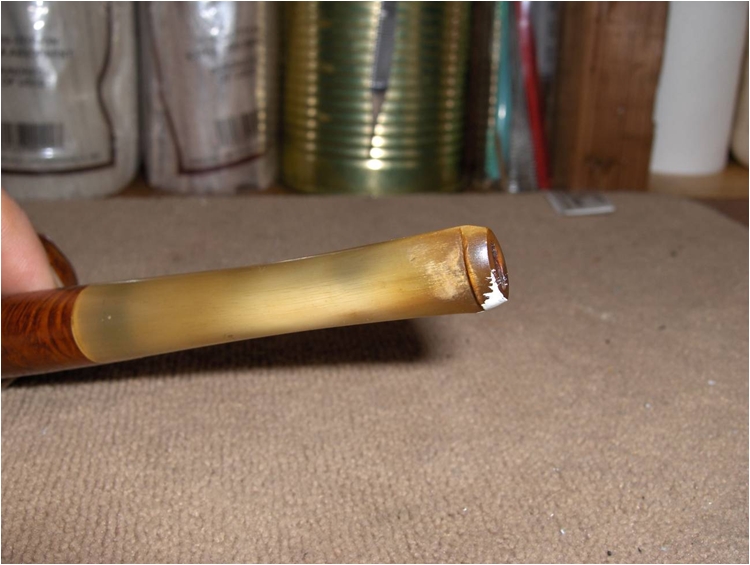
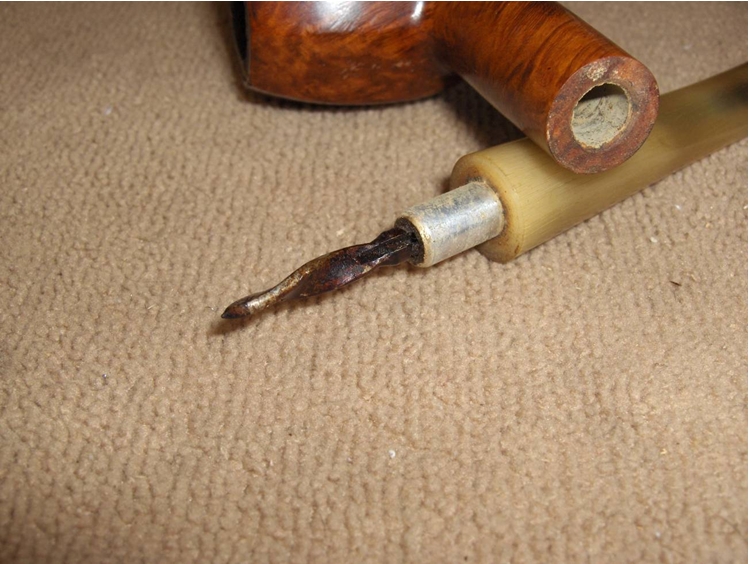 The first thing I did was remove the nasty, tar-caked stinger, which wasn’t easy. The build-up had pretty much glued it into place. I dripped alcohol around the joint until the tar had softened enough that I could unscrew it. Then, I dropped the stinger into a small container of alcohol to soften the remainder of the gunk.
While the stinger detoxed, I attempted to remove the schmutz along the rim with good ol’ cotton pads, saliva, and elbow grease, but I found it to be too stubborn. Since I needed to address the scratched in the briar along the rim anyway, I lightly topped the bowl with 320 and 400-grit sandpaper until both the tar and scratches were gone. The cake in the chamber was light but very hard. I started removing it by sanding out with 320-grit paper. Once most of it had been removed, I switched to 400-grit to finish it off. Unfortunately, like William Butler Yeats wrote, “Things fall apart; the centre cannot hold;” and as careful as I was, the remaining bottom of the meer liner was sacrificed during the cake removal process. Of course, I wasn’t at all surprised. I think the cake was the only thing holding it in to begin with.
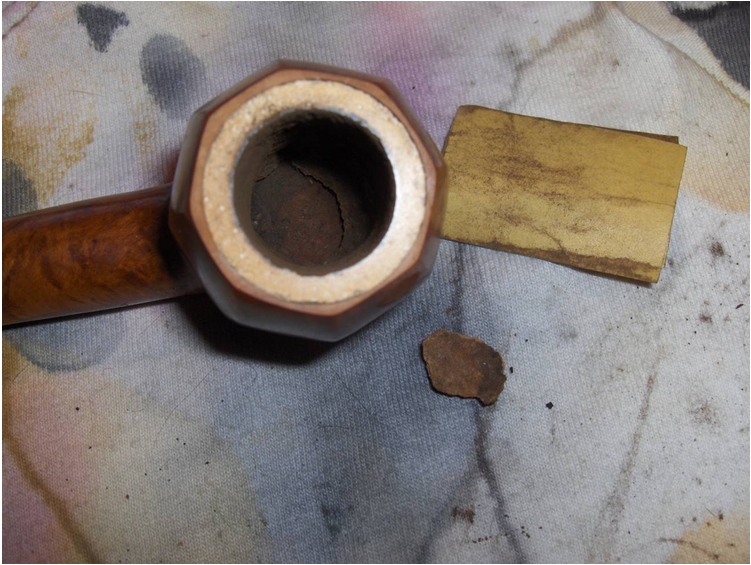 After removing most of the cake, I checked back in with the gummy stinger. The alcohol had softened the tar enough that the majority of it could be removed with cotton swabs and a pipe cleaner. The crud in the air slot was still pretty firm, however, and I had to use a pick to scrape it out before I could scrub it clean with a pipe cleaner. I followed with some #0000 steel wool along most of its length. The aluminum is very soft. So, I maintained a very light pressure and avoided the threaded end.
 Then, I started scrubbing out the inside of the shank with isopropyl alcohol and a few shank brushes, cotton swabs, and pipe cleaners. Let me tell you, this was one dirty Duc. The tar was built up into peaks and ridges that seemed to rival the Himalayas. Removing the crud in the shank was less like cleaning and more like heavy landscaping.
Eventually, it did start to come clean and I was surprised to discover a cork gasket in the mortise that I hadn’t noticed before. It was quite worn and seemed to be deteriorating with age. I found a similarly colored, dry dust around the tenon and also clogging the airway of the stem that I assumed to be detritus from the crumbling cork. There still remained enough of the gasket to give the stem a fairly snug fit, though, and I didn’t have anything at hand for a proper replacement. So, I decided to leave it for the time being to give it some thought. Cleaning the stem internals was no more fun than the shank had been. It was completely clogged and would by no means pass a cleaner. To open it up, I had to drip alcohol into the tenon, wait for it to soak in, and then gouge the softened tar with a straight pick. Rinse and repeat all the way down. The process was a bit like mining, except there was no prospect of gold or precious jewels. When I finally broke through the button end, the sludge that came pouring out looked for all in the world like black squid ink. It actually cleaned up pretty quickly after that and you can see it for yourself in the photo below. Notice that the dark spot on the stem that I referenced earlier has lightened considerably after cleaning.
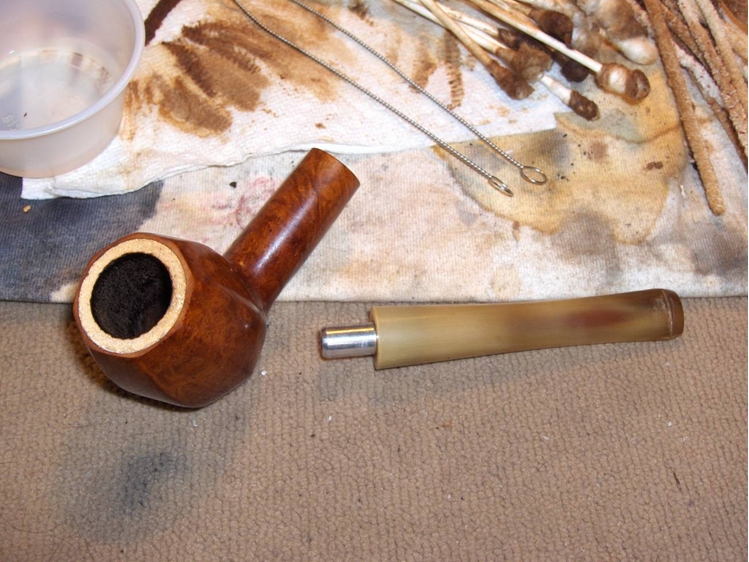 The more I thought about the mortise gasket, the more I knew that I couldn’t leave it be. It was clearly on its last legs and I started to worry about the taste that might be imparted to the smoke by the years of tar soaking into the cork. I still didn’t have a solid solution, but I learned years ago with my first car that anything can be easily disassembled. If you want to continue using it though, you’ll have no choice but to figure out a way to put it back. With that in mind, I decided to remove the gasket.
I picked through my selection of drill bits until I found one that was a perfect match for the job. It was almost exactly the diameter of the mortise. So, I could insert it and rotate it by hand to remove the gasket without any fear of it scraping the briar. Afterward, I very carefully sanded the mortise with 400-grit paper wrapped around a pencil end to remove the remaining cork and glue. The photo below shows the mortise just after using the bit.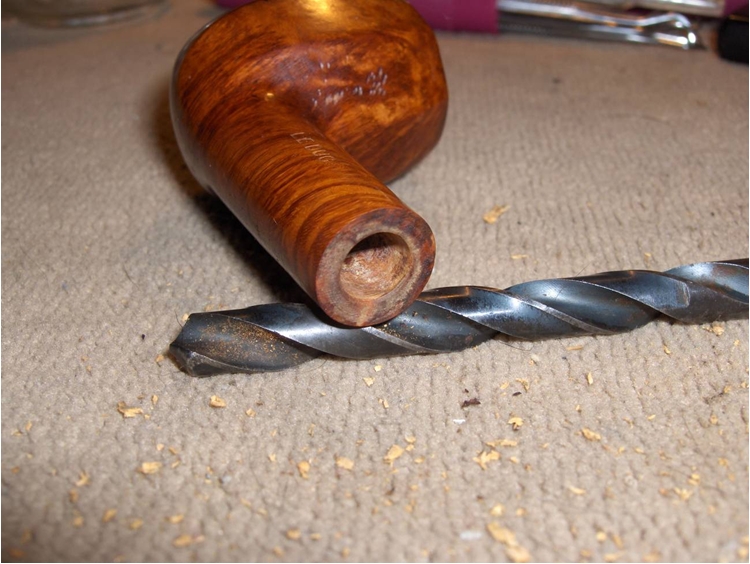 I gave a lot of thought to how best to replace the gasket and experimented with a couple of different materials. Surgical tubing used as a sleeve fitted over the tenon had the longest legs at this stage. I found that tubing with a 1/32” wall would kind of work, but was much too tight of a fit and put far too much stress on the mortise. My ideas were just about exhausted. I began to consider drilling out the mortise to accommodate the tubing sleeve, but that was something that I really didn’t want to do. Then, I remembered that I had some marine heat shrink tubing that I’ve barely ever used. I gave it a try out of desperation. Perfect fit! Since it’s the marine quality stuff, it has adhesive on the inside to keep it from slipping. I made sure to use a piece without any printing because that would just be ugly.
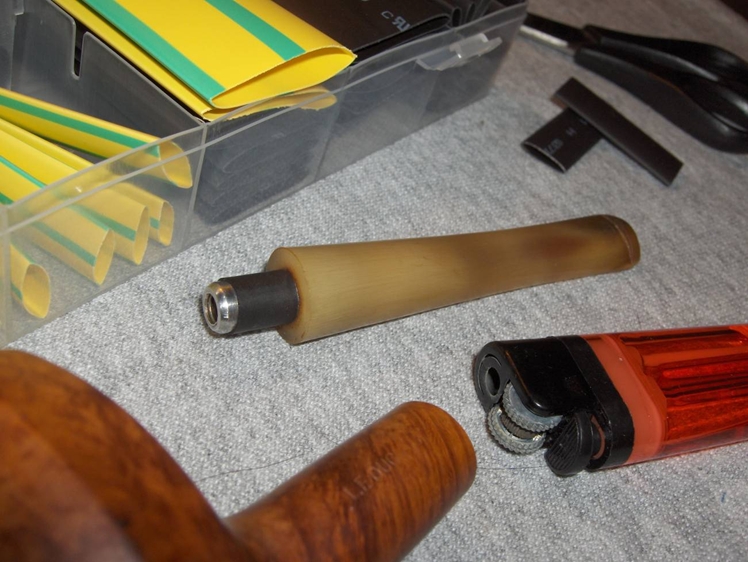 With that problem out of the way, I turned my attention back to the stummel. I stripped the lacquer coat off the bowl by wiping it down with acetone and cotton pads. It was quite stubborn in areas. So, I had to use #0000 steel wool to remove it in a few spots. When the bare wood was exposed it was much easier to tell which of the surface blemishes would require special attention.
 I then clamped the stummel in my bench vice to prepare it for the first step in removing the blemishes. I used some soft foam between the stummel and the vice jaws to protect the wood. Then, I set up my steaming kit, which includes a tea candle, a flat-blade screwdriver, a cotton cloth, and a container of water. I wet the cloth and placed it over the surface dents. Then, I heated the blade of the screwdriver and applied it to the cloth. A hiss and a tiny puff of steam later and the dents were on their way to being level with the rest of the surface. It took multiple applications of steam to raise the nicks along the back of the bowl. The edges were sharp. So, they weren’t removed completely, but they were raised enough to make them much easier to deal with when sanding. All in all, the steam treatment did a great job and would save a lot of time and material later.
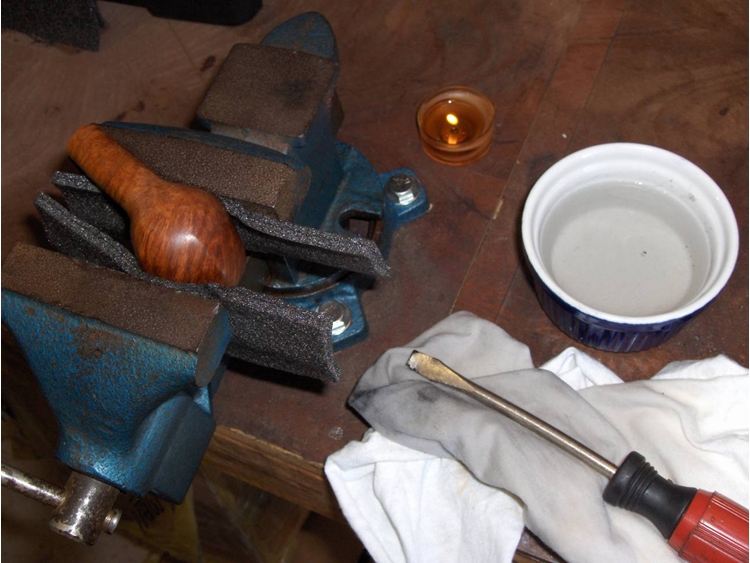 I addressed the remaining nicks and scratches by sanding them out. I used 220-grit paper on the deepest ones to knock them down until they were barely visible. Then, I used 320-grit to completely remove them along with some of the minor scratches. I followed that with 400-grit to blend those areas into the rest of the surface.
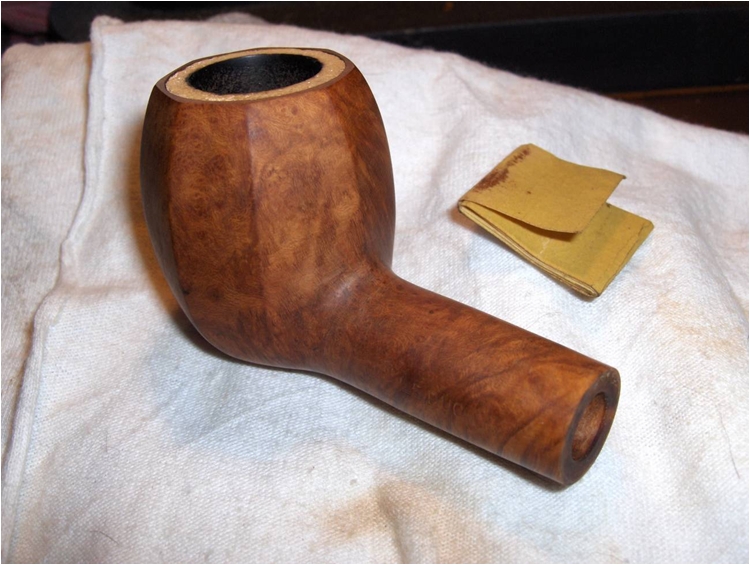 The next order of business was to repair the damage in the chamber. The meer liner sits like a cup inside the bowl and there had been a slight gap between the bottom of the liner and the heel of the bowl. So, with a section of the liner completely missing at this point, there was a significant gap between the draft hole and the bottom of the chamber. I decided to use a two-stage mud application to build up the bottom and replace the missing lining.
In stage one; I ran a pipe cleaner through the shank and slightly into the bowl to protect the airway. Then, I mixed up a batch of what I like to call “pipe tar” and applied a small amount to the bottom of the chamber with my pipe tool. Pipe tar is equal amounts of activated charcoal and FFFF-grade (very fine) powdered pumice mixed with just enough sodium silicate (waterglass) to give it a tar-like consistency. It’s very sticky and sets up quickly. So, it can be difficult to work with when fresh. It clings like ivy, though, and it can be applied in fairly thick layers without developing cracks while it dries. This makes it an excellent choice for building up the bottom of a chamber. It takes about three days to fully cure, but once it has, it is as hard as concrete and just as porous. However, due to its hardness it’s extremely difficult to sand. So, I’ve learned that it’s best to use it sparingly.
In stage two; I again secured the airway with a pipe cleaner, and then mixed up a batch of more traditional pipe mud. The recipe is largely the same, except that I used water instead of sodium silicate for the mix. Although, I did add a drop or two of sodium silicate to act as a binder and to give it a little more “stick”. The mud has a more paste-like consistency than the tar and is slightly gritty. I used my pipe tool to apply the mud around the edges of the heel, and then shaped it to round out the bottom. It takes a full day to dry. Once it has, it’s a bit softer and easier to sand smooth than the tar. The photo below was taken shortly after applying the mud.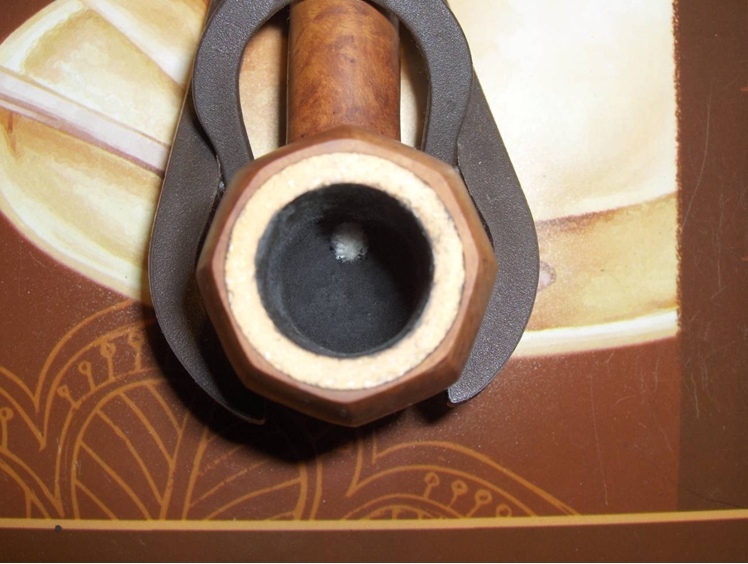 I wasn’t idle during all of that drying. I took the opportunity to get some work done on the horn stem while I was waiting. As I’ve said, this was my first time working with horn and it was quite different from any other stem material that I have encountered.
I started by leveling out the chatter with 220-grit paper. The horn turned out to be much softer than I expected. So, I used a very light touch to avoid removing too much material.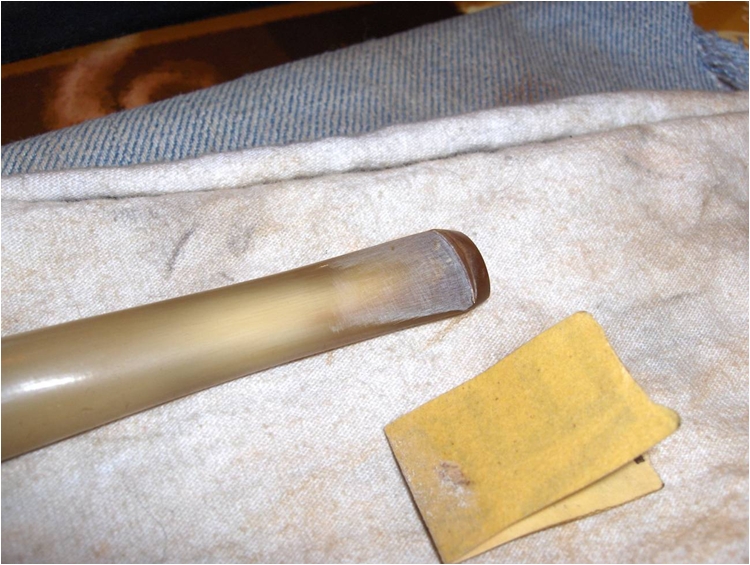 Next, I applied a thin patch of clear CA glue to the tooth impressions at the top. The dents were small and very shallow. So, instead of dripping glue directly on the stem, I put a couple of drops on a cardboard surface. Then, I used a flat toothpick to pick up small amounts of glue and applied it to the stem.
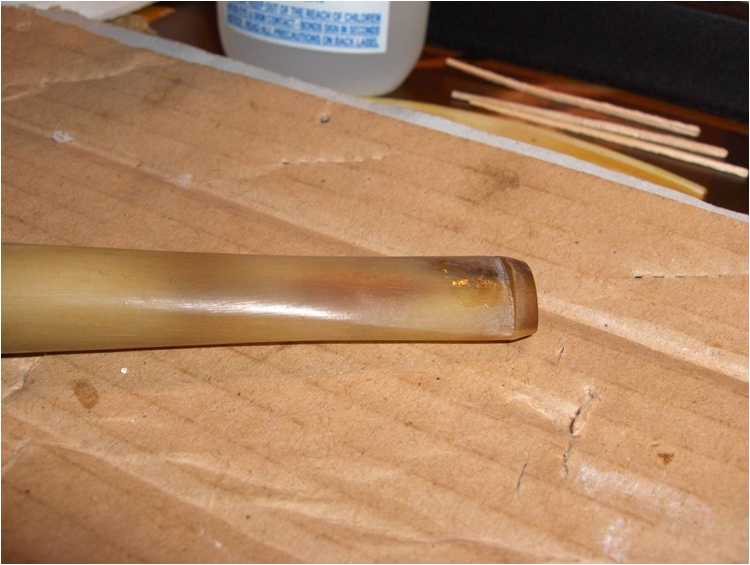 When the glue had dried, I sanded the patches down with 220-grit paper. I began blending them in with 320-grit followed by 400-grit. I rubbed the stem down with a drop of mineral oil between each grit to keep the fine fibers from splintering.
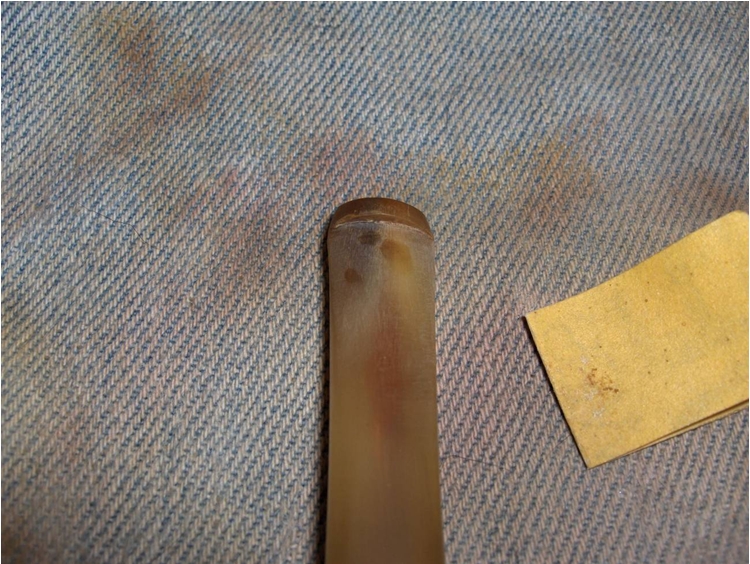 Once the patches were blended, I again rubbed the stem down with mineral oil and lightly sanded the entire surface with 600-grit and 1200-grit to remove a few faint scratches and smooth it out.
 Finally, I polished with 1500-12000 micromesh pads with an application of mineral oil between each progression of three grits.
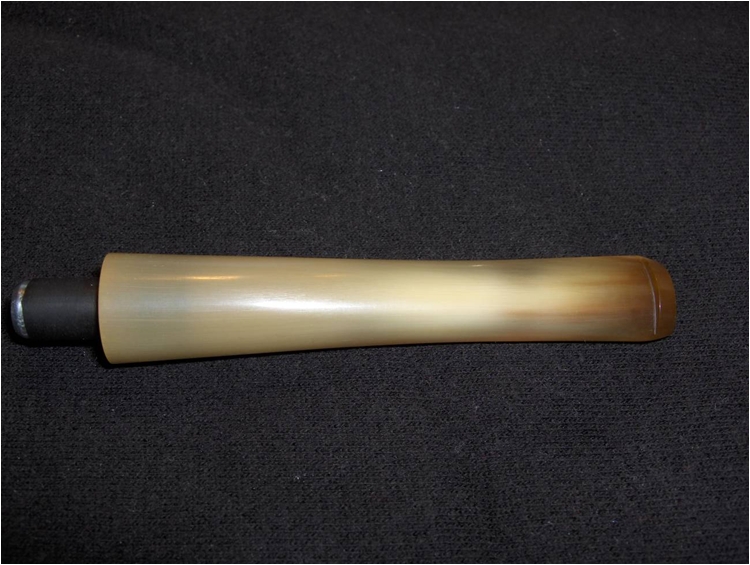
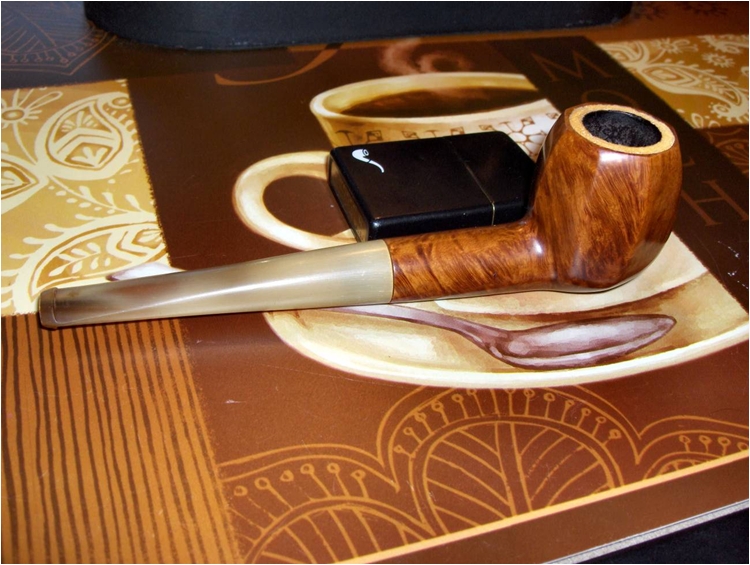
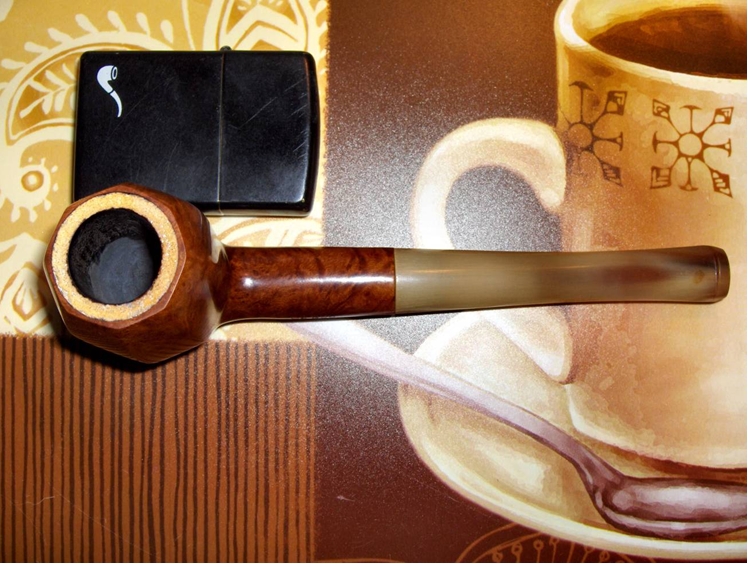
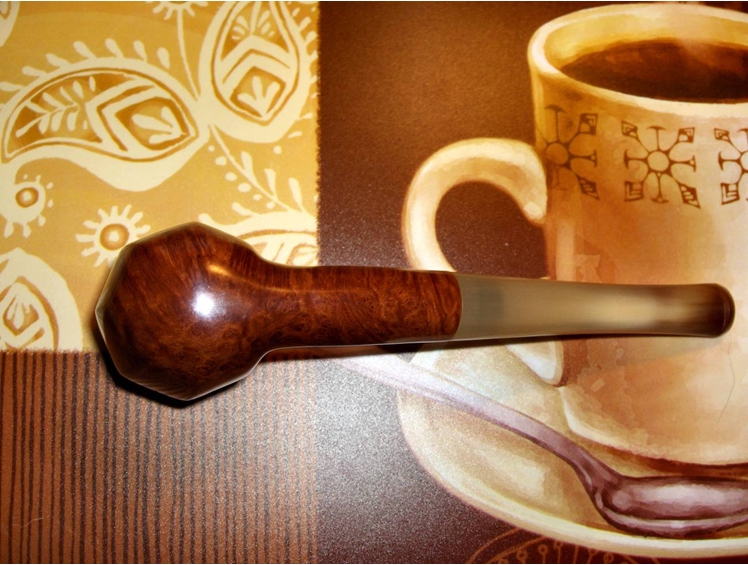
I had no idea when I began working with it that this stem would turn out like it has. When the light hits the stem, the translucency gives it a soft glow. I am completely in love with it and ready to replace all of my stems with horn. The polished stem can be seen in the two photos below (although they don’t do it justice).
 With the stem work completed, it was time to get back to the chamber. The tar and mud repair had cured. So, I used a finger to sand the patch smooth with 400-grit paper. Unfortunately, I seem to have forgotten to take any photos at this stage. I get caught up in the work sometimes. No worries. You can see the final patch in the photos of the completed pipe.
There was nothing left to do then but to work on the finish. I was very nervous about staining around the meer liner. The briar around the rim was so narrow that it seemed impossible to stain it without touching the meerschaum. So, I made an attempt to protect it by smearing a little petroleum jelly over the surface of the meer with a toothpick.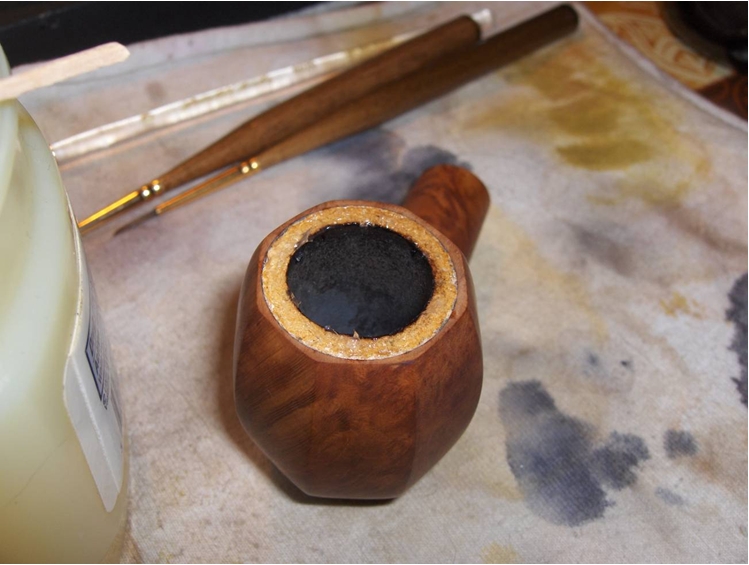 I began staining by applying a rather sloppy coat of Fiebing’s medium brown dye thinned 3:1 with isopropyl alcohol. I used a size 10/0 filbert brush to paint over the grain. I made sure to leave several open and unstained areas to provide some contrast. Normally, I would heat the briar before doing this, but I didn’t want to melt the petroleum jelly into the meer. So, I made do.
After application and flaming, I wiped the rim clean and realized that the petroleum jelly had been a mistake. It had given the meer a slight yellow stain. I scrubbed it out as best I could with a couple of cotton swabs lightly dampened with alcohol, but some of it still remains. Oh, well. Lesson learned. I won’t be doing that again.
I finished this step by hand-buffing the stummel with a cotton cloth to remove the excess stain. You can see the results in the photo below.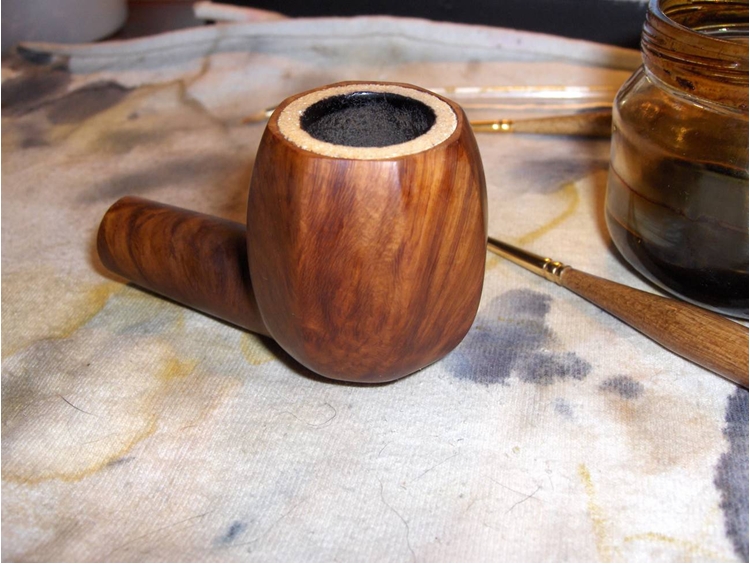 Next, I lightly sanded the entire surface with 600-grit paper before using a size 20/0 liner brush to make a more specific application of dark brown dye thinned 3:1 with alcohol. I used this sparingly, since I just wanted to add some depth to a few areas in the grain. After flaming the stain to set it, I hand-buffed the stummel with a cotton cloth again. Obviously, I skipped the petroleum jelly this time. It turns out that it was unnecessary anyway. The liner brush did a great job of precisely applying the stain to the rim.
 The stummel was sanded with 1200-grit paper, which I followed with 1500, 1800, and 2400-grit micromesh pads. Then, I gave it one, final coat of stain. This time I used light brown thinned to the same ratio as the previous applications. I used a cotton swab to apply it to the entire stummel, except for around the rim where I used the liner brush. I gave it a final hand-buff to achieve the results in the photo below.
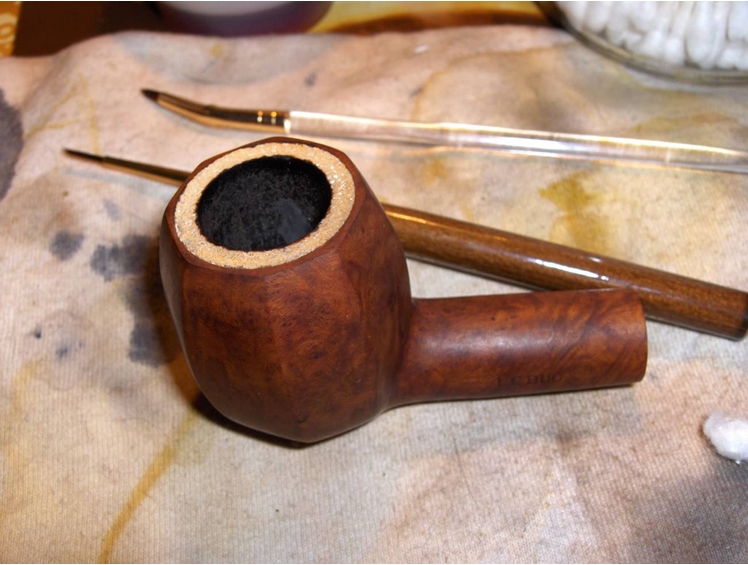 To finish up the work on this pipe, I polished the stummel with the remaining pads in the micromesh series. I then gave it a light buff and a few coats of wax to seal the deal.
I think this one turned out quite nice. There is a “warmth” to the pipe that is difficult to describe. It was also a pleasure to work on a pipe that did not require any major modifications to facilitate repairs for a change (repairs to the bowl lining notwithstanding). You can see the final pipe for yourself in the photos below.


I’ve just come into ownership of a pipe stamped LE DUC ‘Celect’
I doesn’t look meersham lined, nor have the horn stem. It did belong to a Dutch migrant to Australia. Would be nice to gain some history.
LikeLike
I recently came into possession of a handful of old horn stem pipes will aluminum tenons much like yours. They are all in surprisingly good condition relative to age and use, but the gunk buildup is tremendous. My question is this: can the horn stems stand-up to an all night soak in Everclear, or will I risk damage if I try that? Thanks in advance. Hopefully mine will come out half as nice as yours once complete.
LikeLike
Hi Ben. I would not soak them at all. The horn will delaminate if soaked. I clean them carefully with alcohol and pipe cleaners. Lots of work but it is workable.
LikeLike
Yikes! I certainly don’t want that! Thanks for the quick reply. I guess I’ve got a lot of diligent work ahead of me.
LikeLike
That is a beauty, nice job on the stem repair. Invisible!
LikeLike
Fantastic job on a gorgeous pipe!
LikeLike
Anthony, you have a beautiful pipe. Thank you taking us step by step through the process of repairing the liner, repacing the gasket, touching up the horn stem, and stain. Well written, and great photos.
LikeLike