Blog by Steve Laug
The next pipe in the queue is an old timer that Jeff picked up somewhere in his journeys whether online in his pipe hunting is antique shops. This one an interesting older WDC Calabash with a brass shank cap and a rim top cap. The stem is Bakelite with an amber colour. It is stamped on the left side of the shank WDC in a triangle (William DeMuth & Company). It is a Calabash shaped pipe decorated with a brass rim top and cap as well as a brass ferrule. Both have a pattern of filigree and hearts. These older WDC and CPF Calabashes were decorative and had a real flourish that makes them readily identifiable. The finish is smooth and is in good condition despite the years. The brass rim top has some dings in it and there was some lava buildup on various spots. The inner edge of the brass cap was turned down into the inner edge of the bowl. It was dirty with lava and there was a thick cake in the bowl. The brass was tarnished but looked easy to clean up. The pipe was dusty but the finish looked like it was rich and would clean up well. The stem is an amber coloured Bakelite with a threaded tenon in the shank and the stem. The stem has tooth marks and chatter on both sides at the button edge. The photos below tell the story and give a glimpse of the pipe before clean up.
 Jeff took a photo of the bowl and rim to show the condition of the pipe before he started his cleanup work. The spots of lava overflowing on the rim top made me thick that some of the lava had been scraped off by the seller. There was a thick cake in the bowl that would need to be reamed out. There was dust and debris in the curls and curves of the brass cap.
 He also took a photo of the right side and underside of the bowl and shank to show the amazing birdseye and swirling grain around the bowl. The classic WDC stain looked pretty good under the grime.
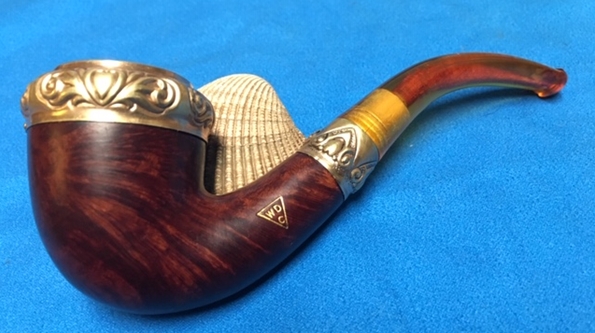
 Jeff took photos of the stamping on the left side of the shank and the setting between the brass ferrule and the bowl. The WDC triangle logo stamping is legible and very readable.
 The next photos show the rim cap and ferrule and highlight the heart and filigree patterns in the brass. You can also see the oxidation on the brass in the photos.
 The next two photos show the stem surface. They show the tooth marks and chatter on both sides near the button. They also show the deep oxidation on the stem. The third photo below shows the threaded bone tenon.
 Jeff did a thorough clean up job on the pipe so that when it arrived here in Vancouver it looked amazingly good for a pipe that is at least a hundred years old. Jeff carefully reamed the bowl with a PipNet pipe reamer and followed up with a Savinelli Fitsall pipe knife to remove the cake. He scrubbed out the mortise and the airway in the shank and the stem with alcohol, cotton swabs and pipe cleaners. He scrubbed the exterior of the bowl, rim, shank and stem with a tooth brush and Murphy’s Oil Soap to remove the oils and tars on the rim and the grime on the finish of the bowl of the pipe. He rinsed it off under running water. He dried it off with a soft cloth. He was able to remove all of the lava build up on the beveled rim top of the pipe. The brass rim top and ferrule looked very good. The birdseye and cross grain was beautiful and the pipe looked very good. There were tooth marks and chatter visible on both sides of the stem at the button. I took photos of the pipe to show its condition before I started my work.
 I took close up photos of the bowl, rim and stem surfaces to capture the condition of the pipe after Jeff had done his cleanup. The rim top was clean and the brass inner edge was in excellent condition. The stem was quite clean with some tooth marks and chatter on the top and underside near the button.
 I took a photo of the stamping on the left side of the shank and the flow of the grain on the shank and bowl side. It is a beautiful piece of briar.
 The bowl and rim top looked really good after Jeff’s clean up work. I decided to go straight to polishing the bowl. I worked some Before & After Restoration Balm into the surface of the briar with my fingertips to clean, enliven and protect it. I let the balm sit for a little while and then buffed the bowl with a cotton cloth to raise the shine. The following photos show the bowl at this point in the restoration process. The bowl and the rim top look really good and the grain really stood out on the smooth rim. The finish looks very good with the grain popping through the brown stain on the bowl and the brass on the rim top and shank end.

 I set the bowl aside and turned my attention to the stem. I filled in the deep tooth marks on both sides with clear super glue. It takes a while to cure so I set it aside and worked on another pipe while it hardened.
 Once the repairs had cured I used a needle file to sharpen the edge of the button and smooth out the repairs on the surface of the stem. I sanded it with 220 and 400 grit sand paper to smooth out the repairs and blend them into the surface of the stem.
 I polished the stem with micromesh sanding pads – wet sanding with 1500-2400 grit pads and dry sanding it with 3200-12000 grit pads. I wiped the stem down with Obsidian Oil after each pad. I further polished it with Before & After Pipe Polish – both Fine and Extra Fine. I finished by giving it a final coat of Obsidian Oil and setting it aside to dry.
 Since I had finished both the bowl and stem I put them back together and carefully polished the bowl and stem with Blue Diamond polish on the buffing wheel. The combination of metal, Bakelite and briar makes this a very touch process. I gave the bowl and the stem multiple coats of Conservator’s Wax. I carefully buffed the pipe with a clean buffing pad to raise the shine. I hand buffed it with a microfiber cloth to deepen the shine. The pipe polished up pretty nicely. The brass rim cap and shank end and the beautiful grain of the briar on the bowl came alive on the buffing wheel. The rich brown stain works well with polished amber coloured Bakelite stem. The finish looks amazing and it is smooth and light weight in the hand. Judging from the condition when we got it, I am sure that this will be another amazing smoker. Have a look at it with the photos below. The dimensions are Length: 5 1/4 inches, Height: 2 inches, Outside diameter of the bowl: 1 7/8 inches, Chamber diameter: 3/4 of an inch. This beauty will be going into my collection of old WDC and CPF. Thanks for walking through the restoration with me on this beautiful old time WDC Calabash pipe.


