Blog by Dutch Holland
With this blog it is my pleasure to introduce you to the work of Dutch Holland. His work comes highly recommended to us by Dave Gossett who has been a contributor to rebornpipes for a while now. Welcome to the blog Dutch. It is great to have you here.
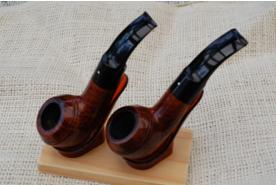 A number of years back I had the good fortune to acquire a Dunhill 52081 Bent Rhodesian. I readily admit to a passion for Rhodies and Dogs that borders on obsession. Several years later I came across a second pipe of the same year and style but a different finish. The temptation was overwhelming and I succumbed. The problem was this second pipe not only had been poorly used but it had a nasty chip in the top center of the bit at the button. But the price was right and at worst, I could always invest in a replacement bit. These Rhodies were only offered for a few years and they don’t come on the market very often so I made the decision to buy. That pipe sat in the “Awaiting Action” box in my shop for a number of years. I really wasn’t sure just how to deal with the repair but last year I decided to give it a shot and to my pleasant surprise found it was neither difficult nor complicated. As you can see from the picture above it’s all but invisible. It requires very close inspection by a knowledgeable eye to detect.
I’ve broken the process down into steps outlined below. Being able to fix a broken bit can do for you what it’s done for me, allowed me to rescue a pipe I really wanted. So here’s one way to do it.
Repairing damage to a pipe stem is an easy five step process. This kind of repair can be done by the hobbyist and makes an old pipe serviceable again at a very modest cost. The outcome is very dependent on the skill of the repairman so a few tries on an old stem for practice is recommended. The better your skill set, the better the final result but it’s neither difficult nor complicated, just time consuming. Some question the durability of this kind of repair but my experience is that they hold up to normal use quite well. I don’t recommend the use of harsh chemicals for cleaning but with reasonable care the repair will last a very long time and for the hobbyist it’s more than adequate for your average project.
What you will need:
Supplies
CA Glue, Activated Charcoal, a small drink bottle cap, light cardboard, Pipe cleaners, Scotch tape and some tooth picks
Tools
A small file set, Sandpaper (400, 600 & 1000 grit) and a set or Micro-Mesh pads (1500 to 12,000 grit)
The Process
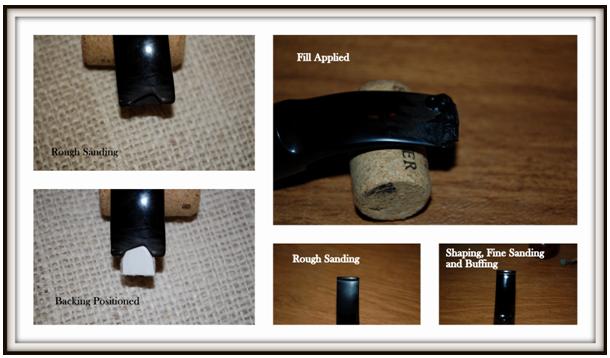
Step 1, Rough Sanding.
Sand the area to be repaired with the 400 grit sandpaper, beveling the area of the break to provide the maximum bonding area for the repair mixture. I like the courser grade as it scores the area around the break and reduces the stark contrast between the repair area and the rest of the bits surface making the repair difficult to detect. Clean the area to be repaired well and make sure it is free of any contaminants which might inhibit the bond of the glue/charcoal mixture. I usually use a high proof alcohol (Wild Turkey 101)
Step 2, Support the repair.
Insert support into the airway to prevent the mixture from invading it. A piece of light cardboard will do the trick. First rap the cardboard in Scotch tape (mixture won’t stick to the tape) and slide it into the slot. Then slide a pipe cleaner into the slot under the cardboard to force a snug fit up against the repair area.
Step 3, Making and applying the repair mixture.
Place a portion of the activated charcoal in the drink cap. I use a spoon on a Czech pipe tool as about the right amount. To that I add the CA glue until I have about a 50% Glue mixture and then gently stir until the charcoal is completely mixed with the glue. I like to let the mixture set for 15 seconds to allow any air bubbles caused by the mixing to escape. Using the tooth pick apply the mixture to the repair area until the build-up is higher than the bit surface. There is some shrinkage when the mixture dries so extra depth is essential to getting a smooth, flat surface when finished. Work quickly as the CA glue thickens rapidly. If necessary repeat this step to get the surface level to where you want it. In the example shown below I added mixture twice. First to fill the gap and a second time to rebuild the button area.
Step 4, Rough sanding & Shaping
Once the repair mixture has cured, (I usually leave it for several hours, probably overkill but I find it shapes better if it’s well cured) start with the files and reduce the excess mixture and get a rough shape. Do not try to get a close finish to the shape you want as the files are quite course and will leave significant scratches on the surface. Allow for this by leaving some surplus material in place. Now with the sandpaper progressively contour the surface starting with the 400 and moving to 600 and then 1000 grits. Slow, careful sanding works best using the sandpaper to contour the fine details. Sometimes air bubbles get caught in the repair mixture and will leave a tiny void in the surface. Should this happen add a thin touch of the CA glue to the void and re-sand. The imperfection will become un-noticeable. Keep in mind that any irregularities in the surface will become traps for contaminants so don’t be too forgiving of them.
Step 5, Finishing the bit
Now you’re ready to restore luster to the bit. Here Micro-Mesh is a great solution for the task. Progressively sand the bit starting with the 1500 grit and progressing up to the 12,000 grit. The human eye cannot detect scratches left by the 12,000 grit pad so the surface looks shiny. I don’t recommend buffing as an alternative. You can quickly undo all the painstaking work you have just completed. As a final step in the process a light buff with white diamond followed some carnauba wax will give you a great shine and inhibit future oxidation.
So there you have it. Give it a try. You can’t make a broken bit much worse than it already is so there’s little at risk. Who knows, you might like the results and there’s something very satisfying about being able to rescue a pipe others would consider a lost cause. This technique was shared with me by Dave G and it works well so I pass it on with my recommendation.
Note
In subsequent tries I’ve found this solution works invisibly Vulcanite but is more detectable on acrylics.