Tag Archives: Kiko African pipes

Family Relic: My Great Grandfather’s Meer Pipe


Blog by Kumayl Rashid

Kumayl tells the story of how I met him and my invitation to him to write a blog on the pipe that he wanted to restore as a part of his heritage. I do not need to repeat any of that for the readers as he does a great job introducing the pipe and himself. I am glad to welcome him to the rebornpipes family with this first blog that he has written for us. Give it a read and you will get a sense of the man and his work. Welcome Kumayl. It is a pleasure to have you here. – SteveDifferent views of the pipe (post-restoration).

June 27, 2019:

Some background and an apology – It was July 2017 that I met Steve. He was kind enough to carve some time out of his day to educate me (in person!) on pipes and the art of restoration. I had recently come into the possession of my great grandfather’s pipe – a beautifully rusticated, black meerschaum. Steve kindly requested that I write a short piece about the pipe’s history and I gladly accepted. I did some research and put together a few paragraphs before work and school dominated my life. Well, two years have passed by way too quickly and needless to say, I didn’t submit that article. An apology to Steve for taking so long, but hopefully you appreciate this little bit of family and pipe history. As I already wrote a good chunk of the article two years ago, I kept any time references relative to July 2017. Note, this isn’t too much of a restoration article as it is a history lesson. Enjoy!

July 2017:

I only recently got into pipe smoking, collecting, and minor restoration and it didn’t take long before I learned that my great grandfather (paternal grandmother’s father or, father’s mother’s father) was also a pipe smoker. It came up in a conversation with my parents where my father was reminiscing memories of his grandfather. The whereabouts of any of his pipes, if they still existed, were unknown. The only logical step was to visit my great uncle – family historian, storyteller, and keeper of relics.

I went over to my great uncle’s place to inquire about the existence of any of my great grandfather’s pipes. Almost immediately upon asking, my great uncle lead me through his humble rancher to a bedside table. A small black pipe, in all its glory, lay there among assorted knick-knacks; set aside, but seemingly never completely forgotten. I held the pipe in my hands, lost for words. Knowing my great grandfather had held and smoked this very pipe was astounding to me. I hadn’t had the pleasure of meeting him but was always reminded of his mannerisms and life story. My great grandfather was Hassanali Nasser Virji – son of a merchant prince, heir to a business empire, businessman, first Mayor of Mwanza, pioneer, and an immigrant. Born in Bagamoyo (the then capital of German East Africa) on November 3, 1905, he spent the greatest portion of his life in Mwanza, later becoming the first mayor of the town in 1957. He immigrated to Vancouver, BC with his family in 1977. He passed away just three years later on December 29, 1980.(Left) My great grandfather wearing the mayoral collar, circa 1957. (Right) A headshot from later in life, date unknown.

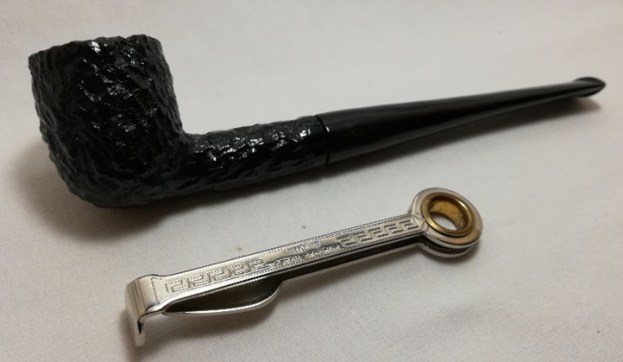
Once my running mind had returned to the present, I continued to marvel at the pipe – its in-hand feel and rustication. As habit now has it, I inspected it for any possible markings or indication of manufacturer and origin. On the bottom of the shank was inscribed “GENUINE block meerschaum 14”. There was a faded inscribed logo on the side of the stem, which I gathered could represent an elephant. Perhaps the most astonishing thing about the several-decade-old pipe was its condition. Apart from some oxidation of the stem, it was perfect. The exterior of the meerschaum bowl still held a shine with no chips or cracks to be seen. The inside of the bowl was clearly used, but still smooth and free from any debris. It was clear that my great grandfather cared for this pipe meticulously. From a very particular man who often preached to his children things like “a place for everything and everything in its place”, this was no surprise.(Top) Inscription on the bottom of the shank. (Bottom) The pipe bowl in pristine condition.

The feeling of holding this family relic, that was seemingly frozen in time, was absolutely indescribable. After showing so much interest in the pipe, my great uncle passed the trust on to me. To this day, my great grandfather’s pipe is one of my most prized possessions.

After I was made the next steward of the pipe, I had to find out more about it. As soon as I got to a computer, I searched through some of the trusty reference sites that Steve had provided me – pipedia.org and pipephil.eu. A few clicks and I was able to postulate that the pipe was most likely a Kiko Countryman – this, based on some similarities of posted pictures, descriptions, and most notably the elephant logo. Kiko was a brand of Amboseli Pipes from the Tanganyika Meerschaum Corporation.

Tanganyika was the mainland part of modern-day Tanzania and was a colony of German East Africa from 1885-1916. In 1916, during World War 1, the territory was seized by the United Kingdom and placed under British rule. It wasn’t until December 9, 1961, that Tanganyika gained independence from the United Kingdom and was named Tanzania (later merging with Zanzibar to form the United Republic of Tanzania). It’s in this territory that the Tanganyika Meerschaum Corporation was formed in 1955 after a Kenyan businessman discovered a meerschaum mine close to Mount Kilimanjaro. This meerschaum deposit along with a few others were all in the Amboseli region at the foot of Mt. Kilimanjaro.

The meerschaum mined from this area is usually brown, black or yellow, is tougher, less porous, and considered to be of a lower quality compared to the Turkish variety. East African meerschaum was exported worldwide for use in the pipe industry. A subsidiary, Amboseli Pipes (also referred to in some sources as the Kilimanjaro Pipe Company Ltd.) produced several brands: Caveman, Countryman, Huntsman, Hillbilly, Kiko, Kilimanjaro, Kudu, Makonde, Merlin, Sportsman, Townsman, and others. Each sub-brand sharing or carrying unique animal logos (elephant, rhinoceros, bird, antelope to name a few).(Top) Faded elephant logo. (Bottom) A profile shot of the pipe used to compare with online sources.

After comparing pipe descriptions, pictures, and the logo found on my great grandfather’s pipe, I settled on the hypothesis that it was a Kiko Countryman (perhaps model #14, from the number found on the shank). Kiko literally means “pipe” in Swahili (Tanzania’s national language). The Tanganyika Meerschaum Corporation was eventually closed after an attempt to keep it running by a Belgium firm. East African meerschaum has been used in pipe manufacturing as recently as 2001 according to Pipedia. For more history and background, I highly recommend checking out Pipedia’s writeup at the following link: https://pipedia.org/wiki/Kiko.Some pictures of the pipe, pre-restoration. Note the slight oxidation (brown tint) on the mouth-end of the stem.

After completing my research, I picked up the pipe once again, now with a greater appreciation of its origins and perhaps rarity (though it remains priceless to me). It was a truly special piece as it was mined, manufactured, and likely purchased in my family’s native Tanzania. At this point, I was torn as to whether I wanted to touch the pipe at all considering its history, meaning, condition and how pristine it looked for its age. However, the stem was showing some age, so that’s where I decided to focus my restoration efforts.The disassembled pipe. This was my first encounter with a threaded tenon system.Close-up details of the buildup and oxidation on the tenon and stem, respectively.

As with previous stem restorations I’d done, I started with sanitization – some bristle pipe cleaners dipped in 91% alcohol did the trick. I ran the soaked pipe cleaners through the stem until one came out near white. I then cleaned the threaded tenon system with a medium bristle toothbrush and some more alcohol just to get rid of any debris and minor buildup. The next step was to clean the outside of the stem with cotton pads and yet more alcohol. This gets rid of any dirt adhered to the surface.The stem, post-sanitization. Oxidation still present.

It was then time to soak the stem in a solution of oxi-clean and warm water to loosen up the oxidation. After a 30-minute soak and one more pass through with a pipe cleaner, the stem was ready for sanding.(Left) The stem after an oxi-clean soak; uniform, matte black finish. (Right) Micro-Mesh sanding pads.

I turned to my trusty Micro-Mesh sanding pads. I worked through from a 1,500 to a 12,000-grit pad, sanding the stem while trying to avoid removing the elephant marking completely. Patiently working through all the pads ensures a deep shine that’ll last. A quick wipe/buff with a dab of oil (I had almond oil on hand) and a microfiber cloth and the stem was nearly finished.

At this point, I attempted to re-ink the elephant logo using some fine implements (toothpick and a sewing needle) and some white acrylic paint. Unfortunately, even though the logo was still visible, it’s far too shallow to re-ink given my very limited experience.The finished and re-assembled stem. The shallow elephant logo can still be made out.

That’s all there was to the restoration aspect of this pipe. I reassembled the pipe and gave it a quick wipe with a microfiber cloth.
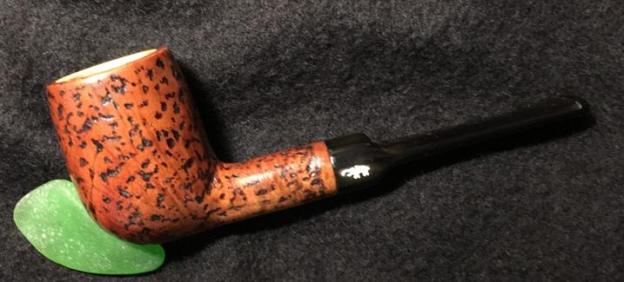
 Finished pipe.

I still have mixed feelings about actually firing it up. Perhaps on my great grandfather’s birthday and/or death anniversary, I will honour his memory with a smoke (likely an English blend as he would’ve enjoyed) through this great little meer pipe. I’m currently looking into getting a display case for the pipe so that I can have it out for my family to view and enjoy. The pipe will stay with me from here on out and will be passed down along with my great grandfather’s autobiography for generations to come. Finished pipe.

Web Sources: pipedia.org, pipephil.eu, wikipedia.org

Giving new life to a Kiko 343 Made in Tanganiyka Meer-lined Billiard


Blog by Dal Stanton

I acquired this interesting Kiko 343 Meer-lined Billiard in a Lot of 66 which has provided many stewards with newly restored pipes.  Aaron saw this uniquely rustified pipe in the “For ‘Pipe Dreamers’ Only!” page on The Pipe Steward site and commissioned it to add to his collection AND this pipe will benefit the Daughters of Bulgaria, our work here in Bulgaria helping women and girls who have been sexually exploited.  Here are the pictures that got Aaron’s attention. I’ve looked forward to working on this pipe because of its country of origin – Made in Tanganyika.  The pipe design itself gives hints of its African origin with a rustification that has a safari motif on a classic Billiard and the stem stamp of an elephant is very cool!  The briar surface also reminds me of cork – a surface that combines smooth and texture which I think is unique.  I assume the shape number 343, stamped on the lower shank, points to the Kiko’s Billiard shape.Dating the minimal age of this pipe is made easy by the fact that Tanganyika is no longer a country.  According to the Wikipedia article, in 1922 the Tanganyika Territory was taken by the British as their share of German East Africa under the League of Nations Mandate.  After WW 2, Tanganyika became a United Nations Trust Territory yet remained part of the British Common Wealth.  Claiming independence from the crown, Tanganyika adopted a new constitution in 1962 that abolished the monarchy and became present day Tanzania.  The picture to the left shows the location of Tanganyika – marked #11. This puts the date of this Kiko at no later than 1962 which gives a bit of vintage as it carries its former Commonwealth history to the present.

I posted some pictures of the Kiko during the restoration on the Facebook group, The Gentlemen’s Pipe Smoking Society, and fellow member, Jonny Mullis commented on the Kiko name that they were wonderful pipes with the animal stamping.  He also said that they were becoming quite collectible and affordable.  That was all good news to me!

The Kiko seems generally to be in good condition but carries with it some fills that I’ll need to take a closer look. The Meer-lined bowl looks solid, but I will be able to see better after cleaning it.  The rim has a fill or composite material that occupies about a quarter of the rim.  Structurally, the rim looks good and should clean up well.  The saddle stem has some oxidation and tooth chatter on the bit which needs addressing.

I begin the Kiko of Tanganyika’s restoration by cleaning the airway of the stem with pipe cleaners dipped in isopropyl.  After this, I add it to a soak of Before & After Deoxidizer with several other pipe’s and their stems in the queue for restoration.  I leave the stem in the soak overnight and after fishing it out of the Deoxidizer, I wipe the fluid off with cotton pads wetted with light paraffin oil.  The raised oxidation also is removed as I wipe.  Unfortunately, the paint used for the elephant stamping did not hold.  I should have covered it!  I will need to retouch the stem stamp later.  To be on the safe side, I also use 600 grade sanding paper and wet sand the stem to remove any residual oxidation.  After this, I remember reading a Charles Lemon’s blog on Dad’s Pipes (LINK) about practices he has learned over the years, and one of them was utilizing Tripoli compound and a buffing wheel to remove oxidation.  I decide to try it out.  To do this, I mount a new, clean felt buffing wheel on the Dremel, set at the slowest speed and apply Tripoli over the stem.  It seems to work well as I’m able to concentrate on areas of oxidation – especially around the button and the curve of the saddle that are more difficult to reach.  The pictures show the deoxidation process. Turning now to the Meerschaum lined stummel, I take a picture of the chamber showing the minor cake that has collected on the Meer surface.  Unlike briar pipes, Meerschaum needs no protective cake.  Therefore, the goal in cleaning is to reveal the Meerschaum surface.  To remove the carbon, I begin by gently using the Savinelli Fitsall Tool to scrape the chamber wall.  When the crunchy texture stops as I gently scrape, lets me know that the carbon is removed.  I then follow by sanding with 240 grade paper wrapped around a Sharpie Pen.  I sand it until it is totally smooth in the chamber.  There is still darker Meer in the chamber, but to remove more simply for aesthetics is not necessary. I then wipe the chamber with a cotton pad wetted with isopropyl 95% to remove the Meerschaum dust left behind.  The Meer lining is in good shape – no cracks or crevices in the chamber – though there are some age scratches here and there. The pictures show the progress. Moving to the external surface, I use undiluted Murphy’s Soap with cotton pads to clean.  I also utilize a bristled tooth brush to work the rustification divots.  To freshen the Meer rim top, I use a piece of 240 grit paper to lightly sand and clean the Meer surface.  This enhances the appearance with the contrast between the Meer and the briar rim. I take some pictures of the cleaning process and this is when I discover a problem.  I detect a crack running from the left side of the bowl downward until it disappears when it intersects with the fill that wraps around the heel and up the right side.  The fill looks like a briar dust/CA glue patch material which I use regularly.  The same patch material quarters the rim.  These pictures show the patch material. To address the crack, my first step is to determine the integrity of the old patch material.  I will try to remove the patch material to see what is underneath.  If I can do this, then I can assess the nature of the repair needed.  The crack that is exposed appears to me to be a fresher progression of crack ‘creep’ – that has grown beyond the original patch.  This repair is straight forward by drilling a counter hole at the end of the crack to stop the creep and applying additional patch material. To test the integrity of the patch material I try to remove it by dissolving it with acetone and cotton pads.  The acetone doesn’t make a dent. These patches are solid.  I work the acetone over the rim and it has no effect on the patch material.  I’m not sure what the patch material is, but it’s not going anywhere soon!  At this point, I will repair the exposed crack and shore up some gaps I detect in the old patch material.  The rustic, craggy look is what makes this Kiko stand out and after working on the patches, I’ll seek to blend this rustic look with the finishing process.  To start, to aid me in drilling a hole at the end of the crack to arrest the crack creep, I use a magnifying glass to identify the end and using a sharp dental probe to press a guide hole.  The guide hole helps when drilling.  I mount a 1mm drill into the Dremel and drill – but not too much!  Going through the Meer lining would not be a happy situation.  The black highlighted rustification patterns, make it much easier to blend the repair. To do this, using a toothpick to run a drop off the end, I spot drop Black CA glue into the counter hole and let it cure. After filling the offset hole, using a toothpick in the same way, I run a line of clear, thin CA glue down the crack.  I use the thin CA glue because it penetrates the crevice of the crack for a solid fill.  After the CA glue cures, I spot drop clear CA glue in a few other places where there were gaps around the old patch work. With the CA glue patches curing, I turn to the stem.  Using micromesh pads 1500 to 2400, I wet sand the stem.  Following this, I dry sand using pads 3200 to 4000 and 6000 to 12000.  After each set of three pads, I apply Obsidian Oil to the stem to revitalize the vulcanite. I love the freshly polished vulcanite pop! With the crack patch cured, I start sanding out the excess CA glue using 240 grade paper followed by 600 grade. To bring out the natural briar shine and hue, I run the stummel through the full battery of 9 micromesh pads from 1500 to 12000.  Before I apply any dye color to the stummel to mask and blend the patches, I want to have an idea of the presentation of the briar.As expected, the briar darkened through the micromesh cycles.  There is still a lightened area around the sanded patch areas which I will blend.  I also want to blend the patches more.After applying several different dye sticks and fan blending with a cotton pad wetted with a bit of alcohol, I tried to darken the lower part of the stummel to provide more blending.  I succeeded to a degree, but not enough that would mask the patch areas.  To do that, I would need to stain the entire stummel darker and that would lose the ‘cork’ or safari appearance of this Kiko Billiard made in Tanganyika. That, I’m not willing to do.  His trademark is rough and rustic!  So, with a little embarrassment, I remember that I have not cleaned the internals of the stummel.  After some pipe cleaners and cotton buds dipped in isopropyl 95%, I now have a clear conscience.Reconnecting stem and stummel, I mount a cotton cloth buffing wheel on the Dremel, set the speed at the lowest speed, I apply Blue Diamond compound to both stem and stummel. After completing an application of the compound, I buff the pipe with a felt cloth to clean off the compound dust in preparation for the application of wax.  Before I apply the wax, I have one more project to complete.  The white elephant stamping’s paint disintegrated in the Deoxidation soak and I need to repair this very cool stamping.  Using white acrylic paint, I dab it over the elephant imprint and dab it with a cotton pad to thin it and allow it to dry more evenly.Well…, in the interest of full disclosure, none of the usual methods worked – paint, wipe while wet – paint, let dry fully, scrape off lightly….  At the end of the day, and some hours of experimentation using a paint brush, needles and toothpicks, I finally arrived at an acceptable result for me.  With a picture of the original on my computer screen to compare, I used a toothpick to ‘sculpt’ the acrylic paint onto the Elephant canvas bit by bit.  Then, before the paint dried, I scrape the unwanted portion from the canvas to shape the image.  This was not a straight forward, slam dunk process!  After many starts and restarts working with a magnifying glass to paint, I came to a place where I am satisfied.  I’m not an artist in anyone’s conversations, but through trial and error, the Kiko Elephant mosaic – it’s no longer a stamping, is not perfect, but looks pretty good.  With the Elephant again standing guard on the Kiko’s stem, I mount the Dremel with a cotton cloth buffing wheel, increase the speed to about 40% and apply a few coats of carnauba wax to the stummel and stem.  After applying the wax, I give the pipe a good hand buffing with a clean microfiber cloth to raise the shine on the unique ‘cork’ rustified stummel and stem.

The rustification on this pipe is unique.  It pulls one toward the African roots of Tanganyika, now Tanzania.  The texture reminds me of cork which by the very nature of the material is not perfect.  This Kiko wears his imperfections well – the fills, evident on the stummel surface, belong and mark the difficulties this pipe has had along the way, but now ready to go again.  The grain nuanced as a backdrop to the rustification, has subtle patterns that remind one of tiger fur.  The Meerschaum lining looks great and will provide the Kiko’s next steward the ability to enjoy a bowl of his favorite blend, and immediately reload for another smoke without the need of resting the pipe.  Aaron commissioned this Kiko from the “For ‘Pipe Dreamers’ Only!” page and now he will have the first opportunity to acquire it in The Pipe Steward Store and what is really good, this benefits our work, the Daughters of Bulgaria – helping women and girls who have been trafficked and sexually exploited.  Thanks for joining me!