Blog by Steve Laug
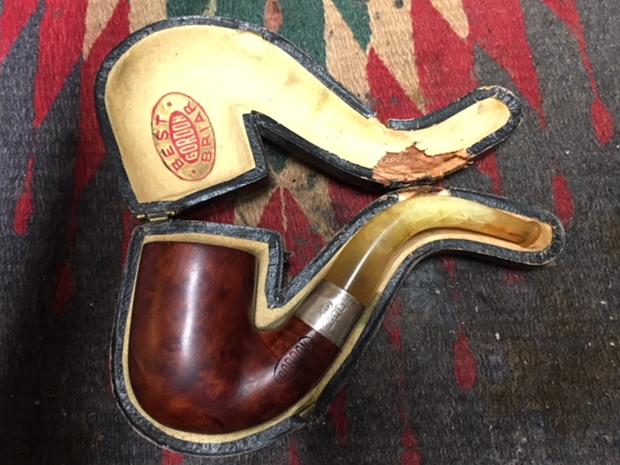
Not long ago I was in communication with Alice regarding a pipe that had belonged to her Grandfather, William Kay. She had been keeping it in a drawer for many years and she took it out to pass it on to her nephew. When she opened the case she said that the amber stem was crumbling to pieces and the case itself was also crumbling. She said that it had been kept dry and safe in a dresser drawer for years so she was sadly surprised by the condition of the pipe. It was a piece of her family’s history but it was in sad condition. She really did not know what to do with it. She wrote to see if I would even be interested in it. She wanted to pass it on and thought I might want it. When I heard about it I wanted to see it before I accepted the challenge to work on it and assess whether I could stabilize the amber and resurrect the old pipe. I was not sure but I wanted to see it. Alice graciously took some photos of the pipe and emailed them to so that I could have a look at what she saw as she looked at it. The photos below tell the story.

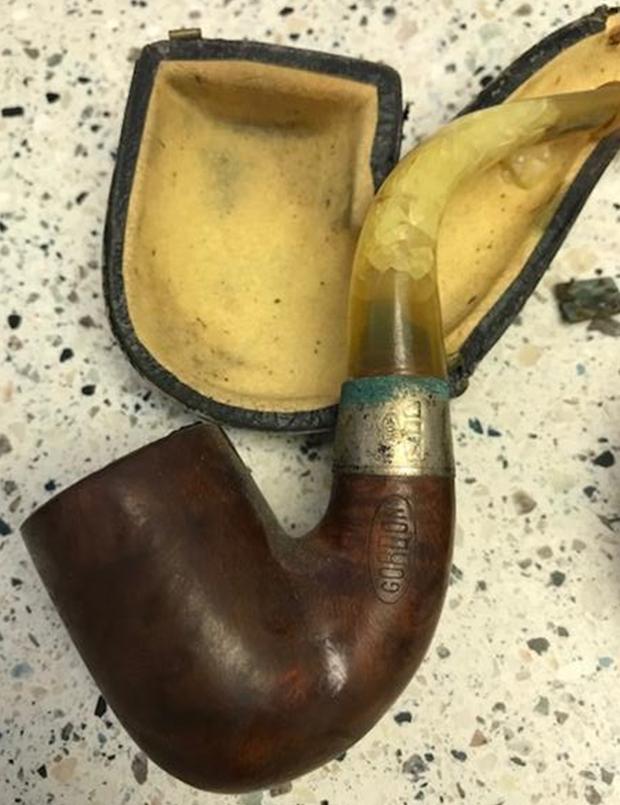
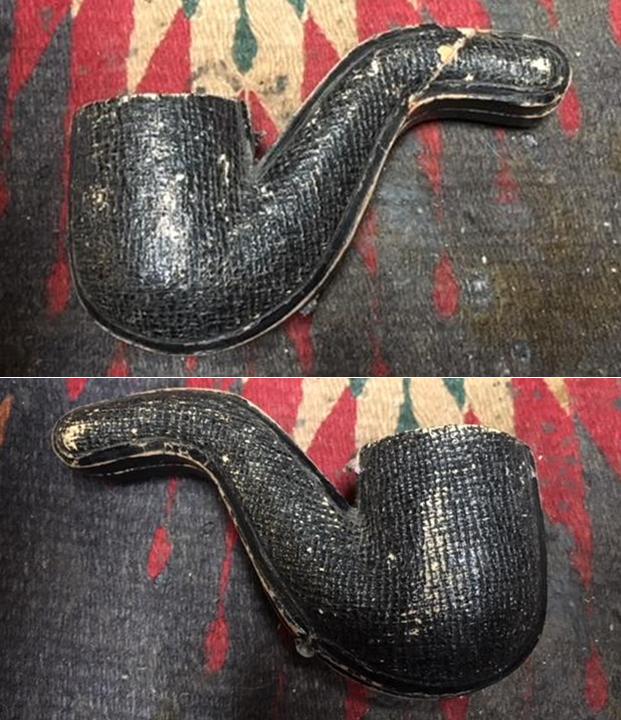
 From what I saw in her photos I was hooked. I could see the “crystallization” of the stem and the chunks of amber in the broken case. It looked salvageable from the photos. Besides that, I wanted to see what I could do with the pipe. I loved shape of the bowl and the curve of the stem. The band was green which made me wonder what was happening to make it that way. The pipe had definitely seen a lot moisture along the way. To me it was certainly worth a try to restore it and the history of the pipe alone made me want to work on it. I wrote Alice back and told her I was interested. After several emails went back and forth between, the pipe was on its way to my brother Jeff’s home in the US as it is definitely easier to ship things within the states that to ship them to Canada. I would have to wait for a bit until I would see it in person.
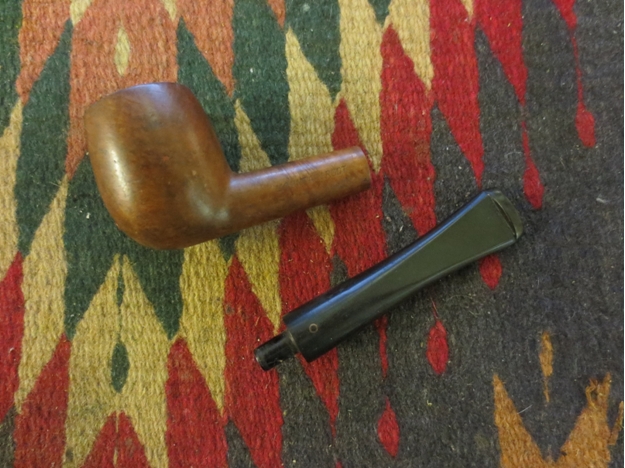
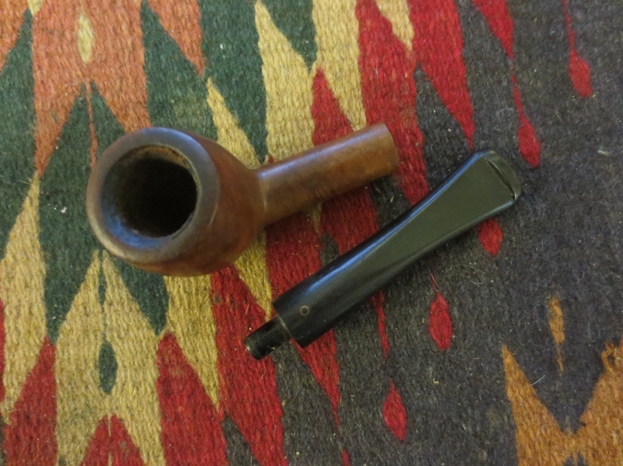
It did not take too long for the package to arrive at my brother’s house. When he opened the box it looked much the same as Alice had described it so nothing more happened in transit. My brother shook his head when he saw it and I think questioned my sanity yet again. LOL! We shall see if I have any semblance of sanity left once I have it in hand and see what I can do. I figure at worst I will need to craft a new stem for it and at best I may be able to make the amber one at least functional and stop the breakdown of the amber. I asked Jeff to take some photos of the pipe so I could see what he saw. He sent me the following photos and they pretty much tell the story of the pipe’s condition.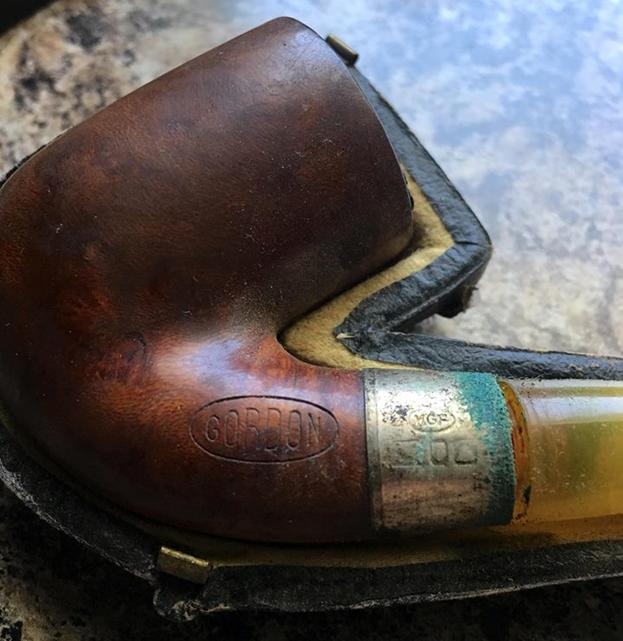
 Two of my daughters visited their Grandad in the States for his birthday at the end of June and brought the pipe in a baggie back to Canada with them on their return. I wrote and asked Alice to send me a photo of her grandfather and a couple of paragraphs about him to give me a sense of background on this pipe. She did a great job capturing his personality and a bit of the unique character that went with it. It helped me see a bit of the man behind this Gordon pipe and gave me even more reason to see it come back to life. Here is what she wrote about her Grandfather, William Kay.
 William Ewart Kay August 21, 1880 – June 6, 1938. His US Naturalization papers list his race as Scotch. (Not Scottish…Scotch) Born in Ontario, Canada, and ended up in Grassy Lake, Alberta somewhere around 1905. He married Lucy Evaleen Phipps in 1909 and they had 4 children. He was a rather interesting man and not always a very nice one. About 1917 he relocated the family to Auburn, Washington and came as a railroad strike breaker. No one talked about those years but my father told me that he was known as Scabby Bill Kay until he died. Railroad towns have no pity. The kids didn’t seem to suffer, at least.
I have his pocket watch. It is not a very expensive piece. According to whispered family stories, he often had a lady friend and this watch was a gift from one of them When he came home sporting a shiny new watch he told my grandmother (not a stupid lady) that when he was walking home a crow flew over his head and dropped the watch right in front of him. Still shaking my head over that tale! Grandmother outlived him by 26 years, happily. I think she loved every minute of not keeping his house.
My Dad said he was an amusing man, a good carpenter and became a strike breaker because there was no work in Canada in those years. My dad met him when they were both working on a government fish hatchery project in Auburn. That’s about all I know about the man. He died 10 years before my birth and the family rarely spoke of him. Times have certainly changed. Nothing is a secret any longer. Sadly, being a family elder means I have no one to ask!
Thanks for all this. I hope it makes it in a reasonable number of pieces. I am still amazed that it disintegrated so fast and in so many strange ways. It has been in its case in a dry dresser drawer forever. — Alice
I was unfamiliar with the brand so I did a bit of hunting on the internet for information on the brand. The inside of the case Gordon Best Briar in an oval on the lid. Gordon was also stamped on the left side of the shank in an oval. I did find a Gordon pipe on Pipephil’s site but the stamping and logo were very different so I am not sure it was the same maker. I also looked on Pipedia and found a listing for Gorden Pipes – spelled differently but the information that followed the name stated that it was an early 20th century brand of Samuel Gordon and that the stamping was Gordon in a lozenge on the shank. Here is the link for that information as it does match this pipe (https://pipedia.org/wiki/British_Pipe_Brands_%26_Makers_E_-_H). There was no more information that I could find on the brand anywhere on the net. The time line fits pretty well with the look and make of the pipe I am working on.
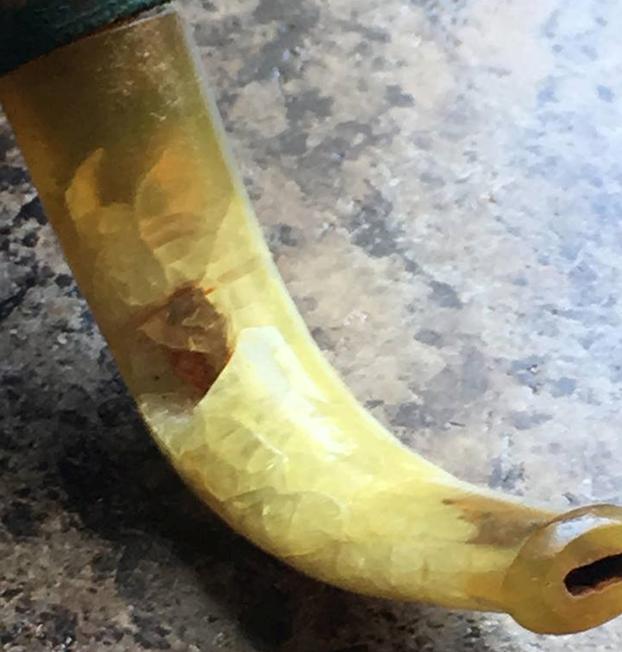
Armed with that information and the backstory of William Kay I brought the pipe to my worktable started the rebuilding of the Humpty-Dumpty pipe. It was going to be a real challenge to put all the pieces together again. Rebuilding and stabilizing the stem was only part of the work. I was not sure that would even be possible because it really seemed to be disintegrating as I touched it. I am pretty certain that the stem is made of amber. I would know more once I tried to rebuild it and put the pieces back together. The tenon was loose in the stem and when I touched it I could see that it was not even connected.
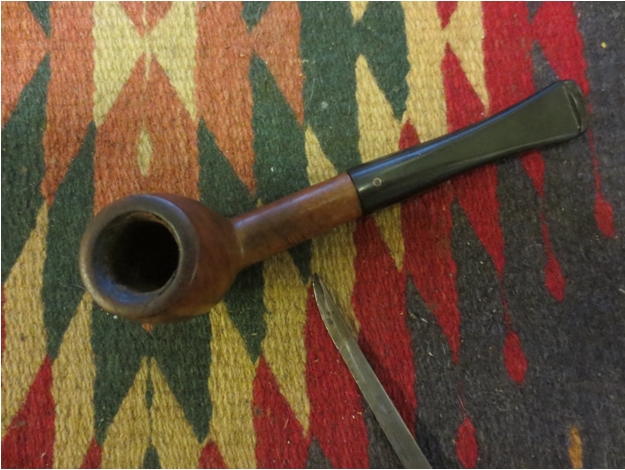
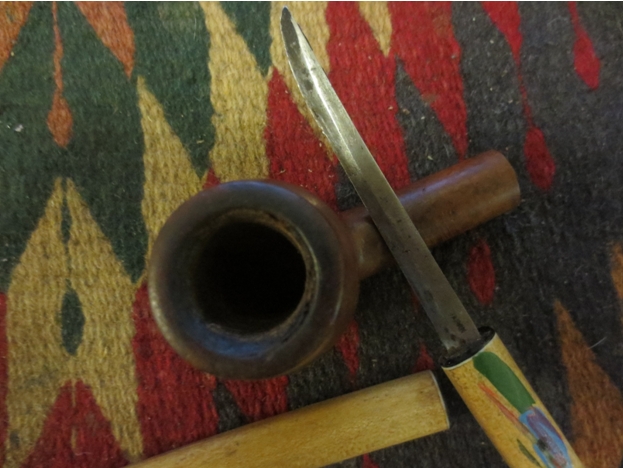
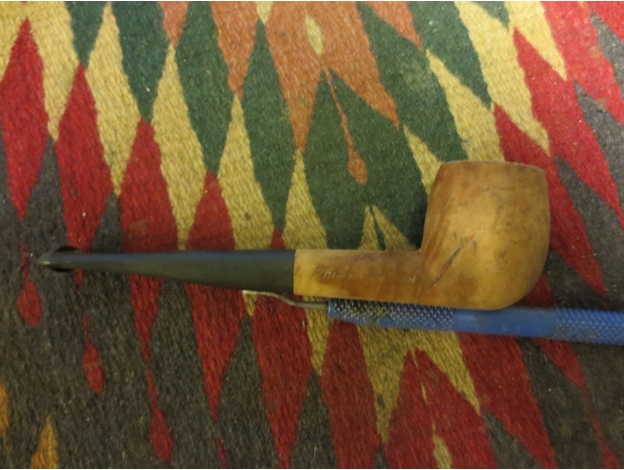
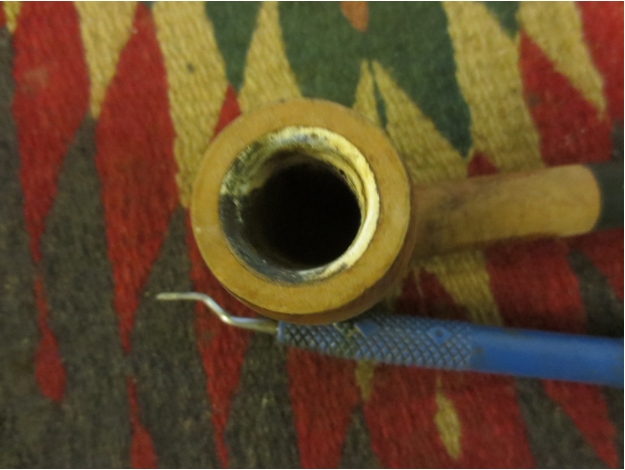
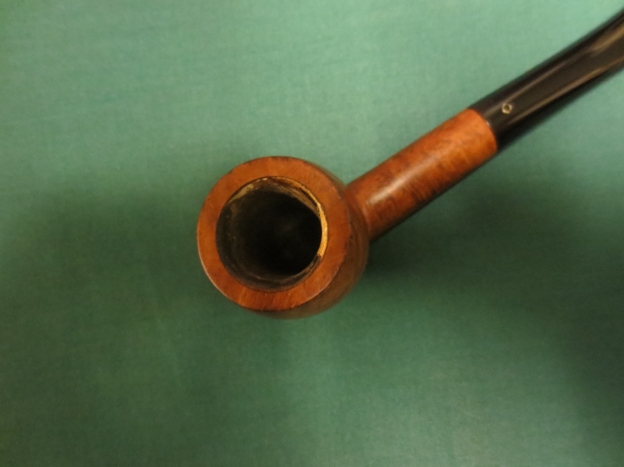
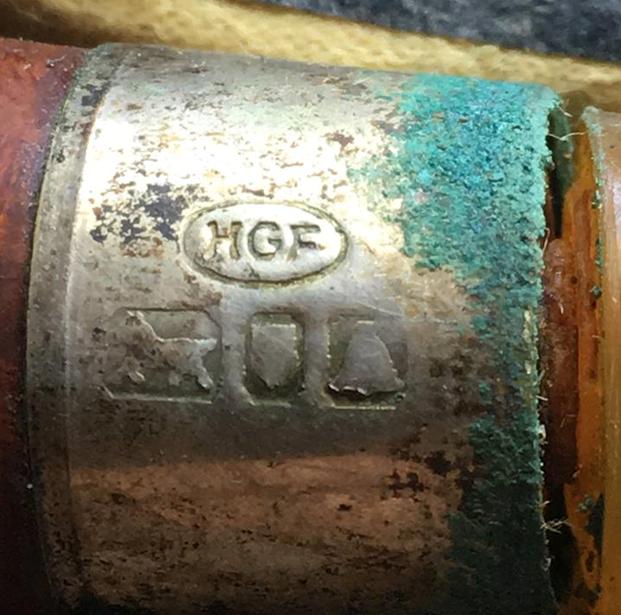
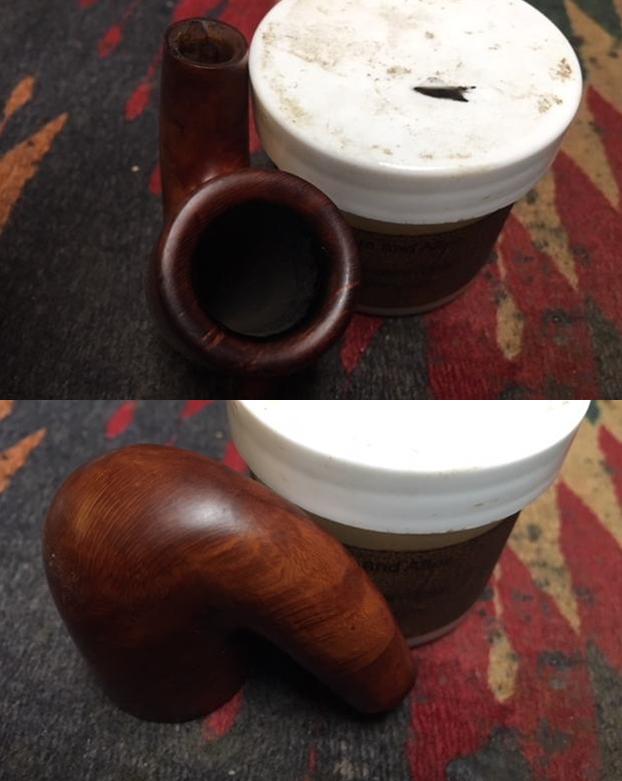
The tenon was metal and it was rusted and deteriorating. It was stuck in the shank of the pipe. I assumed that the end in the shank was also threaded because the stem end was. I thought that it was screwed into a threaded mortise in the shank. The band was silver and the normal black tarnish was present. There was a lot of pitting and a green oxidation that came from the metal tenon and inside the case. The finish on the bowl was ruined and worn out. There was a lot of buildup and grime on the outside of the bowl that would need to be dealt with. The rim top looked like it might be the least damaged part of this old pipe because of the thick lava coat overflowing from the cake in the bowl. The airway from the shank to the bowl was clogged. This was definitely going to be a challenge. I took a photo of the parts of the pipe when I removed the stem from the tenon.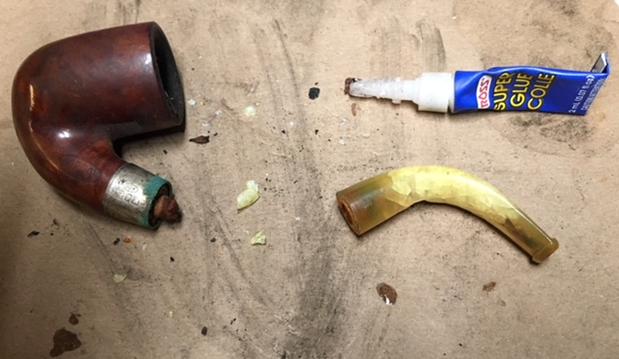 I tried to turn the tenon with a pair of pliers to see if I could unscrew it from the shank. It did not take long to realize that I was not dealing with a threaded tenon at all. The tenon turned out to be a push tenon. It looked like a repair person sometime in the life of the pipe had converted it from a threaded shank and tenon to a push tenon. Their methodology was interesting to say the least. They had slipped a hard rubber tube over the worn threads of the original tenon and drilled out the threaded mortise to receive the push tenon – creative but damaging. He had lined the mortise with a paper washer to hold the tenon tight in the shank. Over the years moisture had gotten into the mortise and the paper was disintegrated and stuck on the tenon and in the shank. The threaded tenon conversion was full of rust as the original metal tenon had deteriorated with the moisture and wicked up the stem and around the band. It was a compound mess that would need creative solutions to be dealt with.
 The band was loose on the shank. The glue that had held it in place had long since deteriorated. I removed the green tarnished band from the shank and laid out the pieces of the pipe at this point in the process to show what I was dealing with.
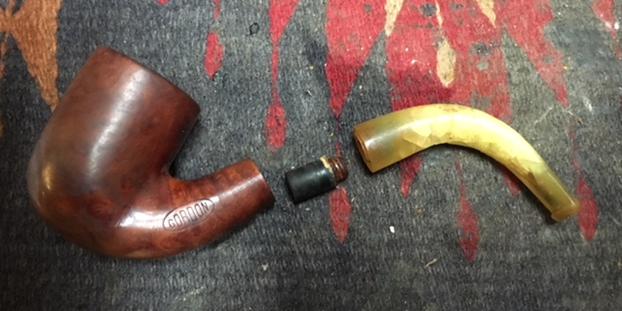 I decided to try to put all of the pieces of the amber stem together again. I greased a pipe cleaner and put it in the airway to keep the glue from filling in the airway. I glued it together with super glue gel and filled in the hole in the right side with the broken chunks of amber. I filled in the gaps around the chunks with clear super glue. I painted the surface of the rest of the stem with clear super glue to stabilize the stem material. Time would tell if it would hold together or not.
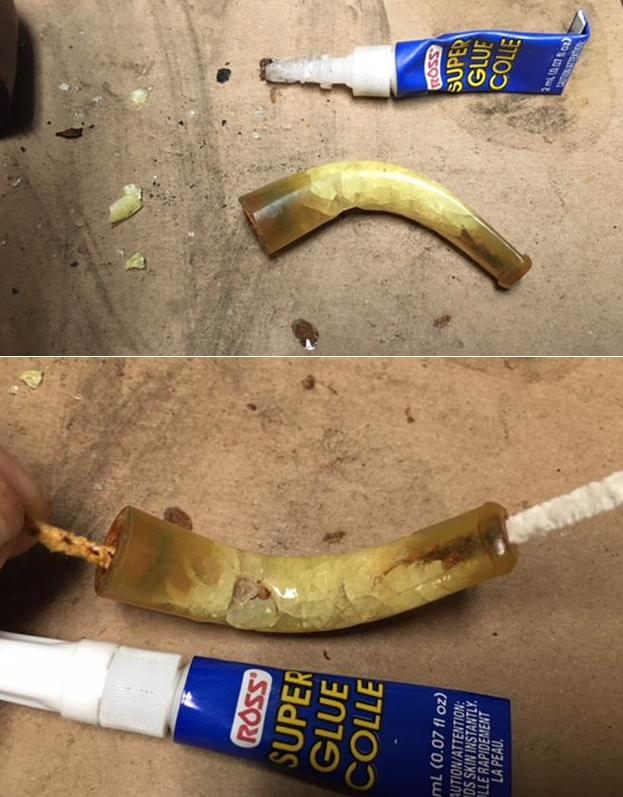
 I let the glue cure for over four hours and when I picked it up to look it over, it fell apart. The stem broke in half and there was a large hole in the right side of the stem. I had not fixed anything at this point but only made things significantly worse. I shrugged it off and glue the two parts back together again. I left the hole to deal with later. The photos below show the state of the stem after repairing the break. It was not looking very promising. I set the stem aside to cure for three full days – it was pretty depressing.
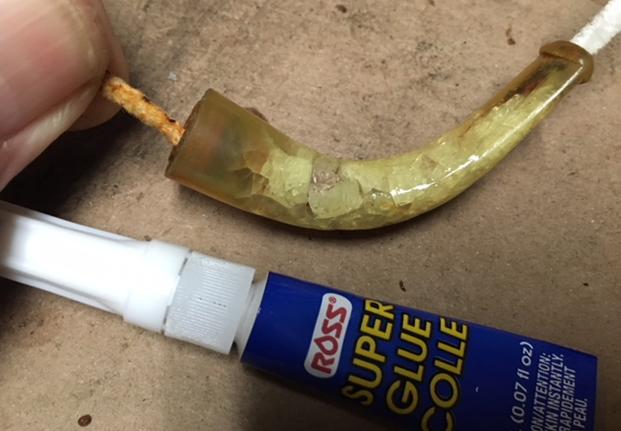
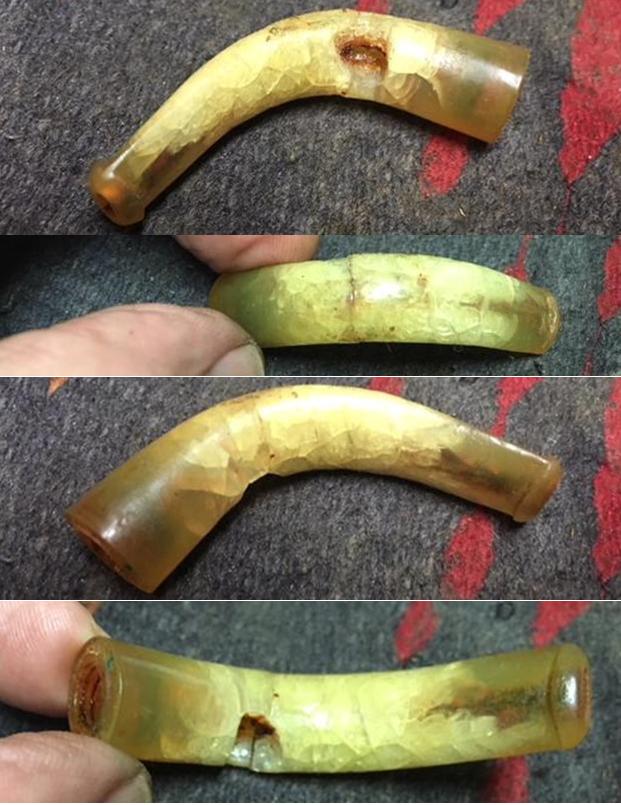 I started to formulate a plan B – a new acrylic stem in case all the efforts on this older stem were for naught. I place an order for a stem with Tim West at J.H. Lowe and it is on its way here. I am hoping it will be a suitable replacement. In the meantime, I took all the pieces of the original stem that I had in the plastic bag that it came in and tried to put Humpty Dumpty back together again. I used an amber super glue gel to build up the edges of the broken part of the stem. I pressed the pieces in place in the hole to build it up and provide a base that I could fill in once the initial glue on the stem cured. I set the stem aside to cure for another couple of days. I did not want to take any chances with breaking it again.
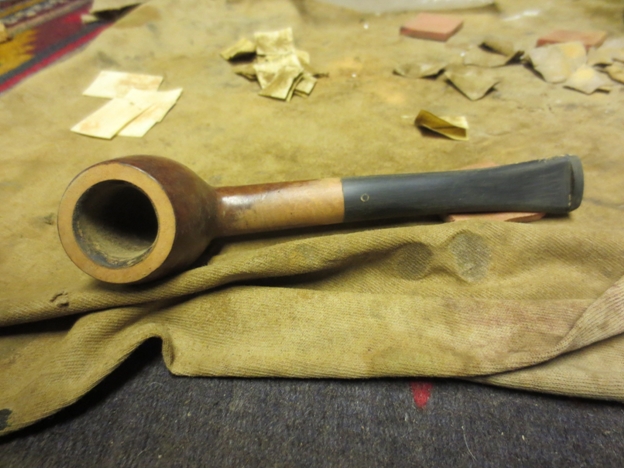
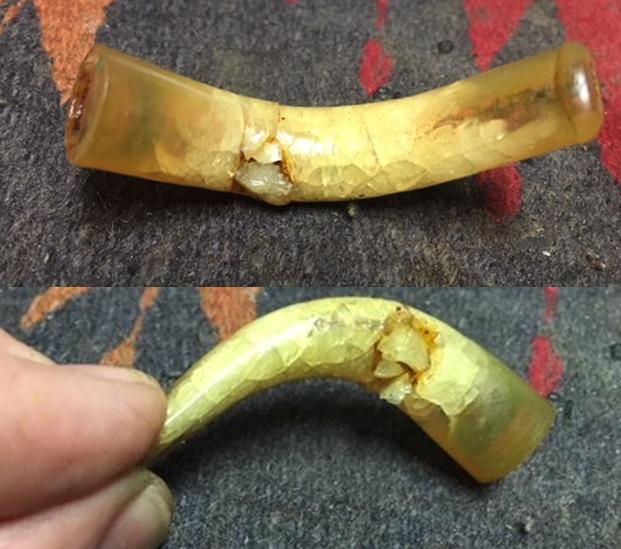 I kept looking over at it and wondering if my repairs would work in the long run. I could see that it was rough but I think it may form enough of a base for me to rebuild the stem with amber super glue once it cures. We shall see. I turned my attention to the filthy bowl. I had already removed the silver band from the shank as it was loose anyway. I used a sharp pen knife to scrape away the paper gasket that lined the walls of the shank. It fell apart as the knife cut it. I reamed the bowl with a Savinelli Fitsall Pipe Knife and scraped the rim top and inner bevel with the edge of the knife. I sanded the bowl with a piece of sandpaper wrapped around a dowel.
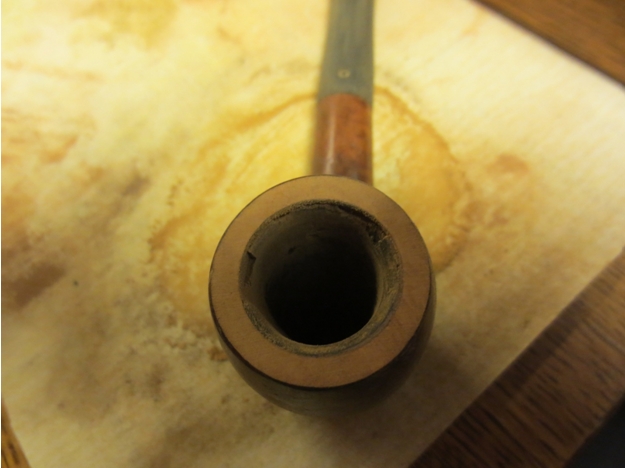
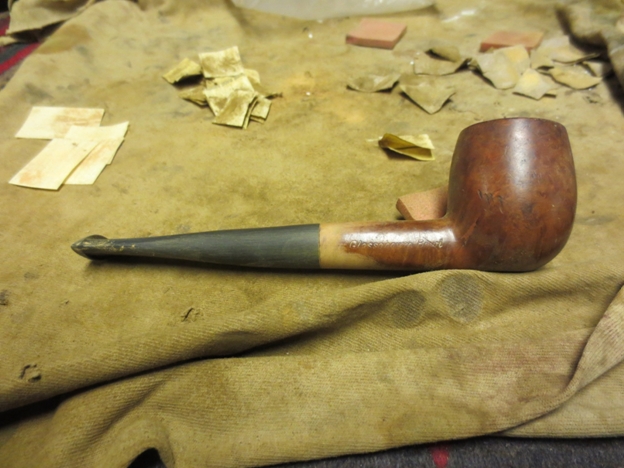
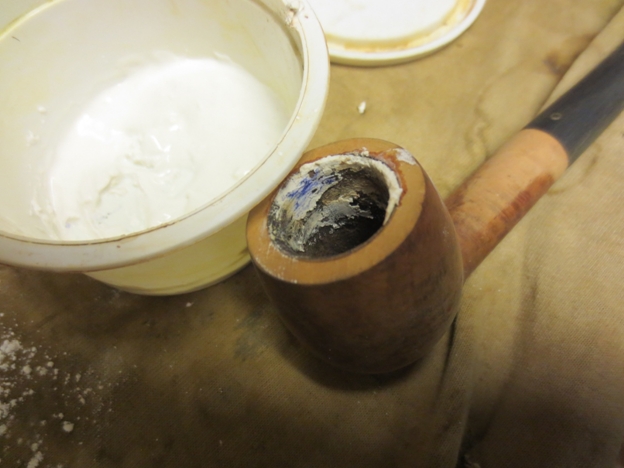
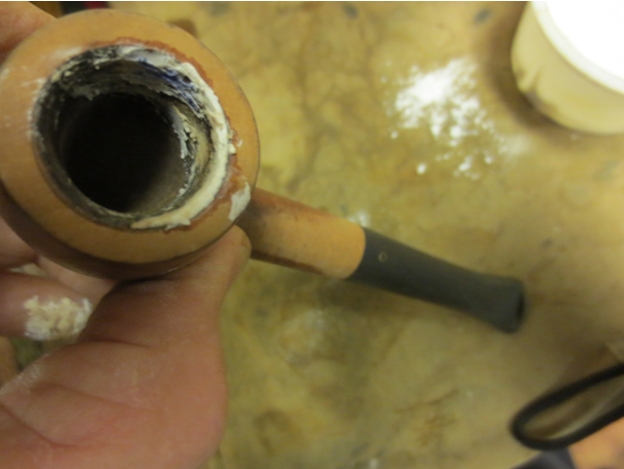
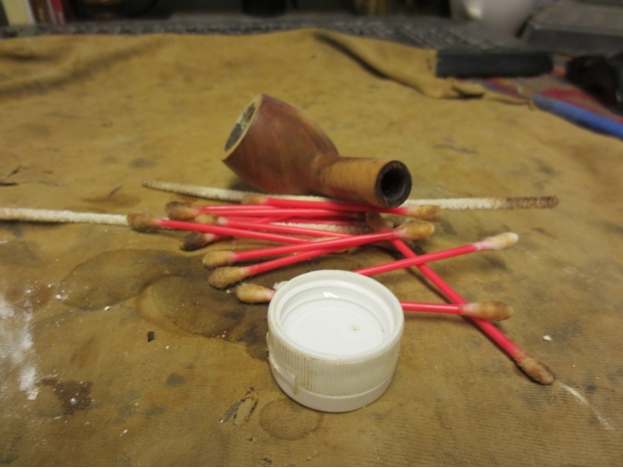
 I cleaned out the interior of the mortise, shank and airway to bowl. The airway was plugged and I could not blow any air through it from either the shank end or the bowl. I pushed a straightened paper clip through the airway to open it up again. I used alcohol, cotton swabs and pipe cleaners – smooth and bristle – to clean out the tars, oils and build up that had collected over the years. It was as much a mess on the inside as the outside.
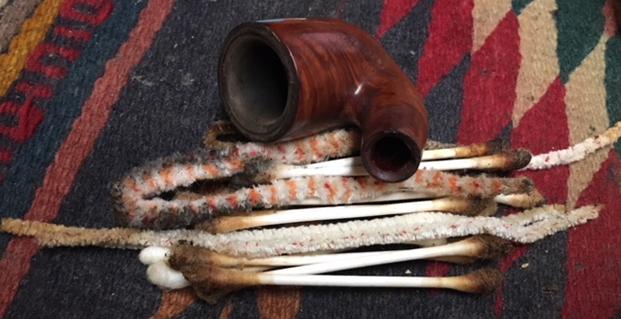 I wiped off the exterior of the bowl and shank with acetone on a cotton pad to remove the remnants of the old varnish finish and the grime that had been ground into the briar. At this point the pipe bowl was beginning to look pretty good. There was some nice grain on the bowl.
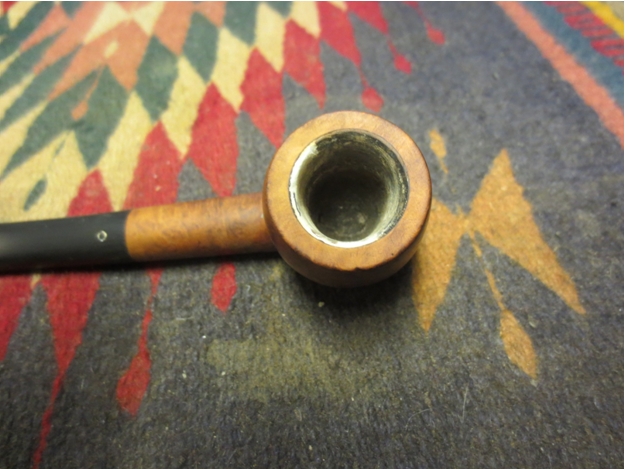
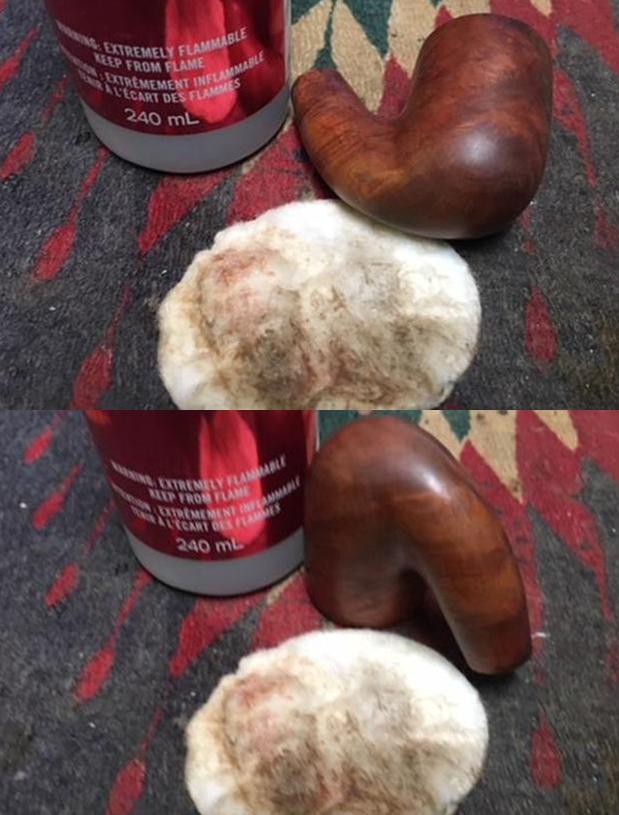
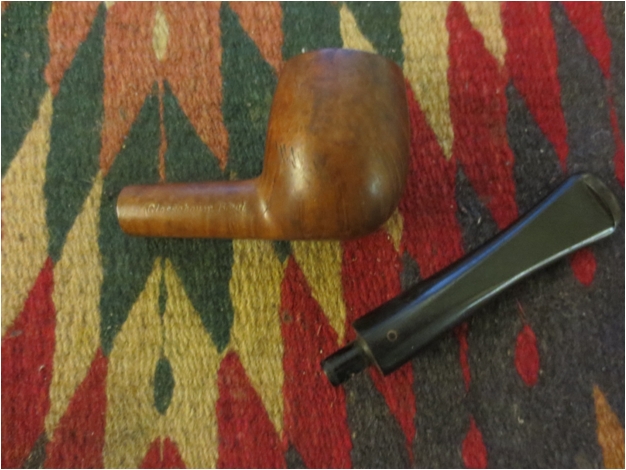
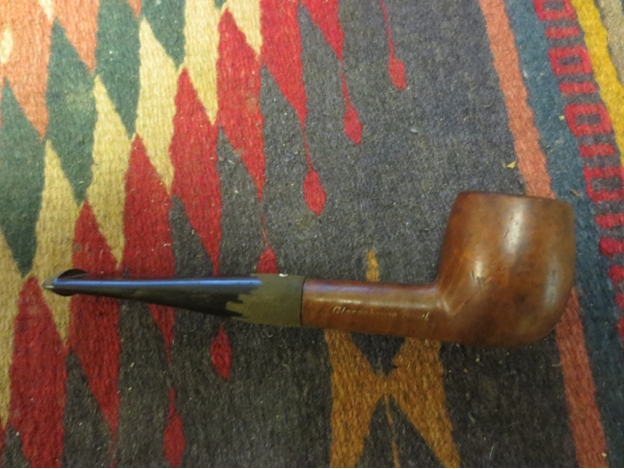
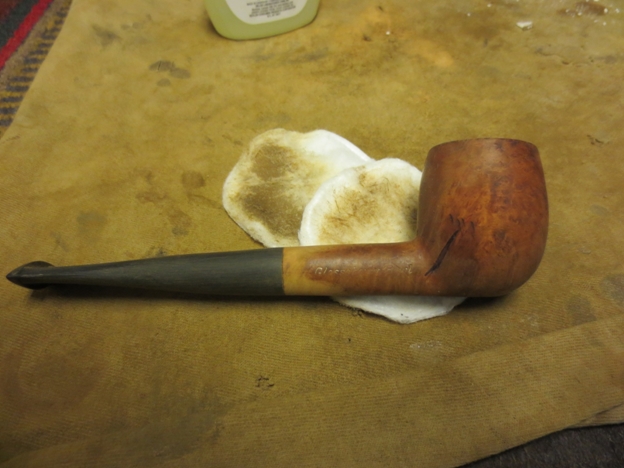
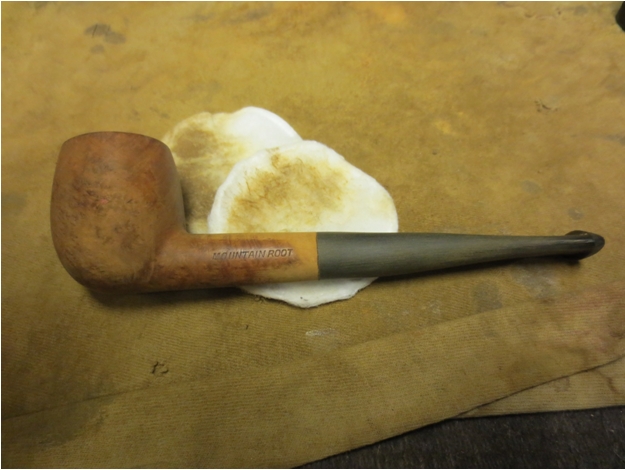
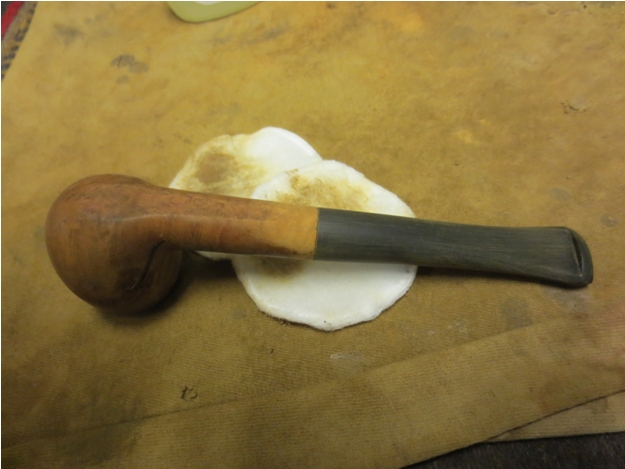
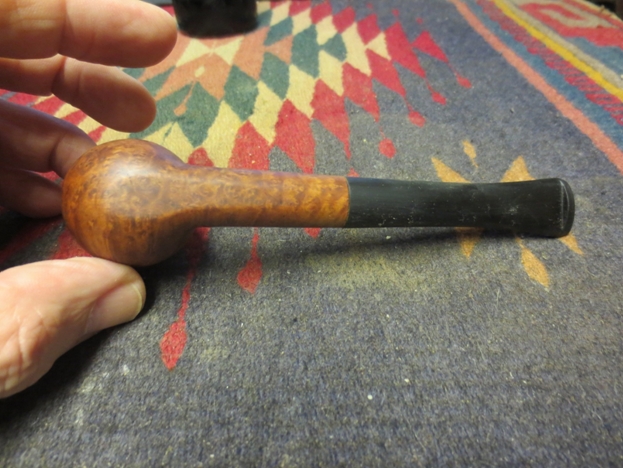
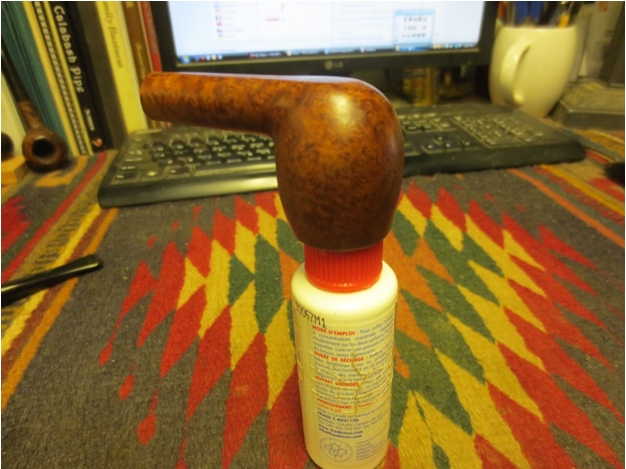
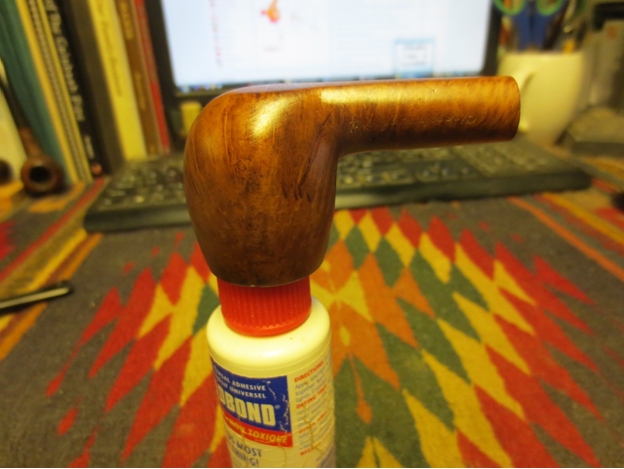
 Once I had the surface clean and free of the old finish and the debris of time it was ready for the next step in the process. I worked Before & After Restoration Balm deep into the briar on the smooth finish to clean, enliven and protect it. I wiped it off with a soft cloth. I buffed the bowl with a cotton cloth to polish it. It really began to have a deep shine in the briar. I took some photos of the bowl at this point to mark the progress in the restoration. The grain on the bowl is really beginning to stand out and will only do so more as the pipe is waxed.
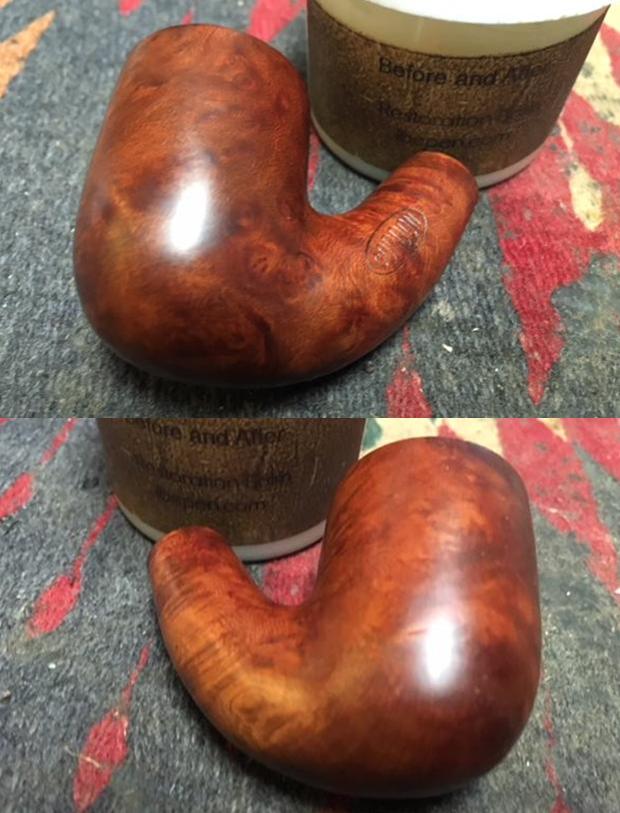
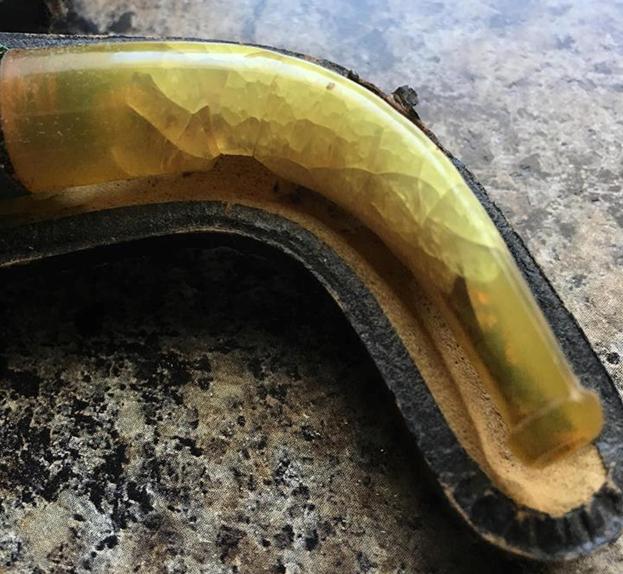
 The stem was still quite a mess. Once the first coats of glue cured I used some thick amber super glue to fill in the larger holes in the right side of the stem and build up around the inserted pieces of the original stem. I needed to fill in some of the open space to stop the airflow through the repair. Once the amber glue had cured I filled in the small areas around the repairs with clear super glue. I set the stem aside and let the glue cure.
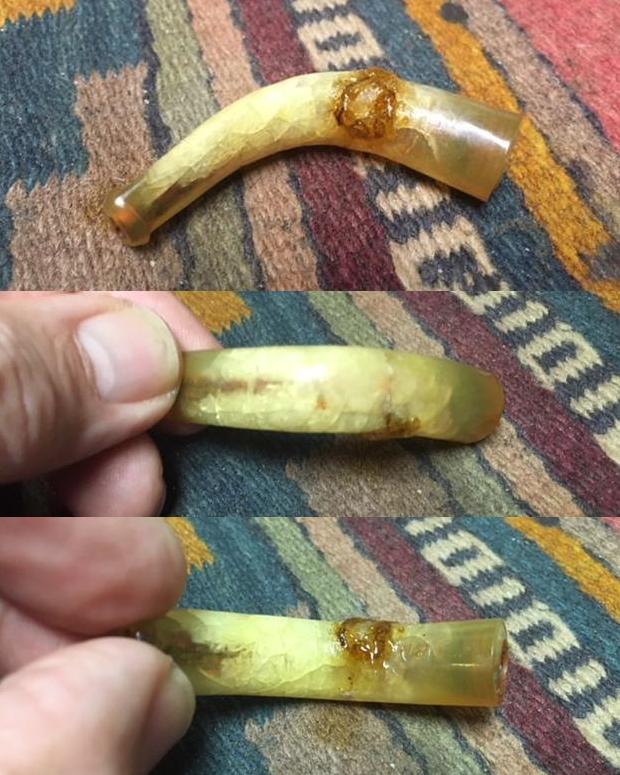 The original tenon was a mess – it really was a hard rubber tube forced over a threaded metal tenon that was rusting and crumbling as well. The shank had been drilled out to remove the threads in the mortise so once again I am guessing that this was some repair person’s idea of creating a push stem. I had removed it earlier and put it aside. I created a new tenon for the stem. It was a threaded Delrin tenon – in this case the threaded portion on a Jobey system tenon was the perfect size for this stem. I would try fitting it once the glue had cured enough to not damage the stem further. I reduced the side of the hip at the top of the tenon to match the diameter of the mortise using files and sand paper. I set the tenon aside and called it a night.
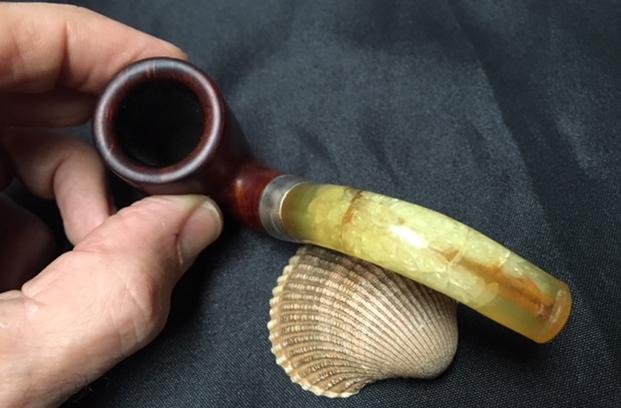
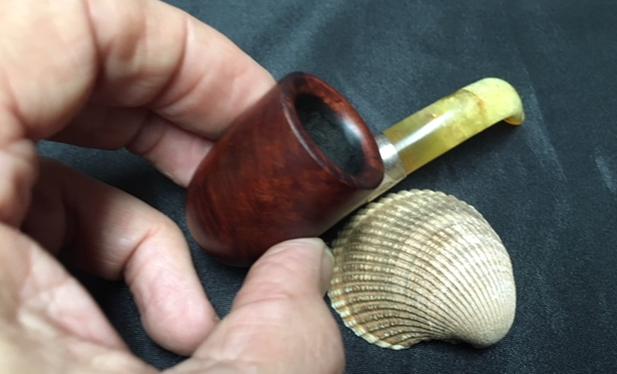
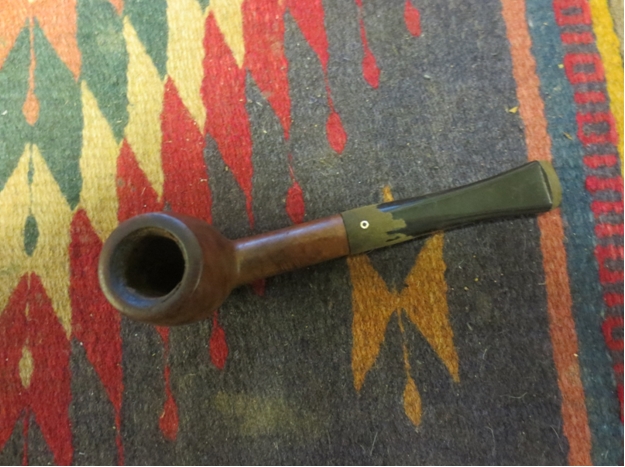
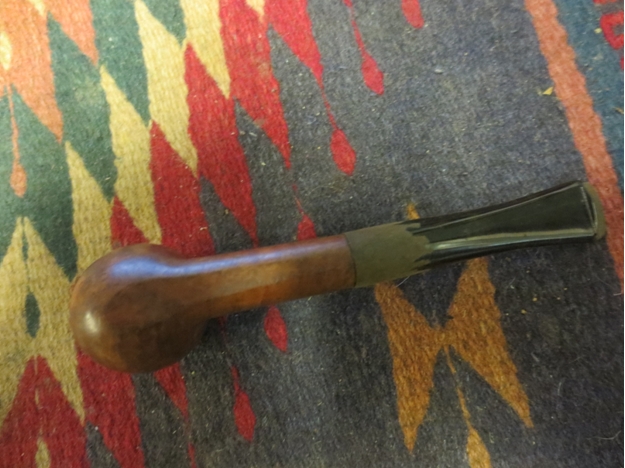
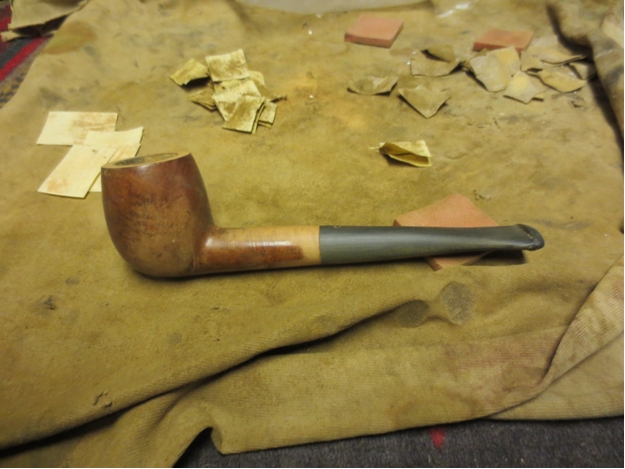
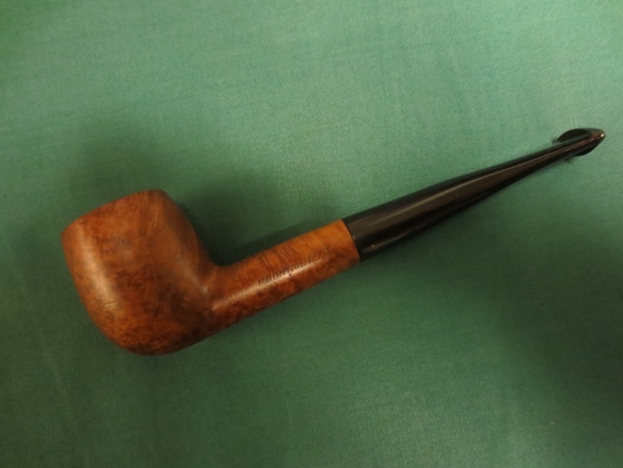
In the morning I checked the stem and found that the glue had hardened on the stem so I sanded the repaired areas with 180 grit sandpaper to smooth out the surface of the repairs and blend them into the rest of the stem. Then I tried to fit the mortise to the stem and found that my measurements were correct and it fit perfectly. I carefully turned it into the stem and took the following photos. The stem was looking pretty decent at this point and the patch seemed to be hard and stable. I decided to be daring at this point and pushed the stem into the mortise of the shank and took some photos of the pipe at this point. Even though there was still a lot of sanding to do on the stem to smooth and polish it, I was making progress and I was excited to see what it looked like. I wanted to send the two photos to Alice so she could see the salvage job on Humpty. At this point the stem material is stabilized and I could see that the stem would be usable. Now I needed to see if I could make it look even better.
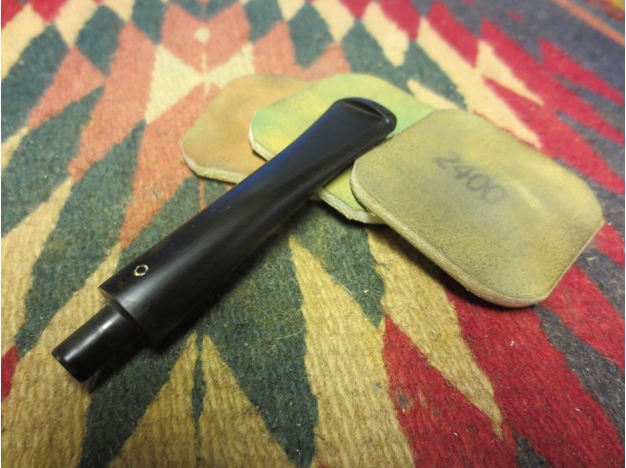
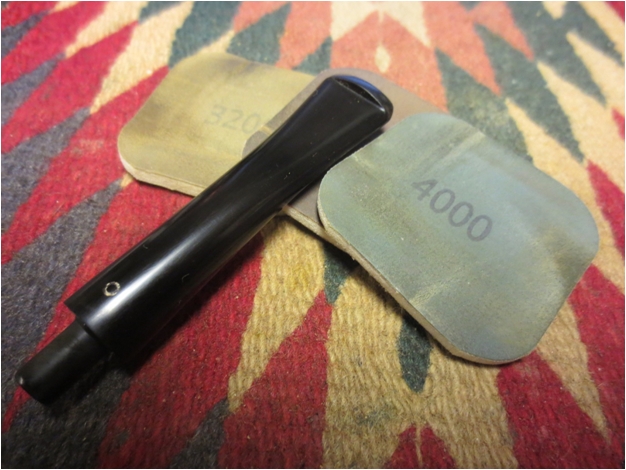
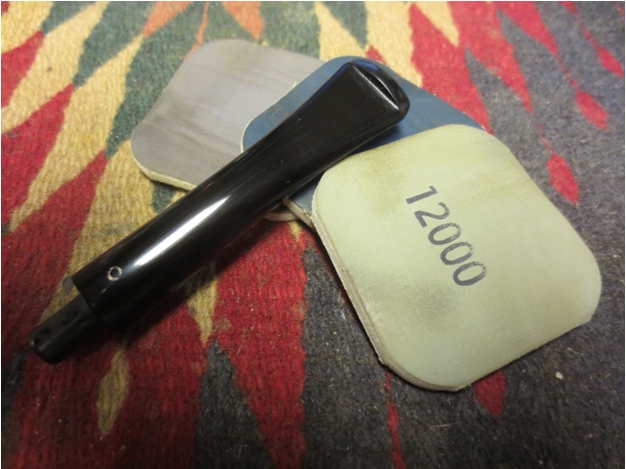
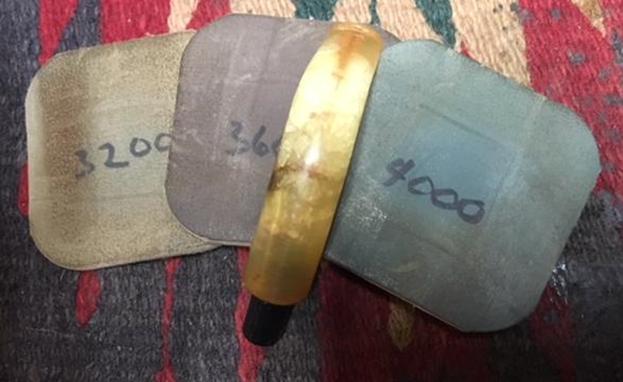
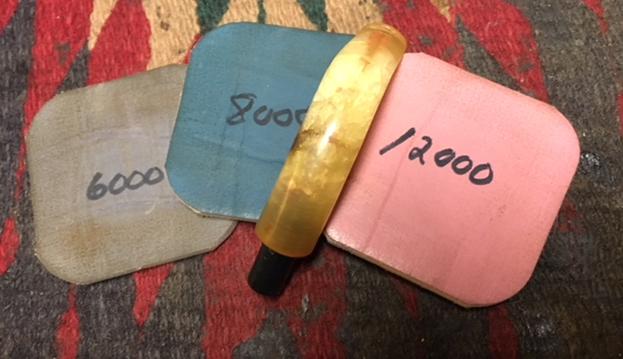
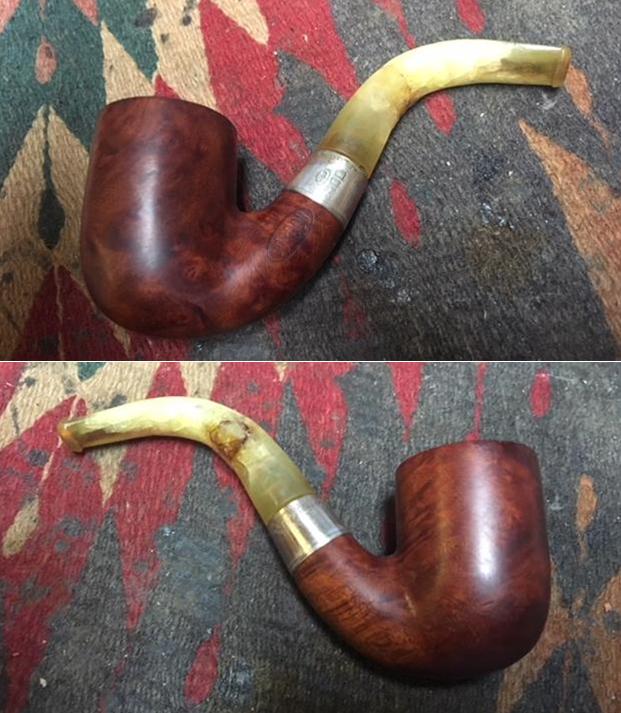 I smoothed out the final touches on the repair with 220 grit sandpaper to blend the repairs into the surface of the amber. I polished the stem with micromesh sanding pads – wet sanding with 1500-2400 grit pads and dry sanding with 3200-12000 grit pads. I wiped the stem down after each pad with Obsidian Oil to give life back to the amber.
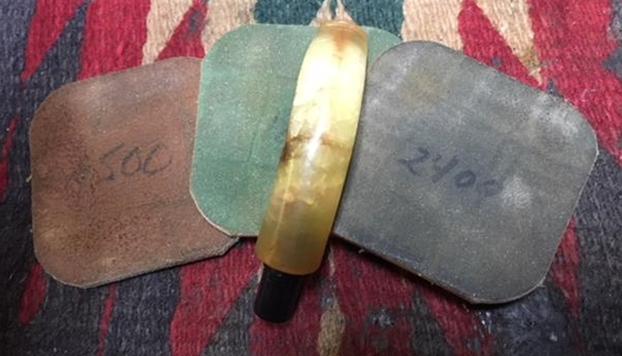
 I put the stem on the shank and set the pipe aside to work on the broken and damaged case. I glued the parts together with all-purpose white glue. I pressed them together until the glue set enough to let the parts hold when I laid the case down.
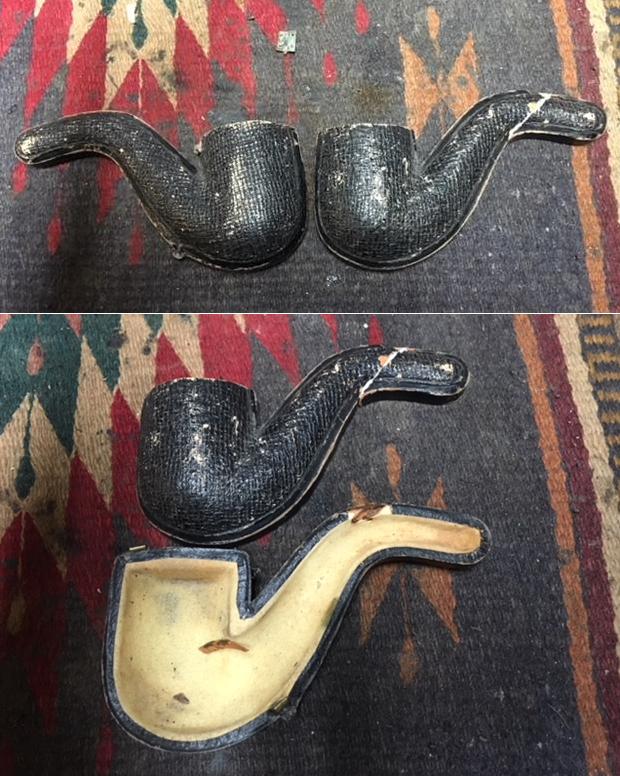
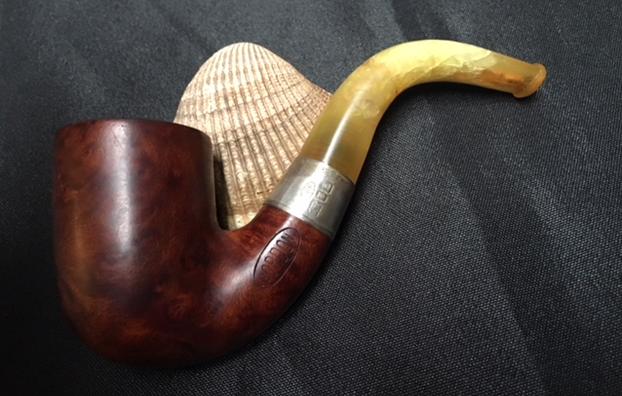
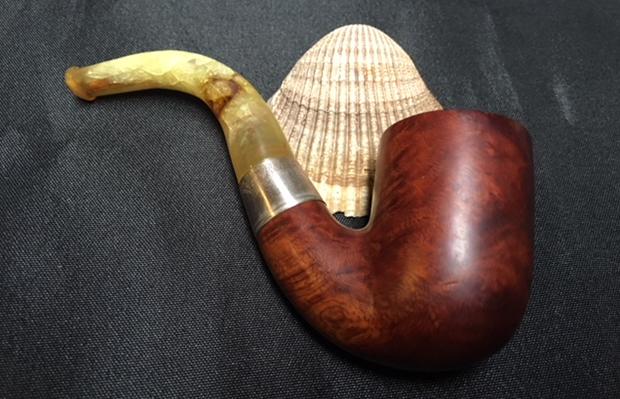
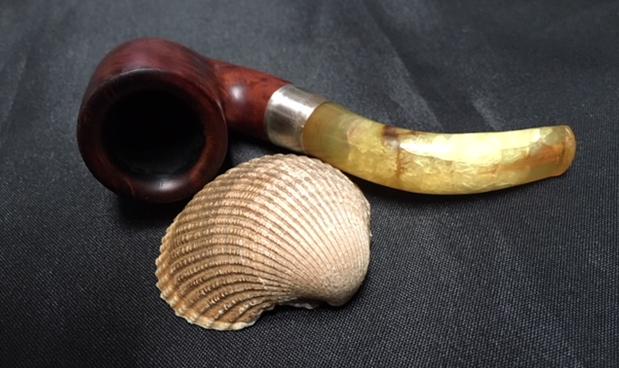
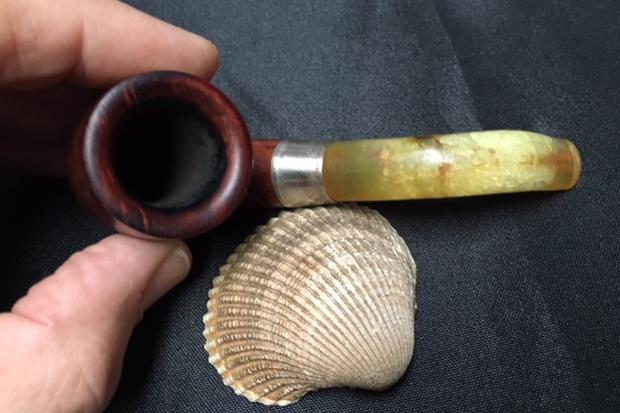
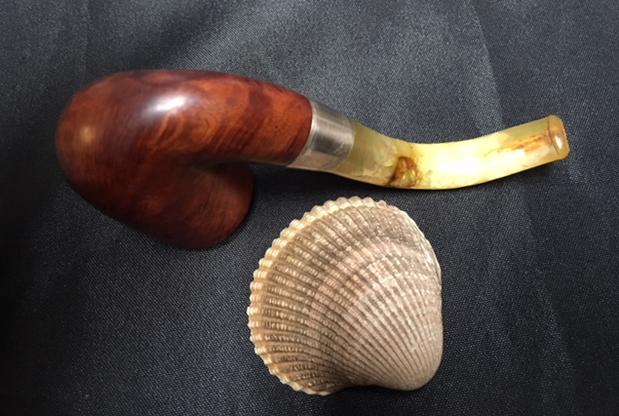
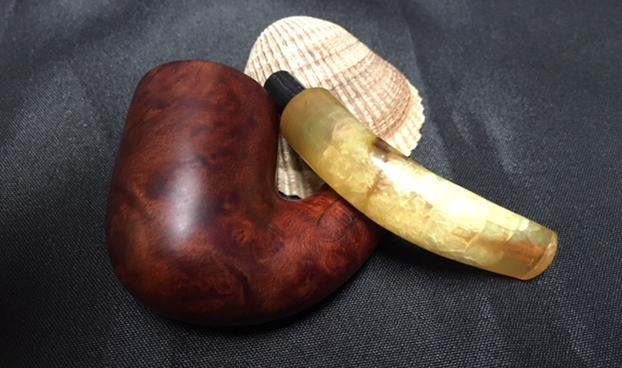
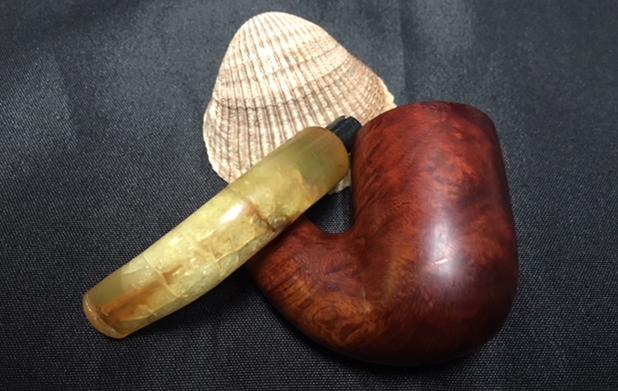
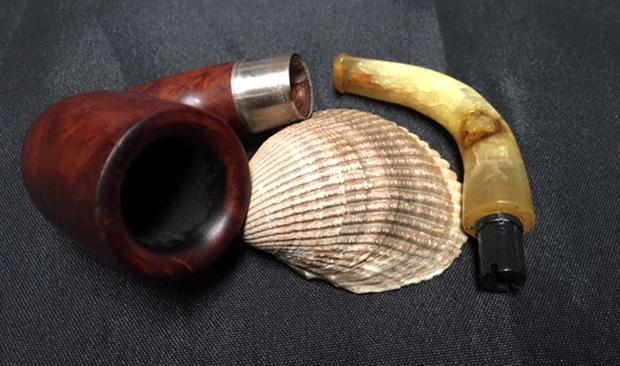
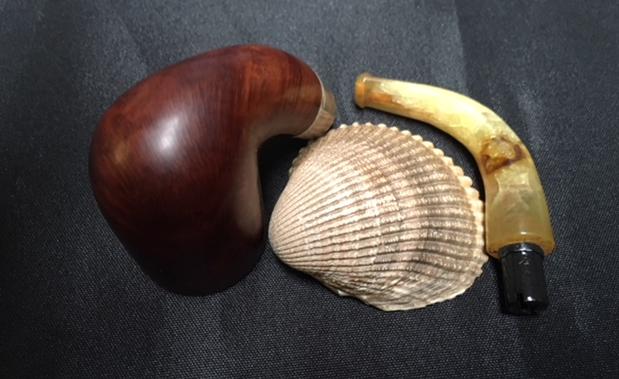
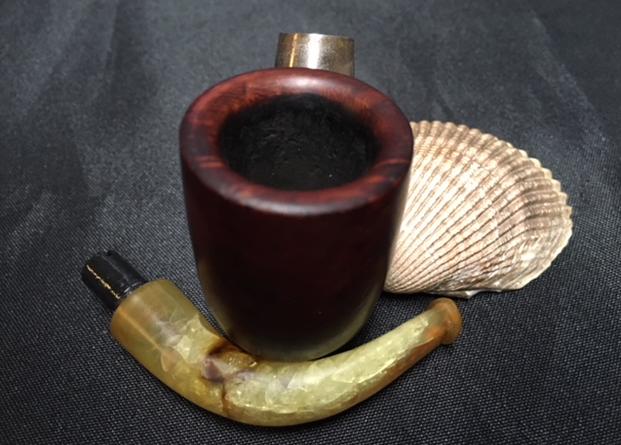
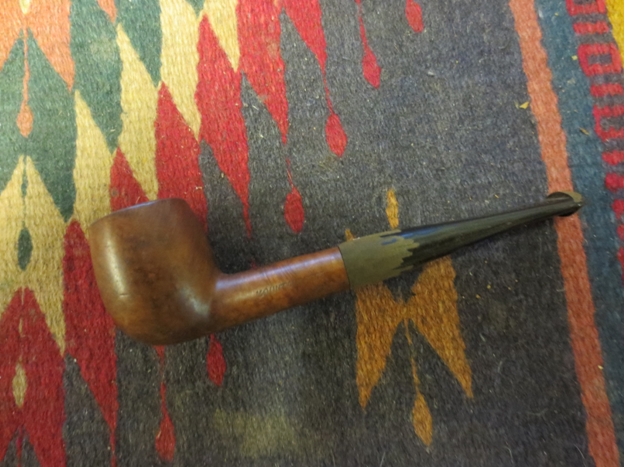
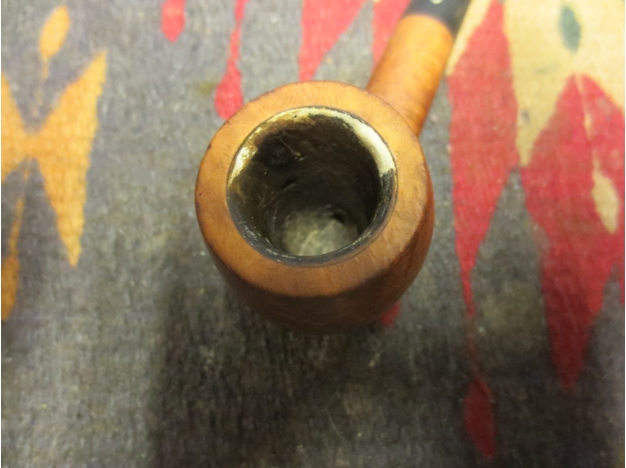
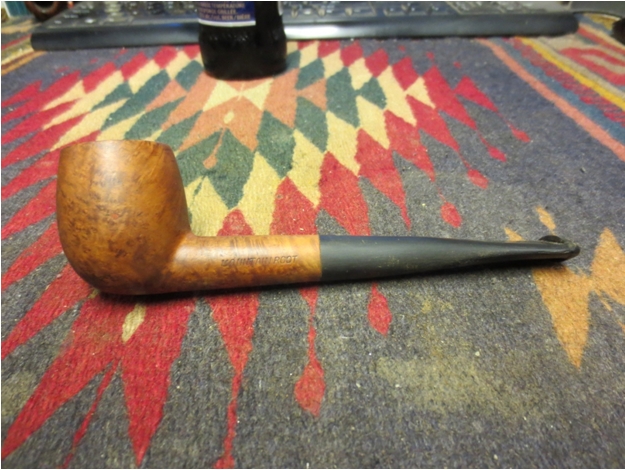
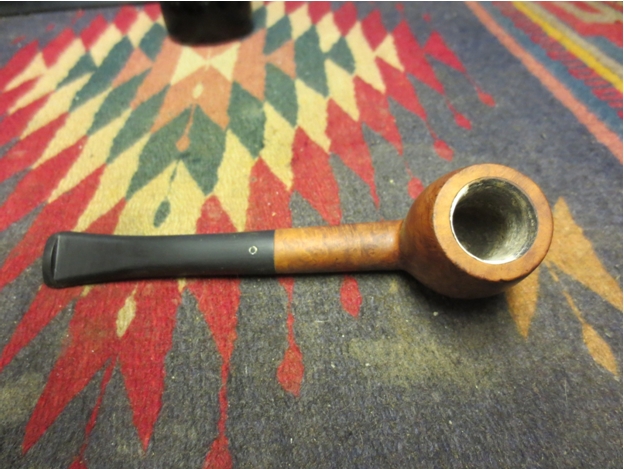
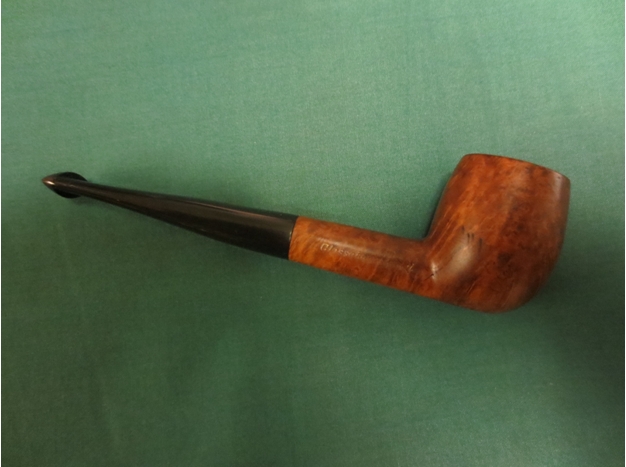
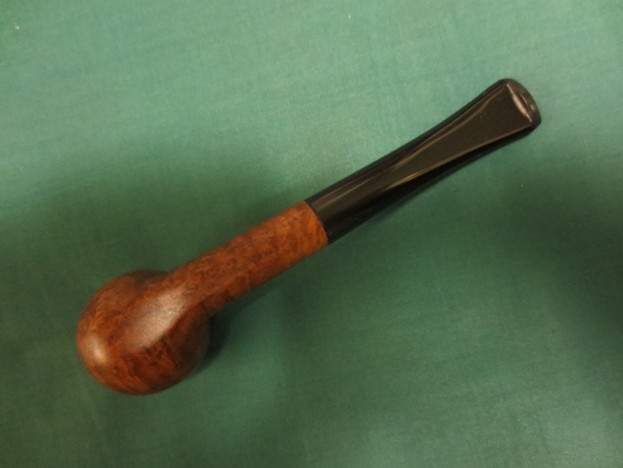
 I polished the stem with a polishing cloth. I buffed the bowl with Blue Diamond on the buffing wheel. I carefully avoided the stamping on the left side of the shank so as not to damage it. I gave the bowl multiple coats of carnauba wax and buffed the pipe with a clean buffing pad to raise the shine. I hand buffed the bowl and stem individually it with a microfiber cloth to deepen the shine. The finished pipe is shown in the photos below. It is great to be able to hold William Kay’s pipe in my hand as a solid and smokeable whole. I can’t wait for Alice to read this blog and see the finished pipe. I look forward to hearing from her. This was a challenging and a fun project to work on. Thanks for taking time to give it a read.