Blog by Paresh Deshpande
When I first laid my eyes on this pipe, I knew I had to have it. It was not the brand nor was it the shape and size that got me attracted, but it was the beautiful straight grains all around that caught my attention.
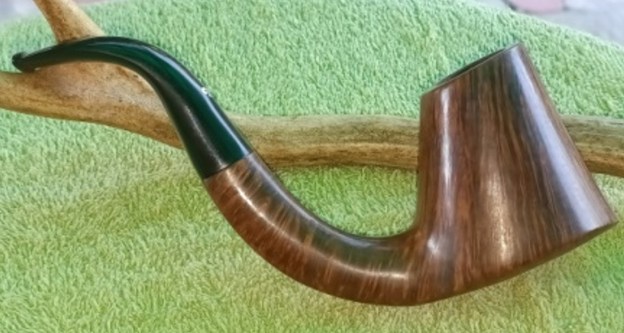
This is a beautiful volcano with perfectly straight grains all around and a flat bottom with some fantastic bird’s eye grains. This flat bottom extends to the lower shank surface and is adorned by; you guessed it right, bird’s eye grains. It is stamped on the left shank surface as “L. VIPRATI” in flourishing cursive hand over “HAND MADE ITALY”. The bottom flat surface of the shank bears five clover leaves, which I think is the grading for this pipe. The top surface of the black acrylic stem bears a fancy intertwined letters L and V in metal, most likely aluminum. Luigi Viprati is a brand that was completely unknown to me until the moment I laid my eyes on this handsome hunk and thus I set about to know more about the brand and it’s carver. Reborn pipes is usually the first place where I hunt for information on all things related to pipe brands and apparently, this may be the first Luigi Viprati pipe to feature on Reborn pipes. The next site I visit for pipe related information is pipedia.org and sure enough there was information on the brand. Given below is the link to the Viprati page on the site and snippets of information reproduced for quick reference.
https://pipedia.org/wiki/Viprati
Though we are accustomed, in Italy, to the quality of design and have always abounded in beautiful and bizarre models of pipes, the creations of Luigi Viprati strikes our eyes. And … think that he is a self-taught.
As a pipe smoker, he began to realize pipes during the free time since the 1972, either for himself than his friends. But his hobby has been stronger and stronger during the years so to become his real job. From then on, his pipes, that in the upper quality have a perfect veining of pellet or flame, are really required. Viprati offers numerous series; one of them the “”Collection Special”” is decorated with silver ornaments applied on the blowpipe and on the head: they are really works of art.
HANDMADE PIPES, HOW IS BORN MY PASSION FOR THE PIPE?
“If you can’t be a highway, then just be a trail, If you can’t be the sun, be a star; It isn’t the size that you win or you fail… Be the best of whatever you are.” Martin Luther King
When a passion catches you when you are young, you will be fascinated by it for your whole life. It all began in 1972, during my military service, when I bought a briar root and I carved a pipe just for fun. This is how a long life passion was born. In the following years, I became more and more expert on briar wood, delving into the ancient culture of pipes. In 1984, I started to sign my pipes with the brand “La Pipa di Viprati” and soon after I met Alberto Paronelli, a well-known producer and founder of an important museum dedicated to the pipe. It was then that I clearly realized my purpose: creating high quality pipes. Now, after having created so many pipes which have made a lot of pipe smokers happy, the idea of this website has come into my mind, in order to show what my hands and my mind have been able to create in these forty years. Years dedicated to a unique and special object, a great companion of our life.
SALVADOR DALI COLLECTION
Each year, beginning in 2003, Luigi Viprati creates a new limited edition pipe for his Salvador Dali Collection, in homage to the great artist’s centenary. Each pipe in the series incorporates unique and distinctive characteristics seen in Dali’s paintings, as interpreted by Luigi. The pipes are numbered and available in smooth or sandblasted/rusticated finishes.
I think I have just added a pipe to my ever growing bucket list of desirable pipes! Continuing with further exploration on the carver to better I visited various sites and have reproduced relevant information below along with the source.
https://www.pipeshop-saintclaude.com/luigi-viprati-handmade-pipes-49
Pipes made by the Italian craftsman Luigi Viprati are all unique handmade creations. Luigi Viprati first worked with renowned Italian pipe makers for a number of years, before starting his own brand in 1984. He only uses briar from the Italian regions of Liguria, Tuscany and Calabria. Nowadays, thanks to the very high quality of his work, Luigi Viprati’s pipes are famous all around the world. His pipes are classified according to a 1-to-5 clover-scale.
https://www.bollitopipe.it/en/60-viprati
Luigi Viprati has built a justifiably powerful reputation for hand crafting some of the most breathtaking straight grains available anywhere. No one realizes this more than Viprati who has built strong personal relationships with the mills or “segerie” which supply his briar, and he visits them periodically to hand select each block of the extra-extra plateaux briar. Recently, Viprati lengthened his usual visit by accompanying the harvesting crew into the dry hills of Tuscany. There he saw how the briar is wrested from the earth, and the meticulous handling it goes through to ensure the smoking characteristics of fine briar.
https://www.tobaccoreviews.com/an-artists-soul-pipemaker-luigi-viprati/
Luigi Viprati says that he’s retired, but he has a damn funny sense of retirement. While he’s no longer putting in the daily grind of work each day to produce the 1,500 or so pipes he used to make each year, he’s still committing a good amount of his time inside his small workshop in Pontoglio, Italy, refining the art he loves most. Instead of donning his fishing cap or buying a set of golf clubs, Viprati is spending his “retirement” passionately pursuing and perfecting the craft for which he has become world-famous—and he is now aiming to produce just 100 pipes of his best quality each year. Anyone who has had the pleasure of meeting the Italian pipemaker, who is now in his mid-60s, wouldn’t expect anything less from him.
Great pipes cannot be created without excellent quality briar. Throughout the years, Viprati has placed such importance on obtaining the best briar available that he regularly went up into Italy’s forested mountains in Sicily, Calabria and Tuscany with the briar harvesters to be the first to pick through the harvest and select the best pieces for himself, including some of the largest briar roots cut from the earth. After selecting the briar boles he wished to purchase, he also discussed with the briar cutters how he wanted his briar to be cut into blocks, preferring larger ebauchons that routinely gave him more options when it came time to carve them into pipes. Once he had returned to his workshop with a ready supply of briar, Viprati always set aside the best in his inventory because he knew that it would be those briar blocks that would yield the super high-quality pipes he really wanted to make.
For most of the pipes he made throughout his career, Viprati typically used briar that had been aged between three and four years; for the highest quality lines—Straight Grain, Collection and Ciro’s Collection—the briar has been aged for at least seven years, and more often it has been aged for at least 10 years.
“A good pipemaker tries to follow the briar and understand the grain,” Viprati explains. “I start with an idea, and the briar tells me what it wants, and I adapt the idea. I use only Italian briar from Tuscany, Calabria and Sicily because Italian briar is the best. The most important thing is who cuts it—he has to be clever to cut it the right way. You can have the best piece of briar and cut it the wrong way, and then it is [crap].”
Having now armed myself with the information and a better and deeper appreciation of the art, skill, ethos and mindset of the carver, LUIGI VIPRATI, it’s time for me to move ahead with inspection of this pipe.
Initial Visual Inspection
There was a thick layer of hard and even cake in the chamber. There was no crud and gunk nor any signs of charring/ lighting marks over the rim top surface. The mortise was relatively clean. The stummel surface appears clean but the appearance was dull and lifeless. The acrylic stem was also very clean with some minor scratches and tooth chatter in the bite zone. All said and done, this pipe was very clean and would just require some cleaning and polishing to bring this pipe back to it’s former glory. The following pictures will give the readers a general idea about the condition of the pipe as it sat on the work table.

 Detailed Inspection
This pipe has a huge chamber and at 31/4 inches, is one of the larger ones in my collection. The chamber widens considerably at the heel of the bowl while being narrow at the mouth of the chamber. There is a thick layer of hard and even cake inside the bowl and more so towards the bottom of the chamber. There is no lava over flow on to the rim top surface and the inner and outer rim edges are in good condition. The chamber walls will be inspected for signs of damage like heat fissures, pits or burnouts after the cake has been completely eliminated and the bare briar is exposed. However, given the solid feel of the external stummel surface this seems unlikely. The ghost smells points towards Virginia tobacco that the previous custodian had likely smoked in this pipe.
 The stummel boasts of beautiful straight grains all around the surface and along the sides of the shank while fantastic bird’s eye grains adorns the foot of the stummel, top and bottom surfaces of the shank. It is evident that Luigi Viparti has let the grains of the wood dictate the shape of this pipe in consonance with his design philosophy. The dark stains of the grains contrasts with the lighter hues of the rest of the briar further accentuating the straight and bird’s eye grains. The stummel surface is very clean but dull and lackluster due to use and storage. There are a few very minor thin fills towards the aft of the bowl and can be identified by the pale putty (encircled in yellow) which can be seen in the following pictures. The mortise is also relatively clean. This pipe does seem to be well cared for and must have been a treasured pipe of the previous owner.

 The acrylic stem surface has a few scratches and minor tooth chatter in the bite zone on either surface. The tenon opening and the slot are clean without any accumulation of old oils and gunk.
 The Process
I started this project by running a pipe cleaner dipped in alcohol through the stem airway and was pleased to note that it came out perfectly clean. The previous steward had really looked after this pipe with great care. Next I addressed the minor scratches and tooth chatter in the bite zone by sanding the surface with a folded piece of 400 grit sandpaper. I ran the sandpaper along the button edges also to sharpen it a bit.
 The excitement of seeing a nicely polished and shining stummel with those exquisite straight and bird’s eye grains resplendent in all it’s glory made me decide to work on the stummel. The narrow mouth of the chamber with a slight broad heel of the stummel meant that use of my trusted PipNet reamer was ruled out. Thus, I reamed the chamber with my knife. Once the cake was taken down to the bare briar, I used a folded piece of 220 grit sandpaper to sand the chamber walls to remove residual cake and even out the wall surface. I wiped the chamber with a cotton swab wetted with alcohol to clean the carbon dust and expose the briar. There is a web of very thin minor heat veins toward the back and above the draught hole. Though not an immediate major concern, it needs to be addressed now to prevent any disasters in future. However, there was a spot on the right side of the chamber where the briar was slightly more charred (encircled in red). I cleaned out all the charred briar from that area and will address it towards the end. I believe that this damage to the inner walls of the chamber was caused by the use of a jet lighter to light the tobacco and hence must be avoided at all costs.
  This was followed by cleaning the mortise with pipe cleaners dipped in isopropyl alcohol. I scraped the walls of the mortise with my fabricated knife to remove the dried oils and tars. The old smells of the tobacco are still strong and would need more invasive methods to get rid of these odours.
 I continued the cleaning of the chamber and shank internals with a salt and alcohol bath. I used cotton balls which is an at par substitute as I have realized over the years. I drew out a wick from the cotton and along with a folded regular pipe cleaner; inserted it into the mortise and through the draught hole into the chamber. Thereafter, I packed the chamber with cotton balls to about quarter of an inch below the inner rim edge and soaked the cotton balls with isopropyl alcohol up to the brim. About half an hour later, the level of alcohol had gone down, having being absorbed by the cotton. I topped it up once again and set it aside overnight. By the next morning, the cotton and alcohol had drawn out all the remaining oils and tars from the chamber and mortise, fulfilling it’s intended task. I removed the cotton balls and ran pipe cleaners through the mortise to clean out all the loosened tars and gunk. The chamber now smells clean and fresh. I set the stummel aside to dry out naturally.
 With the bowl internals clean, I moved to clean the exterior of the stummel. I used a hard bristled tooth brush and wood cleaner soap to scrub the stummel and rim top. I washed the stummel under running warm water with anti oil dish washing detergent and Scotch Brit pad till the stummel surface was clean and dried it using paper towels and a soft cotton cloth. The stummel surface, including the rim top has cleaned up nicely with the beautiful grain patterns on full display. The three very small fills that I had noticed under magnification, are all solid and refreshing them is not required.

 I simultaneously cleaned the shank internals with the detergent and hard bristled shank brush and set the stummel aside to dry out naturally.
 While the stummel was set aside to dry, I decided to complete the preliminary polishing of the stem. I wet sanded the stem surface with 600, 800, 1000, 1500 and 2000 grit sandpapers. This progressive use of higher grit sandpapers helps to eliminate remaining oxidation and also eliminate the sanding marks left behind the lower grit sandpapers. I wiped the stem with a little EVO to hydrate and deepen the shine over the stem surface.
 I went through the 1500 to 12000 grit micromesh pads to wet sand the stem. The stem now has a nice deep shine with no traces of oxidation around the entire stem surface.
 Next, I polished the stummel with micromesh pads, wet sanding through 1500 to 12000 pads, wiping the surface with a soft cloth at the end of the micromesh cycle. The stummel looks amazing with a deep shine and beautiful grains popping over the stummel surface. I massaged a small quantity of “Before and After Restoration Balm” with my fingers into the briar. The immediate and incredible transformation that takes place is a worthy reward for all the efforts!!! I let the balm sit on the surface to be absorbed in to the briar for about 20 minutes. The bowl now looks fresh and attractive with the grains popping out any which way you look at the briar. I polished off the balm with a soft cloth to a lovely shine.
 To apply the finishing touches, I mounted a cotton cloth buffing wheel on to my hand held rotary tool and applied a coat of Blue Diamond to the stummel and the stem to polish out the minor scratches. This was followed up by polishing the entire pipe with a fresh cotton buffing wheel to remove any excess compound that is left behind. A wipe with a microfiber cloth and the pipe is ready for the next stage of polishing.
 With a cotton buffing wheel that I use for carnauba wax, I applied a coat of carnauba wax and continued to work on it till the complete coat of wax had been polished out. I mounted a clean cotton cloth buffing wheel and gave the entire pipe a once over buff. I finished the restoration by giving the entire pipe a rigorous hand buffing using a microfiber cloth to raise the shine further. The finished pipe looks beautiful and is ready to be added to my personal collection of pipes.


 There was only one more issue that needed to be addressed and one that could not be ignored, being a functional issue. Remember the charred spot on the walls of the chamber caused by a jet lighter and the thin web of heat lines? I addressed the former issue first. I decided to fill only the area from where I had removed the charred briar with layer of J B Weld. J B Weld is a two-part epoxy Cold Weld in two tubes; hardener and steel which are mixed in two equal parts (ratio of 1:1) with hardening time of 5-6 minutes and complete curing time of 6-8 hours. I poured the contents of the two tubes and mixed it well. I applied this mix, as evenly as possible, over the heat lines in the chamber wall surface. I worked fast to ensure an even coat before the weld could harden. I set the stummel aside for the application to harden and cure overnight.
 By the next afternoon, the J B Weld had cured and hardened considerably. With a folded piece of 150 grit sandpaper, I sanded the filled JB Weld from the area till all that remained was a smooth surface with the weld deeply embedded into the heat lines and protecting the briar from further damage.
 Next, to prevent the walls from coming in to direct contact with the burning tobacco, I mixed activated charcoal and plain yogurt to a thicker consistency, just enough that it would spread easily and applied it evenly all along the chamber walls after inserting a folded pipe cleaner through the draught hole to keep it open. Once dry and set, this will not only protect the walls but also aid in faster build up of cake. This also addressed the minor thin web of heat lines noticed above the draught hole. I set the stummel aside for 2-3 days for the pipe mud to dry out completely.
  I wish to thank each one for sparing their valuable time to read through this write up and each one is always in my prayers.
