Blog by Steve Laug
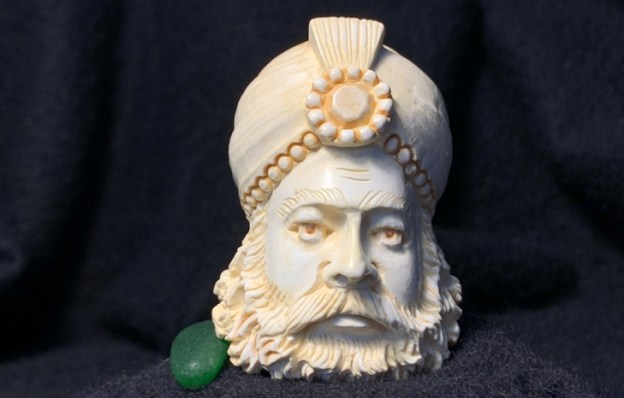
We purchased two of these El-Is Ferit Orersoy Black Meerschaum pipes from a seller in Vilas, North Carolina, USA on 12/01/23. The 2 pipes were both straight Rhodesian style pipes – one with black stem and one with yellow stem. One was smoked and one was clean and unsmoked. Both were boxed in their original cardboard box that is stamped on the top and reads El-Is [over] Ferit Orersoy [over] 1, Kordon 1382 So – 2/8 [over] Izmir. The boxes are light weight and include the original cotton piece the pipe sat on as well as a leaflet on the care of the black meerschaum. The unsmoked pipe will be looked at in the next blog but this one was smoked. It had a light cake in the bowl and some lava overflow on the rim top. The finish was a little spotty where the fingers held it. It would lessen when I cleaned and waxed it. The shank was very dirty as was the bone tenon that held the stem in place. The tenon was threaded into the shank of the pipe first and then the stem screwed onto it to allow for proper alignment. The tenon was lightly stained with tobacco as was the airway in the stem. There was some blackening at the airway’s entrance to the button slot. The pipe smelled dirty and would need to be cleaned up.

 When I examined it, I noticed a light build up of lava on the rim top. Because of the colour of the meer it is more noticeable to touch than sight. It is a dullness to site. When I was touching it I also felt the inner edge and noticed there was a light cake in the bowl and some tobacco debris. The stem had some darkening in the button area and in the first inch of the airway. There were light tooth marks and chatter on the stem surface. But I knew I would need to give this pipe a good cleaning. I removed the stem to give a sense of the parts and to showing the staining on the bone tenon.
 I thought I would include the information from the leaflet that is in each box. It is helpful information on the brand and the meerschaum. I have left out the address on the leaflet as I have included it above. I quote:
THIS PIPE IS MADE FROM PURE BLOCK MEERSCHAUM
Meerschaum is a stone or block mostly found in the Asia Minor. It is imbedded in red clay and usually found 40 to 150 feet under the surface of the ground. Meerschaum is not a clay or mineral but is organic in origin, being fossilized remains of minute sea animals like coral. These little animals died many millions of years ago and the remains of their shells were compressed by earthquakes, washed over repeatedly by the ocean and by floods which deposited earth and rock on top of them, and were moved and shifted by floods and successive glacial movements.
Today, the meerschaum is found only in Asia Minor in sufficient quantity and of quality suitable for commercial use. Meerschaum is very light in weight and is one of the most porous substances found in nature. Consequently, it absorbs nicotine and tobacco is thus filtered in the meerschaum pipe. During the millions of years the outside part of the meerschaum stones or blocks has deteriorated so far that only the kernel of sound meerschaum is left in the middle. The decompose outer parts are 10 to 20 times as much as the sound kernel which is used for pipes.
HAND CARVED
Each pipe is deftly cut by hand and has its own character, and colours gradually as it is smoked, taking on a rich brown colour with the years. The meerschaum is impregnated with wax which helps to give it the beautiful velvety finish for which meerschaum pipes are famous. Each pipe has its own individual character given to it by the artisan who made it.
HOW TO BREAK IN YOUR PIPE
Meerschaum pipes should be broken in much in the same manner as a briar pipe. For the first few smoked, the pipe should be filled only half full and the tobacco packed lightly. This way the outside of the bowl will colour gradually from the bottom up taking on an even, rich brown tone with the years of smoking pleasure. The smoker is cautioned not to touch the warm bowl with his fingers as the moisture left there will affect the eventual colouring.
BLACK MEERSCHAUM PIPES
Not all of us may like a white pipe or some may have preference for the colour of black, so quite rightly they may like to have a black meerschaum pipe. El-Is proudly present black meerschaum pipes. An El-Is specialty, in order to meet its customers demands. These pipes are not painted but given their colour by way of pyrography and then polished. This way, the pipe does not lose its characteristics and retain its colour even after extended usage.
Now it was time to clean up the pipe itself. I carefully scraped the cake out of the bowl with a Savinelli Fitsall Pipe Knife. I took all the cake out then sanded the bowl walls with 220 grit sandpaper wrapped around a piece of dowel. Once I finished the bowl was clean and all cake was a thing of history. I cleaned out the dirty internals in the airway in the shank, the mortise and the airway in the stem with pipe cleaners, cotton swabs and 99% isopropyl alcohol. It took a few to get it cleaned but eventually the cleaners came out clean. I also wiped down the top of the rim with a cotton pad dampened with alcohol and was able to remove the lava coat.
 I lightly polished the rim top with micromesh sanding pads – dry sanding with 1500-1200 grit pads and lightly wiping the rim top down with a damp cloth after each pad. It cleaned up very well.
 I rubbed down the surface of the meerschaum with Before & After Restoration balm. I worked it into the surface of the meer to clean, polish and preserve the pipe. It looks good and the spottiness of the black finish looked much better.

 I applied several coats of Clapham’s Beeswax/Carnauba mix to the surface of the meerschaum. I set it aside to dry between coats and gave it a brisk buff with a soft cloth after each one dried.
 I set the bowl aside and turned my attention to the stem. There was a deep tooth divot on the underside of the stem ahead of the button. I filled it in with clear CA glue. Once it cured I sanded it smooth with 220 grit sandpaper.
 I polished the acrylic stem with micromesh sanding pads – dry sanding with 1500-12000 grit pads. I wiped the stem down after each pad with some Obsidian Oil. I finished polishing it with some Before & After Pipe Stem polish – both Fine and Extra Fine. I wiped the stem down with a final coat of Obsidian Oil. The stem took on a rich glow.
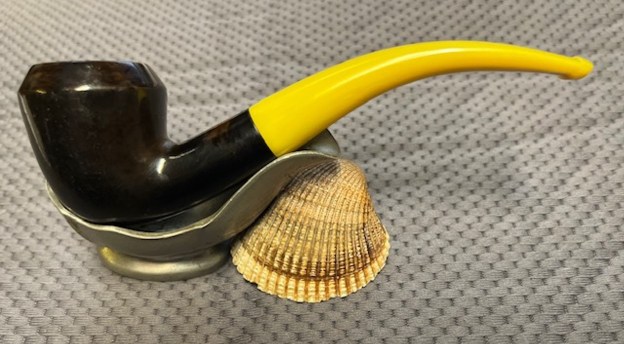
 This nice looking El–Is Black Meerschaum Bent Rhodesian with a yellow acrylic bent taper stem is a great looking pipe now that it has been restored. The black meerschaum is clean and the light weight bowl has a rich glow to it. I put the bone tenon in the shank and then attached the stem to align correctly. If the tenon is in the stem first it does not align with the shank correctly but in the shank it aligns correctly. I put the stem back on the bowl and carefully/lightly buffed the pipe with clean buffing wheel using a light touch on the meer. I gave the bowl and the stem multiple coats of Claphams Beeswax mixed with Carnauba and hand buffed the pipe with a microfiber cloth to deepen the shine. The finished El-Is Black Meerschaum Bent Rhodesian really is a beauty and feels great in the hand and looks very good. Give the finished pipe a look in the photos below. The dimensions of the pipe are Length: 5 ½ inches, Height: 1 ¾ inches, Outside diameter of the bowl: 1 ½ inches, Chamber diameter: ¾ of an inch. The weight of the pipe is 33 grams/21.16 ounces. This beautiful pipe will soon be on the rebornpipes store in the Ceramic & Meerschaum Pipes Section. It should make a great smoker for the next trustee. Thanks for reading this blog and my reflections on the pipe while I worked on it. It was a fun one to work on.