Daily Archives: June 12, 2012

Refurb on an Old BW Dog with Bling


This one is another mystery to me. Because I am always picking up these old timers I have a habit of researching out as much information as I can once they have arrived and I can see the stamping and hallmarks up close. This one bears the hallmarking of the Anchor which tells me it is made or assayed in Birmingham, the Lion which tells me it is Sterling silver and the date letter that though worn looks to be a capital E which would date it as an 1850 pipe. That is as close as I can tell to the date and time frame for this old timer. There is also a Makers Mark in the silver stamped BW and the briar of the pipe is also stamped BW. I cannot find any information on that maker in all of my searching so that is where it stands. If anyone reading this can shed light on the initials and what they may refer to I would deeply appreciate it. Until then I have a nice old bulldog from 1850 that smokes exceptionally well and it is a mystery regarding its maker.

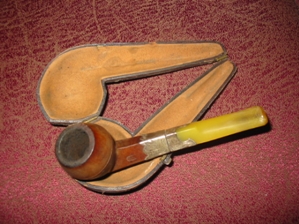
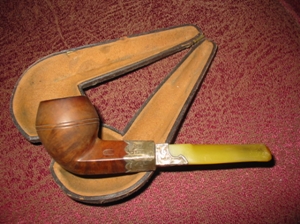
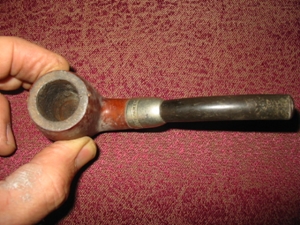
When the pipe arrived it was in rough shape. The silver was very tarnished and dull looking. It was also scratched and much worn in places. The bowl had a very spotty finish with just the remnants of the original stain. The rim was tarred and the bowl heavily tarred and caked. The stem is made of some amberoid substance or may be Bakelite. It seems to be a softer material than the hard Bakelite. It has a bone tenon that was over turned so the stem was off to the side. The button also has an orific hole in the button instead of the newer slotted button.

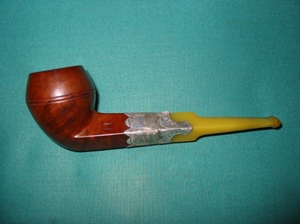
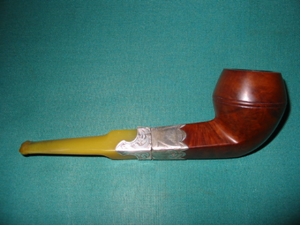
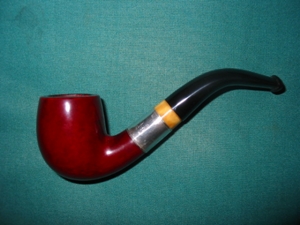
I reamed the bowl and cleaned it with Isopropyl alcohol and many pipe cleaners and cotton swabs. I sanded the bowl to remove a bit more of the cake and take it back to the wood. I then put the bowl in an alcohol soak to remove the remnants of finish and the grime that was worked into the surface of the pipe. Once I removed it from the alcohol bath I re-stained it with Cherry stain. The stem was crackled a bit – lots of tiny spidering all over the surface so I did not want to chance using alcohol on it as it can cause more spidering and cracking. So I cleaned it with Gojo an all purpose hand cleaner with grit suspended in liquid soap. I ran it through the stem repeatedly to remove the tars and grime inside the airway. When it was clean I rinsed it with warm water to remove any residual soap. I sanded the tooth chatter and used my needle files to recut the button as it was pretty worn. I sanded and polished the stem with micromesh pads 1500-6000 grit as is my usual practice. I also heated the bone tenon with hot water and readjusted the fit to the shank. Upon completion of the refurbishing above the pipe and stem were given a final buff with carnauba wax. I also gave the black leather pipe case a cleaning with leather renewer and a coat of wax as well.

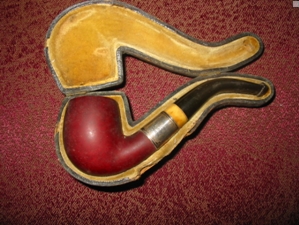
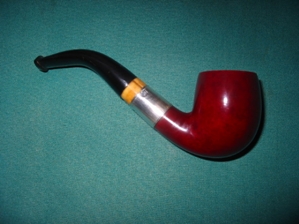
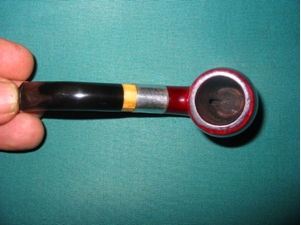
Here is what it looked like when I got it from EBay

ImageImage

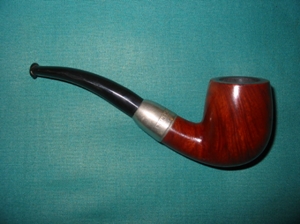
Here is what the pipe looks like today

ImageImageImage

Refurb on an old Morell Mackenzie Bent


Blog by Steve Laug

Yes a Morell Mackenzie. That is how the pipe is stamped and I had no idea what I was dealing with. I have a thing for collecting late 1800 and early 1900 pipes so when this one came up on EBay I just naturally hit the bid button. When it arrived I decided to do a bit of research on it and uncovered the following information. This is taken from a paper on BBB pipes by Jacques Cole:

“Probably one of the first filter pipes (paper filter) was the BBB “Sir Morell Mackenzie‘. That this pipe was made before 1900 is shown by a letter dated August 27, 1891 from Sir Morell Mackenzie regarding these models with longer mouthpieces. The brand survived into the 1960s.”

That is pretty clear information and fascinating as well. I had no idea of the time frame of the introduction of the paper filter in pipes. But this is a nice little pipe. It has the orific button on the mouthpiece (the round hole instead of the slotted airway). It is also a military mount stem. Inside there is a reservoir for the paper filter to sit in. It has a sterling silver shank cap and is stamped Morell Mackenzie. The briar is a nice flame grain and the bowl is well done and well drilled.

I cleaned out the reservoir and the airway to the bowl. Took a bit as I had to work a paper clip through the airway and then a shank brush and finally bristle and fluffy pipe cleaners. The shank and reservoir are now clean!! The stem was an interesting proposition. It was pretty clean as it is built to hold the other end of the paper filter. I cleaned and swabbed it out. The stem needed to be sanded to remove tooth chatter and oxidation. Then I sanded with micromesh pads and buff with Tripoli, white diamond and finally carnauba.

Here are pictures of the pipe before the cleanup:

ImageImage

Here it is after the refurbishing

ImageImageImage

Refurb on an old AD pipe from 1909


Blog by Steve Laug

I finished refurbishing this old timer. I love the looks of it and wanted to share it with you all. It is a bit of a mystery in that it has no stamping on the bowl. The only marking is a hallmark that dates it to 1909 and the letters stamped in the silver of the band AD. The pipe is a cased little thing – just 4 inches long. The stem has a bone tenon but a slotted button instead of the orific hole on most pipes of that era. The ivory band is part of the stem and it inserts into the metal band. The bowl is stained an oxblood red. I reamed and cleaned bowl and shank. I cleaned the threads and the inside of the stem with a shank brush, bristle pipe cleaners and fluffy cleaners. The silver band was polished with tarnish cleaner and a silver cloth. The stem was sanded to remove chatter and then I used Micromesh pads 1500,1800, 2400,3200 4000 and buffed with Tripoli and White Diamond. I rubbed down the case with some leather renewer and it definitely looks better.

The book, Who Made that Pipe attributes the AD stamping to Alfred Dunhill. The Silver Hallmarks site dates it as Birmingham Silver 1909 and the Makers Marks identify the work as being done by Arthur Downing Ltd. That sounds correct to me. The final attachment photo is the clip from the Hallmarks Site. So the mystery remains – is it a Dunhill or is it a nice older pipe banded by Arthur Downing Ltd? Who knows but it smokes great.

Here are the pictures of the pipe before I worked on it
AD1
AD2

Here are some pictures of the finished pipe.
AD3
AD4
AD5

And here is a picture of the logo on the silver band as found on the British Hallmarks site. It matches the stamping on the silver band exactly.
Image

GBD 9438 Tapestry Refurb


Blog by Al Jones

I am truly honored that forum owner, Steve, asked me to write a guest article on his wonderful blog. Just a little over one year ago, I made the transition from occasional cigar smoker to an avid pipe smoker/collector. Pretty early on, I discovered that access to better quality pipes could be had through the estate market. It was also about that time I found the SmokersForums.uk forum and quickly made that venue my go-to spot for pipe information. While reading the “Restoration & Maintenance” section, it became apparent to me that even finer estates could be found if I was willing to put in a little elbow-grease and restore them. If one reads the “Stickies” in that section, pipe restoration techniques can be quickly learned thru contributions from professionals and amateurs. I was fascinated and dove in.

My tools evolved from simple sandpaper and some buffing wheels mounted in a hand drill to a bench mounted buffer, micromesh sanding papers, reamers, needle files etc. Making some of the tools to save a few bucks was all part of the fun and learning process. I favor Vulcanite stems, so occasional maintenance will be a part of my pipe smoking experience.

Due to my Welsh heritage, I’m a big fan of anything British, primarily cars and motorcycles. So, it seemed natural to be attracted to the classic shapes produced by the British masters. I’m a fan of GBD brand pipes and those estates can be readily found at reasonable prices thru Ebay, etc. The 9438 Author shape is a particular favorite and I have several models of that shape. The pipe I chose to document in this article is in Tapestry finish. I was intrigued by the turned stem and after a little research, I found it was a “chair-leg” stem used on certain Tapestry models. My joy in finding this pipe quickly evaporated when I opened the box and saw the level of oxidation on the many curves and crevices. I tend to purchase estates with saddle stems, but this one ramped the difficulty notch up significantly. Indeed this stem proved to be the most difficult I’ve encountered.

Some “before” shots of the pipe:

Typically, it takes me about an hour or so to restore a stem. This one took nearly twice that long. Fortunately, the previous owner had left no teeth indention issues to resolve. I soaked the stem in a mild Oxyclean solution as the first step. In badly oxidized stems, I think this step pays off in removing oxidation from the inside of the stem as well. Next up, I used some 1500 and than 2000 grit wet paper until the brown was removed. Getting oxidation from the chairleg creases was frustrating and finger aching. I almost gave up at one point, but sitting the project down for a few hours strengthened my resolve. I’m always eager to smoke an estate I’ve cleaned up, so there is always that pot at the end of the rainbow. I found wrapping the sandpaper around a thin kitchen knife allowed me to get the oxidation from those thin crevices. Next up, was a polish with each of the final four grades of “micromesh” (4000, 6000, 8000 and 12000). Micromesh comes in pads and sheets. I found the larger, 6” x 2” sheets last longer and are easier to fold into creases, etc. Following the micromesh, the stem had a deep, black shine that I enjoy on my mostly Vulcanite stems.

The next step was to buff the stem lightly with some White diamond and then “Blue Magic Plastic Polish”, each product getting it’s own cloth wheel. The Blue Magic product is made for the automotive industry and available at most autoparts stores (Megiuars also makes a similar product). Some folks are adverse to putting an automotive product on their stems, but so far, I’ve found no adverse tastes, etc. I do think the product helps “seal” the Vulcanite as oxidation seems to either not occur or very slowly. James Upshall pipes are noted for their fast oxidation, but so far my restorations using this product has kept my collection shiny. I also gave the pipe a light coat of “Obsidian Stem Oil”.

The bowl wasn’t in bad shape, but had the usual tobacco/tar buildup on the bowl top. I used my Castleford reamer set to remove the thin cake than soaked the bowl with Sea Salt and Everclear for a few hours. This was done while I was working on the stem. Following the soak, the draft hole was thoroughly cleaned with a series of bristle pipe cleaners soaked in Everclear. I’ve had success eliminating ghosts by cleaning this area of the pipe until the cleaners come out nearly white. I gave the bowl a light buff on the wheel with some white diamond, then Carnuba wax. A hand polish with Paragon wax completed the briar clean up. The wood on the bowl top was a little lighter in color, but I knew smoking it would even out and darken that area. (plus I was not looking forward to prepping and staining the mixed “Tapestry” finish..)

The completed pipe:

It may be a combination of the pipe shape and the effort required to refurbish it, but this particular pipe has become a favorite. I swore that I’d never purchase another chairleg stemmed pipe, but won an Ebay auction last night for another GBD Tapestry pipe with a chairleg stem……

Smoke safe!
Al Jones