Resurrecting a Barling “Fossil” – Gan Barber


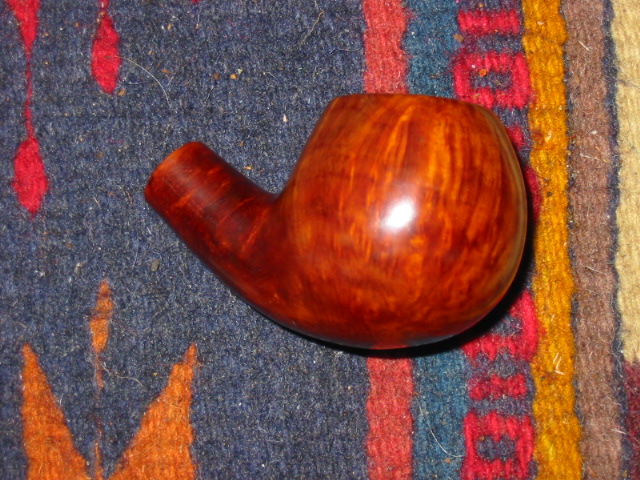
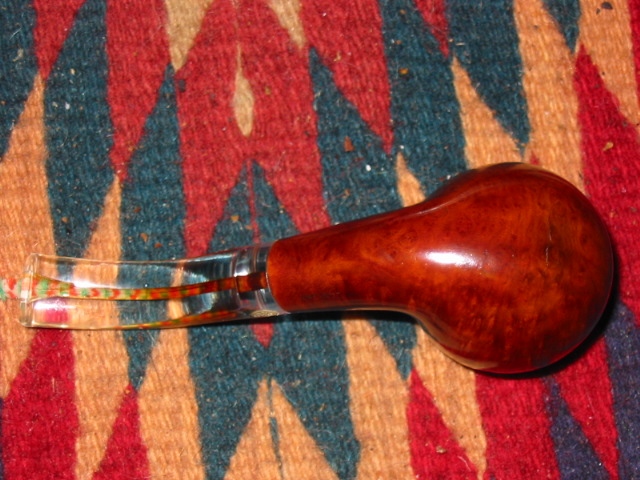
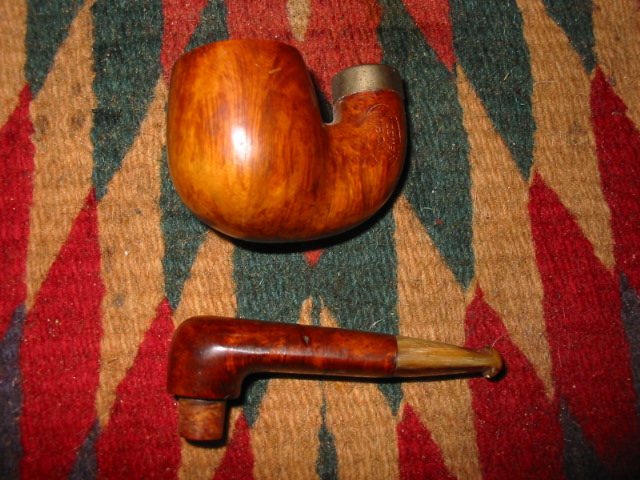
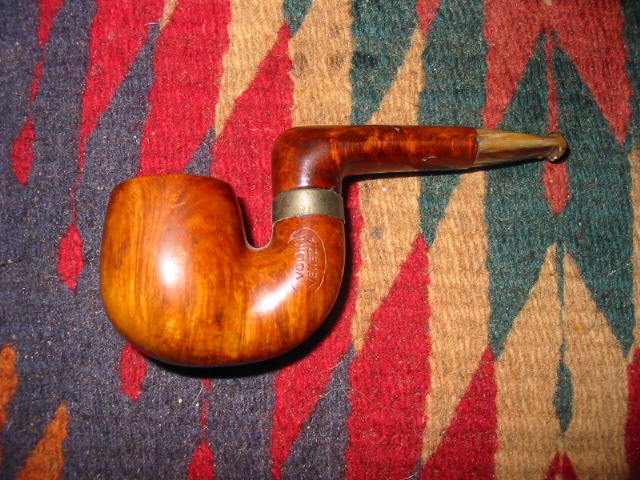
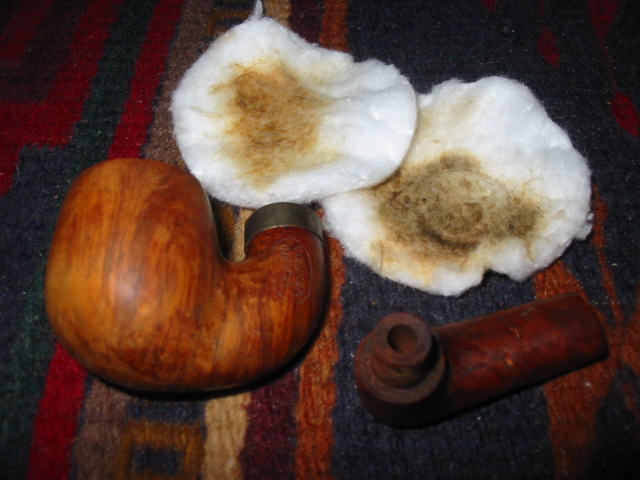
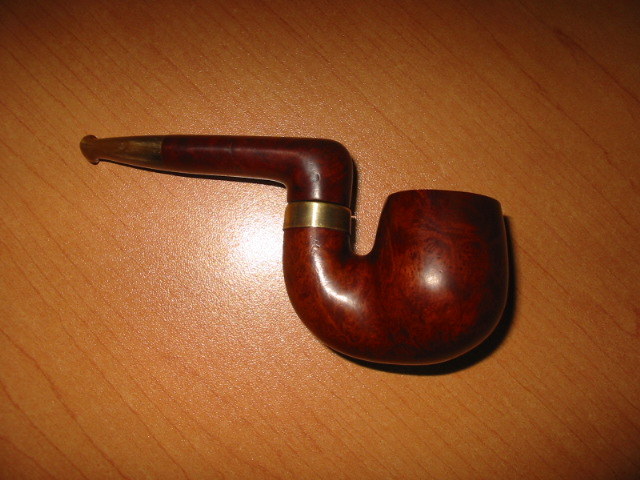
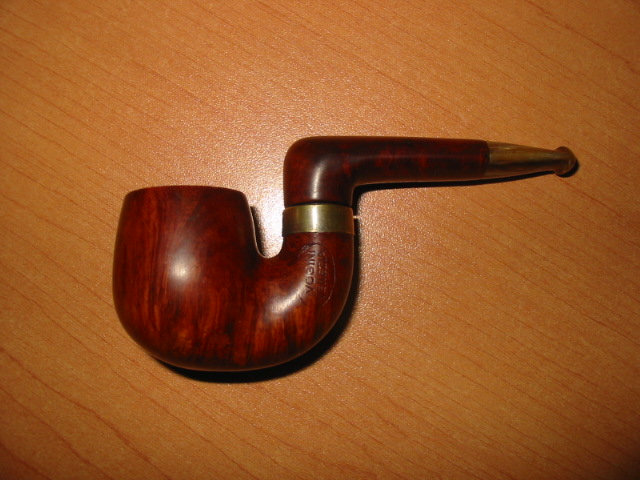
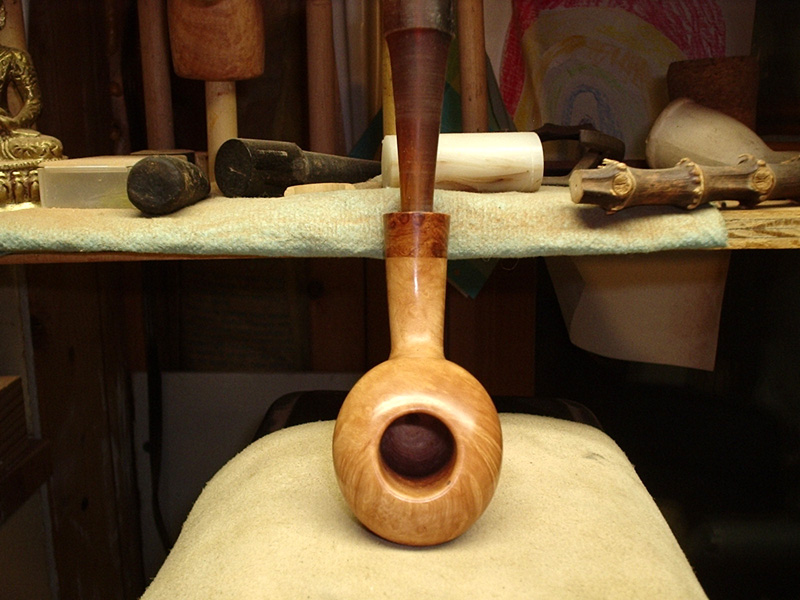
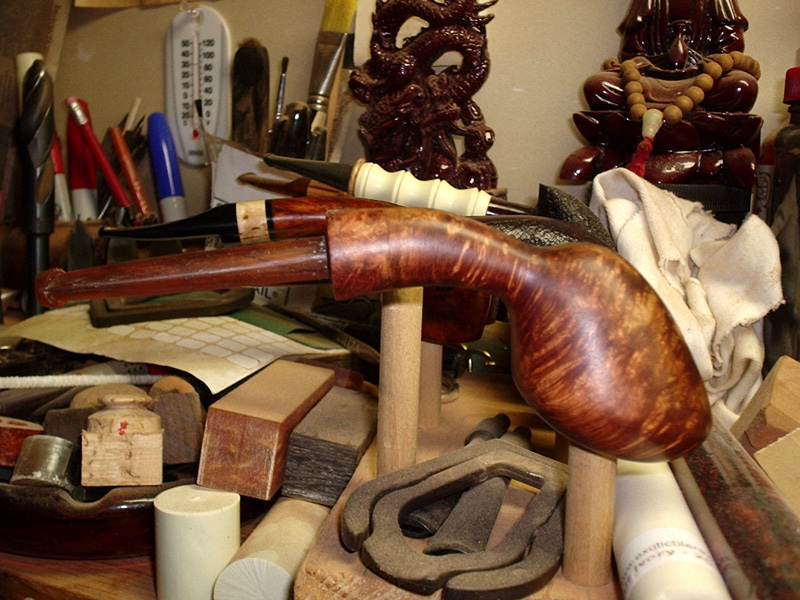
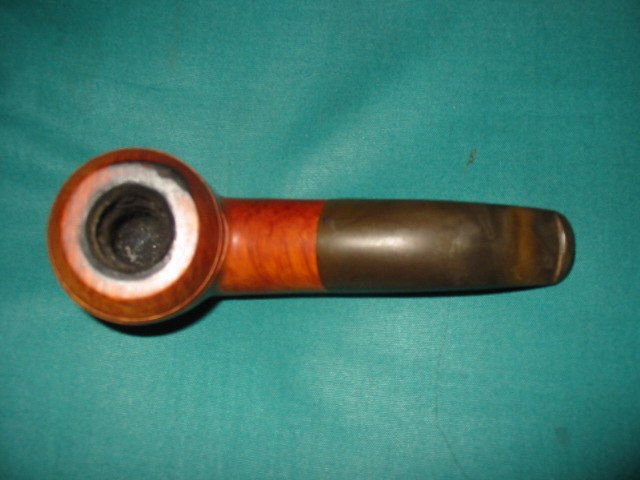
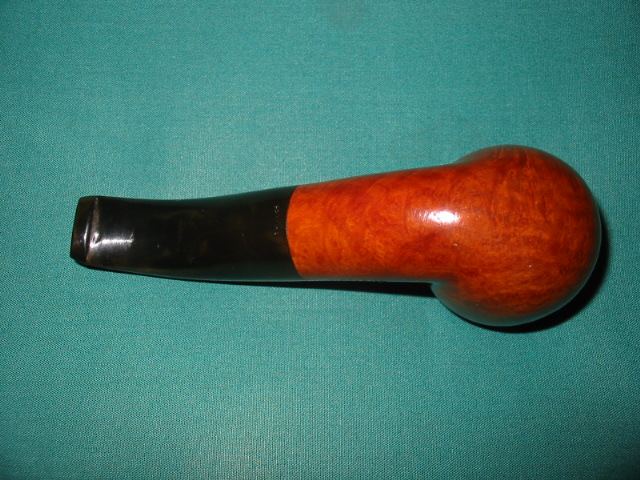
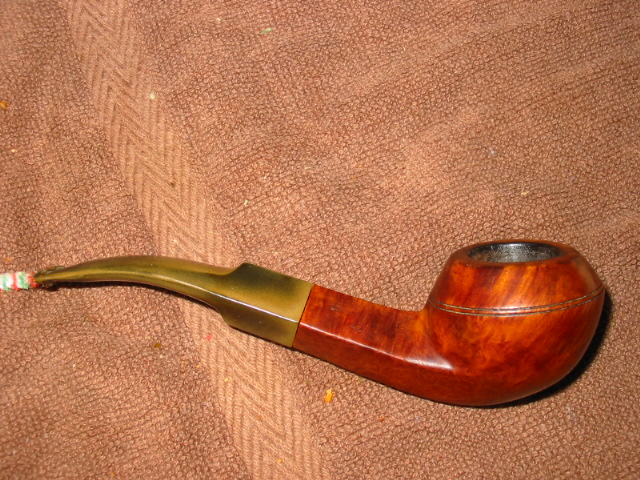
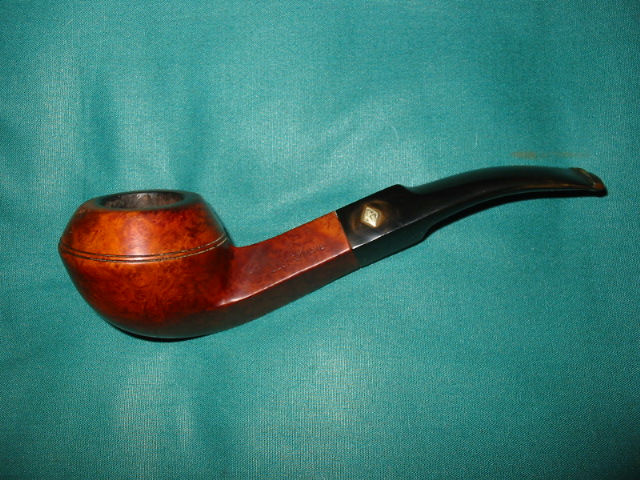
When I put this Barling away in my ‘Lazarus’ box, I thought that it might be from the Early Transition period, and therefore made from the last of that century old Algerian briar that Barling’s were famous for. I had not looked carefully at the nomenclature obscured beneath the grime. Noting that it was a Barling’s, I stored it away, looking forward to the opportunity to smoke from a piece of classic wood.

When I pulled it out and inspected the markings I was disappointed to find it had all the earmarks of a post transition period pipe.  The Barling was in script, the model number had four digits, and T.V.F was stamped on the shank. Further, the bowl was not particularly well carved and there were several major fills – something you would never find on a Pre-transition family era pipe. Oh well. I decided to proceed with the refurb anyways.

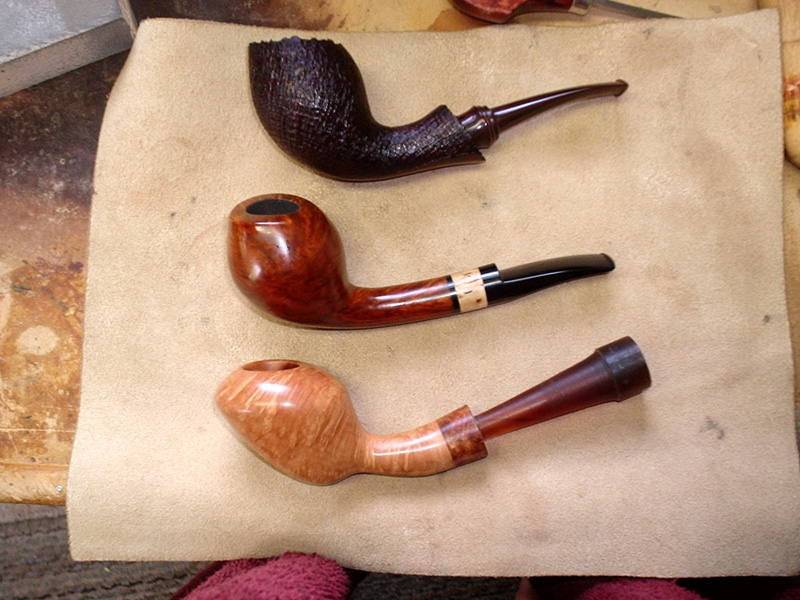
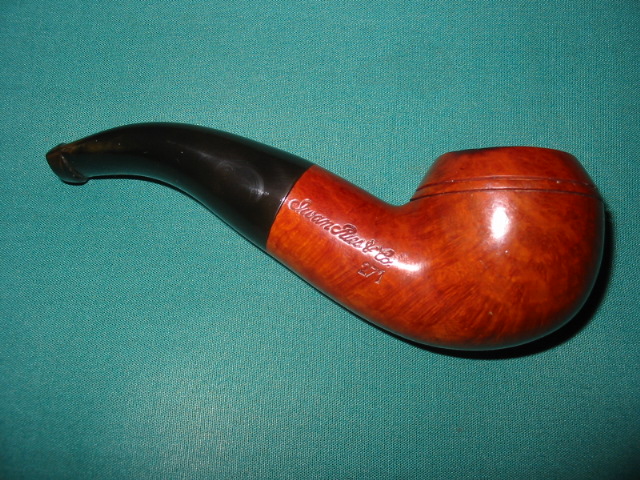
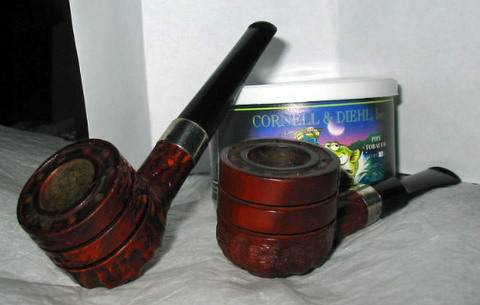
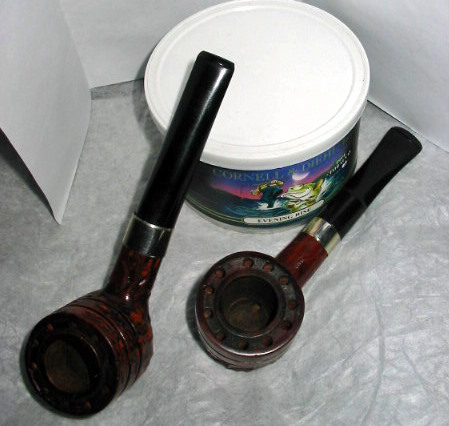
I pulled a beautifully grained twin bore saddle bit Canadian from a drawer of miscellaneous pipes that I randomly smoke. It has no maker’s name, and is simply marked “France” 255. What a great smoker. Dry and sweet, it sang with the sample of Rincon De LA Pipe No. 1 sent to me compliments of 4noggins Tobacco.  So, what’s in a name? You just never know…..

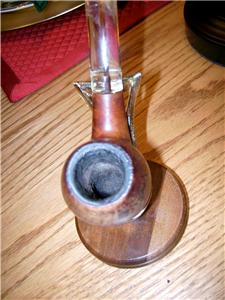
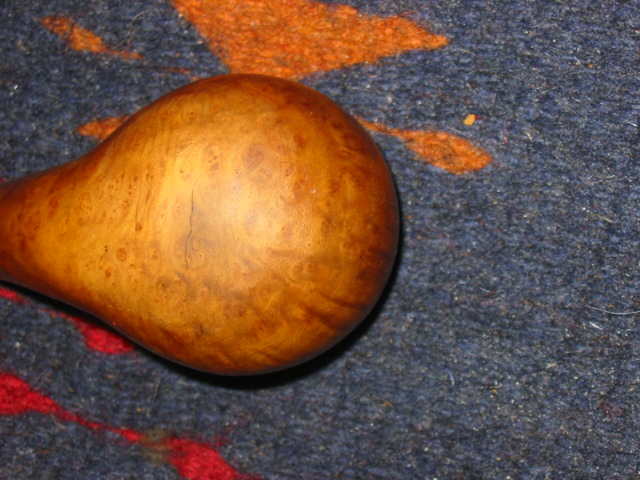
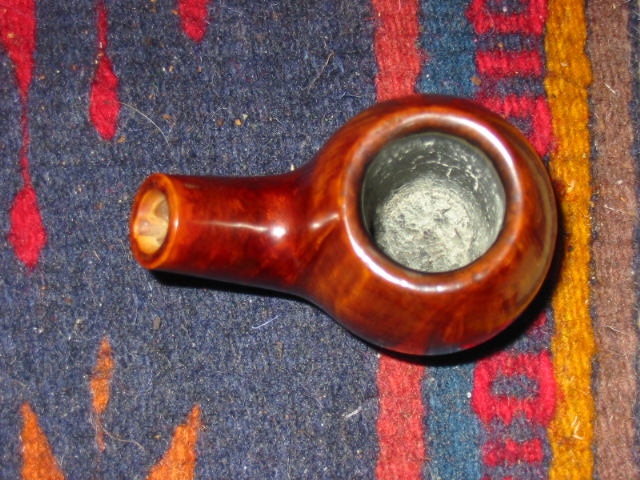
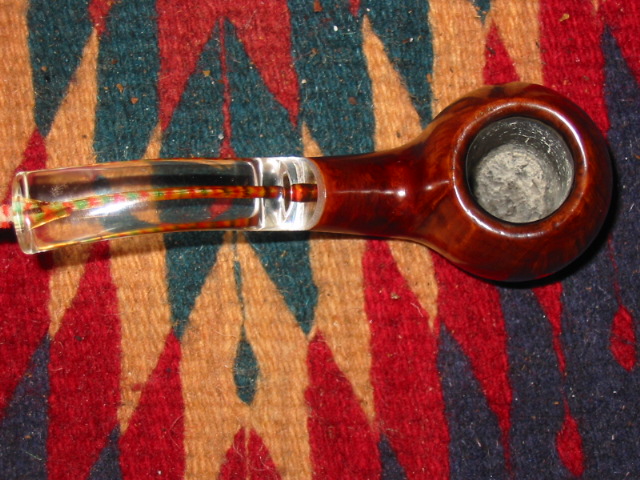
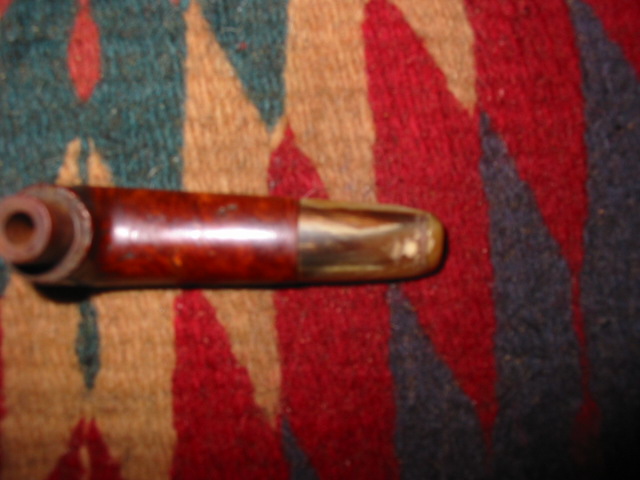
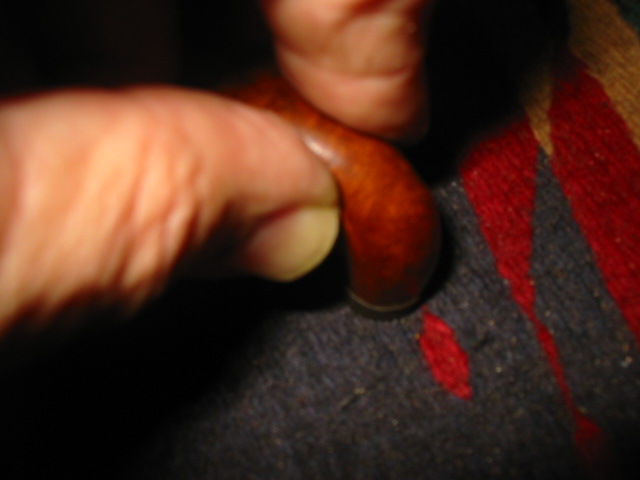
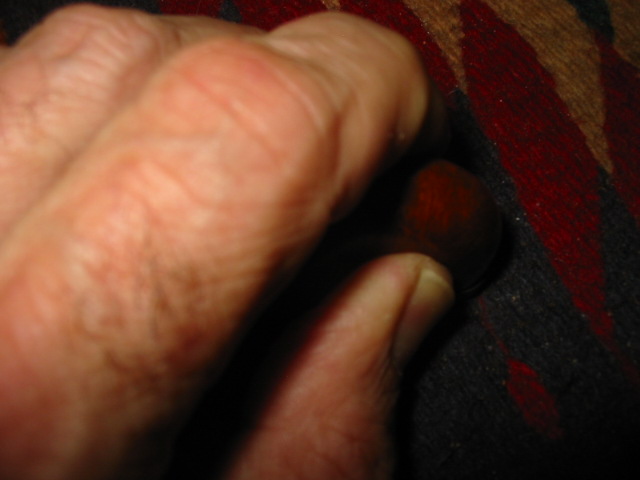
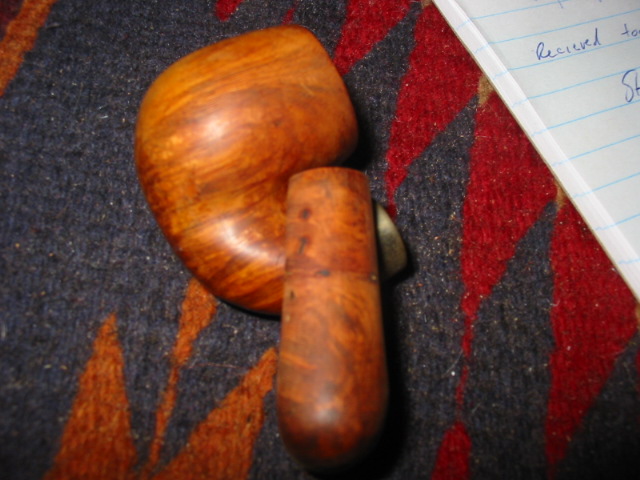
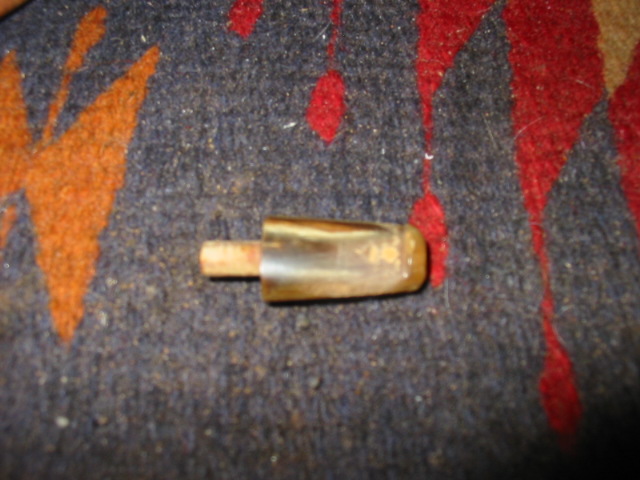
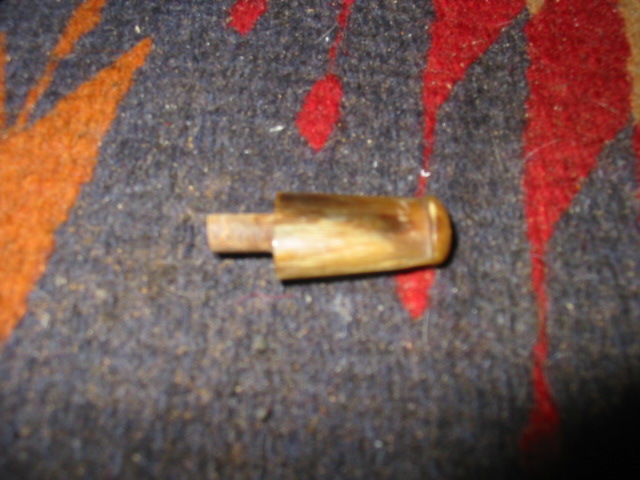
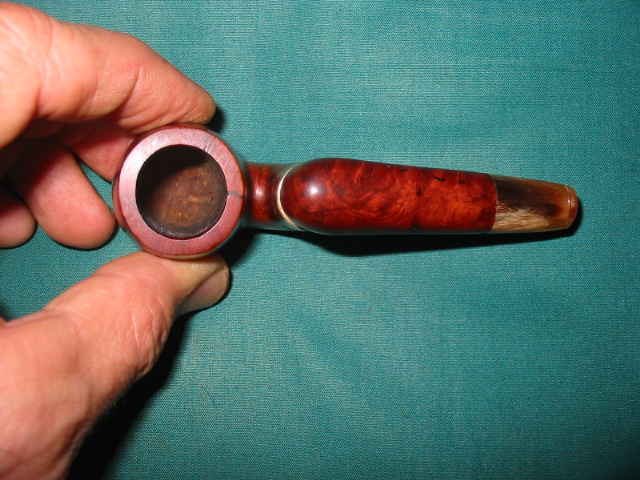
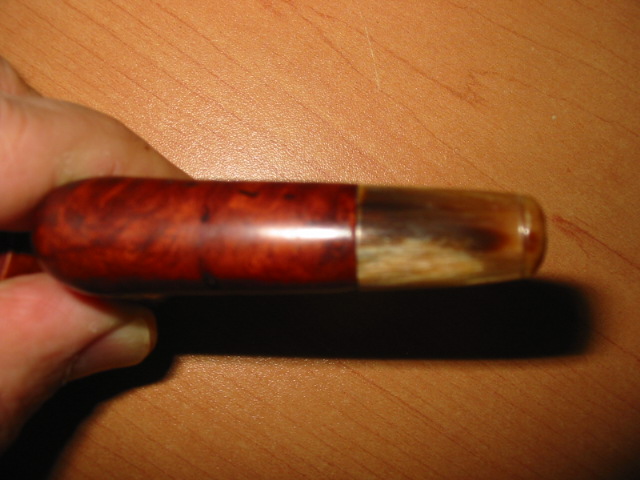
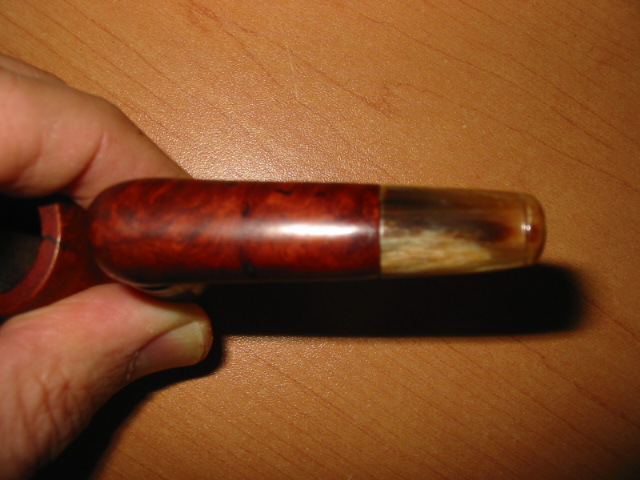
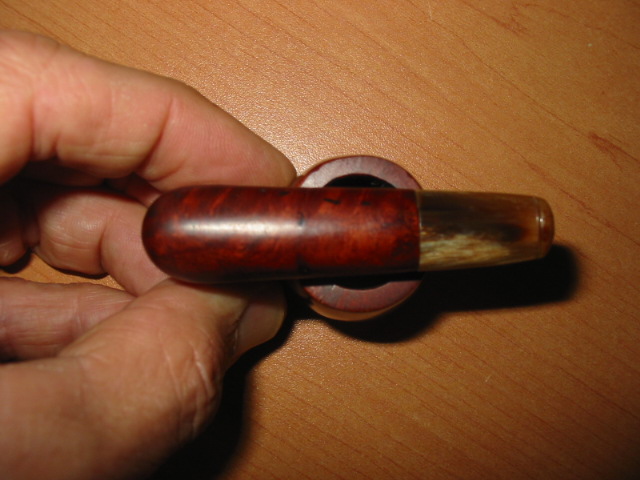
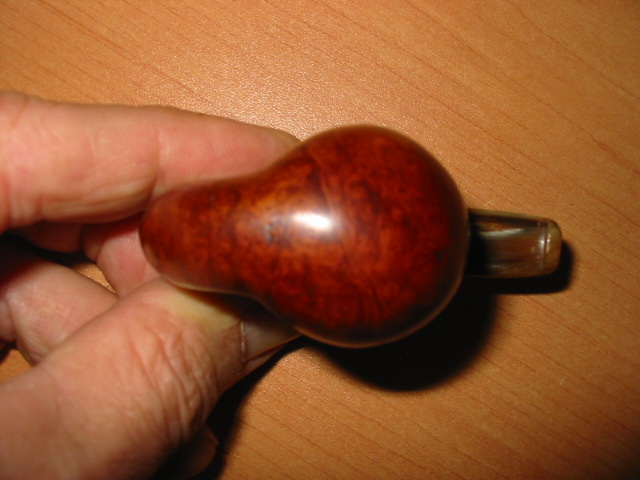
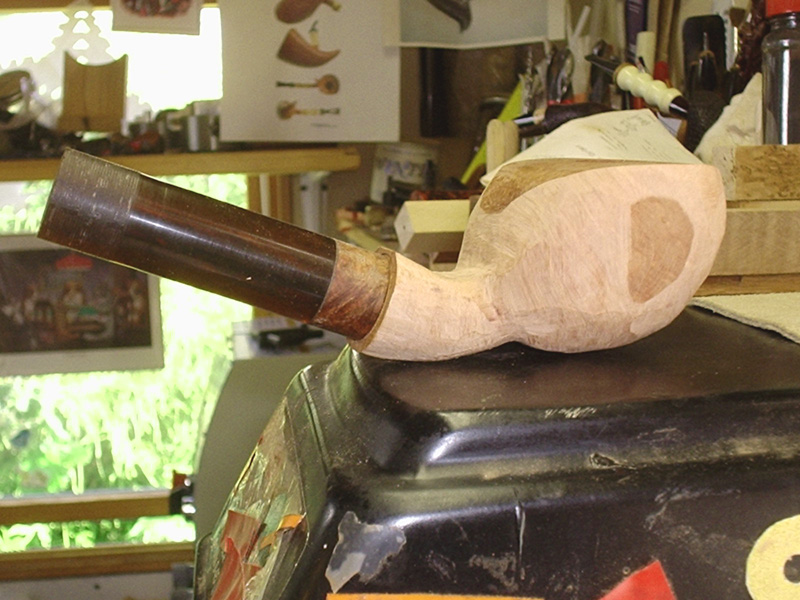
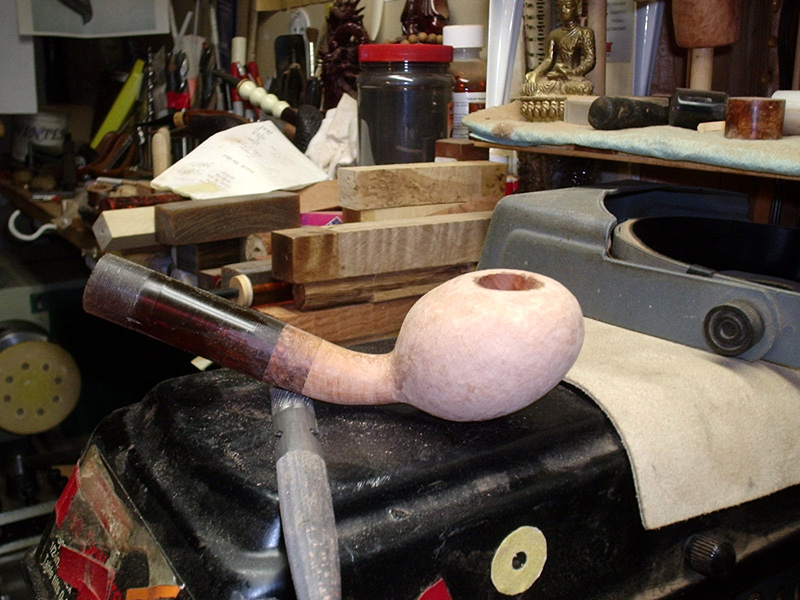
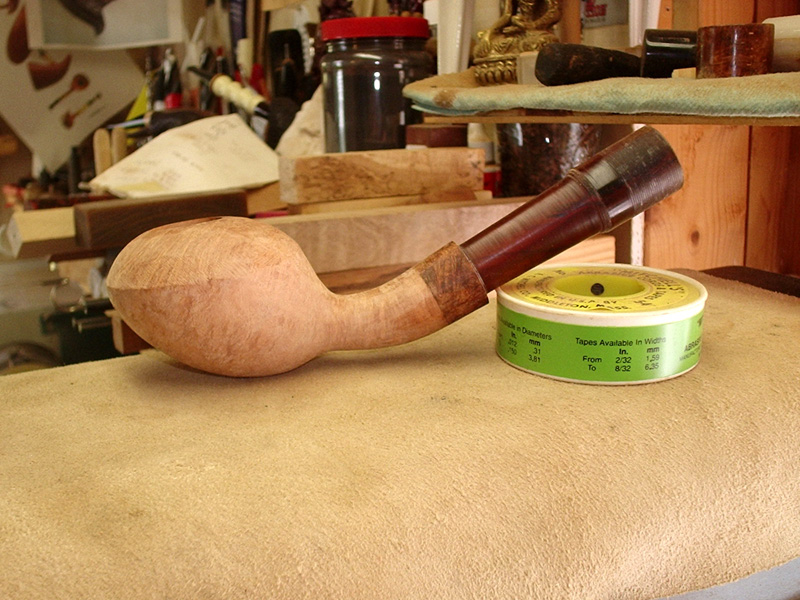
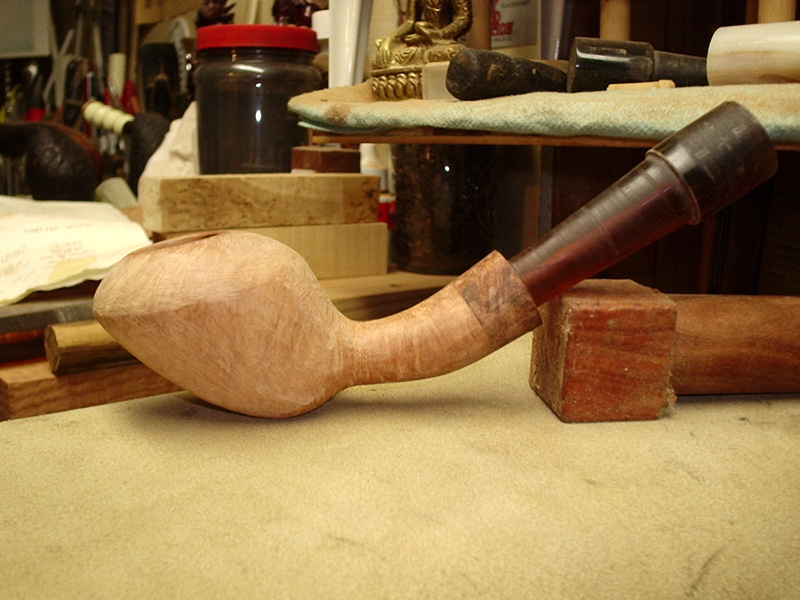
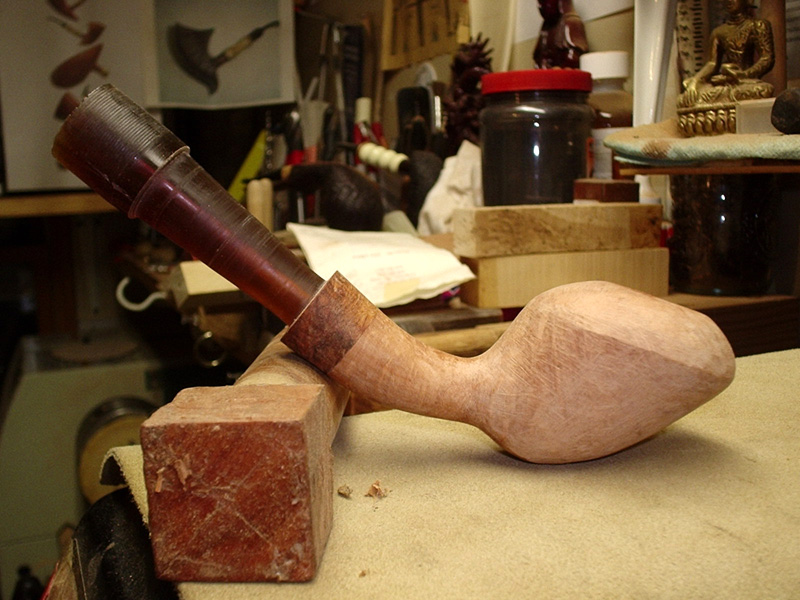
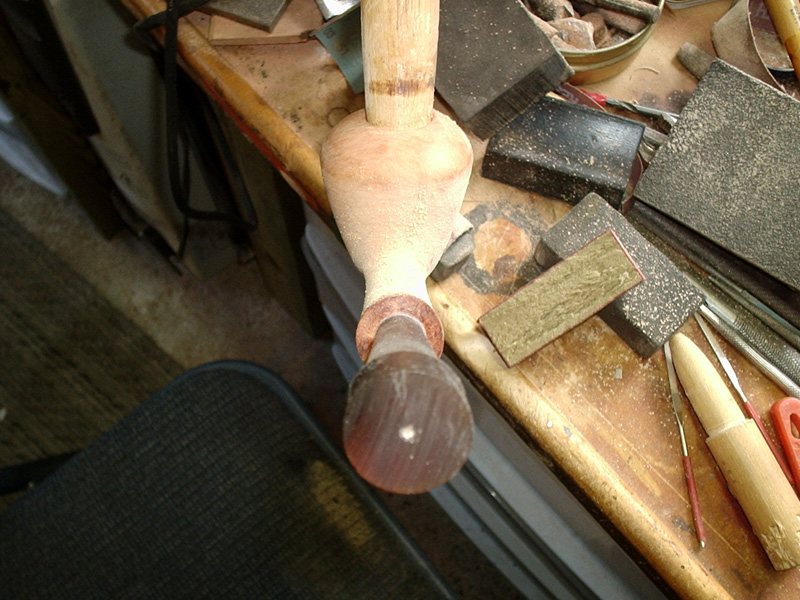
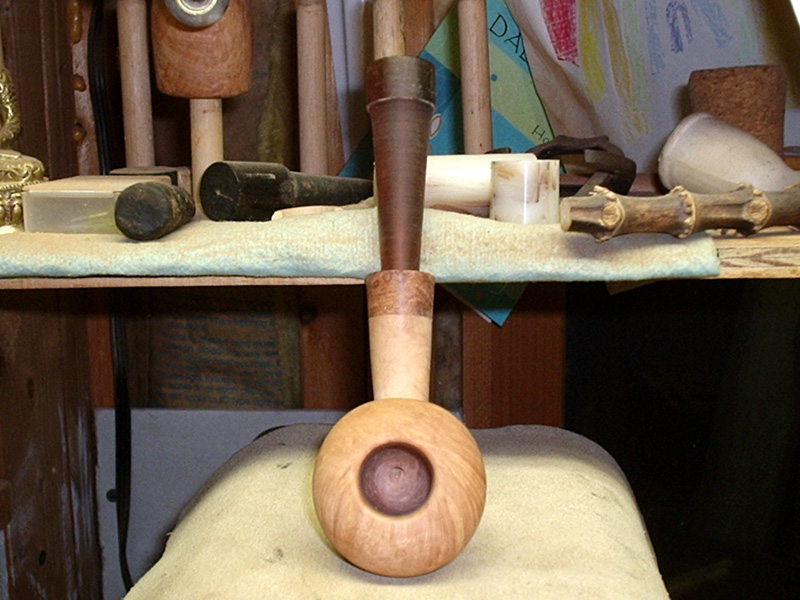
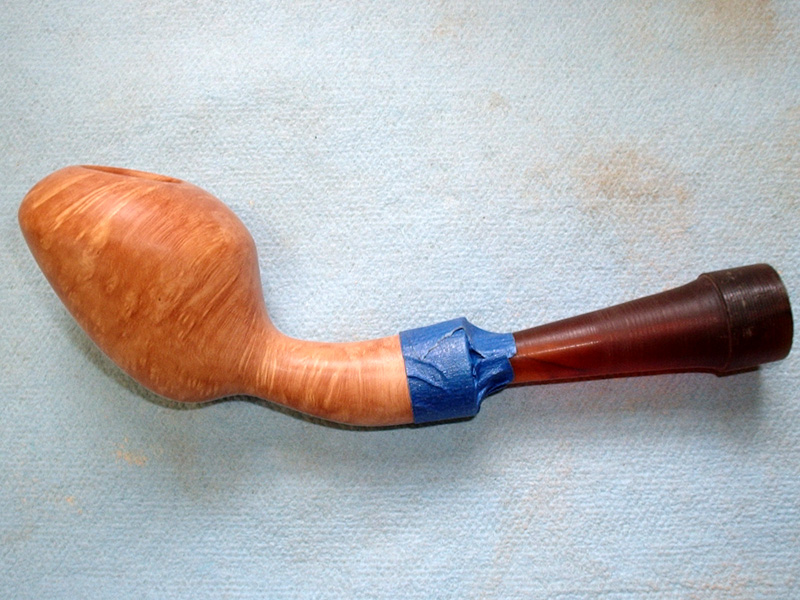
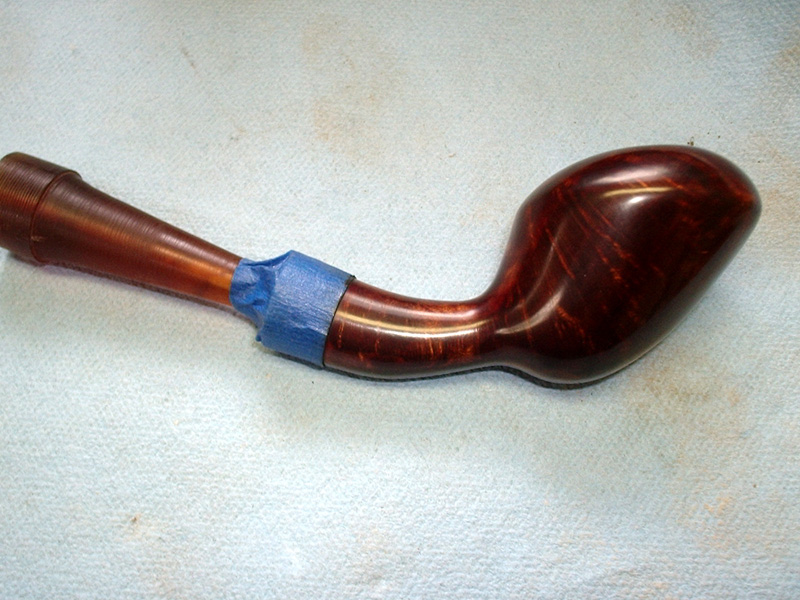
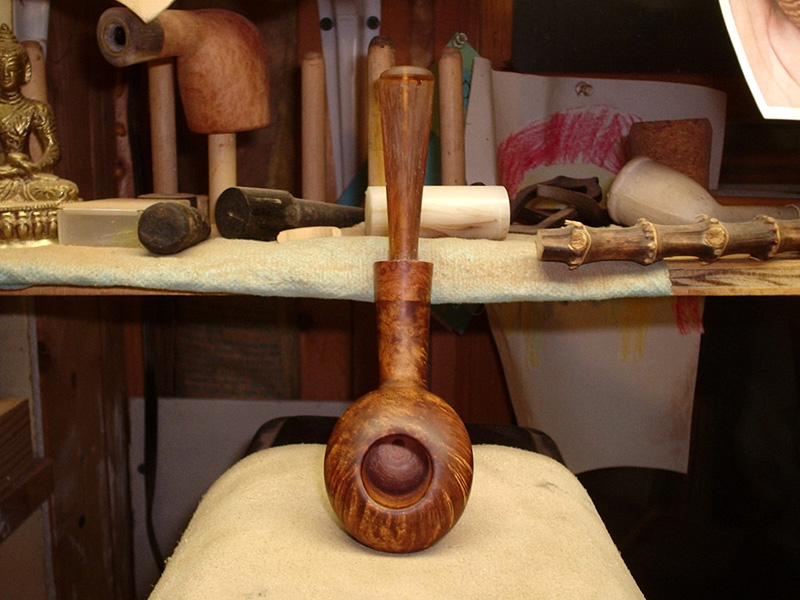
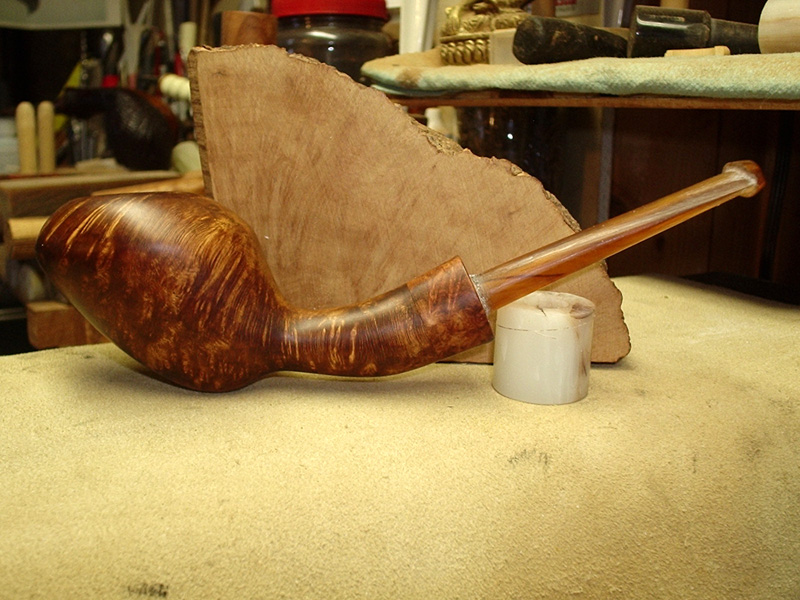
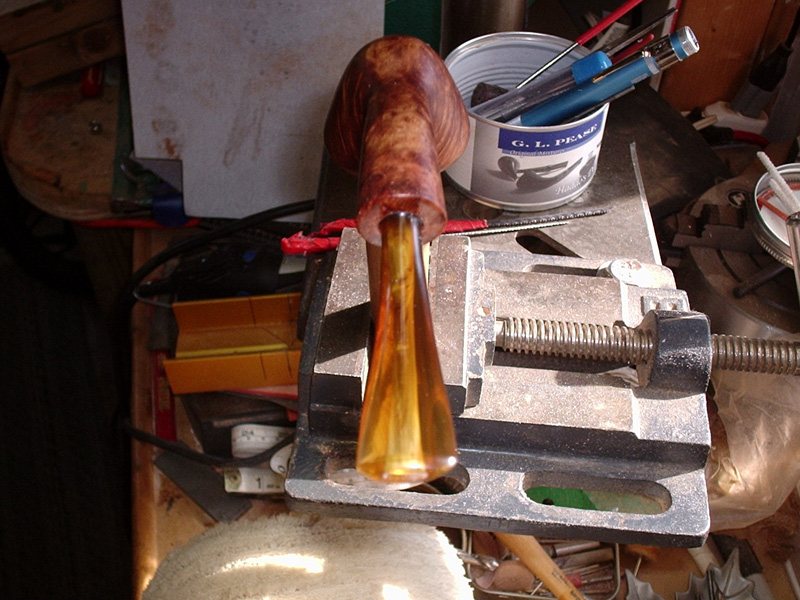
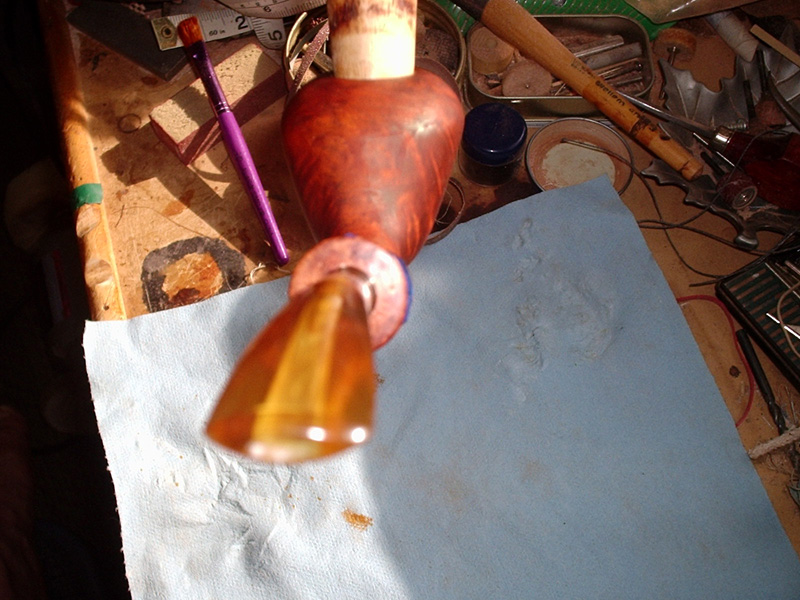
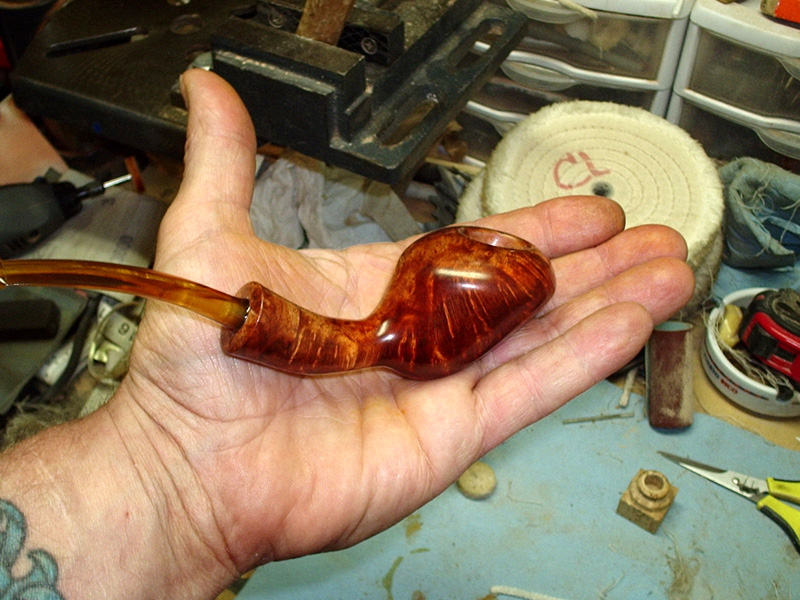
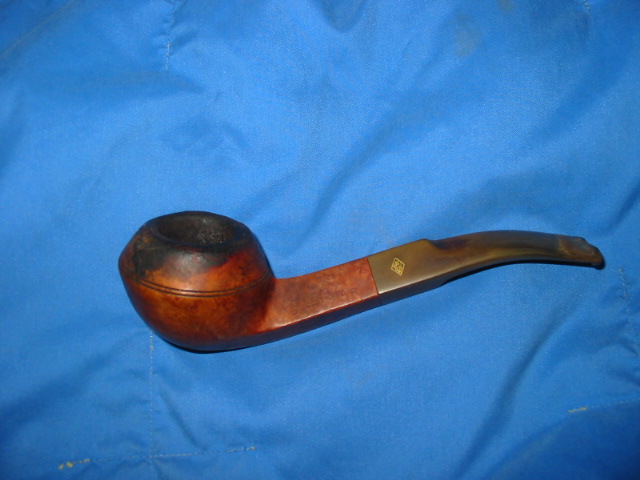
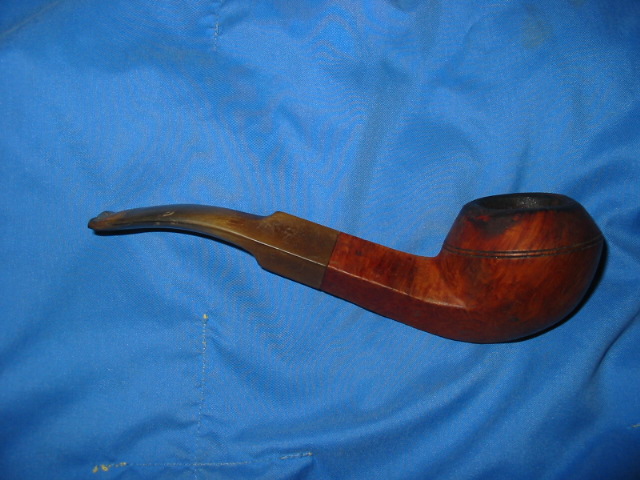
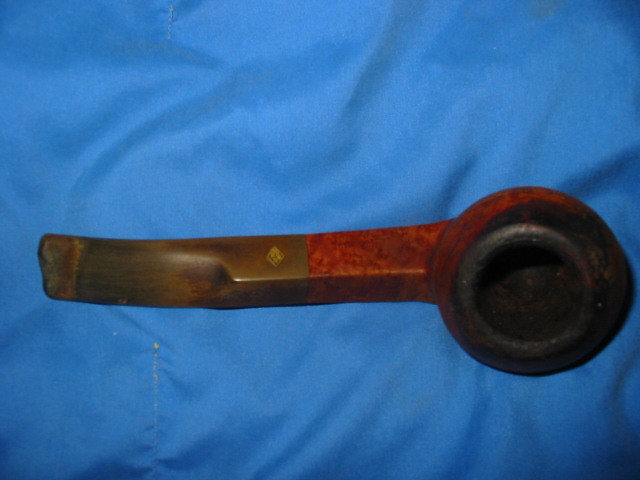
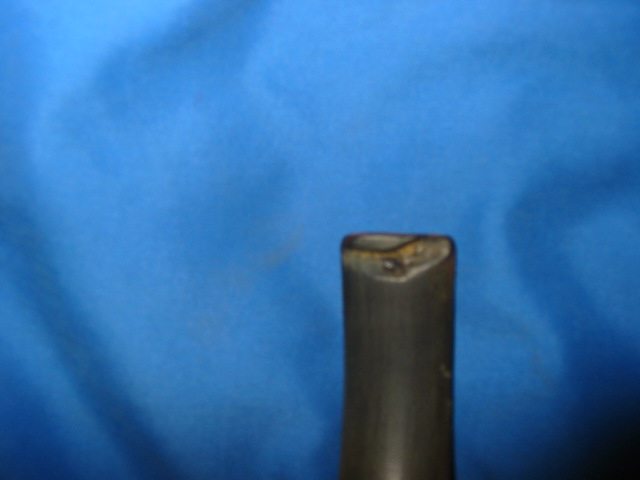
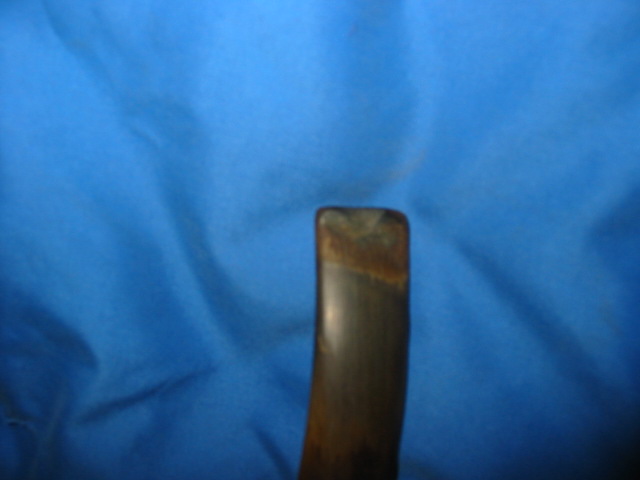
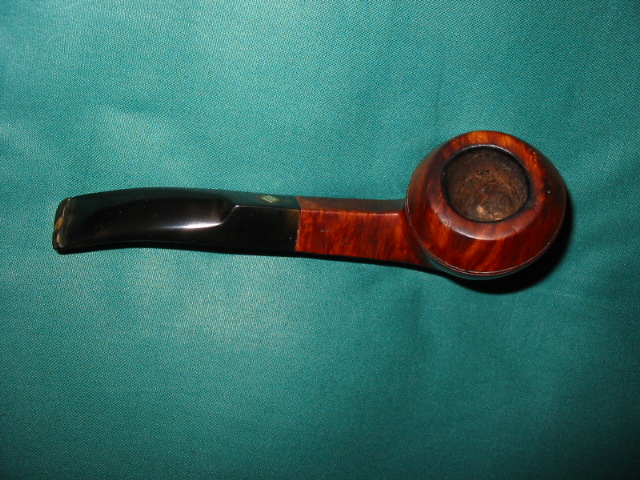
The pipe was in poor condition, having been snapped at the bowl junction where the shank was very thin. Image

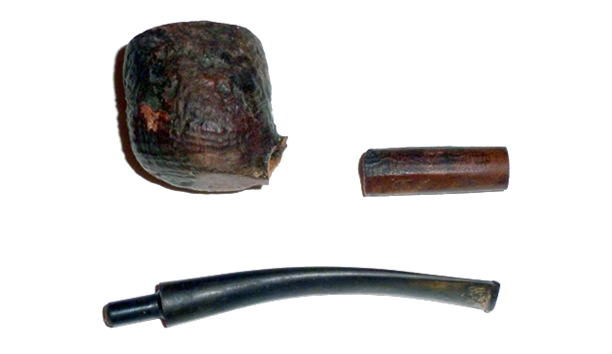
The airway was also drilled off center, which may have contributed to the break. Image

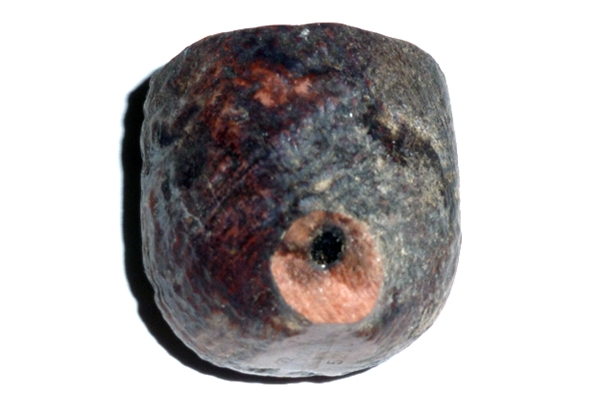
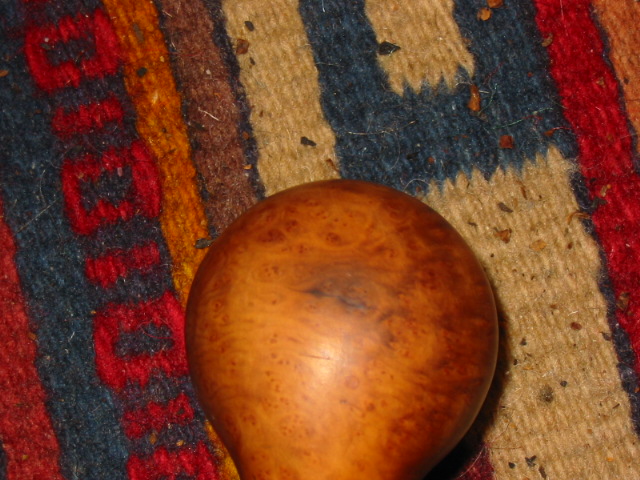
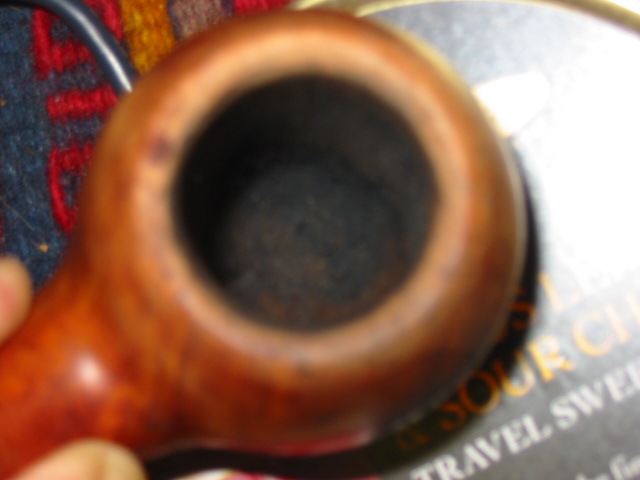
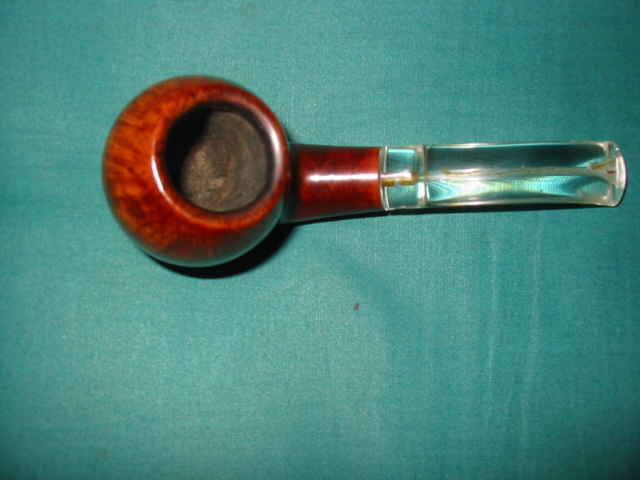
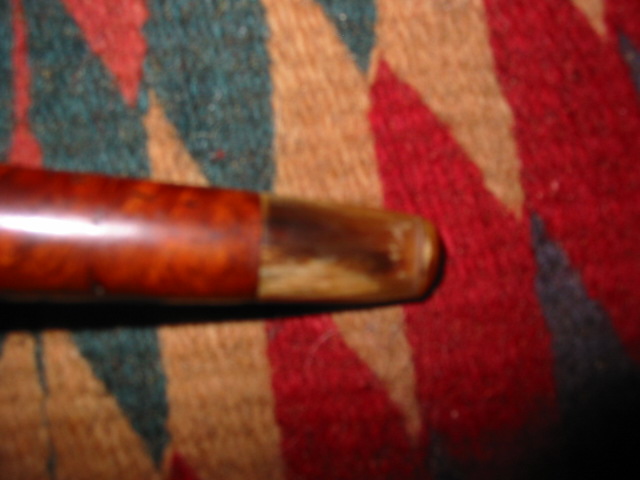
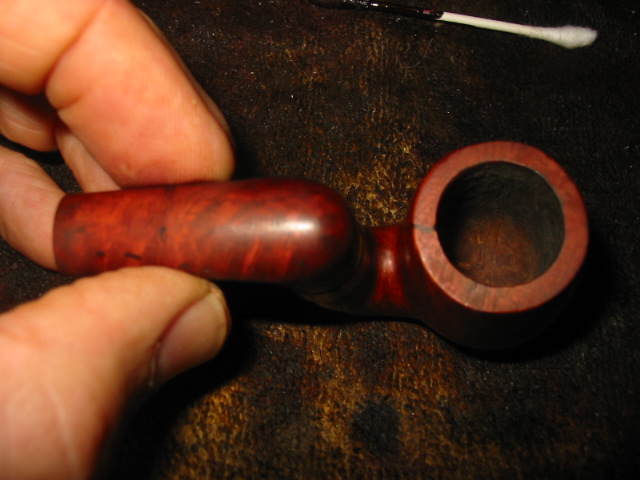
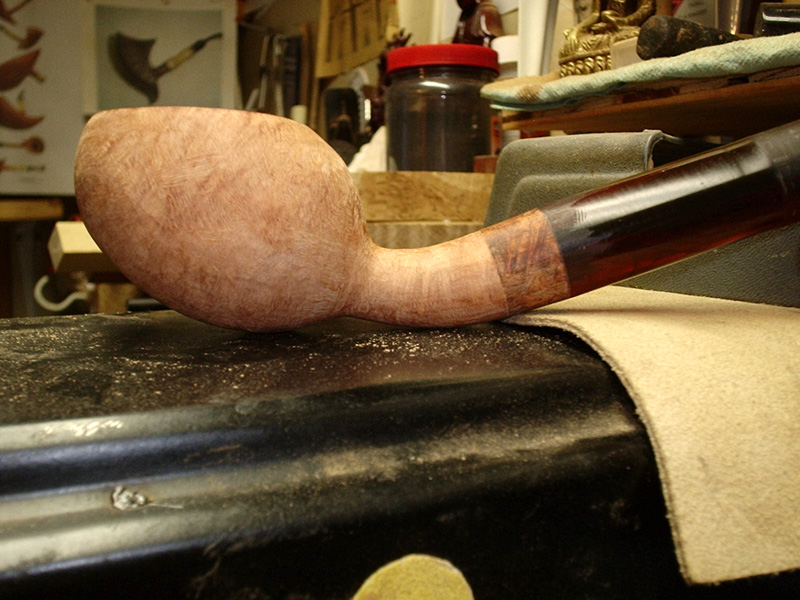
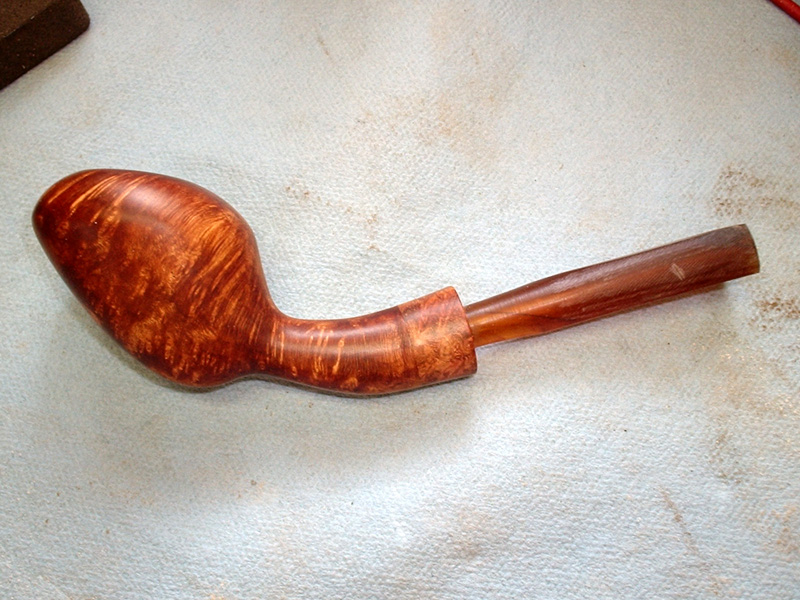
Dirt and grime aside, the bowl chamber was not scorched or heavily caked. The stem had some tooth marks, but was more dirty than oxidized. Image

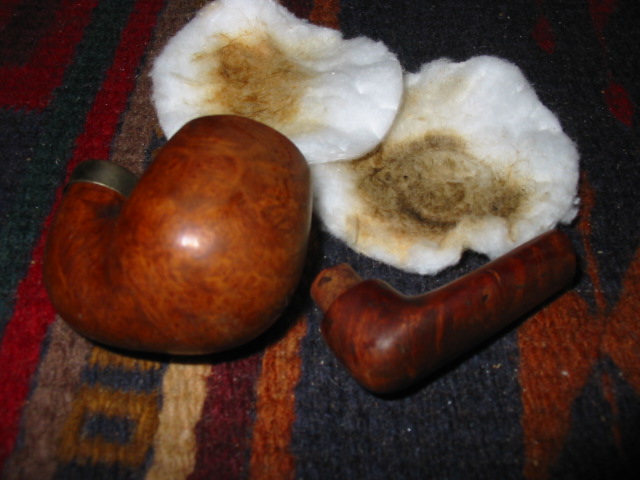
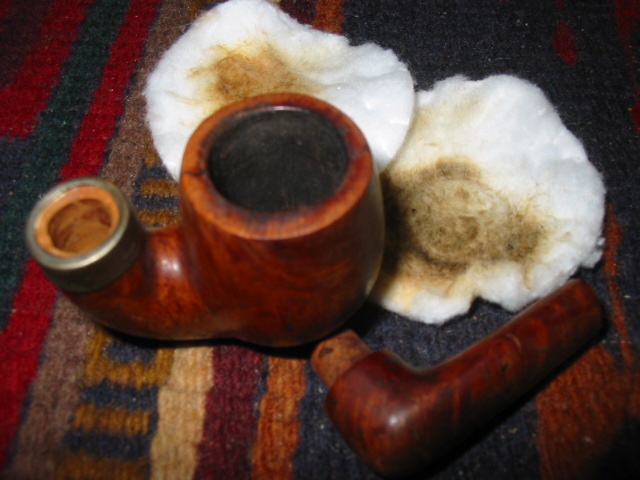
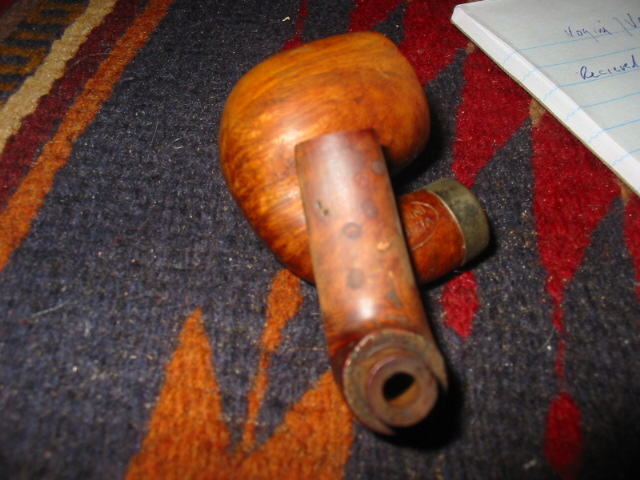
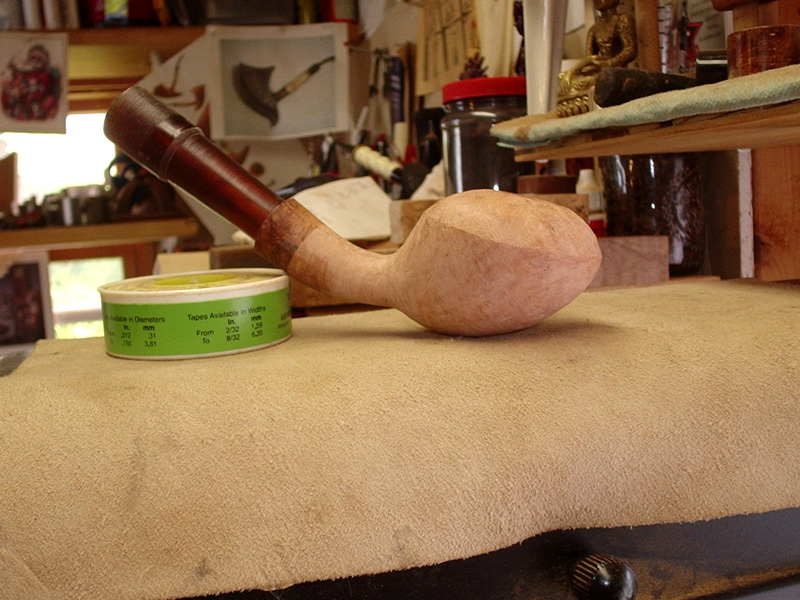
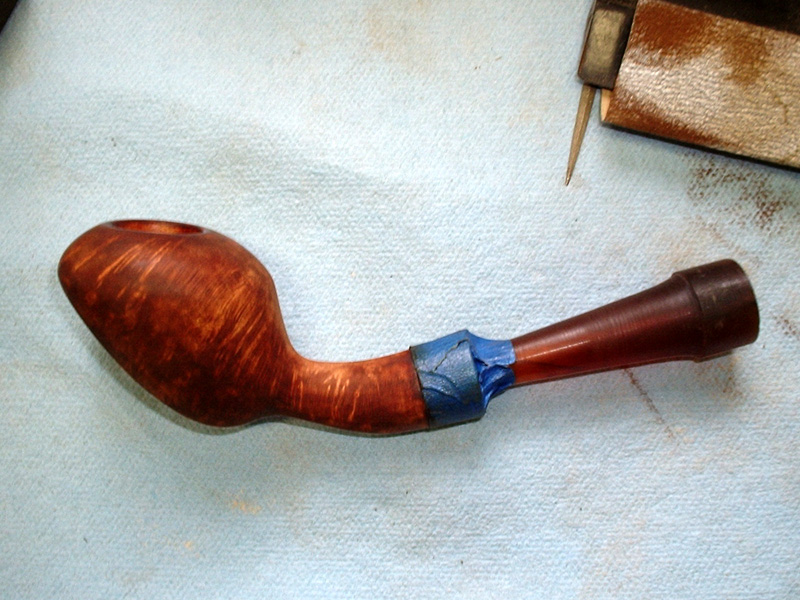
The bowl and shank were placed in my trusty container of 91% Isopropyl alcohol (99% is hard to fine in my neck of the woods) and left to soak for several hours. Meanwhile, the stem went into a bath of Oxy-Clean for 30 minutes, mostly to loosen any residual tars in the airway. Once soaked, pulling several bristle cleaners through the airway was all that was needed to clean out the gunk. After wet scrubbing the exterior with synthetic 0000 wool and Oxy-Clean, the stem was set aside to dry.

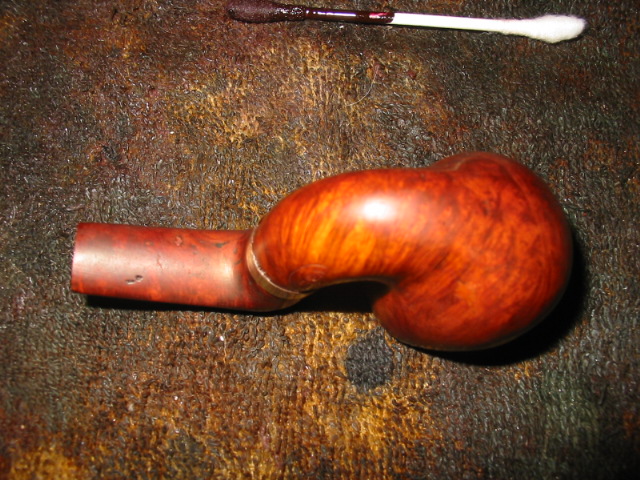
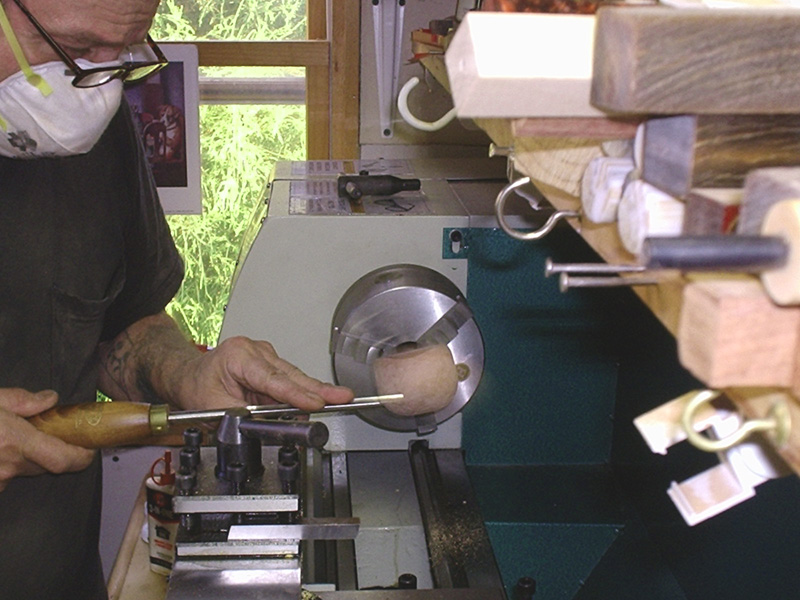
Once the bowl was done soaking, I cleaned the small amount of cake from the bowl with my Senior reamer, dipping the bowl in the bath to rinse out the bits and pieces that came free. Next, the exterior surfaces were scrubbed with the synthetic 0000 wool, working wet with clean alcohol.

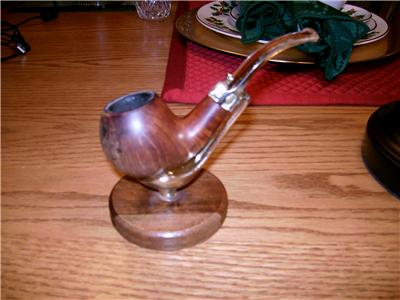
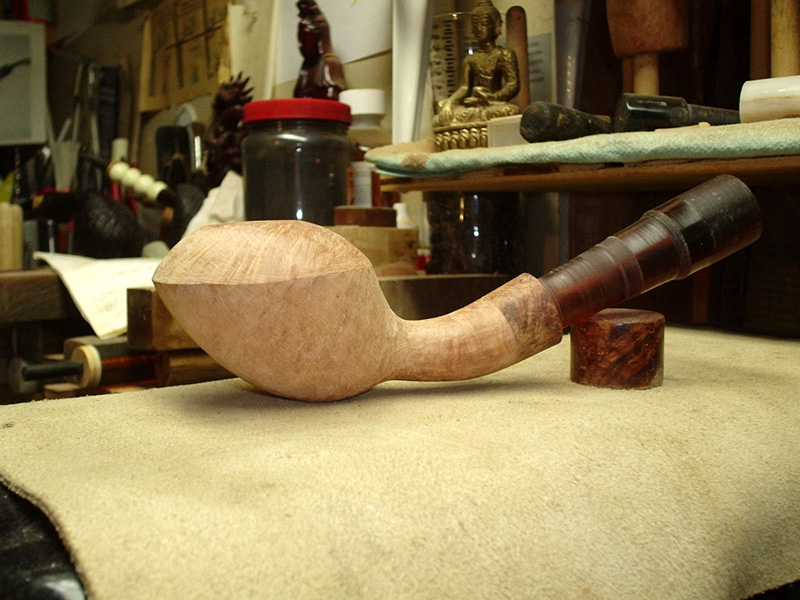
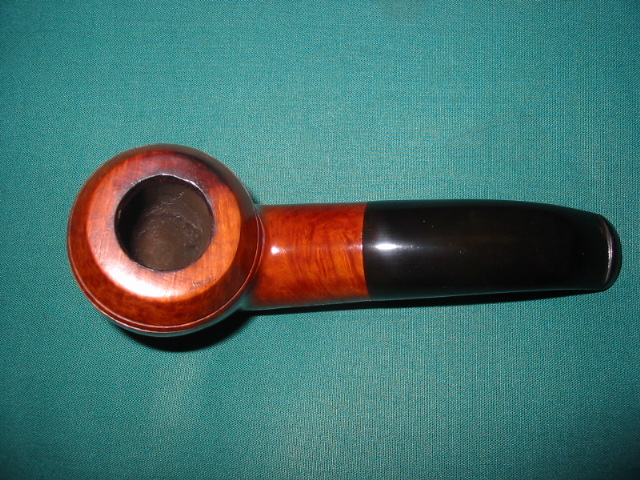
At this point, with the cleaning finished, the Barling was beginning to come back to life. I set the pipe aside for the evening to let everything dry thoroughly before moving on to the bonding phase. Image

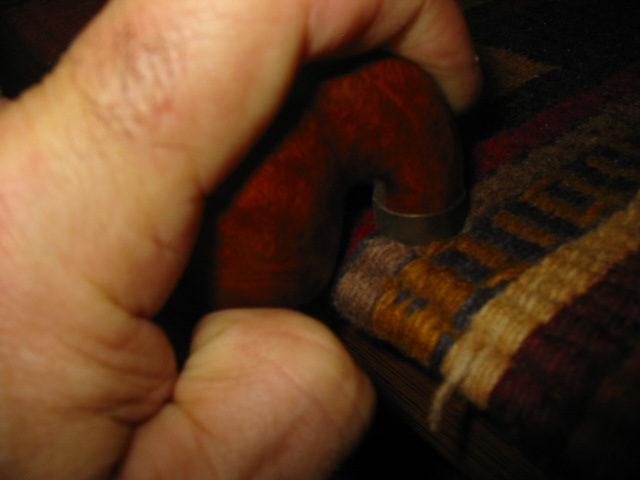
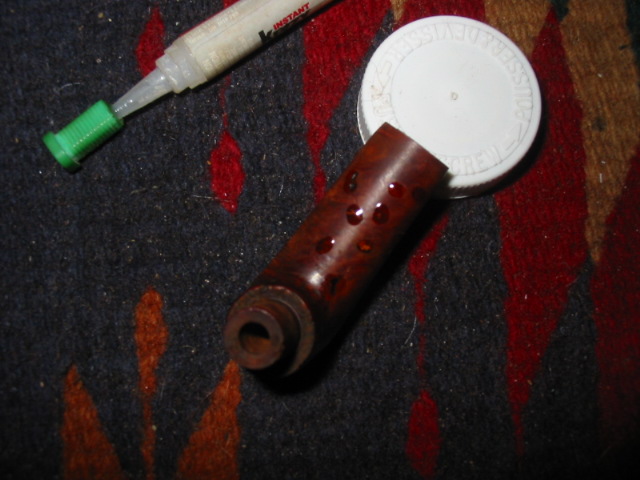
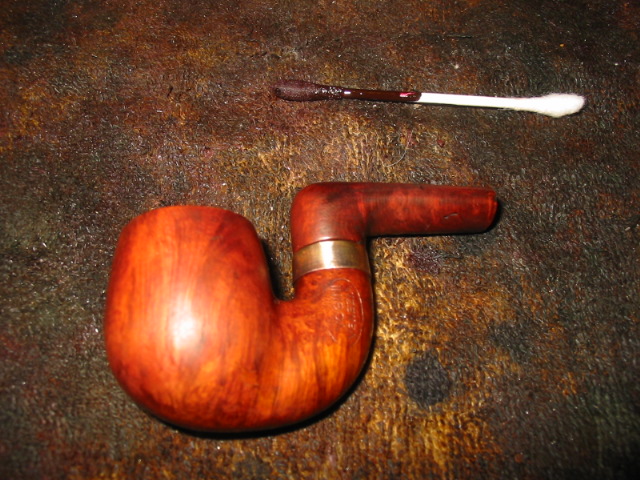
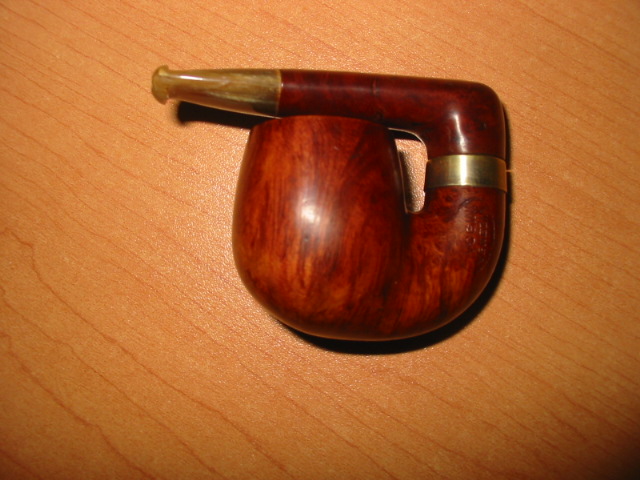
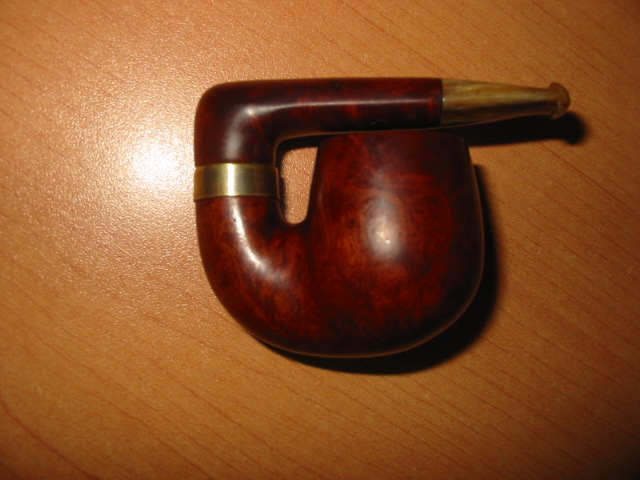
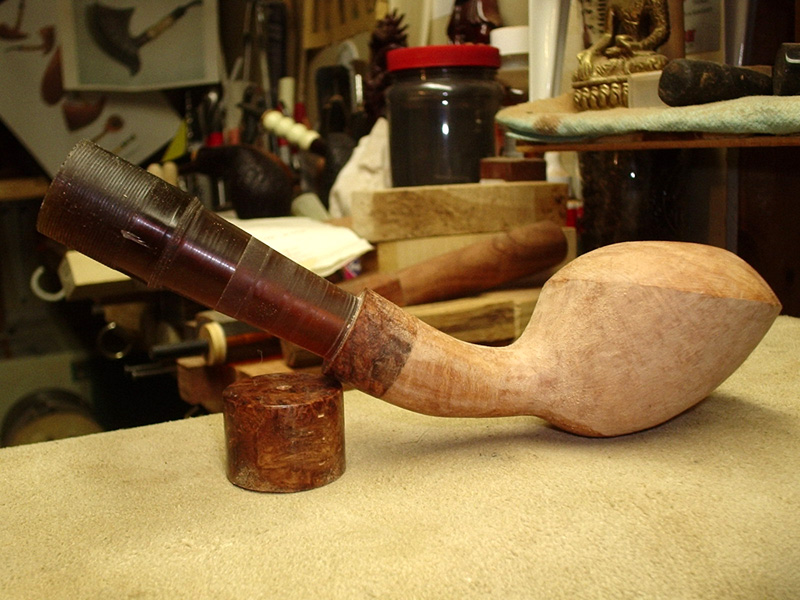
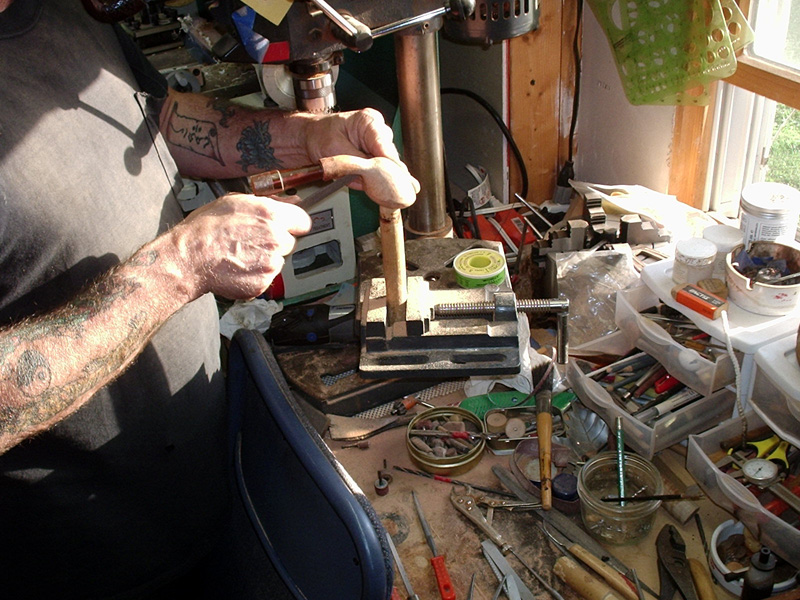
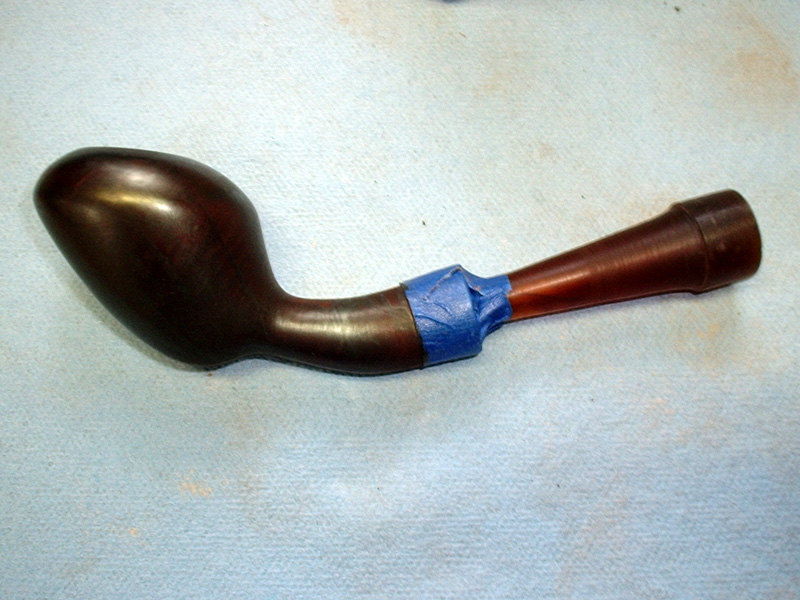
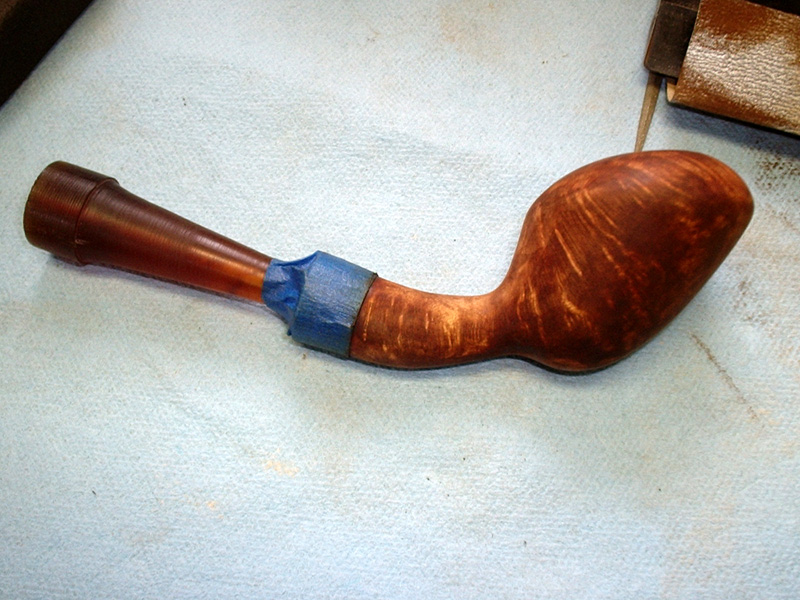
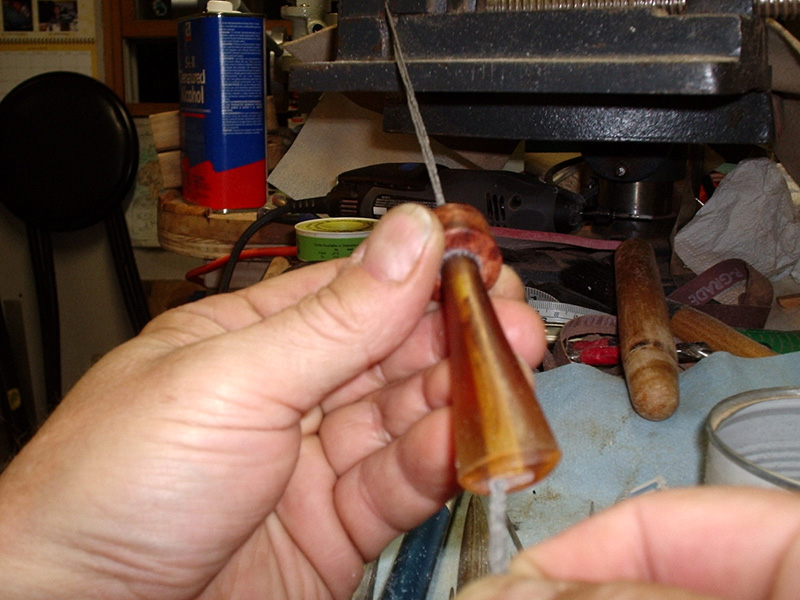
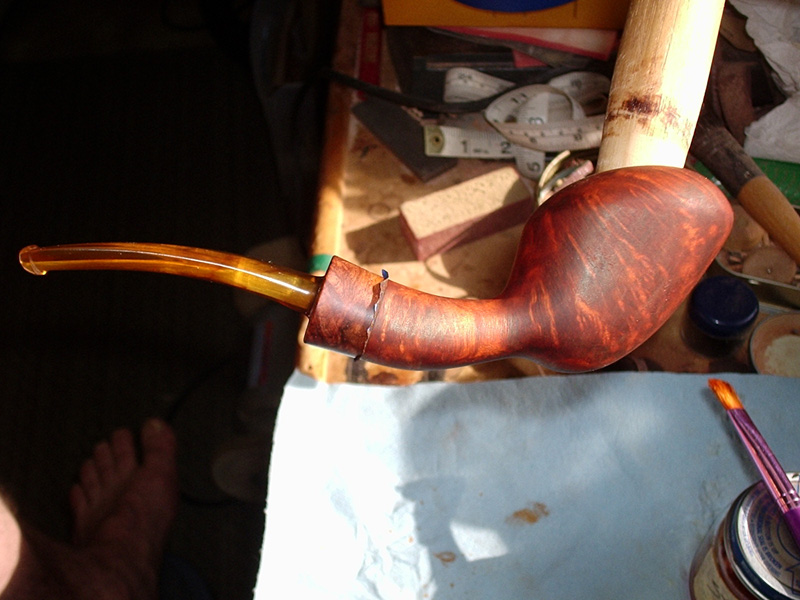
I used my favorite epoxy, JB Kwik to bond the shank back to the bowl. I set the two parts on a clean work surface, aligned as closely as possible, before mixing the epoxy. I applied a thin layer to both surfaces. I pressed the shank and bowl together, taking care to align the fracture, and let as much excess as possible squeeze out to minimize the joint. Hand pressure for three minutes is all that is needed for the initial bond. I then set the bowl down and let it rest for another 7 minutes (approximate). Under ideal temperature, humidity and proportioning, JB Kwik reaches a rubbery stage after 10 minutes.  At this point, I removed the excess epoxy that squeezed from the joint with the tip of a utility knife blade. It peels off like a rubber gasket if you catch it at the right point as it cures. I then used the bit from my Senor reamer to carefully remove any excess epoxy that may have gotten into the airway. Care must be taken to work slowly and with very little pressure, as any leverage against the shank my cause the newly bonded joint to fail. Once the excess epoxy has been removed, I let the stummel cure for at least 6 hours.

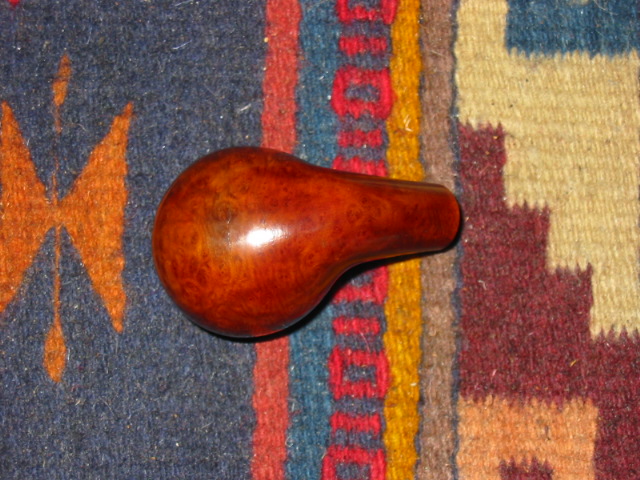
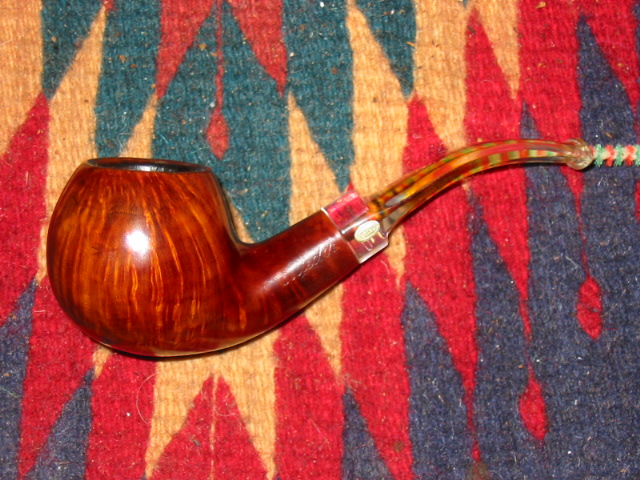
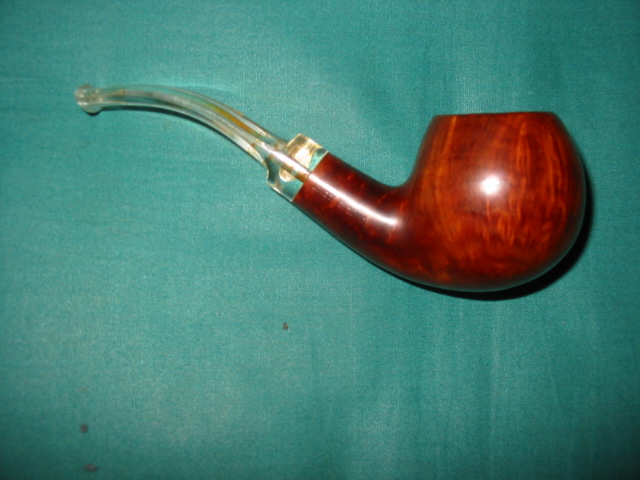
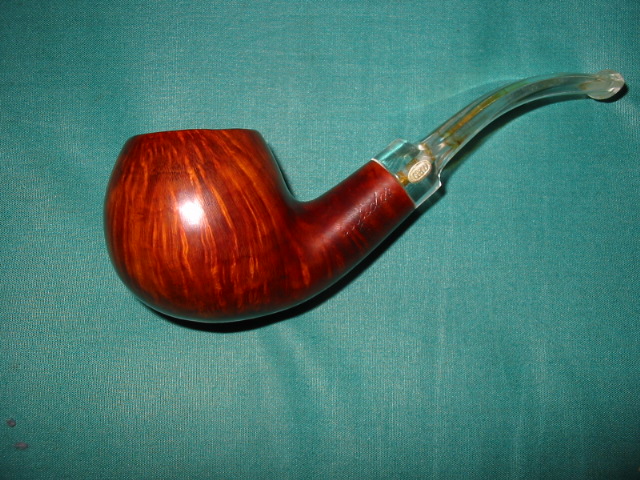
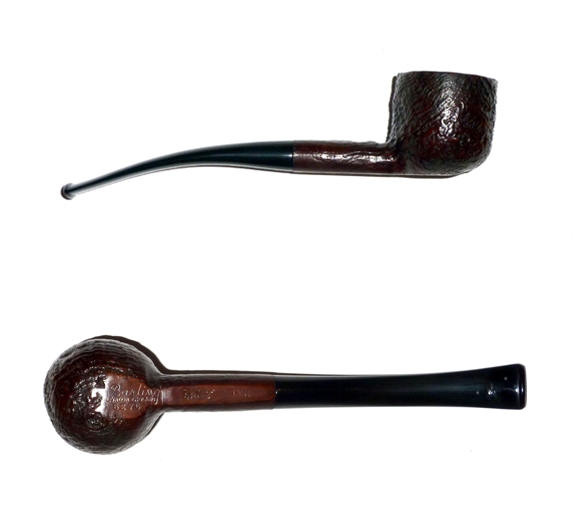
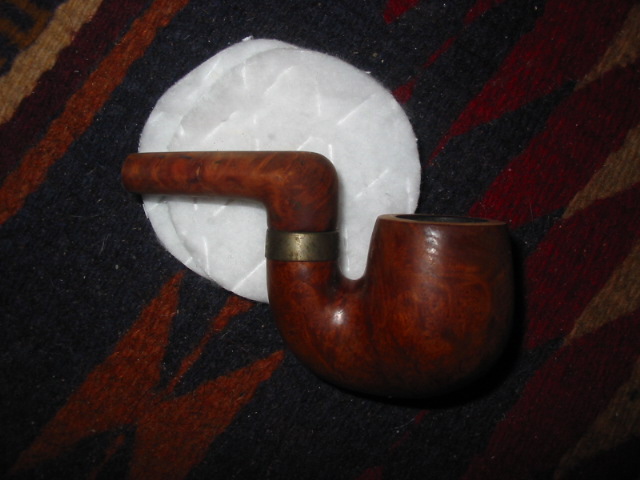
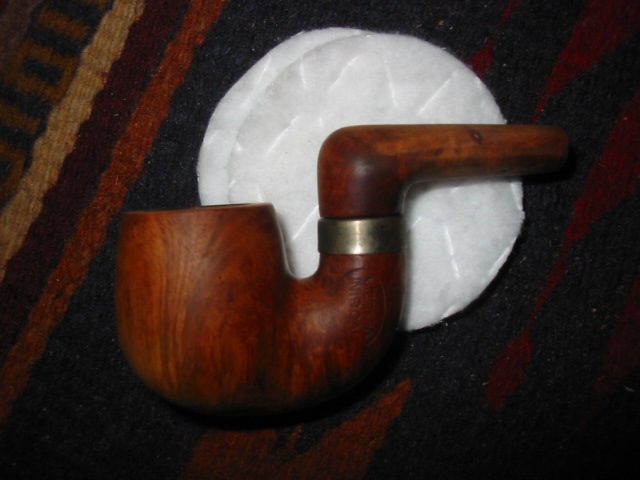
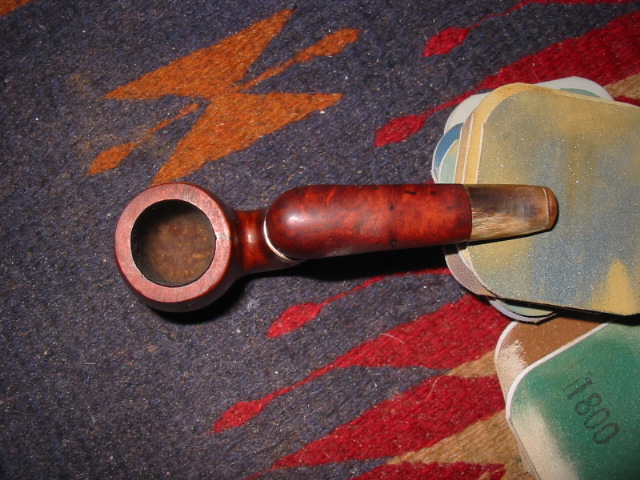
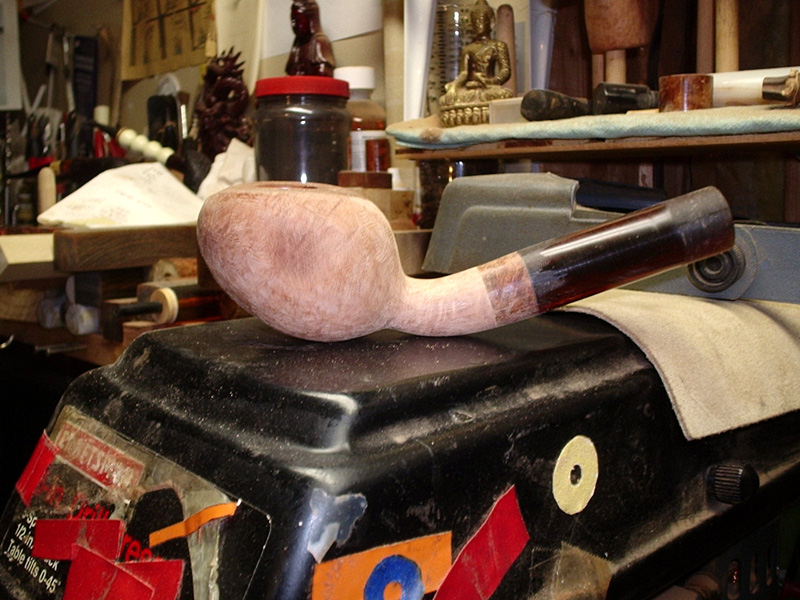
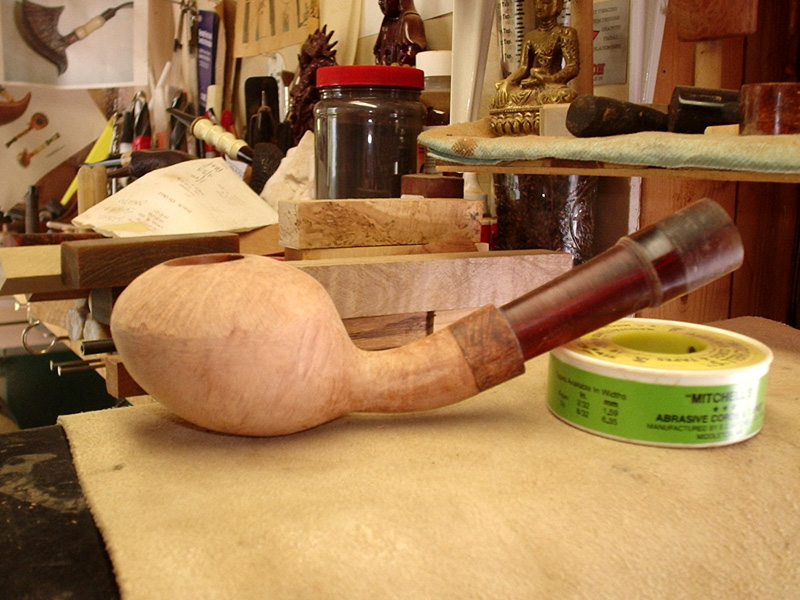
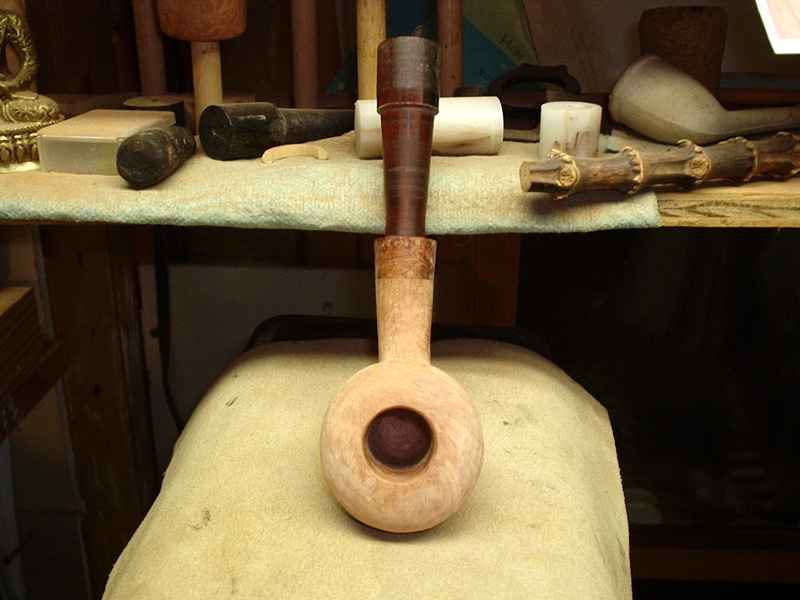
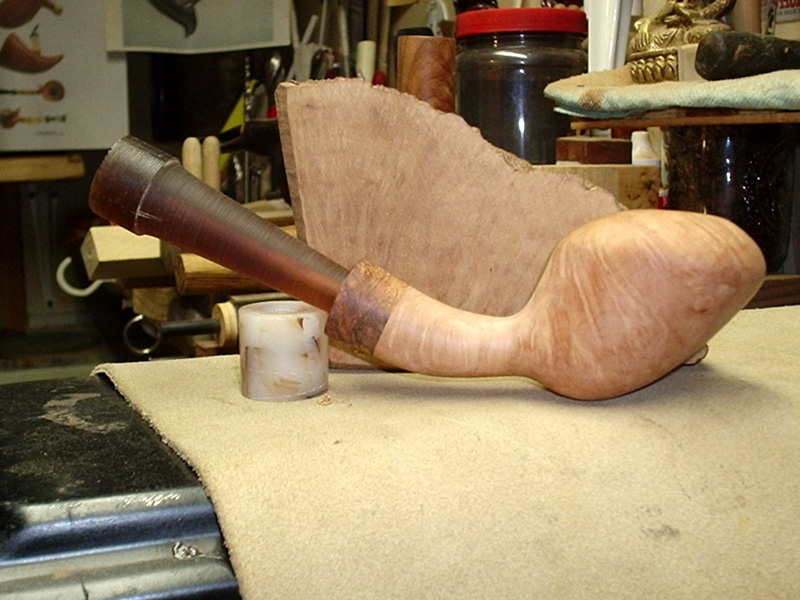
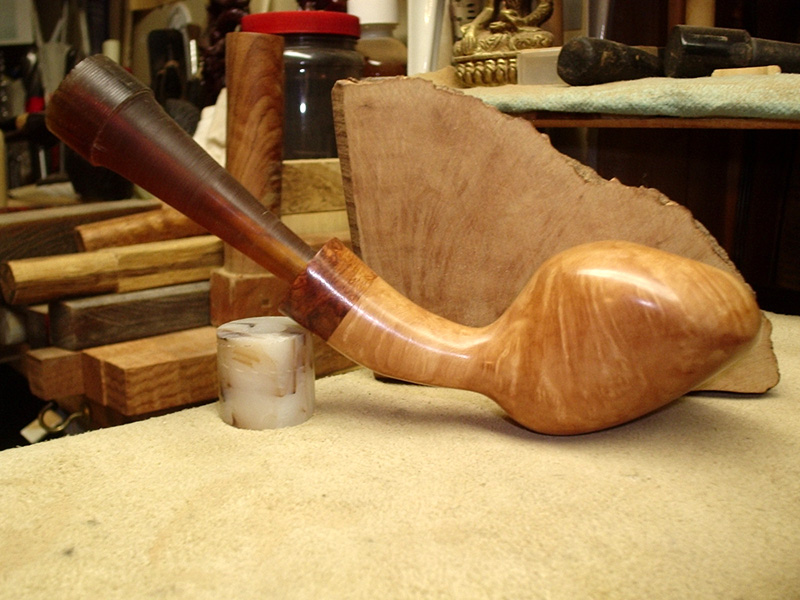
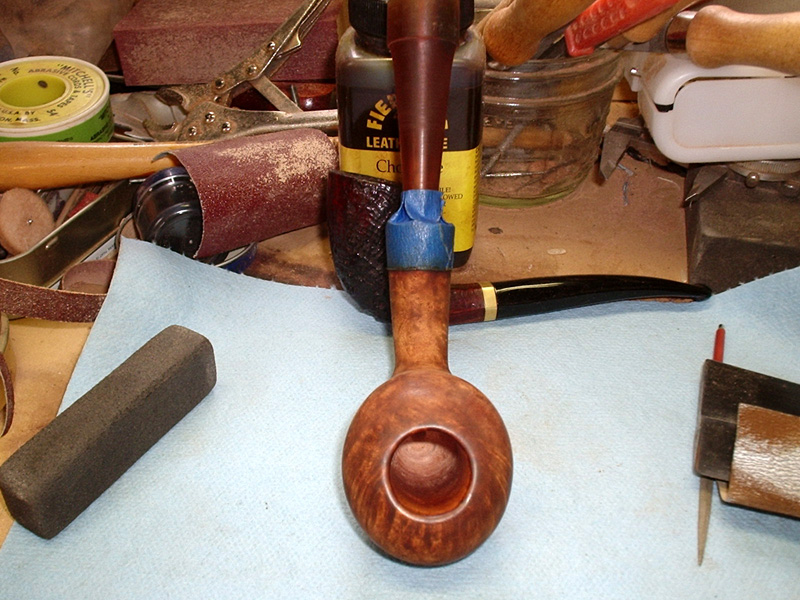
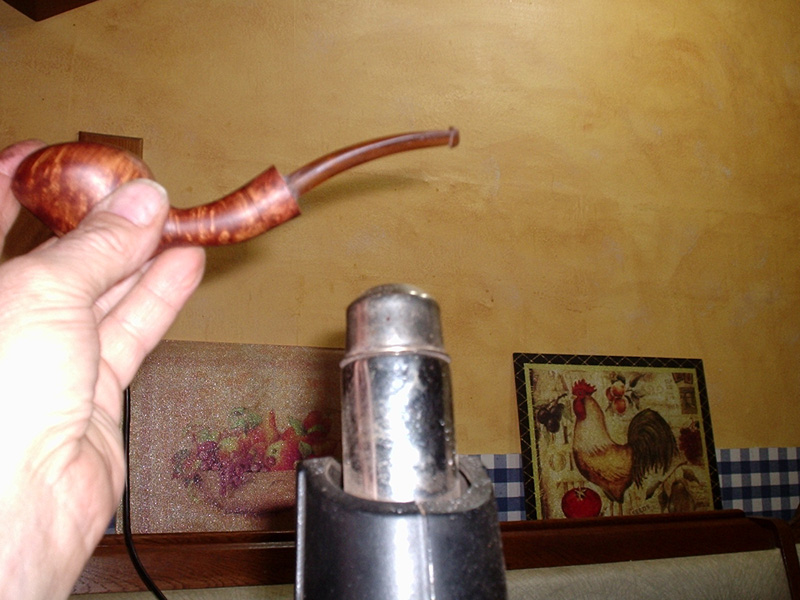
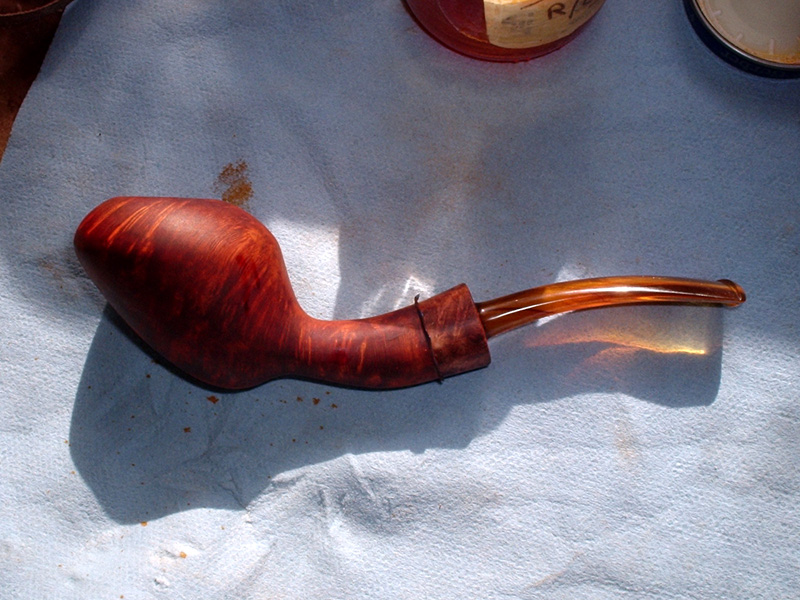
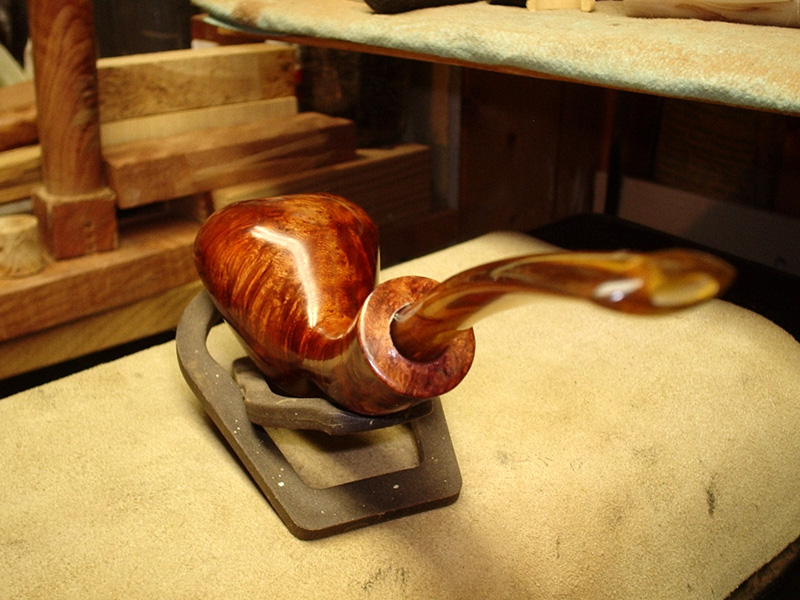
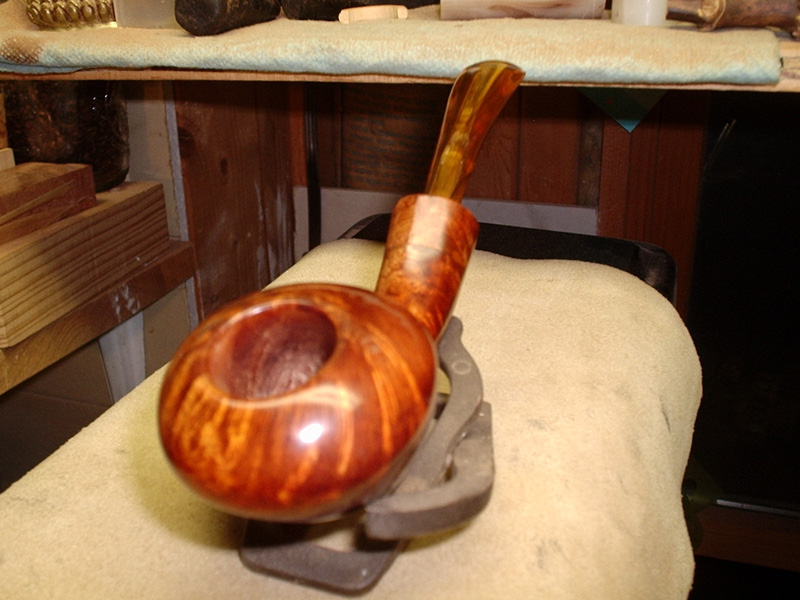
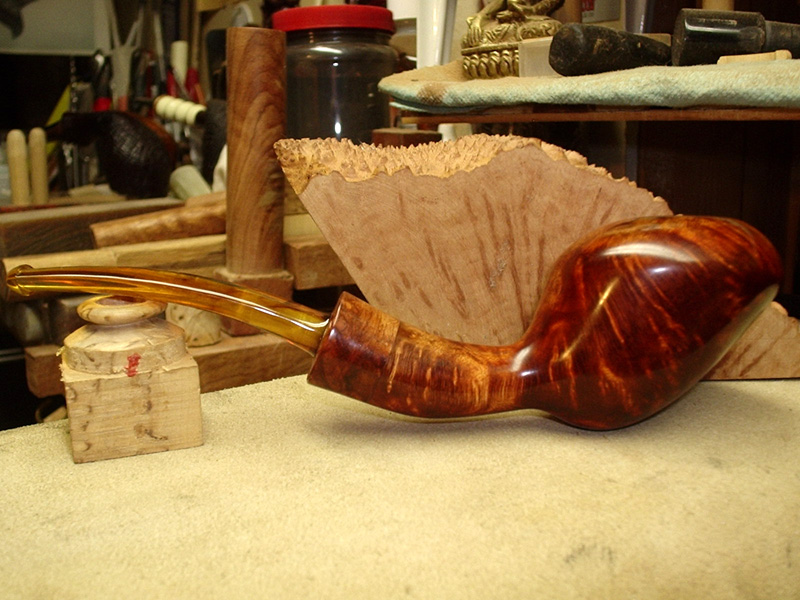
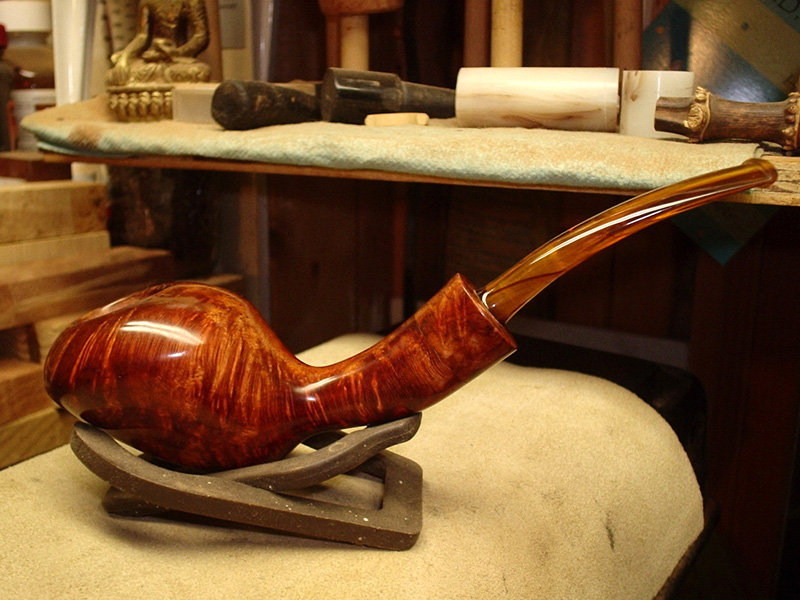
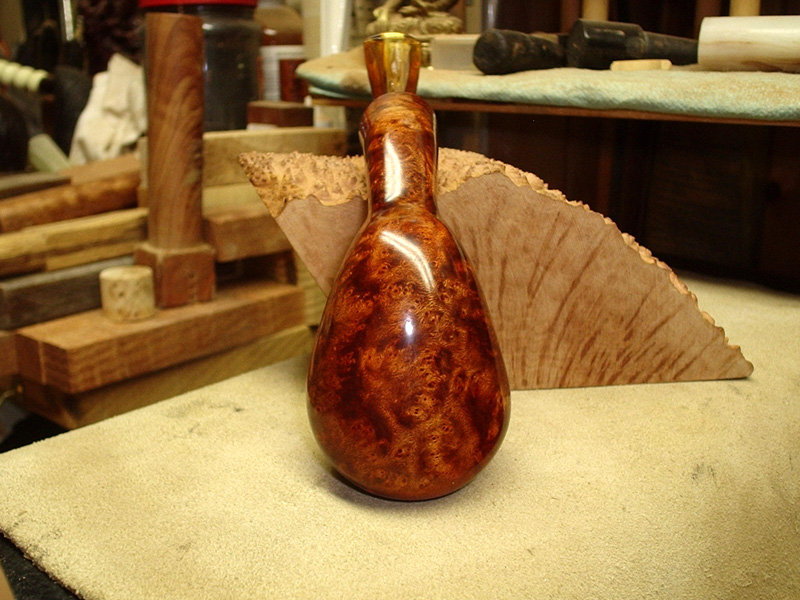
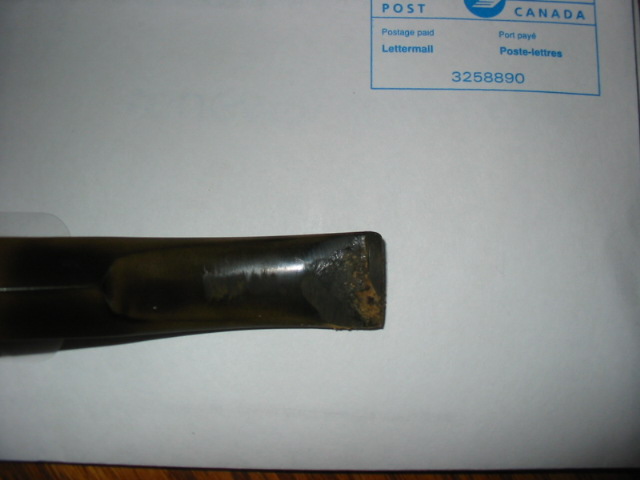
With the pipe joined and epoxy cured, it was time to take the bowl and stem to the buffer for an initial polishing with red rouge. After cleaning any residual compound off with alcohol, the bowl was ready for stain. The stem needed some sanding to clean up the faint scouring from the synthetic 0000 wool. The Barling Cross logo was a faint memory, so conserving it was not a concern. 2×2 flex micro-mesh pads, 1500 through 4000, did the trick.

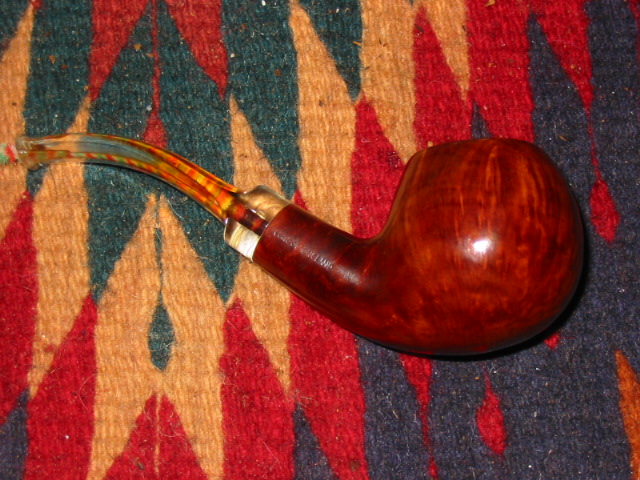
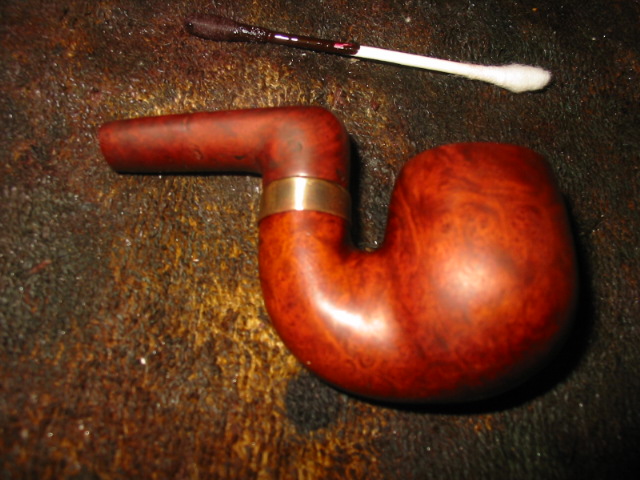
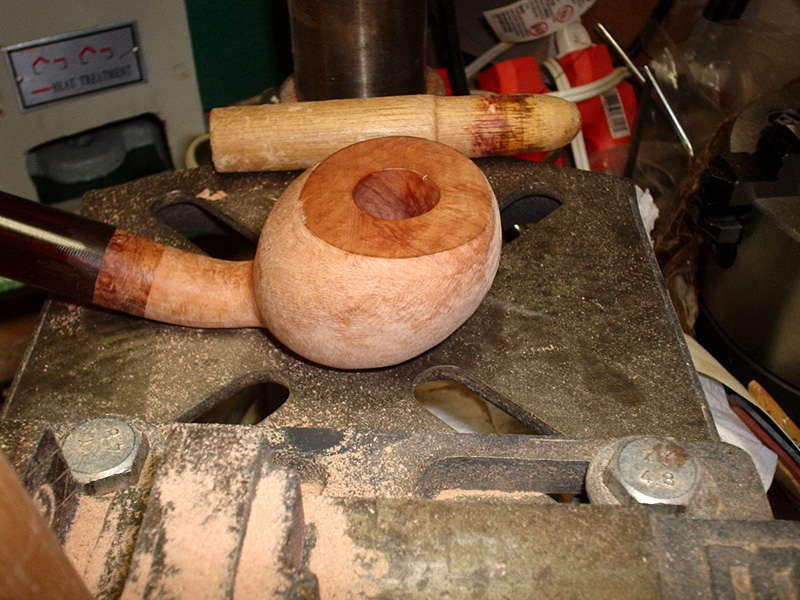
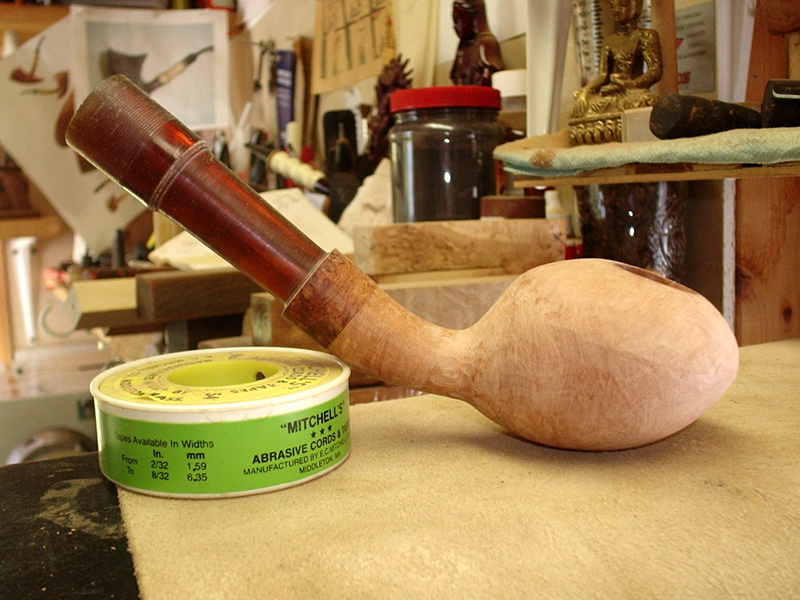
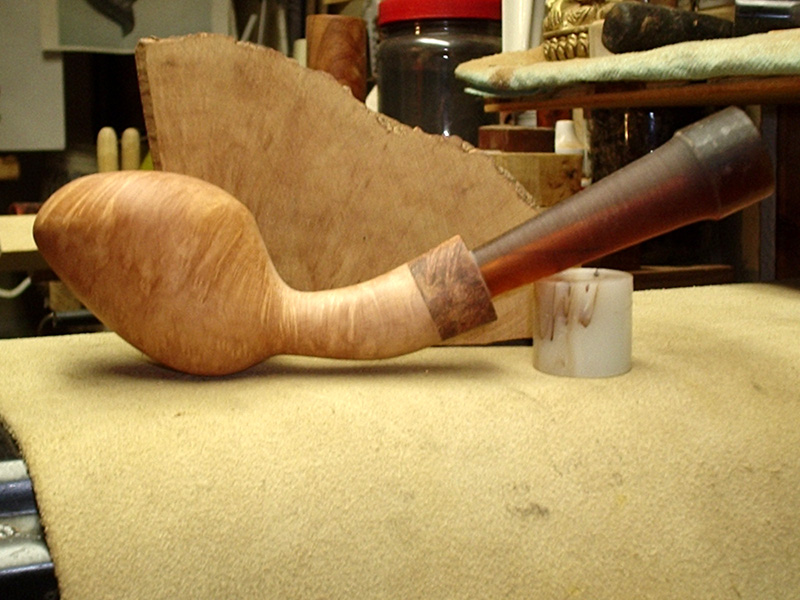
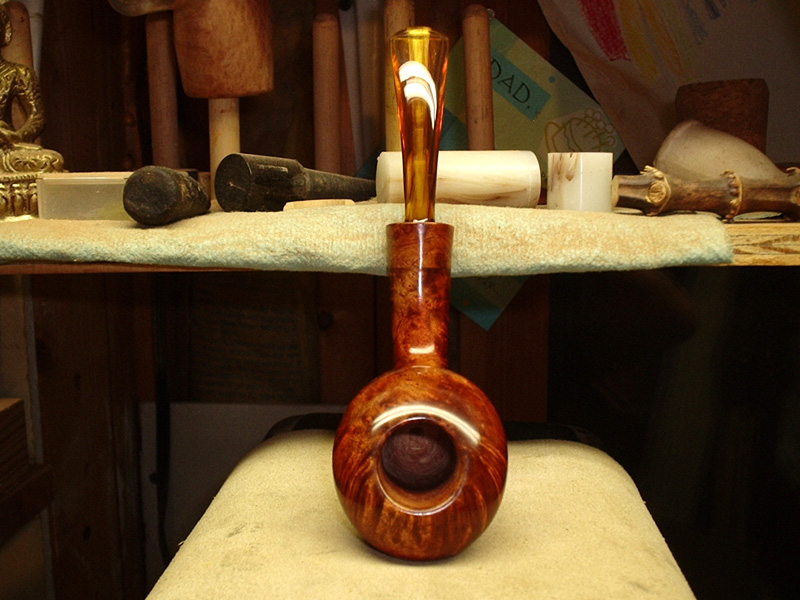
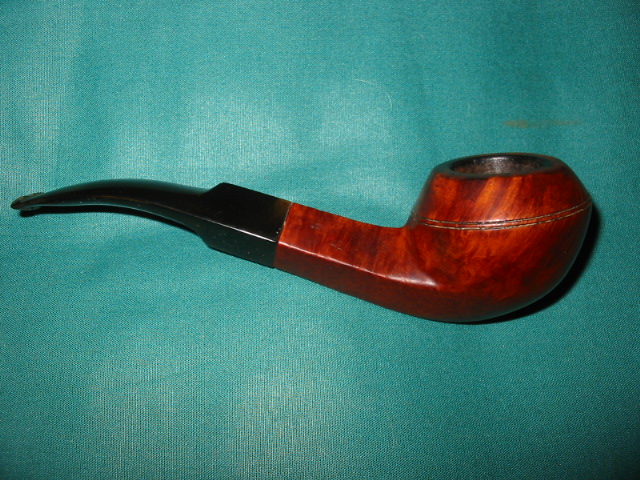
After two wash coats of Feibing’s Medium Brown aniline dye, and spot staining the two rather large fills (sorry, the photos were not usable), I wiped the bowl down vigorously with a micro-fiber cloth and set the stain with a table-top lighter. The micro-fiber cloth works wonders in evening out the coats of dye. Uneven coating or overlap marks blend beautifully when wiped down just after the dye dulls completely.

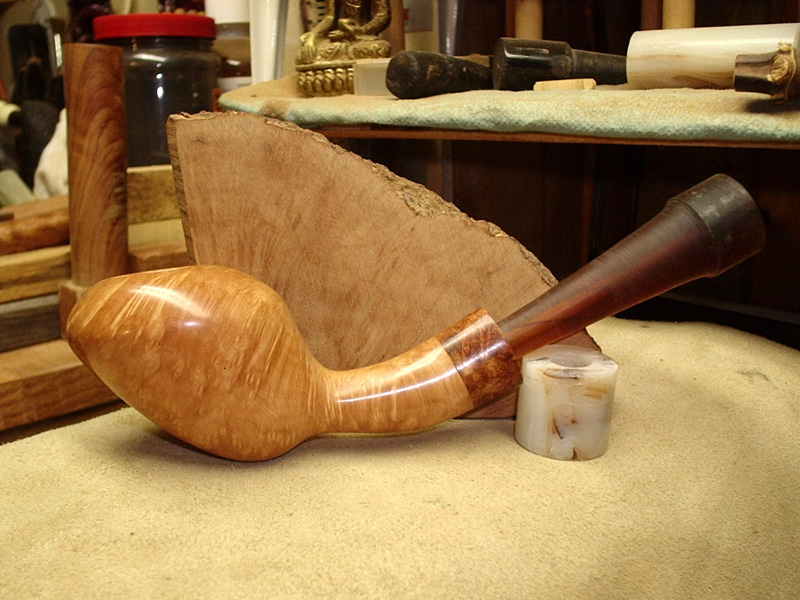
With the stain applied, the fills touched up, and the stem sanded, all that was left was a gentle once-over with white diamond, followed by three coats of carnauba wax on the bowl. The stem received a white diamond buff, followed by two coats of Briar Works Stem Wax and Sealer. I prefer to protect the stem this way, as my saliva tends to react with straight carnauba, leaving an unsightly white stain. ImageImage

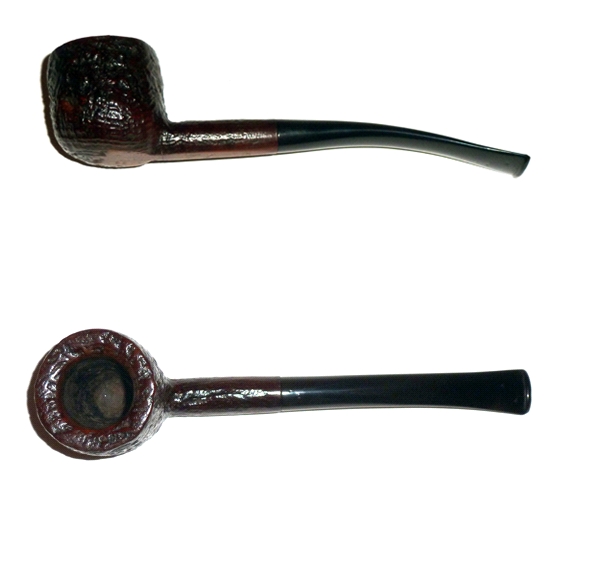
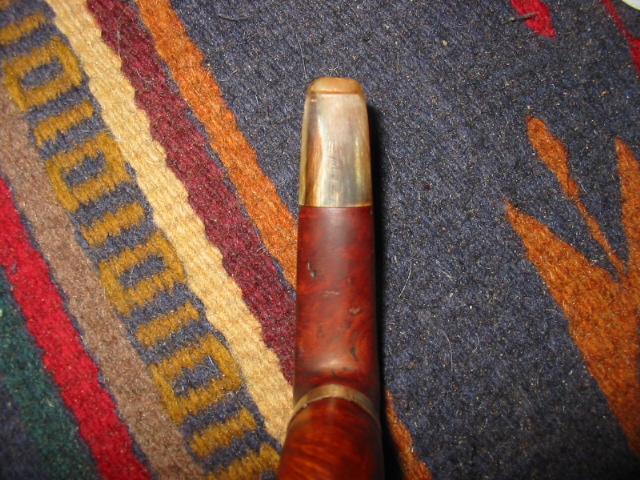
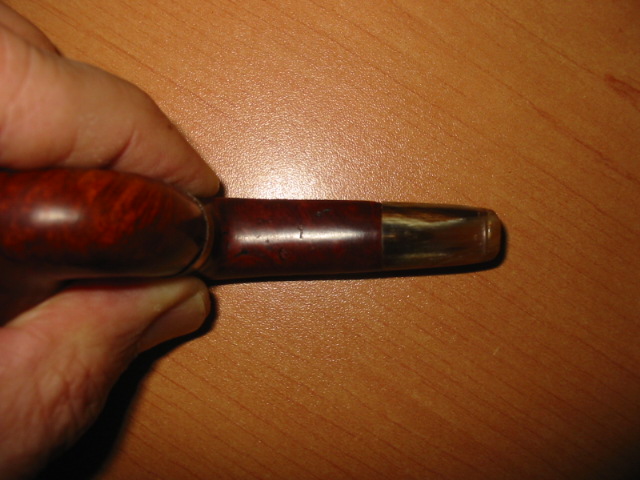
I’ll save the repair of the tooth dents on the stem for a future essay…..

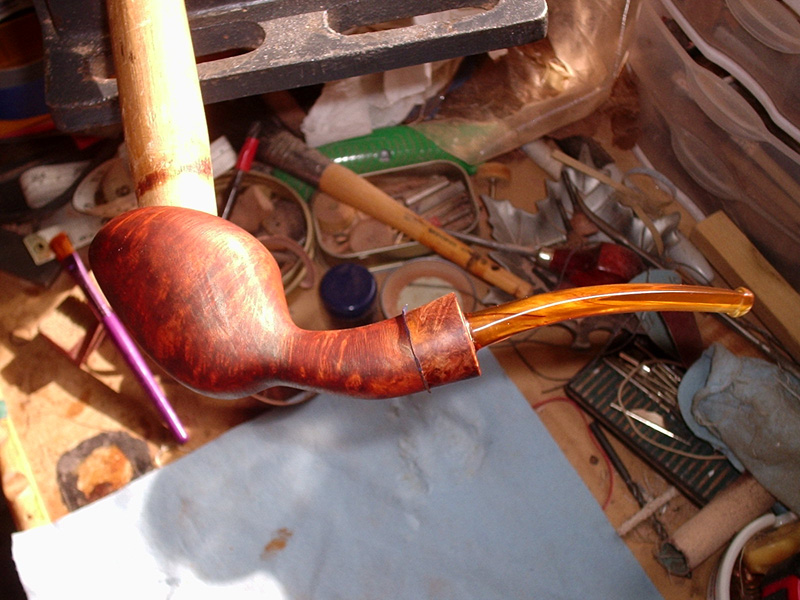
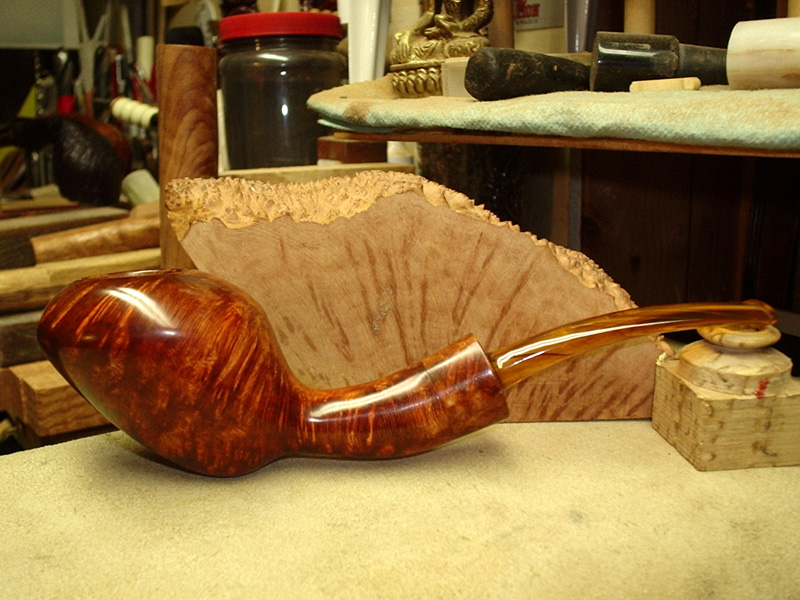
It may be inferior, when compared to the legendary family era Barlings, but it was still fun to resurrect a pipe that could be half a century old. Sandblasted or rusticated pipes are much easier to repair in this manner, as the rough texture tends to hide the repair. The fracture is only evident on the smooth portion of the stem where the nomenclature resides.

Thanks for looking.

-Gan

Chuck’s Gift Pipes Part 1 – a Horn Stemmed Venezia Vogini


Blog by Steve Laug

In celebration of his 1500th post on Smokers Forums, Chuck (Desertpipe) sent me an email regarding some packages that he was going to distribute to three folks on the Forums. Two of them came to the Vancouver area and one went to the East Coast of the US. I refurbished the older Barling that is heading east as a surprise to the new owner. (I posted the refurb on that old pipe on the blog https://rebornpipes.wordpress.com/2012/08/05/new-life-for-an-old-barling/ ) Now the wait for the package to come my way north and into my mail box begins.

Chuck posted on SF that he had mailed out the packages. On 08/23/12 I received this email from him regarding the package coming my way. It seems he has chosen two pipes for me to work on. I look forward to seeing them.

Steve,
Back a decade ago, when I first started getting serious about understanding pipes, I discovered the wonderful world of size. I dawned on me that the size of pipes had radically changed over the course of time, related to the quality, cost and strength of tobacco. I put together quite a collection of pipes from many decades, and also a collection of tobaccos from as many sources and time frames as I could.

The two pipes coming your way are from this collection. The red stemmed pipe will need your magic touch to return to perfect, and I look forward to your take on the restoration. The other is one of my two favorites of this type. It has all the bells and whistles that make one collect very old examples, and I bet it finds a permanent home in your collection.

Enjoy, my Friend,
Chuck

When I received the above email, my curiosity was piqued and I sent him an email asking about the age of the two pipes and this is his response via a reply email.

My best guess…..The red stem is early Redmanol time frame….puts it 1920’s/30’s? 14k gold filled band has no marks to help out.  The horn bit folder (so far beyond cool as to be in a class by itself) is before that, as far as I have been able to trace, turn of the Century or a bit before?

Now I am even more excited to see what the package contains once it arrives. I have a weak spot for older pipes. The tension of the wait increases!

Today, 9/4/2012 Chuck’s gift box arrived. I opened it to find a tin of C&D Opening Night and two nice little old timers. The first is an old WDC bent pot with a Redmanol stem. The other is a folding vest pocket pipe. The shank has a 90 degree bend and the stem is horn. These are going to be great to work on.

I chose to work on the folding vest pocket pipe first. It is stamped Vogini over Venezia in an oval on the upward bend of the bowl to meet the shank. When it arrived the bowl was clean. There were a few scratches on the rim. There were small dents on the left and right side of the bowl. The band was set crooked with the back side lower than the front making a good seat for the shank impossible. The shank is briar and is a 90 degree bent piece. It is very unusual. There were fills on both the top and the underside of the horizontal part of the shank. The stem is a nice piece of horn that is actually quite tiny. It has tooth chatter on the top and the bottom side of the stem. There are two tooth dents on the underside next to the button. The orifice hole in the button is slightly off centre. This is a great looking old timer that should clean up easily and look amazing!

I have done a bit of research and find that the Venezia brand is definitely Italian and is either a Cavicchi mark or La Rocco but not sure which was an early company. The mark may even go back further into history that I am aware and than Who Made That Pipe reports. If any of you have any ideas on the age and provenance of this pipe let me know by posting a comment. Thank you ahead of time for the information. ImageImageImageImageImageImageImageImageImageImage

On the evening it arrived I removed the band from the shank and glued, pressure fit it and reset it at a proper angle to seat the shank correctly. I used carpenters glue to reglue the band. I pressed it on and held it until it was set. I then wiped the bowl down with a cotton pad and acetone to clean off the grime and the remaining finish. I also wiped down the band to remove the oxidation that was built up on it. ImageImageImage

I cleaned off the briar shank and the bowl with some more acetone to remove the finish completely and to clean it so that I could begin to repair the fills in the shank. The first photo below shows the pipe after has been wiped down with acetone completely. I avoid using acetone on horn stems. In pictures 2, 3, and 4 you can clearly see the cotton pads that I use with the acetone to wipe the pipe down. These are circularly pads that I pick up at a local store in the makeup section. They are used to remove makeup but I find them perfect for using with alcohol and acetone wipes. I dampen them with the liquid and then wipe down the surface. The dirty pads in the pictures show the dirt and stain that has been removed from the surface of the pipe. ImageImageImageImage

Once the surface is clean, I picked the pink putty fills from the top and underside of the shank piece. I wanted to refill them with briar dust and super glue (pictures 1 and 2 below show the spots that were filled with the combination). ImageImage

I sanded the filled areas (pictured in the next two photos) until they were smooth dark spots on the surface of the wood using fine and extra fine sanding pads. I continued to sand down the surface of the shank and the bowl until the spots were basically blended into the wood as much as possible. I also sanded the rim and top of the bowl to remove the scratches. The bowl and rim were sanded with micromesh pads 1500-2400 grit. The shank was also sanded with the same grits. Photos 3-4 show that finished look of the spots. Once they were sanded to that point I wiped down the shank piece with a pad and isopropyl alcohol to clean off any remaining dust on the briar. ImageImageImageImage

I set the bowl aside and worked on the stem to remove the tooth chatter and the tooth marks on the underside. Horn is such interesting material to work with. I use a fine grit sanding sponge to remove the chatter and tooth marks. It is flexible so it is easy to conform to the curve of the stem. I also had to use emery cloth (fine grit) to remove the remaining marks left by the tooth dents. ImageImage

I restained the bowl and the shank with an oxblood aniline stain, flamed it and then buffed it with White Diamond to remove opacity of the stain and polish it. I wanted the bowl and stem to match in colour rather than the original look of the darker shank and lighter bowl. I gave the entirety several coats of carnauba wax and a light buff with a flannel pad on the buffer. ImageImageImageImage

From the above pictures you can see the colour of the shank and bowl are pretty close. I needed to do some work on the fit of the shank to the bowl. The briar tenon on that portion of the shank was loose fitting and could easily have fallen out at this point in the cleaning. I used a thin coat of super glue and sanded it down to make it a snug fit. Once the shank had a good flush fit and was snug to the bowl, I sanded it with micromesh pads 8000 and 12,000 grit to give it a shine. I gave it another coat of carnauba wax and set it aside.

ImageImageImage

I gave the tenon on the stem a thin coat of super glue as well and sanded it until the fit was snug. The stem had been loose and easily came out of the shank and would twist from side to side. The superglue made it fit perfectly. I continued to sand the surface of the stem with micromesh pads using the 1500 and 1800 grit pads before buffing it with White diamond. I went on to sand it with the pads from 2400-12,000 grit. Each successive sanding brought more of a shine to the stem. Once it was finished I gave it several coats of carnauba wax and buffed the whole pipe on the buffer to raise the shine. Image

Image

The final pictures were taken this morning (9/5/12) after a quick wipe down with a polishing cloth. The next series of five photos show the pipe with the shank and stem extended and ready to smoke. There are several shots to show the state of the horn stem after the sanding and polish. It has a beautiful natural sheen to it that is amazing and only possible in horn. There is almost a warm glow that seems to come from within the stem. You can see that the super glue patches in the fills and the sandpits are fairly well blended into the shank.  ImageImageImageImageImage

The next series of four photos show the folded pipe ready to be put in the vest pocket and carried with me to the next event where I want to take a small pipe which folds up nicely into a small square and slips into my pocket. The grain on this little pipe is amazing.

I would like to once again thank Chuck for his generous gift of this old timer. I look forward to firing it up and smoking it over the remaining years I am around. I love these unique old timers that add colour and character to my collection. I often wonder what stories they would tell if they could speak. Ah well, I will now add my story to the list of those who have smoked and enjoyed this beauty. ImageImageImageImage

The Birth of a Pipe – A Comissioned Gabrieli Pipe


I contacted Dan Chlebove of Gabrieli Pipes in Bethlehem, Pennsylvania about carving a pipe for me. I wanted something in a shape similar to a Becker Wasp but with Dan’s own take on it. Over the time he worked on it he took these pictures to show me the development of the pipe from the initial drilling until it was finished. I collected the photos and made this photo essay on the birth of a comissioned pipe. I thought some of you would enjoy seeing the process from the initial drilling to the finish.

Image

ImageImageImageImageImageImageImageImageImageImageImageImageImageImageImageImageImageImageImageImageImageImageImageImageImageImageImageImageImageImageImageImageImageImageImageImageImageImageImageImageImageImageImageImageImageImageImageImageImageImageImageImageImageImageImageImageImageImageImageImageImageImageImageImageImageImageImage

Reviving a Genod Shaped like a 9242 GBD


Blog by Steve Laug

When I saw this one on EBay I immediately put in a bid that would make it mine. When it arrived this is what it looked like. The bowl was relatively clean and easy to work on. The rim had a pretty serious burn on the inside and the outside edge of the bowl on the right side. It is visible in the second photo below. The bowl was also slightly out of round due to reaming with a sharp blade. The stem was oxidized and was an uneven brown tone. There were two small tooth marks on the stem one on top near the button with a match on the underside near the button. The first picture is a bit blurry but I include it as it gives an idea of the shape of the pipe and why I compared it to a GBD 9242. This one is stamped Genod on the left side of the shank and on the right side Iwan Ries & Co (in script) over the shape 271. 
Image

Image

I cleaned the bowl and reamed it carefully to remove the carbon build up and uneven cake. I then used sand paper to smooth the inner edges of the bowl and bring it back as closely as possible to round. I topped the bowl minimally to remove the burn damage on the flat surface and minimize it on the outer edge of the bowl. For the most part it came out but left a little darkening on the surface of the rim. The right edge also has some remaining darkening and a small divot out of the edge.  I cleaned the shank with isopropyl alcohol and many pipe cleaners, cotton swabs and a shank brush. I then place the bowl in an alcohol bath to soak while I worked on the stem.

The stem is very hard vulcanite. The tooth dents are more cuts than dents and one day I may fill them with super glue but decided to leave them at this point. I sanded the stem with 400 and 600 grit wet dry sandpaper and water to remove the oxidation. It was not terribly deep so it came off very easily. I then used micromesh sanding pads from 1500-6000 grit to polish the stem. When it was finished I rubbed it down with some Obsidian Oil and set it aside to dry.

I took the bowl out of the alcohol bath and dried it off. I used some medium brown aniline stain mixed 50/50 with isopropyl alcohol to lighten and thin it. I rubbed it on with the dauber and then flamed it and buffed it. I put the stem on it before buffing and gave the entirety a buff with Tripoli and White Diamond. Once it was finished it was given multiple coats of carnauba wax.
Image

Image

Image

Image

Stem Repair and a Makeover on a BBB Bulldog


Blog by Steve Laug

When I saw this old Bulldog on EBay I could not pass it up. It had several things about it that I enjoy – it was a BBB pipe, it was older, and it looked like a challenge as the stem was badly chewed but still retained the shape. In the first three pictures below you can see the overall state of the pipe. The bowl was badly tarred and the finish was ruined, both from the tars and from what appeared to be some water marks. The rim looked to be in bad shape – much buildup of tars and carbon. But as I inspected it I found that there were no dents in the rim. The grain on the pipe showed some promise. The stem fit well and had the stepped down tenon that is on the older BBB’s. The brass logo in the diamond was still pretty clear, a bit worn but still very distinguishable. The button was non-existent and was badly dented by teeth. There was one small bite through on the underside of the stem and the rest were large deep dents. The stem was badly oxidized and in places had a white lime like substance on it. ImageImageImage

I began the clean up by reaming the bowl and then giving it a thorough scrub with Murphy’s Oil Soap and a soft bristle tooth brush. This one took a lot of scrubbing to remove the grime from the rim and the edges of the slop on the bulldog. I also cleaned out the grooves around the bowl with a dental pick. Once the bowl was cleaned I did the inside of the shank and the stem. This took many pipe cleaners and cotton swabs with alcohol as well as a shank brush to scrub it out. I then greased a pipe cleaner with Vaseline and inserted it in the stem and flattened it in the slot so that the whole slot was filled. Once that was done I was ready to start rebuilding the button and the stem surface. ImageImage

The next two photos show what remains of the button and the deep channels gnawed in the underside (first photo) the top of the stem (second photo). I heated the stem with my heat gun to raise the dents as much as possible but truly they were cut and deep so the heat did very little to remedy the situation. ImageImage

With the pipe cleaner and Vaseline inserted in the slot I used super glue to build up the bite marks. The first photo below shows the underside of the stem (remember the bite through and the deep groove in the picture above). I layered in the super glue until the hole and the groove were filled and the button also built up. I rebuilt the top edge as well with the superglue and repaired the button on that edge as well. It was not nearly as damaged as the underside so it took less work to rebuild it with the glue. Image

The next photo shows the patch on the underside once it was dry and I had sanded it with 240 grit sandpaper to remove the ridges and the excess of the super glue. Image

I continued sanding the surface on the underside of the stem and recut the button with my needle files. The photo below shows the underside of the stem after the work is basically finished cutting the button and smoothing the surface of the stem. Image

With the top of the stem I also sanded it with 240 grit sandpaper and worked through the 400 and 600 wet dry sandpaper and water to smooth the surface and rebuild the button. I used the needle files to cut the lip on the button and sharpen the profile in the same manner as the underside photos above. Somehow the photos I took of the top side of the stem did not turn out so they are not included in the article. Suffice it to say that the work was the same on both the top side and the underside of the stem.

The next series of three photos shows the pipe when it was completed. The bowl was restained with a medium brown aniline stain and flamed to set it. Then it was buffed with Tripoli and White Diamond to polish it. The stem was cleaned with Oxyclean and sanded with 400, 660 and 1200 wet dry sandpaper and water. I left the area around the stem logo as I did not want to damage the metal logo. The work done on this stem was done before I “found out” about micromesh sanding pads. I will have to rework the stem when I take this pipe out the next tim and clean it up around the logo with the micromesh pads. They are perfect for the angles of the logo and it should be much simpler to clean up. Notice the top of the stem in the third photo and the profile of the button on the first two photos. The stem is fully functional and smokes absolutely great. The button is comfortable in the mouth and the bites and dents are not visible. ImageImageImage

GoedeWaagen Ceramic Double-walled Pipe Restemmed


Blog by Steve Laug

I picked this old ceramic double-walled pipe up at an antique shop. The thing that attracted me to it was the amber stem. Or at least it appeared to be amber. The stem was taped to the shank with scotch tape and the bowl was badly caked with thick tars and carbon. The outside of the bowl was spotty with grime and grease. There were fingerprints all over the grime. The stem was blackened on the inside and showed stain through the airway and button. The bowl was cream coloured porcelain under the grime and had a Delft blue Dutch windmill on the front and smaller ones on the horizon around the bowl. The bottom edge of the bowl and part way up the sides was had blue lines and shadows drawn in to look like a canal with the windmills on the other side of the water. Behind and above the windmills clouds and sky had been stylized into the scene. The entirety had been glazed with a clear glaze over the pipe. With a little work this might very well turn out to be a beautiful pipe.

When I brought it home to work on it there was quite a bit to do to clean it up. I removed the scotch tape from the stem and shank and the stem dropped out of the shank on the work table. It had a metal screw tenon that was clogged and badly bent. I was able to remove the screw tenon from the stem with a pair of needle nose pliers. It was threaded into the stem so with a little effort I was able to unscrew it. The stem was indeed amber and as the screw tenon came out a small flake of amber came with it. I cleaned the airway on the stem with isopropyl alcohol, pipe cleaners and a shank brush. I scrubbed the button and slot to remove the blackening that was built up on it. I then removed the scotch tape from the shank using some acetone to soften the glue. It came off easily. The gold coloured band is stamped GoedeWaagen Made in Holland. I cleaned the band and polished it. I used a dental pick to remove the broken cork that was inside the shank. It was glued it and it was brittle. It came away with a bit of work. I used cotton swabs to clean out the shank. In the bottom of the shank was a metal piece that originally had been on the end of the cork insert and slid below the inner bowl of the double-walled pipe. I scrubbed the bowl with hot water and repeatedly ran water through it to loosen the buildup of tars inside between the walls. I scrubbed the outside of the bowl while I was washing it and was able to remove all of the grim. The remaining patina and coloration of the bowl is similar to a meer.

I decided to replace the original tenon with a Delrin pushpull tenon. That sound like an easy swap but it was not that simple. The tenon that was in the pipe was very small and the threads were fine. The new Delrin tenon was ¼ inch in diameter and was a good open draw. I drilled the amber very carefully with 3/16 inch drill bit to remove the threads and then a ¼ inch drill bit to open it up. I used a cordless drill that I adjusted to a slow speed and gently opened up the amber to ¼ inch. I took it back to the work table and used a tap to thread the newly drilled opening. Once that was clean and open I screwed in the new tenon and the stem was good to go. I cleaned up the tenon and stem junction and sanded it smooth so that the fit was smooth and transitionless.

Then it was time to figure out how to work on the mortise. I did a bit of searching to see if I could find what the original mortise looked like when it was new. There was nothing that I could find to make the job a bit easier. So I began to work through some options. I had a wine cork that I kept here so I thought that might be a good base to begin with. I drilled the cork with a ¼ inch drill bit so that the airway through it would be open and easy to work with.

I screwed in the Delrin mortis portion of the push pull tenon on one end of the cork and threaded in the metal tip in the other end. I then took my Dremel to the cork to reduce the size of the cork. I removed the outside of the cork with the sanding drum until it was as close as I could get with the Dremel. I then sanded the cork with a folded piece of emery cloth until it was almost perfect. I unscrewed the metal tip and measured the depth of the shank so that the cork plus the tip would end up with the tip just below the air hole in the bottom of the bowl. I cut the cork with an art knife that was sharp until it was the correct length. Then I used my sanding board to level the cork so that when the metal tip was in it would sit smoothly. It took a bit of sanding but once it was done I reinserted the metal tip.

With the cork the right length and ready to insert I needed to fine tune the fit. I decided to stabilize the cork around the metal tip and the Delrin insert as I did not want it to break when I inserted in the shank. I used super glue to stabilize the cork. I then sanded the cork by hand with the folded emery paper until it was round and smooth. I wanted it to be a tight pressure fit in the shank. From what I could read the cork insert was put in and left until the pipe smoker decided to remove it to clean it. Then a new cork would be used to replace it. I decided to keep that tradition. 

Once the cork fit correctly, I greased it with some Vaseline jelly and fit it in the shank. I was able to easily press it in place. When I was level with the end of the shank I use a ball point pen to set it a bit deeper to receive the tenon with a slight bevel.

I pushed in the stem and aligned it and the fit was absolutely perfect! I polished the bowl and the stem with a quick buff of White Diamond and then gave the entirety several coats of carnauba wax to protect it.

A Pair of Doodlers Restemmed


I picked up these two Doodler bowls that needed stemming. They were made by Tracy Mincer of Custom Bilt fame. They are unique in the pipe world, and often have been copied by others. The basic design involves deep grooves cut into the bowl and then holes drill from the rim to the bottom of the pipe. These tubes around the bowl and the open grooves are designed to cool the bowl as the pipe is smoked and deliver a cool dry smoke. These two were a mess when they arrived and need quite a bit of work. The shanks on both bowls were crack with hairlines crack in several places. They required gluing with super glue and then a pressure fit nickel band on each one. The bowls were reamed and cleaned and then restained with a medium brown aniline stain. I buffed them both with Tripoli and White Diamond to polish them.

I took two stems out of my can of stems – one a saddle and one a taper stem. I used the PIMO tool to turn the tenons to fit the shank. Then I used my Dremel to fit the stem to the shank. I took off the extra material until it was the same diameter as the shank. I used a variety of sandpapers to bring the stem down to the perfect fit. I used 400 and 600 grit wet dry sandpaper and water to remove all of the scratches. I used Micromesh from 1500-6000 grit to polish and smooth the stem. Both pipes and stems were polished with carnauba wax and a soft flannel buff. ImageImage

Explanation of Various Sandpapers I use for Stem Work


Blog by Steve Laug

ImageI thought it might be helpful to take some time to address the issue of sandpapers and sanding with regard to the work I do on stems both in removing oxidation and the removal of tooth chatter. I found a great chart on the grits of sandpapers that will help explain the designation system I refer to when I speak of various grits of sandpaper.

When I start on stem that are highly oxidized I use the CAMI (or US Standard system) 240 grit sandpaper. This is the crossover grit between the medium grit sandpapers and the fine grit sandpapers. 280 grit is the first fine grit sandpaper and 220 grit is the last medium grit sandpaper. The 240 grit works very well in removing the surface oxidation and also tooth chatter and tooth dents that have been raised to the surface. I always sand with this paper in vertical direction from the tenon to the button. I have learned that to sand the horizontal direction leaves scratches that are deeper and much harder to remove with the finer grits of sandpaper.

From that point on I have used 320 and 340 fine grit sandpaper but will often skip ahead to 400 grit wet dry sandpaper that works well with or without water. I personally use it with water – wetting the stem and then sanding the scratches left by the 240 grit sandpaper. I begin sanding in a vertical direction up and down the stem and finish sanding the stem in the horizontal direction around the stem from tenon to button. This sanding removes much of the scratching and prepares the stem for further sanding with finer grit papers.

I skip to the 600 grit wet dry sandpaper next to keep refining the sanding of the scratches. By this point the stem is a matte black and clean of most of oxidation. Again I use the paper wet. I wet the stem and sand both vertically and horizontally. I finish the sanding horizontally before moving on to the next grit. If it is available to me I use 1200 grit wet dry paper next to finish off the sandpapers. This grade of paper gives a nice smooth finish.

From this point on in the sanding process I use micromesh sanding pads or micromesh sand paper in the fine grits. I begin with the 1500 grit sanding pad pictured in the photo to the left. The makers of the micromesh pads use a colour system to identify the grit of the pad. The 1500 is the copper/reddish brown coloured pad at the top left of the photo. I use all of the pads with water. I wet the stem and then sand it with the pad. The 1500 grit pad works well to remove any remaining scratImageches and begins to polish the stem. The wet stem will need to be wiped off regularly of the slurry that is left from the wet sanding dust.

The 1800 grit pad brings the smoothness of the stem one step closer to finished. I always use it wet as well. Once I have sanded the stem to this point I wipe it down and wet it with clean water to see if any scratches remain. If there are some I work on them with the 1800 grit or go back to the 1500 grit until I have removed them. These pads work exceptionally well around stem logos. The 2400 grit takes the shine deeper into the vulcanite or Lucite. I use this to polish the entire stem from tenon to the button. Again I use all pads with water – wetting the stem and sanding them horizontally at this point. The 3200 through the 4000 grit polishes the stem more deeply with each higher grit pad. Used wet and wiped off after sanding the finish of the stem should begin to take on more of a shine and the matte finish should begin to disappear.

The last three grits of micromesh – 6000 to 12000 at first seemed to be over kill to me. But each time I use them I find that the difference between each one is significant. The difference between the 8000 and the 12000 grit is the most dramatic. The 12000 grit used wet leaves the stem with a glassy finish that is ready to have a final buff with carnauba wax.

Four Pipes Restored – #1 Charatan Special Shape 44


Blog by Al Jones

Recently a friend asked me to restore four pipes that came from the estate of a family friend . This gentleman, from Ohio, had previously gifted me two wonderful GBD’s from this same estate. So, I was more than pleased to restore this quartet for him to enjoy.  From research into this group of pipes and my two, I belive they were purchased from the old Smokers Haven in Ohio.

First up on the bench was this massive Charatan Special billiard. I’ve seen these Specials before, but they almost always have a saddle stem. This one has a lovely tapered stem. The pipe is 7″ long and at exactly 100 grams, a hefty hunk of briar. This one is a shape 44 and has the Lane stamp.

Paired with a 4K Castello to give you a perspective on the size of the pipe:


Each of these four pieces had a heavy layer of grime on them (as did the two GBD’s in my collection) and a very thick layer of tar on the bowl top.  The had some small tooth impressions that lifted out with some heat.

The tars on top came off with some light scrubbing. I soaked the stem in a mild Oxyclean solution to remove some stubborn oxidation. I stayed away from the “CP” stamp. It is light, but visible. I did not soak the bowl on this one, just gave it a light reaming. The owner smoked all of these pipes very hot and did a fair bit of damage to the inside of the bowl.  I was afraid to remove the cake filling that was filling in the crevasses. With a little use, the cake should build over these spots and the pipe should still have a long life, the briar is still very thick all over. There were a few dents on the bottom of the bowl. They lifted out nicely with an old kitchen knife held over a propane torch and a wet cloth.

After soaking the stem, the oxidation was removed with 1500 and then 2000 grit wet paper.  I then moved to using the last three grades of Micromesh sheets (6000>8000>12000).  The stem was then buffed first with Tripoli and then White diamond rouges.  A final buff with Blue Magic Plastic polish was the final step.

The tars on the bowl top were removed with a very mild solution of water and alcohol as I didn’t want to lighten the stain.  As the heavy layer was removed, I switched to plain water on a cloth.  The bowl was buffed with Tripoli, White Diamond and then Carnuba wax.  The briar really cleaned up nicely.

The finished pipe is a very regal looking piece.


I’ll detail the other three pipes from this estate in future essays.

Al Jones, aka Upshallfan

Repairing an Over-Reamed Bowl in a GBD Collector Century


Blog by Steve Laug

I picked up this older GBD bent apple with a Perspex stem on EBay for a reasonable price, at least in my opinion it was reasonable. On the left side it is stamped: Collector in script over GBD in an oval over Century. On the right side it is stamped: London England over the shape number 9633. The Collector line is the middle line between the Conquest and the Colossal. These three lines were termed GBD plus sized pipes. The dimensions on this one are length: 5 ½ inches, height: 1 ¾ inches, outer diameter: 1 ¼ inches, chamber diameter: 1 inch. The bowl exterior is chunky and wide and the bowl is larger than normal sized GBD`s.

The two pictures below are the ones that were used on the listing on EBay. The stem is dirty but whole and intact. The bowl rim is badly caked and the bowl itself looks to be caked and maybe a bit over reamed but it is hard to tell. The finish on the pipe was pretty much gone as can be seen in the two photos. There were some dark marks on the bowl front and the sides were faded in colour. Nonetheless it looked like it was worth a bid in my opinion. I asked a few questions of the seller and was answered cordially but with little helpful information regarding the state of the bowl. So I would just have to see it when it arrived. ImageImage

When it came, it was both in better shape and worse shape than the photos in the listing showed. The finish was dirty and really not in too bad a shape other than worn spots. The rim was caked and dirty but was not dented and damaged. The bowl had indeed been over-reamed. In fact it looked to have the beginnings of a burnout – or at least a hot spot on the bottom of the bowl. The stem was dirty but had no bite marks and minimal tooth chatter. Looking at the bottom of the bowl I notice what appeared to be a dark spot and maybe even the beginnings of a hole. This was not a good sign. I had repaired that old Dunhill with a briar plug not long before this so I knew it could be repaired but I wanted to be sure of what I was dealing with. I took the bowl and stem apart and carefully reamed the sides of the bowl to clean out the remaining grit. The top was cleaned with Murphy’s Oil Soap undiluted and scrubbed with a tooth brush. I did not worry about the finish as I was going to restain and refinish it when I was done. I set the stem aside for a bit while I worked on the bowl. Once it was clean I put it in an alcohol bath to soak and remove the remaining finish and grime. ImageImageImage

I removed the bowl from the alcohol bath and wiped it down to dry it off. I turned it over and the three pictures below show what I saw. From the outside the bowl looked like it was beginning to burnout. There was a darkening on the surface and what appeared to be a small crack in the briar. From the inside the over-reaming can be seen clearly. The bottom of the bowl was below the airway and the remaining briar was very thin.

ImageImageImage

I sanded the bottom of the bowl to see how deep the discolouration went into the briar and was pleasantly surprised. The photo below shows what the spot looked like after sanding. I then used a dental pick to pick at the crack in the surface and see how thin it was and how deep the crack went. The briar was still hard and did not break away with the dental pick. That was another good sign. I cleaned the surface with isopropyl alcohol and dried it off. I used some small drops of super glue to fill the crack and then sanded the surface again to smooth the patch of the glue. I did not plan on selling this pipe as it is a shape I enjoy so all of my work was for my own use at this point.  Image

The picture below shows the bowl after some more sanding and a light coat of medium brown stain. I restained the entire bowl and buffed it to see if the repair would be less obvious. You can see from the photo below that it is a bit darker and would require a few more coats of the brown stain to make it recede into the background.

ImageImageImage

I fired up a good cigar and made some pipe mud of the ash and water and began to rebuild the bottom of the bowl. I layered on several coats of the mud allowing it to dry to the touch between coats. My goal was to build up the bottom of the bowl to the bottom of the air way. The pipe mud is fairly thick but it actually worked quite well. In the photo below you can see the bottom of the bowl. I also used it to fill in some of the cracks in the cake on the sides of the bowl. I wanted to protect this pipe from further damage to the bowl.

Image

Once that was finished and dry I restained the pipe with two more coats of the medium brown aniline stain. I flamed the stain between coats to set it. Once it was dry I buffed the bowl with Tripoli to make the grain show and lighten the stain. The next series of four photos show the finished look of the bowl. The photo showing the bottom of the bowl shows that I was able to blend in the darkened area with each successive coat of stain. It is still present but it does not pop out at you when you look at it. In the photos you will also notice a pipe cleaner inserted in the stem. I used lemon juice to soak the stain in the Perspex as well as some hand cleaner with grit in it. The stain is stubborn to remove so I left the pipe cleaner soaked in the products in the stem overnight several times in an effort to remove the stain. You can see from the photos that it is lighter than when it arrived but it is still present. (NOTE: do not use alcohol in cleaning Perspex stems as it causes the stems to craze – multitudes of tiny cracks appear throughout the material.) ImageImageImageImage

The last series of photos shows the pipe as it is today. The refurbishment on it was about 2 or more years ago. I have smoked it in my rotation and it smokes very cool. The pipe mud has held up well and is incredibly hard now. The finish has darkened a bit and taken on a patina that I like. The save on this pipe worked incredibly well. One day if the need arises I can put a briar plug in the bottom of the bowl but so far it has not been necessary. ImageImageImageImage