Author Archives: upshallfan

Unknown's avatar

About upshallfan

Moderator on the PipesMagazine forum since 2011. Guest contributor on the Reborn Pipes Blog by Steve Laug.

GBD 357 Virgin Prince Restored


By Al Jones

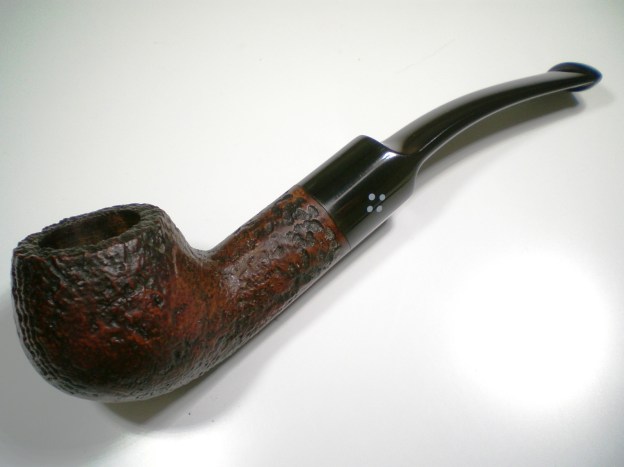
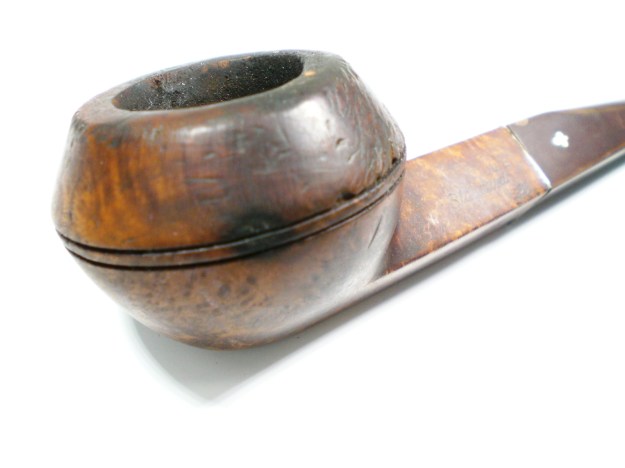
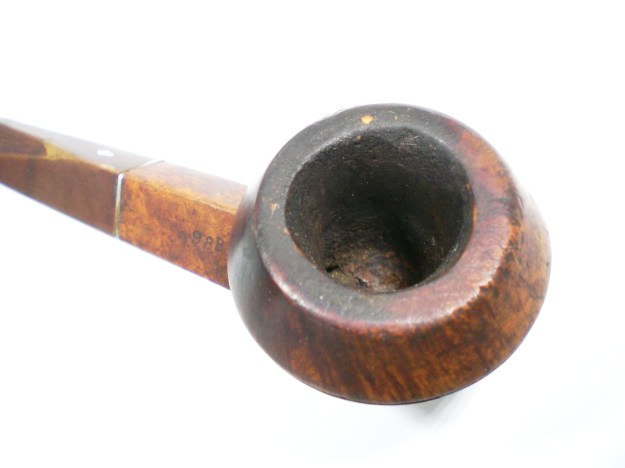
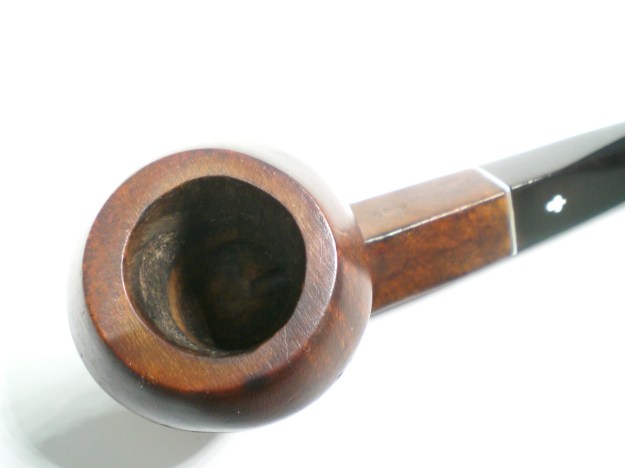
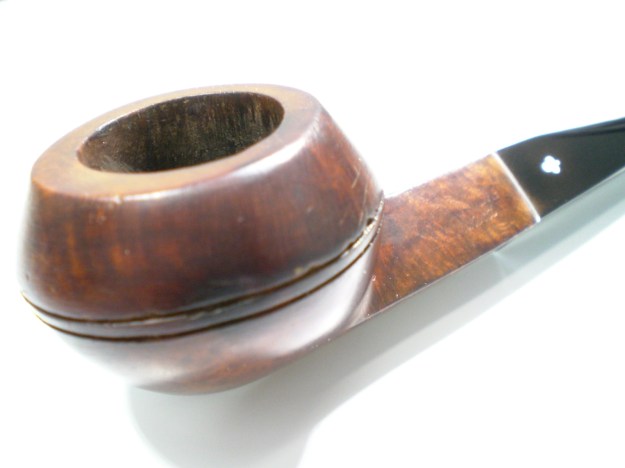
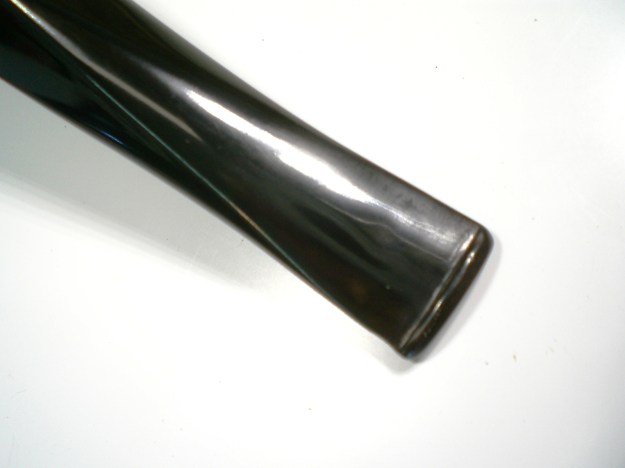
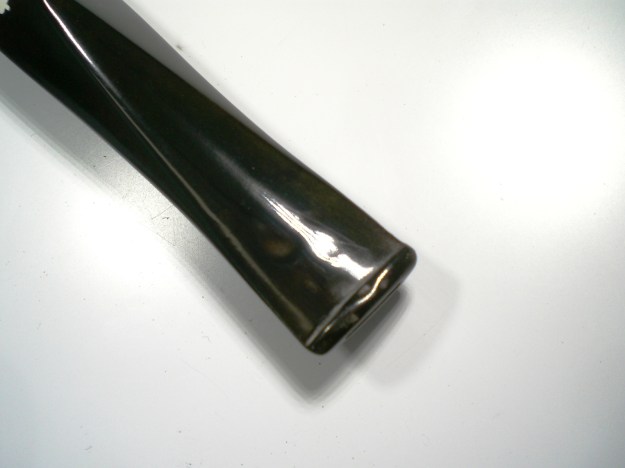
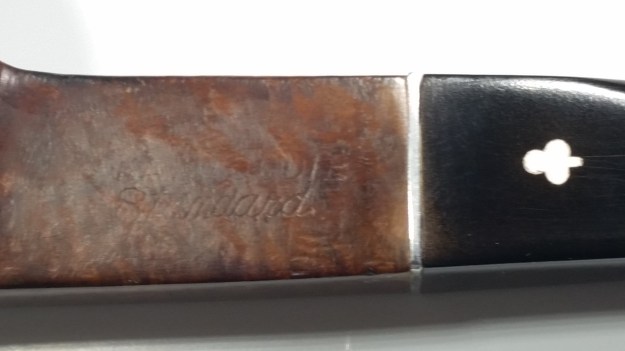
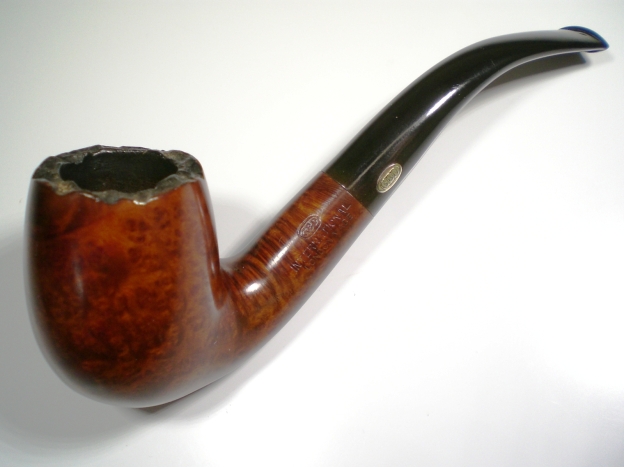
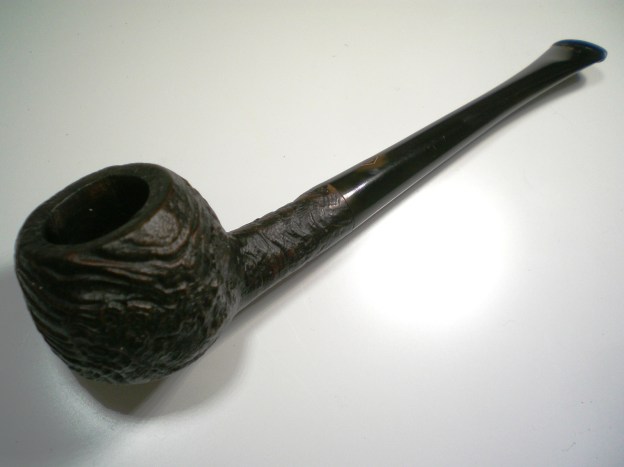
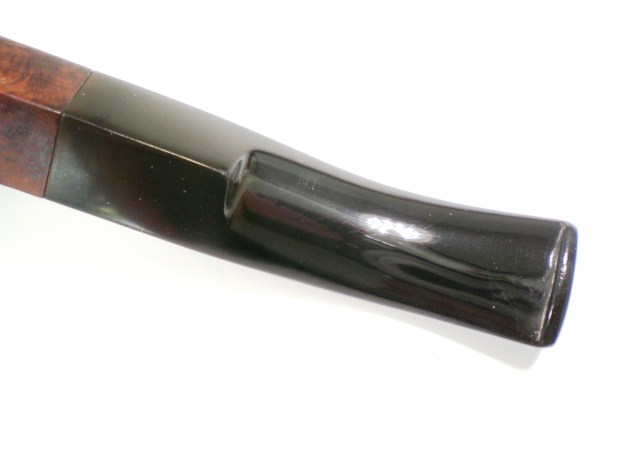
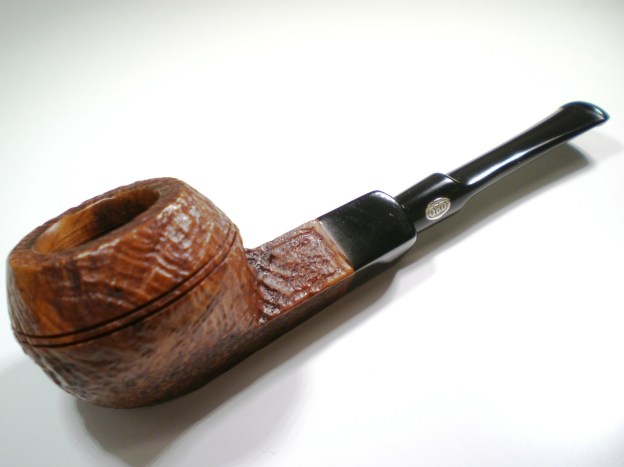
I’ve owned several GBD 357 Prince shapes, but all have had the Perspex stem, so they were eventually sold. I’ve had a 357 with vulcanite stem on my Holy Grail list since I sold my last of that shape in 2012. I love Virgin grade pipes and I was fortunate to win the auction for this one. Thanks to the Ebay app on my phone, I placed my winning bid while watching the sunset at Bahia Honda State Park in the Florida Keys and it was waiting for me at the end of our vacation. The pipe looked in pretty decent shape, with lava boiling over the bowl top and some degradation of the button, quite typical for an estate pipe.

Below is the pipe as received.

GBD_357_Virgin_Before (1)

GBD_357_Virgin_Before (5)

GBD_357_Virgin_Before (4)

GBD_357_Virgin_Before (2)

GBD_357_Virgin_Before (3)

GBD_357_Virgin_Before (6)

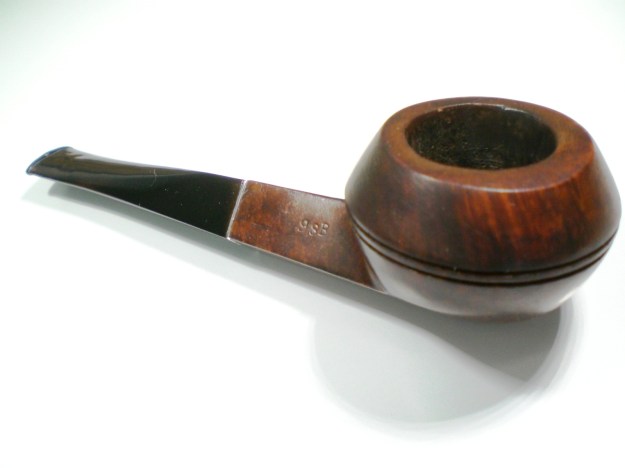
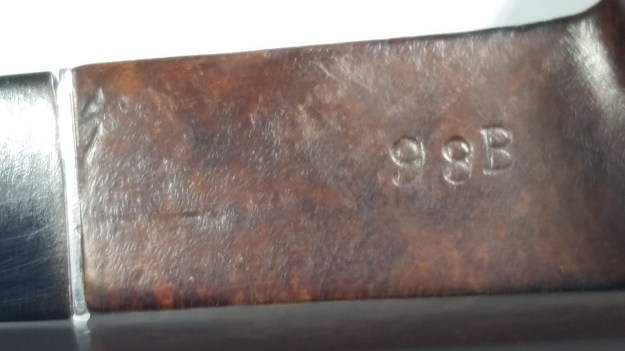
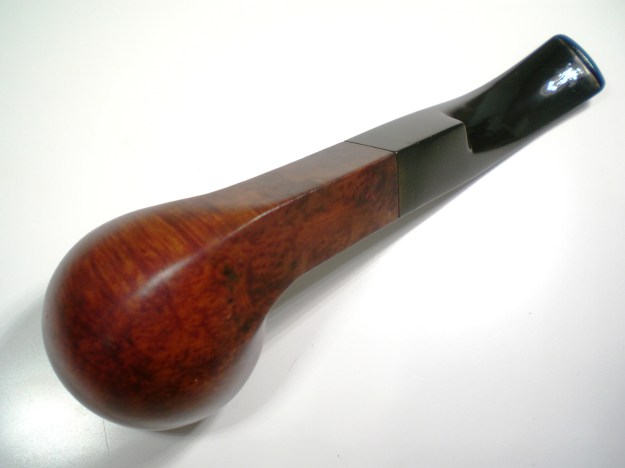
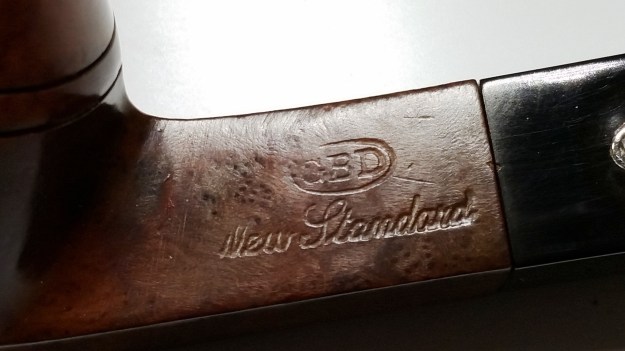
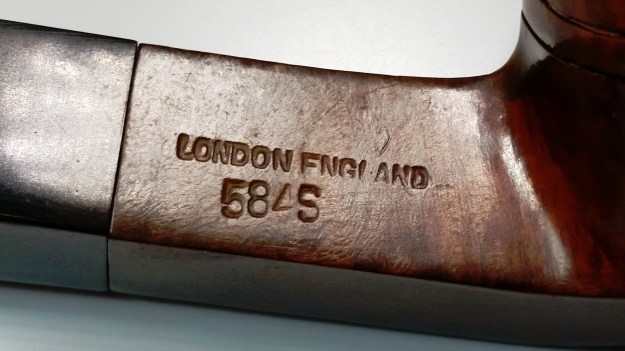
I used some light Oxy-Clean solution on a cloth to remove the heavy deposits on the bowl top, then some 1500 grit. A beautiful, beveled bowl top was revealed. There a couple of gouges just inside the bowl, which I smoothed over with some 800 grit paper. The stain had faded in several spots. I used a diluted Fieblings Medium Brown stain to revive and blend in the color. The bowl was then buffed with White Diamond and several coats of Carnuba wax. There was very little cake in the bowl. The bowl was then soaked with sea salt and alcohol. After the soak, I cleaned the shank with some bristle brushes and alcohol. The nomenclature was mint, so I was sure to steer clear of these areas during the work.

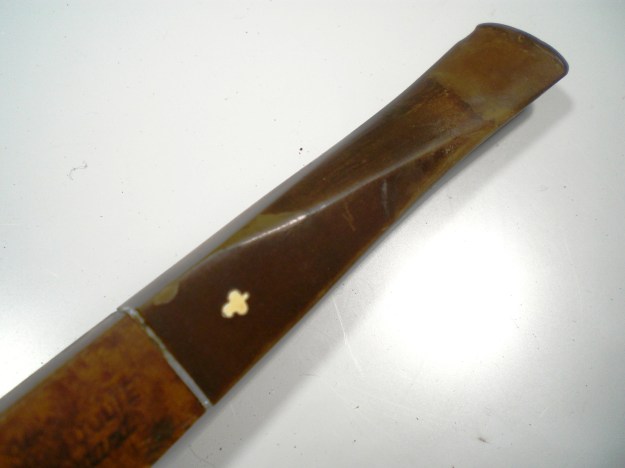
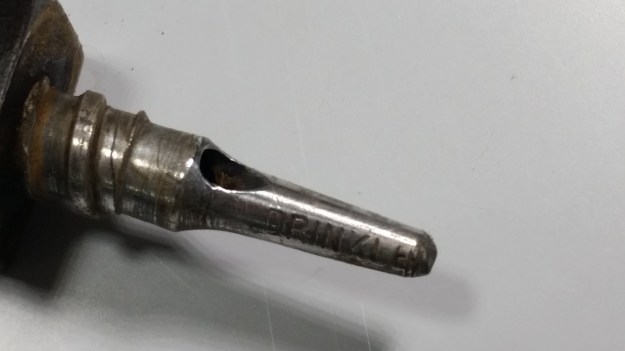
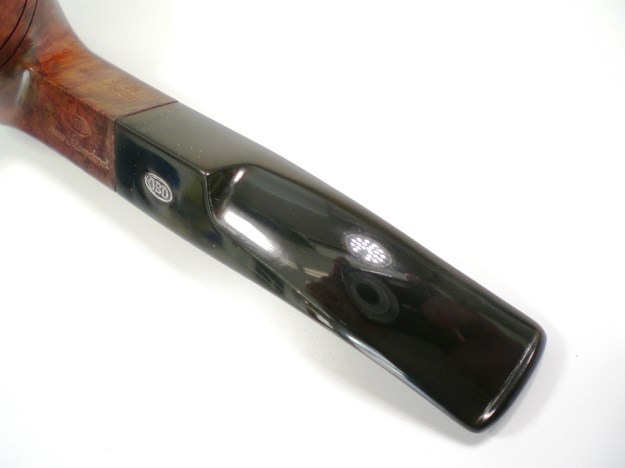
I used the Black Superglue and accelerator on both sides of the button with a little vulcanite dust mixed in. I used 800 grit paper to reshape the button. I removed the mild oxidation on the rest of the stem with 800 grit paper, then 1500 and 2000. Micromesh sheets in 8000 and 12000 grade were then used. This work was done with the stem mounted on the bowl. I then buffed the stem with White Diamond and Meguiars Plastic Polish.

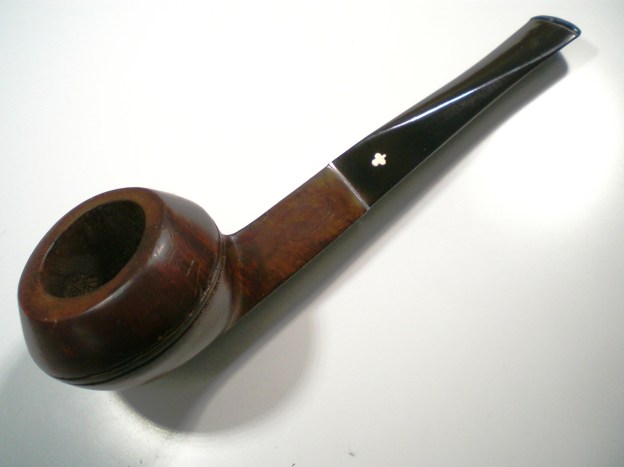
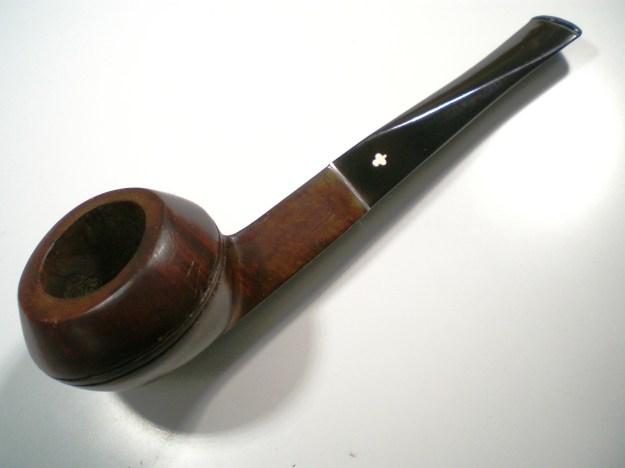
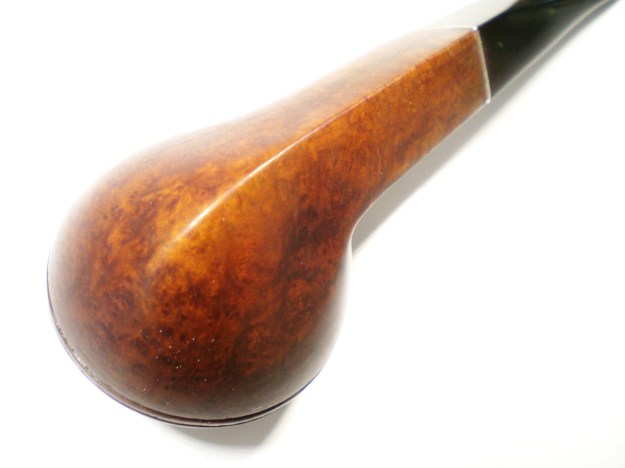
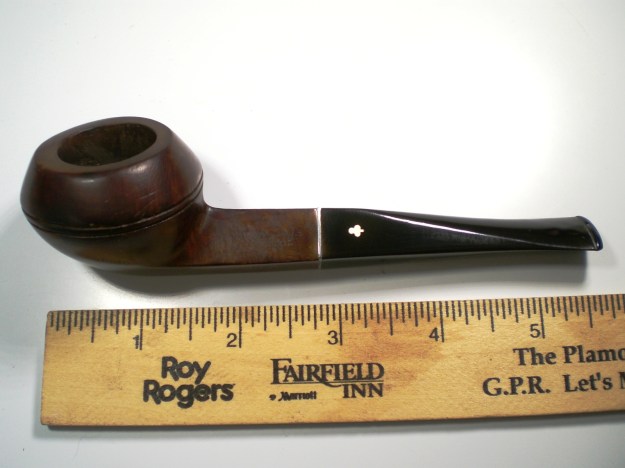
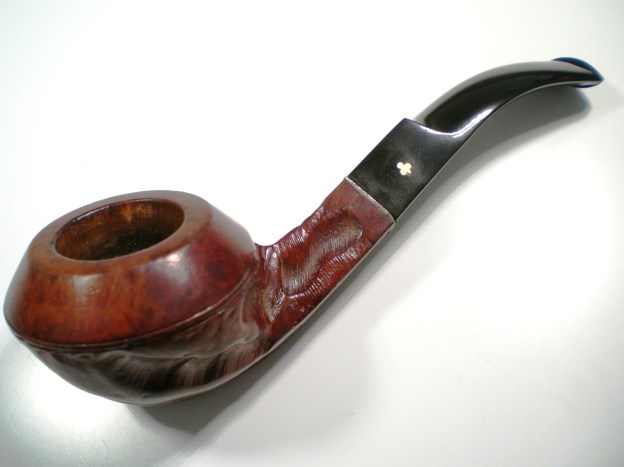
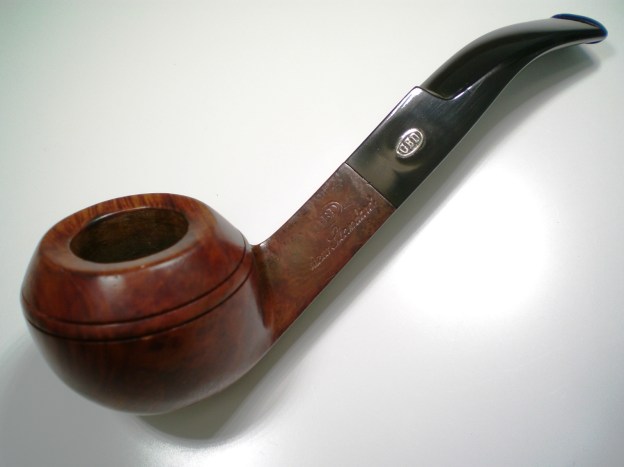
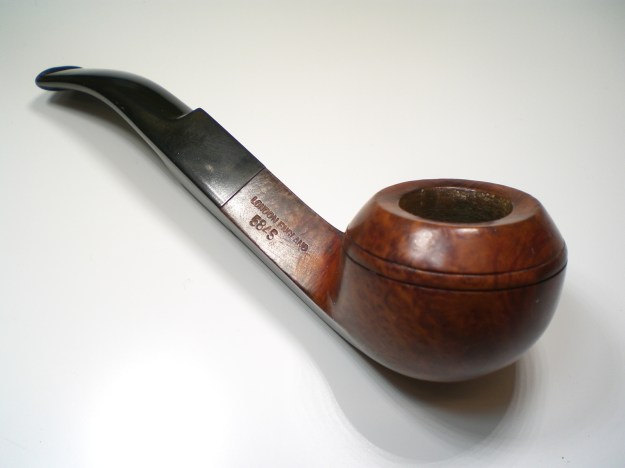
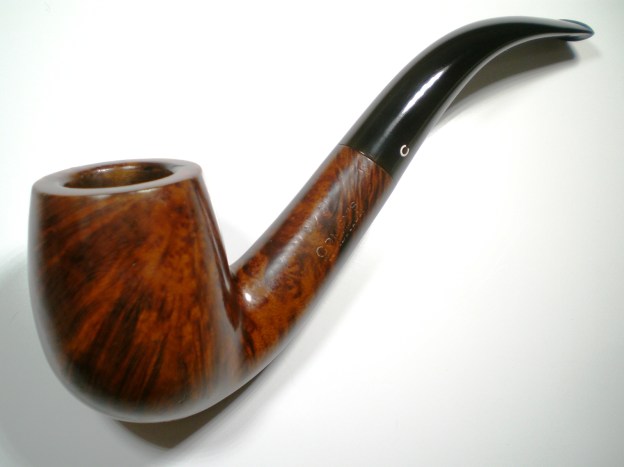
GBD pipes, even Virgin grades, aren’t known for their grain, but this one has a some nice features and a little birdseye on the bottom of the bowl

Below is the finished pipe, I’m very pleased to add this one to my collection.

GBD_357_Virgin_Finish (1)

GBD_357_Virgin_Finish (6)

GBD_357_Virgin_Finish (5)

GBD_357_Virgin_Finish (7)

GBD_357_Virgin_Finish (4)

GBD_357_Virgin_Finish (8)

GBD_357_Virgin_Finish (2)

GBD_357_Virgin_Finish (3)

?

?

?

?

GBD_357_Virgin_Finish (1)

Comoy’s Heritage 120 Restored (1977)


By Al Jones

I’ve seen a few “Heritage” pipes go thru Ebay in the past few years, but I wasn’t able to locate anything about the line. The ones I’ve seen are packaged with an upgraded presentation box and red silk sleeve. I believe they may have also come with a matching tamper. This one has an 18k Gold, Hallmarked band with the date letter “C”. I learned that gold hallmark dates are the same as silver. The C means it was made in 1977. The C logo on the pipe is also the 3 part type, which was used until around 1981. The pipe had some scorching and nicks on the bowl top, the gold band was dented but the stem was nearly mint.

Here is the pipe as it was received.

Comoys_Heritage_102_Before (1)

Comoys_Heritage_102_Before (2)

Comoys_Heritage_102_Before (3)

Comoys_Heritage_102_Before (4)

Comoys_Heritage_102_Before (5)

I’ve never previously worked on a Gold band. This band was loose and slipped right off. Fortunately, there is a custom jeweler on the PipesMagazine forum. He runs a jewelry business in Alabama called “Cosmic Folklore”. I contacted him for advice on how to make the band more presentable. He volunteered to work the band himself, as I found (and assumed) that the gold layer was quite thin and fragile. I received the pipe and band back after a week. It was much improved and I was relieved of the worry of ruining the band. Thanks Cosmic!

I glued the band back in place with a few drops of wood glue, which seemed to work fine. The bowl was reamed of the slight cake and soaked in alcohol and sea salt. Once the soak was completed, I used a series of bristle brushes dipped in alcohol to clean the interior of the shank.

The rim had some problems that needed to be addressed and I wanted to alter the bowl top and shape as little as possible. I used some Oxy-Clean solution on a rag to rub off the tar build-up. The rim was darkened underneath. I used some 2000 grit wet paper to carefully remove as much of the rim darkening as possible. I was also able to work out some but not all the dings around the bowl top. I used some lightened Fieblings Medium Brown stain to revive the color. The bowl was then polished with White Diamond rouge and several coats of Carnuba wax.

The stem took little effort. I removed some of the light oxidation with 1500 and 2000 grade sandpaper. Next was the 8000 and 12000 grade micromesh.

Below is the finished pipe. If you have any information about this Comoy’s series, please let me know.

Update: I did receive some information from a member of the Pipes Magazine forum. He has a 1975 Comoy’s catalog which describes the Heritage pipe, detailed below. I had assumed that the 120 stamp was a shape number, but now I believe that to be the serial number.

Heritage: Once in a while we come across a bowl so beautiful that we hate to part with it, almost preferring to lock it away for our own private pleasure. But when we do release these beauties, we give them a 22 ct.gold mount, a hand cut mouthpiece and a casket to match. Deservedly rare and consequently expensive. Each pipe carries it`s own serial number.

That forum member was nice enough to scan and email me that referenced catalog page.

Heritage_Line_Catalog_Info

Comoys_Heritage_120_Finish (1)

Comoys_Heritage_120_Finish (4)

Comoys_Heritage_120_Finish (2)

Comoys_Heritage_120_Finish (5)

Comoys_Heritage_120_Finish (6)

Comoys_Heritage_120_Finish (7)

Comoys_Heritage_120_Finish (8)

Comoys_Heritage_120_Finish (3)

Comoys_Heritage_120_Finish (9)

Comoys_Heritage_120_Finish (12)

Comoys_Heritage_120_Finish (13)

Comoys_Heritage_120_Finish (11)

Sasieni Ashford S Ruff Root Restoration


By Al Jones

I have several models of the Sasieni Ashford in various finishes, but this is my first S model, which designates the saddle stem. The Ashford shape is number 88 on the Sasieni shape chart. The “Four Dot” stamping indicates that the pipe was made between 1946 and 1979. Sasieni called their sandblast finish the “Ruff Root”. My other Ruff Root Ashford has a tan stain and of course the tapered stem.

The pipe was in decent condition, with a heavily oxidized stem and a few teeth indentions. There was a mild cake in the bowl, but the briar appeared to be in very good shape with strong nomenclature.

The pipe as received is below. The stem dots were a beautiful shade of Robins-egg blue.

Sasieni_Ashford_S_Ruff-Root_Before (1)

Sasieni_Ashford_S_Ruff-Root_Before (4)

Sasieni_Ashford_S_Ruff-Root_Before (2)

Sasieni_Ashford_S_Ruff-Root_Before (3)

Sasieni_Ashford_S_Ruff-Root_Before (5)

I reamed the bowl and soaked it with sea salt and alcohol. At the same time, I put a dab of grease on the four blue stem dots and soaked it in a mild Oxy-clean solution.

I’ve found Sasieni stems to be very resilient in removing teeth indentions and this one responded nicely to some heat. All of the indentions save one underneath were able to be removed. I removed the oxidation from the stem starting with 800 grit paper, than 1500 and 2000 grades. 8000 and 12000 grades of Micromesh were used next. The stem was then buffed with White Diamond and Meguiars Plastic Polish.

The briar only needed to be buffed by hand with Halycon wax.

The finished pipe is below and I’ve included a picture comparing it to the standard Ashford Ruff Root.

Sasieni_Ashford_S_Ruff-Root_Finish (1)

Sasieni_Ashford_S_Ruff-Root_Finish (5)

Sasieni_Ashford_S_Ruff-Root_Finish (2)

Sasieni_Ashford_S_Ruff-Root_Finish (6)

Sasieni_Ashford_S_Ruff-Root_Finish (4)

Sasieni_Ashford_S_Ruff-Root_Finish (7)

Sasieni_Ashford_S_Ruff-Root_Finish (3)

Sasieni_Ashford_S_Ruff-Root_Finish (8)

?

?

Sasieni_Ashford_S_Ruff-Root_Finish (10)

Sasieni_Ashford_S_Ruff-Root_Finish (1)

Kaywoodie 98B Standard Restoration


By Al Jones

I picked up this pretty beat Kaywoodie as a parts pipe, but after receiving it, the pipe showed enough promise that I couldn’t dismantle it.

The pipe came equipped with the “Drinkless” stamped stinger, but missing the ball.  This is an important detail in dating the pipe, so I was glad to see it.   The “Drinkless” stamp on the stinger was dropped in the early 1950’s and the 4-hole stinger was dropped by 1954.  So, this pipe dates before 1954, but could be as early as the late 1940’s.  A member of the Pipesmagazine.com forums pointed out that the 98B shape had a flat top in the early 1940’s catalogs, then changed to a domed top in the 1950 catalogs.  Below are two catalog pages from 1947 and 1955 showing how the shape evolved.

Below is the pipe as it was received.  The stem was badly oxidized, with teeth marks.  The briar was burned on top and it had some scorch marks on each side.  The scorch marks on the bowl sides were the most worrisome.  I was afraid if they were to be removed, the bowl shape might be altered.  The pipe would definitely need to be restained.

Kaywoodie_99B_Standard_Before (1)Kaywoodie_99B_Standard_Before (4)Kaywoodie_99B_Standard_Before (2)Kaywoodie_99B_Standard_Before (5)Kaywoodie_99B_Standard_Before (3)Kaywoodie_99B_Standard_Before (6)

I reamed the bowl and topped the bowl using some 320 grit paper on a flat surface.  I used 600 grit paper, dry, to remove the scorch marks on both sides of the bowl.  I then used a razor blade to redefine the bowl rings, and followed that with a needle file.  I was pleased to get most of the scorch marks out without significantly adding any flat spots or loosing the bowl rings.

I soaked the entire bowl in an alcohol bath. The stem was soaked in a mild Oxy-Clean solution, with a dab of grease over the logo.  Following the alcohol bath, I removed the rest of the stain with some Super-fine steel wool.  I used a cloth on the nomenclature, which was already faded.

The bowl was then stained with Fieblings Medium Brown stain, at close to full strength.  I was pleased to find that this covered the remaining scorch marks nicely.  The bowl was then buffed with White Diamond and several coats of Carnuba wax.  The bowl had been reamed a bit out of round, but there was plenty of wood on that side.  I didn’t feel compelled to do anything else and it shouldn’t be a issue in use.

Using the flame from a lighter, I was able to remove some of the teeth marks. I sanded the oxidation from the stem with 600 grit paper.  I wrap the paper around a popsicle stick on bulldog stems to keep the stem angles from softening.  This was followed with 800, 1500 and 2000 grit wet paper.  The stem was then buffed with White Diamond and Meguiars Plastic Polish.

Below is the finished pipe.  This one should be ready for another 60 years of service.  I’ll most likely resell the pipe and recommend that the cut stinger be cut off completely.  I left it on only to show the dating provenance.

Kaywoodie_99B_Standard_Finish (1)Kaywoodie_99B_Standard_Finish (3)Kaywoodie_99B_Standard_Finish (4)Kaywoodie_99B_Standard_Finish (5)Kaywoodie_99B_Standard_Finish (6)Kaywoodie_99B_Standard_Finish (7)Kaywoodie_99B_Standard_Finish (8)Kaywoodie_99B_Standard_Finish (9)Kaywoodie_99B_Standard_Finish (10)Kaywoodie_99B_Standard_Finish (11)Kaywoodie_99B_Standard_Finish (12)Kaywoodie_99B_Standard_Finish (13)


Kaywoodie “Handmade” Supergrain Bulldog Restoration


By Al Jones

I have worked on a few Kaywoodie “Handmade” stamped pipes in the past, but I don’t recall any also having the Supergrain stamping. This one came via eBay and the sellers photos showed it was in good condition save for the stinger. The stinger had been removed from the threaded vulcanite stem and was stuck in the mortise insert. Here is the pipe as it was received with the last picture showing the frozen stinger.

During the restoration, I was pleased to find the four hole stinger intact and with “Drinkless” visible. There is also a remnant of a number under that stamp. The four hole stinger was eliminated in the early 50’s. The ball on this one is smaller,so I estimate it to be from the late 40’s.

Kaywoodie_SG_Handmade_Before (1)

Kaywoodie_SG_Handmade_Before (2)

Kaywoodie_SG_Handmade_Before (3)

Kaywoodie_SG_Handmade_Before (4)

Kaywoodie_SG_Handmade_Before (8)

I reamed the bowl, which was in great condition. I plugged the end of the protruding stinger and filled the bowl with alcohol. After several hours of soaking, I was able to get the stinger to budge. Unfortunately, when it came out, a piece of the thin insert broke off on the outer edge. I used some JB weld to reattach it and filed it smooth. I think the repair will outlast the pipe.

Kaywoodie_SG_Handmade_Before (6)

I screwed the stinger back into the stem and secured it with some wood glue. It took me a few minutes to get it orientated correctly.

The stem was in terrific shape, with just some mild oxidation. So, I started with 800 grit, progressing thru 1500 and 2000. I then used 8000 and 12000 micromesh paper. The stem was then mounted onto the briar and buffed lightly with White Diamond and then several coats of Carnuba wax.

Here is the finished pipe.

Kaywoodie_SG_Handmade (1)

Kaywoodie_SG_Handmade (4)

Kaywoodie_SG_Handmade (2)

Kaywoodie_SG_Handmade (5)

Kaywoodie_SG_Handmade (12)

Kaywoodie_SG_Handmade (11)

Kaywoodie_SG_Handmade (6)

Kaywoodie_SG_Handmade (10)

?

?

Kaywoodie_SG_Handmade (9)

Kaywoodie_SG_Handmade (1)

GBD 508 International


By Al Jones

This GBD 508 “International” was a relatively simple restoration. The stem was heavily oxidized and it had a few teeth ripples, but the bowl interior and shank were very clean. International grade pipes all appear to have black, plateau tops.

GBD_508_International_Before (1)

GBD_508_International_Before (4)

GBD_508_International_Before (3)

GBD_508_International_Before (5)

There was only a slight cake in the bowl, it was reamed and soaked with alcohol and sea salt. I put a dab of grease on the brass stem rondell and soaked it in a mild Oxy-Clean solution for several hours. Using a lighter flame, I was able to raise the tooth indentions. The stem was then sanded with 800 grit paper to remove the heavy oxidation. I didn’t take it all off at the stem junction, as I didn’t want to change the fitment. That was followed by 1500, 2000 grit paper and 8000 and 12000 grade micromesh sheets. The stem was then buffed with White diamond and Meguiars Plastic Polish.

The bowl was buffed lightly with White Diamond and several coats of Carnuba wax.

Below is the finished pipe.

GBD_International_508_Finish (1)

GBD_International_508_Finish (3)

GBD_International_508_Finish (2)

GBD_International_508_Finish (4)

GBD_International_508_Finish (8)

GBD_International_508_Finish (7)

GBD_International_508_Finish (5)

GBD_International_508_Finish (6)

GBD_International_508_Finish (9)

GBD_International_508_Finish (10)

GBD_International_508_Finish (1)

1947 Parker Super Briar Bark Prince


By Al Jones

It has been a while since I’ve been so excited to work on a pipe. This Parker Super Briar Bark was snagged by my friend Dave. He always has a good eye for a great pipe and asked me to restore this for him. The blast on the pipe is hard to believe and I was thrilled to open his package and handle the pipe. The pipe had a thick cake,but the briar looked magnificent. The stem was heavily oxidized and had a hole in the stem and some teeth intentions. Overall, it didn’t look like a difficult restoration. George Dibos reminded me that removing all of the oxidation would decrease the stem dimensions.

The pipe is stamped with the Patent number and a two-digit “22” (not underlined). I’ve learned that the dating for this pipe starts with the number 20 in 1945, making this pipe a 1947 manufacture.

Below is the pipe as received.

Parker_Super_Bark_Before (1)

Parker_Super_Bark_Before (3)

Parker_Super_Bark_Before (5)

Parker_Super_Bark_Before (6)

I reamed the bowl and found what appeared to be a heavy cake was only loose tobacco that was never removed from the last time it was smoked. The bowl interior was in outstanding condition. The tars on the bowl top were removed by rubbing with a cloth dipped in Oxy-clean solution.

The biggest issue and a huge concern was that the stem was stuck fast to the bowl. The pipe is so small, and stem so slim, I had to be careful to not break the tenon. Typically, a pipe can be placed in the freezer, which allows the briar to expand and release the stem. This also makes the tenon incredibly brittle. I decided to first try filling the bowl with alcohol and plugging the button end. After an hour of soaking, I was able to remove the stem without damage.

I put a dab of grease on the stamped “P” stem log and soaked it in a mild Oxy-clean solution for several hours. After the soak, I started removing the oxidation with 800 grit wet paper. Once the heavy layer was removed, I started to work on the hole near the button. I put packing tape on an index card, then cut that into a shape that would slip into the stem. I put a light coat of grease on the taped piece of index card to keep glue from sticking to it. I used the Black Super glue product to slowly fill the hole. Here is the stem with several layers of super glue, then sanded smooth.

?

?

Parker_Super_Bark_Before (10)

Parker_Super_Bark_Before (11)

The oxidation on the stem was removed starting with 800 grit paper, moving thru 1500 and 2000 grade. 8000 and 12000 micromesh was used and the the stem was buffed with White Diamond and Meguiars Plastic Polish. I covered the P stem logo with a small piece of masking tape.

Parker_Super_Bark_Before (12)

Below is the finished pipe.

Parker_Super_Bark_After (1)

Parker_Super_Bark_After (6)

Parker_Super_Bark_After (2)

Parker_Super_Bark_After (7)

Parker_Super_Bark_After (10)

Parker_Super_Bark_After (9)

Parker_Super_Bark_After (5)

Parker_Super_Bark_After (3)

Parker_Super_Bark_After (4)

Parker_Super_Bark_After (8)

?

?

Parker_Super_Bark_After (1)

GBD 584S New Standard Restoration


By Al Jones

This GBD 548S New Standard came to me thru Ebay and seemed to be in good condition. The thick, striated layer of oxidation appeared to be the only challenge. The 584 shape is intriguing in that I don’t recall seeing it previously. Google yielded only one ebay ad from 2008,sold by Coopersark (a pair of 584, tapered stem pipes) It is similar in shape to the more common 549 Bulldog GBD shape. Below is the pipe as received.

GBD_584S_Before (1)

GBD_584S_Before (2)

GBD_584S_Before (3)

GBD_584S_Before (4)

GBD_584S_Before (5)

I reamed the slight cake from the bowl and soaked it with alcohol and sea salt. The stem was soaked in a mild Oxy-Clean solution to loosen the oxidation.

I used 800 grit to remove the top layer of oxidation on the stem. I wrap the paper around a popsicle stick to keep the diamond stem angles from rounding. Removing oxidation is always a compromise, as stem material is also removed. I then moved to 1500 and 2000 grade wet papers. Then 8000 and 12000 micromesh. The stem was mounted on the bowl and buffed with White Diamond and then Meguiars Plastic Polish.

The bowl top had some darkening, which I removed carefully with 2000 grade paper. I did a “stain wash” on the bowl and bowl top with a paper towel dipped in Medium Brown stain. There were some faded areas of the stain and the wash helps blend in those areas for a more consistent color finish. The bowl was then buffed with White Diamond and several coats of Carnuba Wax.

Below is the finished pipe.

GBD_584S_Finish (1)

GBD_584S_Finish (2)

GBD_584S_Finish (3)

GBD_584S_Finish (4)

GBD_584S_Finish (5)

GBD_584S_Finish (6)

GBD_584S_Finish (7)

?

?

?

?

GBD_584S_Finish (1)

GBD Militaire Bulldog


By Al Jones

This unqiue GBD was posted unrestored,last year on the “GBD Collectors Thread on PipesMagazine and caught my attention. I was recently delighted to find it for sale on Ebay and fully restored. I won the auction and after receiving it, I realized that I knew little about the Militaire finish. This pipe is sandblasted and in the 9240 Squat Straight Bulldog shape.

GBD Collectors Thread – PipesMagazine.com

Google didn’t yield any additional information on the Militaire finish but the few pipes I discovered were all sandblasted (typically “Prehistoric” grades). By GBD standards, the blast is very good.

The seller (303_pipe_restoration) did a great job on the pipe and it came ready to smoke. I’m typically not happy with most stem restoration work, but this one was excellent. I used some high grade micromesh on the stem and then polished it with Meguiars Plastic Polish as I feel it helps retard oxidation. The bowl was very clean and there was no ghosting.

The pipe is stamped “London, England” and has the brass stem rondell, which indicates it was made prior to 1981. The pipe weighs an amazing 30 grams and is easily the lightest of any GBD in my collection.

GBD_9240_Militaire_Gallery

GBD_9240_Militaire (5)

GBD_9240_Militaire (3)

GBD_9240_Militaire (4)

GBD_9240_Militaire (6)

GBD_9240_Militaire (2)

?

?

GBD_9240_Militaire_Gallery

Comoy’s Shape 43 Tradition Restoration


Blog entry by Al Jones

I can’t resist pre-Cadogan, Comoys Tradition grade pipes. They are readily available and decent examples needing restoration don’t sell for exorbitant prices. This Shape 43, Large Bent Billiard was well loved, but showed promise. I’ve worked on a few Shape 42 Medium Bent Billiards, but this is the first Shape 43 that I’ve encountered. Curiously, this shape is not on any of the on-line Comoy’s shape charts (pipepages, etc.). It is on the shape number list on the Pipepedia site.

The stem was heavily oxidized, but the drilled, 3 piece “C” logo was readily identifiable. The stem had some teeth marks on both sides of the stem and some small sections of button were worn. Tars in the shank kept the stem from being inserted all the way. The bowl had a heavy layer of tar on top.

“Before” Pictures

Comoys_43_Tradition_Before (1)

Comoys_43_Tradition_Before (3)

Comoys_43_Tradition_Before (5)

Comoys_43_Tradition_Before (4)

Comoys_43_Tradition_Before (6)

Comoys_43_Tradition_Before (2)

I used some 800 grit wet paper to carefuly remove the thickest coating of tars from the bowl top. Then, 1000 grit and finally a wet cloth with oxy-clean water. The tars came off completely and showed no scorched briar. The Comoys trade-mark beveled bowl top was worn but intact. There was one dent in the bowl top and one small crease on the front of the bowl. Using an iron set on “High” and a wet cloth, I was able to steam most of the bowl top dent out and raise the crease as well.

The bowl was soaked with isopropyl alcohol and sea salt. After the soak, I used a series of bristle brushes and alcohol to clean the interior of the shank.

The stem was soaked for several hours in a mild Oxy-Clean solution. I use a lighter to lift out the dents on the top and bottom of the stem. There was one tooth prick that was repaired with Black Superglue. I used the Black Superglue to rebuild the worn sections of the button. I blended the button in using 800 grit paper. The oxidation was removed starting with 800 grit paper, then 1500 and 1000 grades. This was followed with 8000 and 12000 grade micromesh. The stem was then buffed with White Diamond rouge and auto plastic polish. I’m very pleased with the condition of the stem.

The bowl was buffed lightly with White Diamond and several coats of Carnuba Wax. The excellent nomenclature was buffed by hand.

Below is the finished pipe.

Comoys_43_Tradition_Finish (1)

Comoys_43_Tradition_Finish (4)

Comoys_43_Tradition_Finish (2)

Comoys_43_Tradition_Finish (5)

Comoys_43_Tradition_Finish (6)

Comoys_43_Tradition_Finish (8)

Comoys_43_Tradition_Finish (3)

Comoys_43_Tradition_Finish (7)

?

?

?

?

Comoys_43_Tradition_Finish (1)