Blog by Steve Laug
The next pipes I am working on were purchased on 01/26/2023 as part of a group of pipes from a fellow in Copenhagen, Denmark. There both expectedly dirty and obviously they had been someone’s favourite smokers. The pipes are both stamped on the topside of the shank and read Stanwell [over] Made in Denmark [over] RM96. The RM96 stamp had me a bit mystified though I figured it was probably made for a smoking competition thanks to Jesper’s previous help. I would need to check that out. On the straight grain pipe (#1), the dirty smooth finish was not able to hide the beauty of the grain around the bowl and shank. There were tars and oils ground into the surface of the briar. The bowl had a very thick cake that flowed over the top of the smooth rim in a heavy lava coat in spots around the bowl. The inner edge was so heavily coated in those spots that it was hard to assess its condition. The stem was a black vulcanite saddle stem with a brass Crown S logo stamp. It had some light tooth marks and chatter on both sides ahead of the button. On the mixed grain one (#2) the finish was about the same – dirty and covered with grime and oils ground into the bowl surface. There was a thick cake in the bowl and the lava coat on the rim top was heavier than on #1. The stem had matching tooth marks to #1 making me think it was probably from the same owner. Jeff took photos of the pipes before he started his clean up work.
PIPE #1
 PIPE #2
 Jeff took photos of the rim and bowl of both pipes to show the heavy cake and heavy lava coat covering the rim top. The inner edge of the rim on both was so thickly caked that it was not possible to know with certainty the condition. They really were dirty pipes but still were beauties. He also took photos of the stem surfaces to show its overall condition when they arrived.
PIPE #1

 PIPE #2

 The photos of the sides and heel of the bowls show some beautiful grain around the bowl and shank sides. Pipe #1 has some great straight grain around the bowl and shank. Pipe #2 has a mix of birds eye, flame and swirled grain. The brown stain on both pipes adds depth to the finish on the pipes and makes the grain really stand out on the bowl and shank.
PIPE #1 PIPE #2
 He also took photos of the stamping on the topside of the shanks. It is clear on both pipes and reads as noted above. You can also see the inlaid brass Crown S on the top of the saddle stems in the photos.
PIPE #1 PIPE #2
 I decided before I started my work on the pipe to try and unravel the stamping on the topside of the shanks on each pipe. I did a Google search of Stanwell RM 96 and got no hits. I changed the search to hunt for a Stanwell Made in Denmark RM 96 still found no information.
I wrote to Jesper Klith on Facebook and asked he could help me out with information. He has been a very willing and knowledgeable help for these special pipes and city pipes. He replied quickly with an answer and an interesting personal note that I have included below.
It’s from my club Randers Pibeklub. The year I became a member and from my 2nd contest haha. I wonder how it ended up in Canada?
So now I knew! The RM 96 stamp was on a Pipe Club pipe (both of them in this case) and meant Randers Pibeklub. The pipes were made to be used in the competition and was also a commemorative piece. Now it was time to start my work on the pipes.
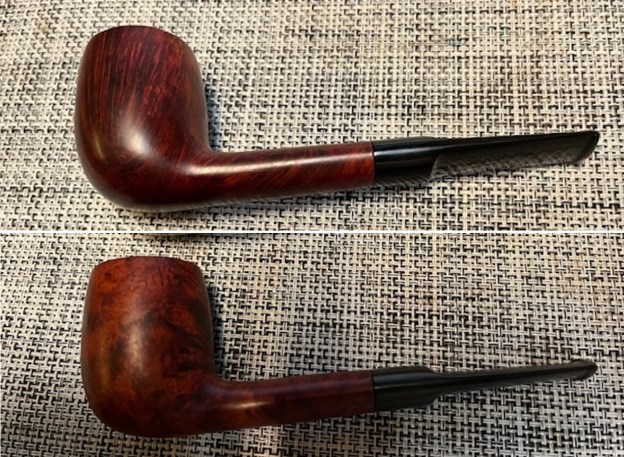
Jeff did his usual clean up on the two pipes. He reamed the bowls with a PipNet pipe reamer and cleaned them up with a Savinelli Fitsall Pipe Knife. He scrubbed the exterior with Murphy’s Oil Soap and a tooth brush to clean off the grime off the finish and the overflow of lava on the rim tops. The cleaning had removed the grime on the rim tops. He cleaned up the internals of the shank, mortise and stem of both pipes with pipe cleaners, cotton swabs and alcohol to remove all of the oils and tars in the pipe. He soaked the vulcanite stems in Briarvilles Pipe Stem Deoxidizer and was able to remove any remaining grime on the surface and inside. The fit of the stems to the shanks looked great and the brass Crown S logo shone on each. When they arrived here in Vancouver they were clean pipes and I knew what I had to work with. I took photos of them before I started my part of the restoration. Please note that though they seem to show a size variation they are identical. The variation is caused by the angle of the camera. 


 I took photos of the rim tops and the stems to show their condition. Jeff was able to clean up the cake and the lava overflow that was shown in the rim and bowl photos above. The rim top on both looked very good but there seemed to be light damage and darkening to the top and inner edge of the bowl. The stem looked better, though there were light tooth marks and chatter on both sides near the button.
 I took a photo of the stamping on the top of the shank on each pipe to show that it was readable and undamaged by the cleanup work. I removed the stem from the shank and took a photo of the parts to give a sense of what the pipe looks like.
 The pipes looked so good that I started my work by polishing the smooth rim top and bowl on both of them with micromesh sanding pads. I dry sanded it with 1500-12000 grit pads. I wiped the bowl down after each pad with a damp cloth. The pipe began to take on a rich shine and grain was beginning to stand out. I sanded with all of the pads and wiped the bowl down after each pad with a soft cloth.


 I rubbed the bowl and shank down with Before & After Restoration Balm to deep clean the finish on the bowl and shank. The product works to clean, enliven and protect the briar. I worked it in with my fingers to get it into the briar. I used a horsehair shoe brush to work it into the sand blast. I let it sit for 10 minutes then I wiped it off and buffed it with a soft cloth. The briar really began to have a rich shine. I took some photos of the bowl at this point to mark the progress in the restoration. It is a beautiful bowl.

 I set the bowl aside and worked on the stem at this point in the process. I polished the light tooth marks on the surface of both stems with the new regular grit sanding pads I purchased. I used 320-3500 grit sanding pads. They looked significantly better at this point.
 I polished light tooth marks and chatter out of the stem with micromesh sanding pads – dry sanding with 1500-12000 grit pads. I wiped the stem down after each sanding pad with Obsidian Oil.
 I polished the stem with Before & After Pipe Stem Polish – both Fine and Extra Fine. I gave it a coat of Obsidian Pipe Stem Oil. It works to protect the stem from oxidizing. I set it aside to dry.
 I put the stems back on the beautiful pair of Stanwell RM 96 Oval Shank Saddle Billiard and took it to the buffer. I buffed the bowl and stem with Blue Diamond to polish the briar and the vulcanite. Blue Diamond does a great job on the smaller scratches that remain in both. I gave the bowl and the stem several coats of carnauba wax and buffed the pipe with a clean buffing pad to raise the shine. I hand buffed it with a microfiber cloth to deepen the shine. I am amazed at how well it turned out. The finished pipe is shown in the photos below. These are beautiful Stanwell Randers Pibeklub 96 Club Pipes – the vulcanite saddle stems and smooth finish combine to give the pipes a great look. The dimensions of Pipe #1 are Length: 5 inches, Height: 1 ¾ inch, Outside diameter of the bowl: 1 1/8 inches, Chamber diameter: ¾ of an inch. The weight of the pipe is 1.16 ounces/34 grams. The dimensions of Pipe #2 are Length: 5 inches, Height: 1 ¾ inch, Outside diameter of the bowl: 1 1/8 inches, Chamber diameter: ¾ of an inch. The weight of the pipe is 1.16 ounces/34 grams. I will be putting these pipes on the rebornpipes online store in the Danish Pipe Pipemaking Companies Section shortly, if you are interested in adding one or both of them to your collection. Thanks for walking through the restoration with me on this beauty!
As always, I encourage your questions and comments as you read the blog. Thanks to each of you who are reading this blog. Remember we are not pipe owners; we are pipe men and women who hold our pipes in trust until they pass on into the trust of those who follow us.
Pipe #1


 Pipe #2


