Blog by Steve Laug
The next pipe on my work table is an interesting Bamboo style Poker/Sitter. It has a three knuckle piece of bamboo joined to the bowl with a metal tenon allowing it to be flush mounted. There stem is also held in place on a metal tenon fixed in the mortise end of the bamboo. The stamping on the heel of the bowl reads JSP over 7. The airway in the shank is the same diameter from the shank end to its entry into the bowl with stainless tubing on both ends. The draught on the pipe is open and unhindered. The design is definitely made to create a very cool smoke. The bowl had a moderate cake and there was lava and darkening on the rim top and inner edge on both the front and the back of the bowl. The airway and mortise are full of tars and oils both in the shank and stem. It was dirty. The stem has some light tooth chatter on the top and underside of the stem ahead of the button. There is also a carving in the left side of the stem that matches the grooves in the bamboo. There is an red acrylic spacer fixed to the end of the bamboo. I am including photos of the pipe to show what it looked like when I brought it to the work table.
 I took photos of the rim top and stem. You can see the cake in the bowl and the darkening on the rim top and on the front and back inner edge of the bowl. The stem had some tooth marks and chatter on both sides ahead of the button.
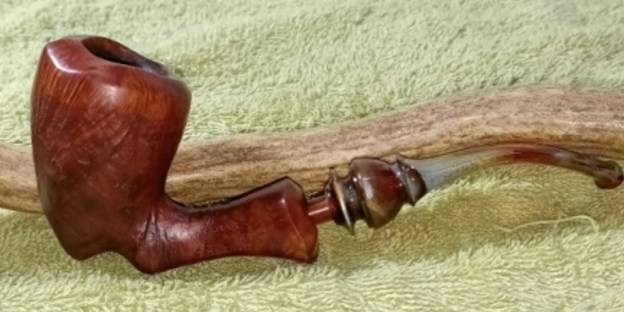
  I took a photo of the stamping on the heel of the bowl. It is clear and readable as noted above. I also removed the stem from the shank and took a photo of the part to give a sense of the flow of the pipe. It is truly a unique pipe and the grain shows well in the photo.
 I turned to Pipedia to have a look at the history of the brand. I was pretty sure it was made by Joel Shapiro but needed confirmation (https://pipedia.org/wiki/JS_Pipes). Here is the information from the article.
Welcome to JS Pipes! http://www.jspipes.com
Let me introduce myself. My name is Joel Shapiro, and I live in Rancho Cordova, California. I offer a limited number of handmade briar pipes for sale.
The type of briar (Grecian, Italian, etc.) will be noted for each pipe made, along with further details concerning stem type (ebonite, lucite, cumberland, etc.) and shank extensions. A complete size description will be included with each pipe posted for sale.
I do not fill any flaws in the briar, so the buyer will see exactly what is offered with nothing to hide. All pipes are finished with a buffed in coat of carnauba wax over the stain. Stains are all alcohol based and will not seal the wood, so won’t alter the smoking experience or the breathing qualities of the briar.
In addition, I also offer a unique tamper design. My tampers are hand turned from quality hardwoods and the foot is cut at an angle to aid in mounding the tobacco and keeping the ember banked. I have found that this design results is fewer relights for a more enjoyable smoke. I can make these in any custom size and in most hardwoods, including some exotics. If you’d like a custom size (for very large pipes for example) or material, please contact me at jspipes@jspipes.com. All tampers are priced at $24.95, unless the material chosen is particularly expensive or difficult to work.
If you’d like to buy a pipe or tamper, but prefer to pay by money order or check, please e-mail (jspipes@jspipes.com) for my mailing address.
Would you like an email when new pipes are posted? Send me an e-mail and request to be on the JS Pipes mailing list! jspipes@jspipes.com
I started my work on this pipe by scraping it out with a Savinelli Fitsall Pipe Knife to remove the cake. I sanded the bowl walls with a piece of dowel wrapped with 220 grit sandpaper. I took the cake back to smooth bowl walls.  I cleaned out the mortise and the airway in the shank and the stem with alcohol and pipe cleaners. It was quite dirty but once cleaned smelled better.
  I worked on the darkening on the back inner edge of the rim top and on the top itself. I was able to polish it out with a worn 1500 grim micromesh sanding pad.
 I polished the bowl with micromesh sanding pads – dry sanding with 1500-12000 grit sanding pads. I wiped the bowl down after each sanding pad with a damp cloth to remove the sanding debris. The bowl began to take on a rich glow.


 I rubbed down the bowl and shank with Before & After Restoration Balm. It is a paste/balm that is rubbed into the surface of the briar. The product works to deep clean the finish, enliven and protect the briar. I worked it into the briar with my finger tips. I let it sit for 10 minutes then wiped it off with a soft cloth then buffed it with a cotton cloth. The briar really began to have a deep shine in the briar and the grain shines through. The photos I took of the bowl at this point mark the progress in the restoration. It is a gorgeous pipe.

 I set the bowl aside at this point and turned my attention to the stem. I polished the stem with micromesh sanding pads – 1500-12000 grit sanding pads and water to wet sand the stem. I wiped it down after each sanding pad with Obsidian Oil on a cotton rag after each sanding pads. I know that many say Obsidian Oil does nothing for acrylic stems, but I find it does two things – first it gives some protection to the stem from buildup and second it gives the sanding pads bite in the polishing process.
  I have found that Before & After Fine and Extra Fine stem polish works well to remove the fine scratches in the vulcanite. I rub the Fine Polish on the stem and wipe it off with a paper towel and then repeat the process with the Extra Fine polish. I finish the polishing of the stem down with a final coat of Obsidian Oil and set the stem aside to let the oil absorb. This process gives the stem a shine and also a bit of protection.
  The final steps in my process involve using the buffer. I buffed the bowl and stem with Blue Diamond to polish out the light scratches in the wood and the remaining surface oxidation in the stem. I gave the bowl and the stem multiple coats of carnauba wax. I have found that I can get a deeper shine if I follow up the wax buff with a buff with a clean buffing pad. It works to raise the shine and then I hand buff with a microfiber cloth to deepen the shine. It is always fun for me to see what the polished bowl looks like with the polished stem. It turned out to be a nice pipe. The interesting tight grain around the bowl sides and shank looks great. The vulcanite saddle stem polished very well and looks good with the bowl. The Joel Shapiro (JSP) Bamboo Poker feels great in my hand. It is a well-balanced pipe. Have a look at it with the photos below. The dimensions are Length: 5 inches, Height: 2 inches, Outside diameter of the bowl: 1 1/8 inches, Chamber diameter: ¾ of an inch. The weight of the pipe is .99 ounces/28 grams. It is a beautiful pipe and the bamboo shank is well fitted to the bowl. The ruby shank end spacer and the taper stem is well chosen and work well with the bowl. It you are interested in adding the pipe to your rack let me know. It will be going on the rebornpipes store in the American Pipe Makers Section soon. Thanks to each of you who are reading this blog. Remember we are not pipe owners; we are pipe men and women who hold our pipes in trust until they pass on into the trust of those who follow us.