Daily Archives: March 2, 2015

An Instruction Sheet for using a Pipe Retort


Blog post by Steve Laug

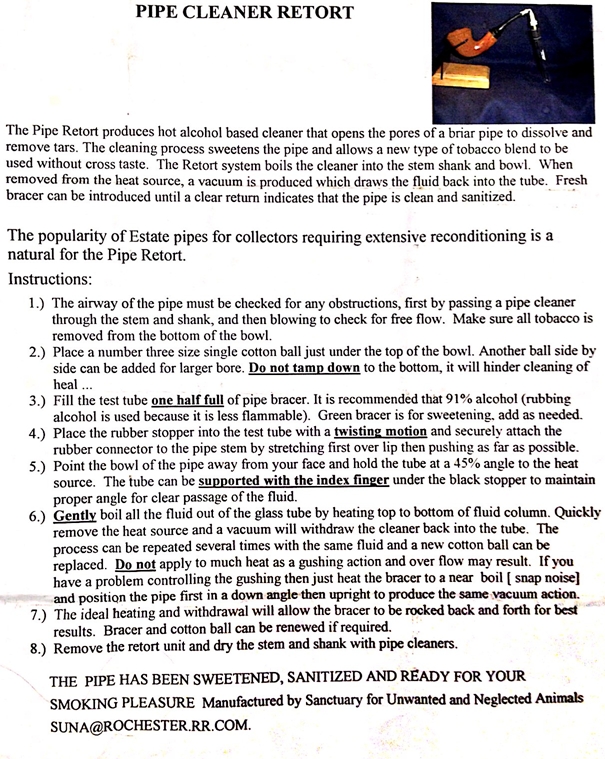
When I purchased my Pipe Retort from SUNA they included this document with the product. I found the document when I was sorting through papers in my filing cabinet. It is a helpful set of directions that I thought I would post here. new doc 3_1

Restoring a Wally Frank Natural Sun Cured Algerian Made Pot


Blog by Steve Laug

This older Wally Frank Pot shaped pipe came in the same gift box as the little no named prince that I restored recently. In fact it was the second pipe in the photos included with the prince. It was a fairly decent piece of briar with one large fill on the top of the shank in the middle. The putty used was brown rather than pink coloured putty so it would blend fairly well. The briar was darkened from use with oils and dirt. There was a thick build up of tar and oil on the rim that was rock hard. The cake in the bowl was thick and hard. The stem was good quality vulcanite and did not have much oxidation. There were deep scratches around the stem near the stem shank junction. There were also flecks of metal in the vulcanite that makes me think that the pipe is a war years pipe as often the rubber stems were made from recycled tires. There was a slight buildup of calcium on the stem just ahead of the button. The tenon had an aluminum inner tube that sat ran the length of the shank and ended with a diagonal cut end in the bottom of the bowl.Frank1

Frank2

Frank3

Frank5 The next three photos show the stamping on the pipe. The pipe was stamped on the left side of the shank Natural over Sun Cured and on the right side Wally Frank Ltd. On the underside of the shank it was stamped Second and Made in Algeria. I have seen plenty of pipes that were stamped Algerian Briar but this is the first stamped Made in Algeria that I have seen.Frank6

Frank7

Frank8 The next photo is a close-up of the rim and bowl. It shows the cake and the build-up on the rim as well as the inner tube sitting in the bottom of the bowl.Frank9 I reamed the bowl with a PipNet reamer starting with the smallest cutting head and working up to the head that was the same diameter as the bowl. I reamed the bowl back to bare wood and wiped down the inside of the bowl with cotton swabs and alcohol to remove the dust that remained in the bowl.Frank10 I scrubbed the exterior of the bowl and rim with acetone on cotton pads. I scrubbed until the oils and dirt were gone from the bowl and the rim was clean. There was some nice grain showing on the bowl – cross cut on the side and birdseye on the front and back.Frank11

Frank12

Frank13

Frank14 I sanded the stem and shank with 220 grit sandpaper to remove the scratches around the stem at the junction. I sanded both the shank and stem with medium and fine grit sanding sponges. I sanded the bowl and rim with a fine grit sanding sponge. I cleaned out the shank and the stem with pipe cleaners, cotton swabs and alcohol until they came out clean. The shank was remarkably clean considering how caked the bowl was. I wonder if the inner tube was not responsible for that.Frank15 The next two photos show the pipe along with the no name prince that I recently restored. Both had a natural finish that probably was oiled originally.Gen13

Gen14 I decided to rub this pipe down with olive oil as I did the prince. I rubbed on the oil with a paper towel and let the wood absorb it. I wiped off the excess and hand rubbed it until the wood had a rich glow.Frank16

Frank17

Frank18

Frank19 I buffed the bowl with White Diamond to give it a shine and then gave it a coat of carnauba wax. I then worked on the stem with micromesh sanding pads. I wet sanded the stem with 1500-2400 grit sanding pads and dry sanded with 3200-12,000 grit pads. I rubbed it down with Obsidian Oil between each set of three pads.Frank20

Frank21

Frank22 I buffed the pipe and stem with White Diamond and worked it over the stem and bowl until the feel was smooth. I also buffed it with Blue Diamond. I gave it several coats of carnauba wax and buffed it with a soft flannel buff to raise the shine. The finished pipe is shown in the photos below.Frank23

Frank24

Frank25

Frank26

Frank27

Frank28

Frank29

Frank30

Frank31

Frank32

Frank33

A Fresh Start for a no name Imported Briar Prince


Blog by Steve Laug

The next pipe on the work table is a little prince with no stampings other than Imported Briar on the left side of the shank. It has the characteristic worm trail carvings that were used in days gone by to cover imperfections in the briar. I have never been a fan of these carvings and would much rather have had the original sand pits or rough areas exposed. This pipe had a natural finish – unstained. It looked like it had originally sported and oil finish. The rim was damaged and had a small crack that went into the surface across the top right front edge. The transition between the stem and the shank was not smooth. The vulcanite stem was higher than the briar on the underside and the sides of the shank. The stem itself was made of good quality vulcanite and was not oxidized and did not have tooth marks or chatter.Gen1

Gen2

Gen3

Gen4 The next photo shows a close-up of the rim surface and gives a clear picture of the crack on the rim. It looks far worse than it actually was. The crack did not go too deeply in to the rim surface. It certainly was there and went into the bowl on the inside and into the worm trails on the outside of the bowl. I figured I could top the bowl and remove most of the cracked portion.Gen5 I reamed the bowl with a PipNet reamer starting with the cutting head that was closest in diameter to the bowl. I reamed it back to bare wood so that I could examine the crack on the inside edge of the rim.Gen6 I topped the bowl on a topping board using 220 grit sandpaper. I wanted to remove as much of the damaged area as possible without altering the profile of the pipe.Gen7

Gen8 I cleaned of the rim with isopropyl alcohol to remove the sanding dust. I dripped some clear superglue into the shallow surface of the remaining crack in the rim. I cleaned out the shank with cotton swabs, pipe cleaners and alcohol. Once the glue dried I topped the rim a final time to remove the excess glue and smooth out the rim. I also wanted to remove a bit more of the damaged area.Gen9

Gen10 Over the years when I have come on pipes with the worm trail carvings I have decided to highlight them since I cannot hide them. I have never liked them but figured why pretend that they are not present. I use a black permanent marked to trace the carving in the trails. I go over the carvings until the black has a good coverage on the surface of the carvings. At this point in the process it always looks quite stark against the lighter reddish brown of the briar but once I am finished it looks far better in my opinion.Gen11

Gen12 I wiped the bowl down with acetone on a cotton pad a final time to clean off the dust and to clean up the markings from the Sharpie.Gen13

Gen14 Since this pipe originally had a natural finish – possibly oil finish I decided to return it to that state. I rubbed the bowl down with a light coat of olive oil.Gen15

Gen16

Gen17

Gen18 I have read others talk about the oil going rancid on the briar but I have never had that happen. Rather, I have found that when I rub it on to the surface of the briar and rub it in by hand the heat of my hands rubbing it quickly cause the oil to be absorbed and the result is that the grain is highlighted and the briar has a rich reddish brown hue once it is buffed and polished.Gen19

Gen20

Gen21

Gen22 I sanded the shank stem junction earlier in the process with 220 grit sandpaper and also with a medium and fine grit sanding sponge. I sanded the entire stem in the process of adjusting the fit with the shank. I now used the micromesh sanding pads to polish the stem. I wet sanded the stem with 1500-2400 grit pads and also sanded the bowl and shank at the same time.Gen23 I dry sanded the stem, shank and bowl with 3200 -12,000 grit sanding pads. The bowl and the stem began to take on sheen with each successive step up in grit of micromesh pad. I rubbed the stem down with Obsidian Oil between each set of three pads and continued to sand until the stem was finished. I gave it a final coat of Obsidian Oil and gave the bowl a final wipe down with olive oil on the towel to remove any sanding dust from the polishing.Gen24

Gen25 I buffed the stem and bowl with White Diamond on the wheel and then gave both multiple coats of carnauba wax. I buffed the pipe to a shine with a soft flannel buffing wheel. The finished pipe is shown below. You know, on this one after the refinish, the worm trails don’t look too bad!Gen26

Gen27

Gen28

Gen29

Gen30

Gen31 I decided to take a lesson from Andrew Selking and his pipe photos for the final pictures of the pipe. His signature is the nice piece of drift wood in the photos. I don’t have one of those but I do have an old cast iron frog that my grand dad gave me years ago. I decided to use it as a prop in the photos to hold up the pipe.Gen32

Gen33

Gen34