rebornpipes is over a year old and currently there are over 450 articles on the blog. The site continues to grow as the nine blog writers and additional guest writers share their refurbishing work in articles on the blog. The original vision of rebornpipes being a place to share ideas and processes of refurbishing continues to come to fruition as those who read the blog contribute their comments and also write ups about their own refurbishing work. The collection of tips, tricks, use of tools and processes continues to grow over time. As it grows and deepens I am becoming more and more aware of how easily the good tips and tricks will become lost in the sheer volume of material.
With that in mind I am working on several ideas that will help to maximize your experience with the blog. The first of these involves encouraging users to utilize the search feature on the home page. It is a great help as you seek to find information on whatever topic that you are looking for on the blog. The data here is truly a gold mine of ideas and as it grows I can see it becoming an expanding source of know how information to address the needs of anyone who wants to either refurbish their own pipes or those of others. The search feature is a definite help.
But the search engine is only as good as the systematized organization that accompanies the articles on the blog. The underlying structure needs to be seamlessly integrated in a way that makes wealth of materials easily accessible to the viewer/user. To make the search feature even more robust I am in the process of reworking the tags on the articles to facilitate this process. WordPress allows blog writers to set up tags for every article that is written on the blog. Tags are the key ideas or concepts that are covered by the articles. It is the tags that make the data more easily searchable. These tags not only work for the search engine on the blog but also for Google and other online search engines.
An example of how tags work may help illustrate this. If on a pipe restemming article the tag was simply restemming a pipe it would bring up a multitude of articles on restemming that may or may not have the information you are searching for. However, if that tag was broken down into multiple tags such as – using a Dremel to shape a stem, turning a tenon, tenon turing tools, shaping a button, cutting a slot, you could search under any of the parts of the work of restemming that might interest you for further details that are involved. I am working on systematizing the tags so that readers of the blog can easily search for what they are looking for on each topic of interest. As I read through the various articles again on the blog I have found that each has the potential to have unlimited numbers of tags that help to organize the topics covered in that article. But there is a need to standardize these tags to make the connections between articles easy to find.
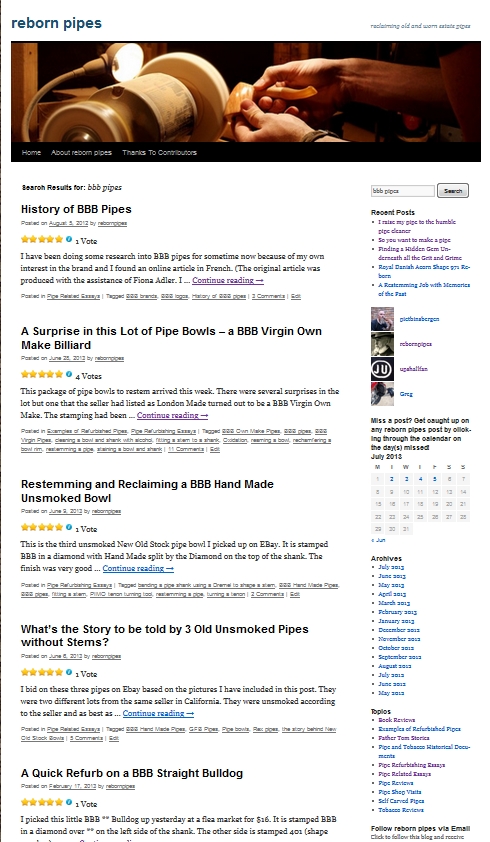
A reader should be able to put in a word, term or group of terms in the search box on the opening page of the blog and find a listing of all the articles on that idea as well as articles that use parts of the idea in the work on a particular pipe or process. This should include not only the main article on it but also every other article that mentions that particular topic. To help visualize this process I used screen capture to show an example. In the first picture below I entered a search for BBB pipes and the search came back with several pages of articles on the blog on that topic. The picture below shows the first page of the list. I could specialize that search to a specific model of BBB or a repair on a BBB pipe and have a smaller list of specialized information. You can see that the process can greatly facilitate finding material on the blog.
To make the search even more specific and usable I am in the process of entering tags for every article on the blog that breaks down the specifics to include the make of the pipe, the model, the work done on it, stem repairs, restaining the bowl, etc. The addition of the multi-tags should make searching more easily done. I have included an outline below of the tag systematization that I am working from in the process. I want to seek to develop continuity among all of the articles. When I am finished with it the search feature will be more precise and helpful in yielding the information that you might be searching for.
I would encourage you to give the search feature a try while I continue to work on the tags for all of the articles. Type in a topic of choice and see what is present in the blog archives. Check back often as I continue to refine the tags and make the search more functional.
Here is the outline for the tags that I am working on presently. It is still in development so I am confident that new sub categories will be added in the process of entering these tags for the articles now present.
1. Stem work
a) Shaping a stem with a Dremel
– Shaping a saddle stem
– Shaping a diamond stem
– Shaping a taper stem
b) Shaping a stem with files and sandpaper
c)Using a tenon turner to cut a new tenon on a stem blank
– PIMO tenon turning tool
– PME tenon turning tool
– Lathe
d) Replacing a broken tenon
– Using a threaded tenon replacement
– Using a Delrin tenon replacement
e) Fitting a stem to the shank
f) Polishing the stem
– With a buffer
– Without a buffer
– Micromesh sanding paper/disks
– Polishes and compounds
g) Removing oxidation from the stem
– Bleach
– Oxyclean
– Bic Lighter
h) Cutting a new button on the stem
– Cutting a new button with needle files
– Shape a button with needle files and sandpaper
i) Opening up the airway in the stem
j) Shaping the slot in the button
k) Orific openings in the button
l) Using estate stems to restem pipes
m) Using stem blanks
n) Repurposing stems – saddle to diamond shaped, billiard to lovat
o) Lifting tooth marks – using heat – heat gun, boiling water, Bic lighter
p) Repairing bite throughs/holes with superglue
q) Repairing holes with vulcanite dust and superglue
r) Repairing holes with vulcanite dust and epoxy
s) Filling dents with superglue – clear/black
t) Filling dents with vulcanite dust and superglue/epoxy
u) Drilling and setting a Delrin replacement tenon
v) Cleaning the inside of the stem – tools
w) Protecting stem logos and stamping
x) Bending stems with heat – heat gun, oven, flame, boiling water
– Bending acrylic stems
– Bending vulcanite stems
y) Repairing P-lip stems
2. Bowls – Refinishing
a) Removing a finish
– An alcohol bath
– Acetone washes
– Sanding
b) Refinishing a bowl
– Sanding with micromesh
– Sanding with wet dry sandpaper
c) Staining a bowl
– Applying the stain
– Aniline stains
– Flaming the stain
– Lightening a stain – diluting, washing
– Matching stains
d) Rusticating a bowl
– Rustication tool options
– Finishing a rusticated bowl
– Staining a rusticated bowl
– Polishing a rusticated bowl
– Waxing a rusticated bowl
e) Sandblast bowl
– Cleaning a sandblast finish with Oil soap and a toothbrush/tire brush
– Polishing a sandblast
– Staining a sandblast
– Waxing a sandblast
f) Topping a bowl
– Sanding the rim
– Sanding setup
– Staining the rim
– Polishing/waxing the rim
– Beveling the inner edge of the rim
g) Steaming out dents
– Tools needed for steaming dents
– Process of steaming dents
h) Replacing fills
– Removing old putty fills
– Replacing old fills with a mix of briar dust and super glue
3. Bowls – Internals
a) Reaming bowls
– Different types of reamers
– When to ream
b) Bowl Coatings
– Removing bowl coatings
– Making and applying bowl coatings
c) Sweetening a bowl
– Salt and alcohol treatment
– Cotton bolls and alcohol treatment
– Activated charcoal
d) Pipe Retorts
– What is a retort
– How to use a retort
– How to make your own retort
e) Repairing cracked bowls
f) Chamfering the rim
g) Repairing an over reamed or over drilled bowl
– Making and using pipe mud
h) Repairing an out of round bowl
i) Cleaning bowls and shanks
– Pipe cleaners and cotton swabs
– Sanding paper
– Pipe retorts
j) Alcohol bath – how to make one and use it
k) Opening an airway
l) Coping with an off centre airway
4. Bands
a) Repairing a cracked shank
– Delrin/stainless insert
– Glue
– Bands
b) Pressure fitting a band
– Heating the band – heat gun, flame
– Pressing the band in place
– Removing dents and dings in a band
c) Polishing a band/ removing tarnish and scratches
– Silver polish
– Polishing cloths
– Micromesh sanding pads
d) Shank Extensions and banding
e) Repairing a broken shank
– Shortening the shank
– Regluing a broken shank
– Adding a shank extension
5. Documents
a) Historical documents
b) Catalogues – shops and brands
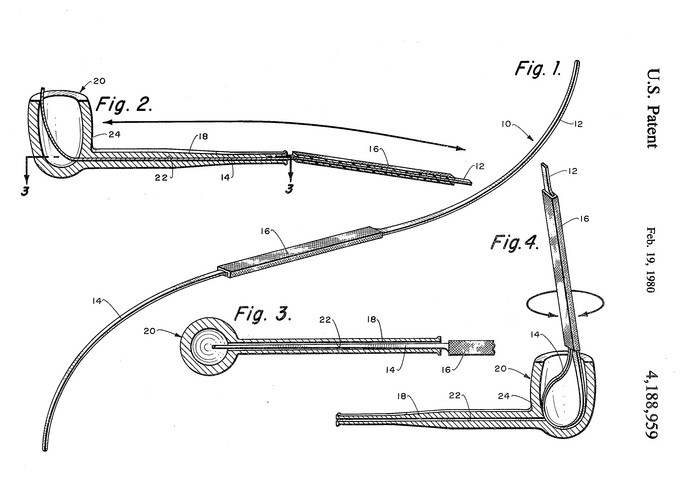
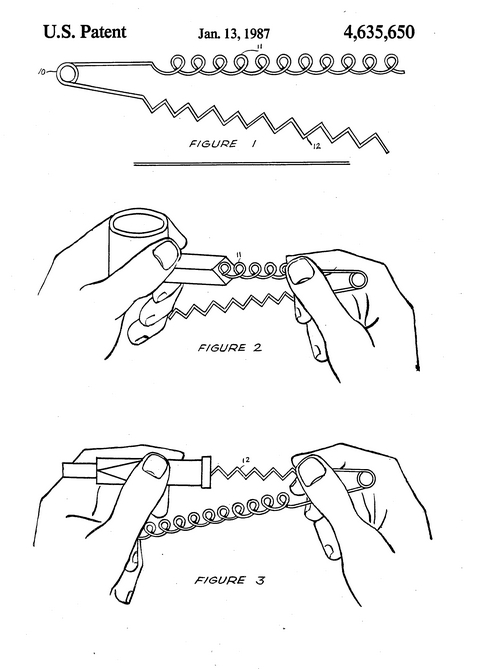
c) Patent information
d) Brochures
e) Instruction manuals
6. Stories and Essays
a) Father Tom stories
b) Short stories
c) Pipe reviews
d) Tobacco reviews
e) Book reviews
f) Pipe related topics
g) Pipe Shop visits
7. Self-carved pipes
a) Carved from kits
b) Carved from briar blocks
c) Reimagined pipes
If you come up with additional topics that should be added as you read this please post them in the comments and I will add them to the list. This is a work in progress and will take time to fully implement but I think it will be an aid to finding materials here.