Blog by Paresh Deshpande
This pipe had been lying around in the pile of pipes to be restored for a long time. How, when and from whom I got this pipe is now all but a completely faded memory.
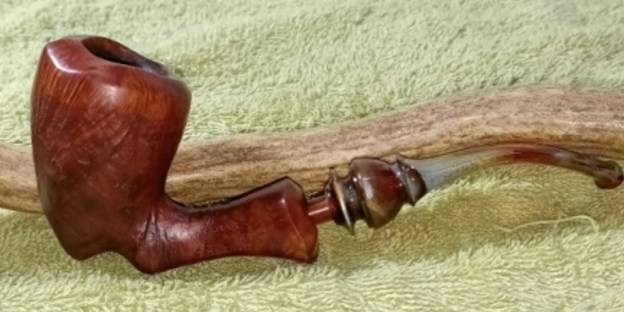
Whenever I went through the pile and came across this pipe, the Acorn shape freehand always made me believe it to be Danish made. However, when I picked it up for restoration and checked out the stampings my assumptions were proved to be incorrect. This shallow sandblasted Acorn shaped twin heeled pipe with a wavy smooth rim top and a flared shank end is stamped on the left side of the shank as “HANDCARVED” over “BY” over “DENNIS RUTH” in freehand cursive writing while the smooth bottom of the flared shank is stamped as “8 – 18 – 78” denoting the date of carving this pipe. The stampings are crisp, clear and easily readable. The acrylic fancy turned stem is devoid of any stamping. This is one maker that I haven’t come across in the years that I have been working on pipes, it piqued my interest and I wanted to know more about this maker. I visited pipedia.org where there is very brief and concise information about the carver. Given below is the link to the brief on pipedia.org for those interested to view some of his work since the information is reproduced below.
https://pipedia.org/wiki/Ruth,_Dennis
An American pipe maker working from Des Moines, Iowa, Ruth is independent craftsmen who, like others of his genus, prefer quality over quantity. He was an employee of a tobacco/pipe shop known as the Tobacco Bowl, where he custom made pipes to his customers requests during the 1970’s – 1980’s.
The date stamped on the pipe places it in the correct time period when Dennis Ruth carved pipes to his customer’s request. With a better understanding of the pipe and its carver, it was time to work on the pipe itself.
Initial Visual Inspection
This shallow sandblasted Acorn shaped freehand is perfectly proportioned and lightweight. There is a thin layer of cake in the chamber while the smooth wavy rim top surface is clean and in good condition. The stummel appears dull and lifeless. There is a slight bulge on the left side above the foot of the stummel which needs to be investigated. The shank end has what appears to be a fill. I need to check and confirm if the fill needs to be refreshed along the way. The mortise is nice and clean. The fancy acrylic stem with swirls of orange brown and grey perfectly complements the stummel and makes for a visual treat. Other than dullness of the surface, the stem is in decent condition. The following pictures will give you a general idea of the condition of the pipe.

 Detailed Inspection
The wavy rim top surface is pristinely clean with no damage to either the inner rim edge or rim top surface. There is a very thin layer of cake. For a pipe that is 45 years old, it has seen very minimal use and this makes me wonder what could be the reason for this? The answer could lie in the condition of the chamber walls which will be ascertained once the cake has been taken down to the bare briar. The warm honey brown colored Acorn shaped stummel has a very shallow sandblast with upper 1/6 th portion being smooth and showing beautiful straight grain. Though clean, the stummel appears dull and lifeless. A nice scrub and polish should make the briar look lively. However, there are two spots, one about half way down from the top on the left side of the stummel and the second one, continuing along the same plane to the front of the stummel (encircled in yellow) that have darkened and bulged. This definitely is not a good sign and could be the beginnings of a burn out. Whether these two spots are hot spots or otherwise will be confirmed after the chamber has been examined once the cake has been completely removed. The mortise is clean and the one fill at the shank end appears stable and solid.

 The variegated acrylic fancy stem has beautiful swirls of grey and orange browns that lend a trendy look to the entire pipe. The stem airway is clean and there are no bite marks/ tooth indentations or tooth chatter in the bite zone. The button edges are in pristine condition. However, there is on oddity at the slot end. The slot is rounded and seems as if the maker forgot to cut a horizontal slot. It’s definitely not orifice but appears unfinished and that is the oddity on this otherwise beautifully carved pipe. The tenon end and slot end are all clean and tidy.
 The Process
I ran a pipe cleaner dipped in 99.9% pure alcohol through the stem airway just to make sure that the airway is perfectly clean as appreciated and was pleased to note that it was. Now all that remained to complete the stem refurbishment was to subject it to the polishing regimen. I set the stem aside to work upon later. Using my fabricated knife, I scrapped out the little cake from the chamber walls. I further smooth out the chamber walls by sanding it with a folded piece of 220 grit sandpaper and wiped the walls with a cotton swab moistened with alcohol to remove the residual carbon powder from the chamber. Close observation of the walls confirmed that the walls have thinned out more along the mid left side and towards the front of the chamber (encircled in light blue). This damage is not deep and restricted only to being superficial, however, if not addressed now, a burn out is an imminent danger later during use.
 I wet sand the stem with 600, 800, 1000, 1500 and 2000 grit sandpapers. This helps remove the layer of grime and dullness from the surface, address minor tooth chatter and bite marks, while progressive use higher grit sandpaper helps remove the scratch marks left behind by the coarser grit sandpaper.
 I moved ahead with the polishing regimen of the stem by dry sanding the surface using 3200 to 12000 grit micromesh pads. The stem has a nice transparent shine to it and the swirls add another level of complexity to the beauty. I set the stem aside till I completed the repairs to the stummel.
 Turning my attention to the stummel, I continued with the internal cleaning of the stummel. Using a dental scoop, I scraped out the dirt and dust form the walls of the mortise. I further cleaned the walls of the mortise and airway using pipe cleaner and q-tips moistened with alcohol. The mortise is now clean and fresh.
 Once the stummel internals were cleaned and freshened up, I proceeded to the external cleaning of the surface. I cleaned the external surface of the stummel with undiluted Murphy’s oil soap and a hard bristled toothbrush. I cleaned the smooth rim top surface with the soap and Scotch Brite pad. I thoroughly cleaned the mortise with shank brush and anti-oil dish washing soap.

 As remarked earlier, the chamber wall on the left and towards the front had charred a bit and once the charred wood was reamed out, it left the walls slightly thin which would lead to a burnout when smoked if left unaddressed. I decided to address this issue by coating the walls with a layer of J.B. Weld. J B Weld is a two-part epoxy Cold Weld in two tubes; hardener and steel which are mixed in two equal parts (ratio of 1:1) with hardening time of 5-6 minutes and complete curing time of 6-8 hours. I poured the contents of the two tubes and mixed it well. I applied this mix over the entire chamber surface as a very thin coat. I worked fast to ensure an even coat before the weld could harden. I set the stummel aside for the application to harden and cure overnight.
  Next I sand the weld coating to a nice smooth and even surface using a folded piece of 180 grit sandpaper.
 After I had applied and sanded down the JB Weld to a thin coat, I wanted to further protect the briar while adding another protective layer between the JB Weld and burning tobacco. I addressed this by mixing activated charcoal and plain yogurt to a thicker consistency, just enough that it would spread easily and applied it evenly all along the chamber walls after inserting a folded pipe cleaner through the draught hole to keep it open. Once dry and set, this will not only protect the walls but also aid in faster build up of cake. I set the stummel aside for the bowl coat to dry out and harden for a couple of days.
  Three days later, the bowl coating had completely hardened. I rubbed a small quantity of restoration balm in to the stummel surface and set it aside for about 20 minutes to be absorbed in the wood. The balm not only hydrates and rejuvenates the briar wood but also enlivens it. Thereafter I hand buffed the stummel with a microfiber cloth to deepen the shine. The stummel looks absolutely stunning at this stage.

 I completed this project by hand polishing the stummel with Halcyon II wax. I rubbed this polish deep into the rustications and after a couple of minutes, vigorously hand buffed the stummel with a microfiber cloth to a deep shine. I polished the stem with Blue Diamond compound and subsequently with carnauba wax using my hand held rotary tool. This is a gorgeous looking pipe and will be an integral part of my collection of contemporary American Pipe Carvers. Shown below are a few pictures of the completely refurbished pipe. Hope you have enjoyed the restoration journey of this project as much as I loved working on it. Cheers!


