Category Archives: Pipe Related Essays

Short and not so short essays on pipes and tobacciana

Making a Simple Light Box


Blog by Andrew Selking

I saw a post by Andrew on one of the forums I follow and wrote and asked if he would post it here. It is something that I have been working on for a while now and to read Andrew’s work. Without any further ado here is the article.

Let me preface this by saying I am not a photographer and I only have vague memories of learning about light in science class. I’m also frugal, so when I started looking for ways to take better pictures of my pipes, cost was big consideration.

So let’s build a light box. First we’ll start with the materials:

medium size cardboard box
white tissue paper
white duct tape (you could also probably use white masking tape)
white poster board (the thin flimsy kind)
day light bulbs (14W compact fluorescent)
ideally three directional lamps

Cut out square sections on three sides of the box. Tape the top of the box and cut out a square section for the top. I used some of the scrap cardboard to reinforce the top. Next tape your poster board in the inside of the box. You will want it to curve from inside the box so that it makes the item you’re photographing look like its floating. Use the white tape to cover any cardboard that is inside the box. Finally, tape your white tissue paper over the openings on the two sides and the top.photo1

photo2

photo3

photo4I don’t have a fancy camera, but it does have a setting for slow flash to help give a better fill. I also use the close up setting. I was having problems getting my darker pipes to show up in the pictures. I tried more light and it still didn’t help much. I accidentally discovered that changing to a darker background makes the wood easier to see. I have an example of a pipe photographed with the all-white background and the same pipe photographed with a green towel in the background.photo5

Photo6 I know a lot of you out there do some really great work restoring pipes, while others have amazing pipe collections. This is an easy way to let others appreciate what you do. I hope you found this post useful and I look forward to some amazing pictures.

Restoring Two Older Bonus Walnut Pipe Stands


Blog by Steve Laug

One of the perks I picked up in the recent lot of pipes I bought off of craigslist was a walnut pipe rest and a walnut 6 pipe rack/humidor. Both of them were in decent shape. They were scuffed and worn in spots and dusty from disuse. But they were still very functional. I have wanted a two pipe rack like the one on the left of the photo for a while now to use on my desk at the office. The other six pipe rack with the humidor now resides beside my chair in the living room. I have had pipe laying in an ash tray and tins stacked next to them. I was able to put the pipes into the rack and the tins in the humidor so it was a great addition.craig4 I took a few photos of each piece before I cleaned them up to show that they were in relatively good shape for pieces this age.rack1

rack2

rack3

rack4

rack5

rack6

rack7

rack8 I worked on eth humidor/rack first. I took it apart to clean up the pieces. The sides of the humidor had removable cedar panels on the sides of the box. The bottom and top of the humidor were milk glass and both were in great shape. There as a sliding metal plate perforated with holes that held absorbent material inside that could be wetted to keep the humidor living.rack9 I scrubbed the glass on the top and the bottom with soapy water and rinsed them before drying them. The walnut rack and case I scrubbed down with Murphy’s Oil Soap and then hand buffed with a soft cotton cloth. The wood was quite soiled as can be seen from the cotton scrubbing pads in the next two photos. I was able to remove all of the grime from the wood and bring some warmth back to the finish.rack10

rack11 I put the interior of the humidor back together. There was a cardboard piece that sat between the milk glass and the wooden bottom of the box that went in first. Then the cedar pieces that went on the sides went in next. These were beveled on the bottom and sides to make for a smooth fit with no gaps. They were well cut and fit tightly together with no gaps.rack12

rack13 I slid the metal plate out of the track in the lid and scrubbed it with a damp cloth to remove the dust and tobacco bits from the surface of the metal. I buffed it with a soft cloth to bring back some shine. After I had dried it out I slid it back into place on the lid. There is a gold label on inside of the lid that reads “Made of Genuine American Walnut”.rack14

rack15

rack16 I buffed the rack and humidor by hand and took the next series of photos.rack17

rack18

rack19

rack20 I scrubbed the two pipe rest with Murphy’s Oil Soap and hand buffed it with a soft cloth. The finished pipe rest is shown in the photo below. It looks like new and has a deep warm glow to the finish again.rack21

Smoke Rings


Circumstances and events of life have had me out of the shop for too long now, something I hope to rectify very soon. Since I’ve been unable to work on any of my projects I’ve been doing a little writing again, a passion I’ve let lay dormant for a while. At any rate, I thought this particular poem might be of interest to you good pipe men and women so, without further adieu, I share “Smoke Rings” with you.

Greg's avatarPotholes in the Road of Life

A few days ago Carpe Diem Haiku Kai did an exercise on, what else, haiku: specifically form. The challenge was to stretch ourselves by doing three haiku in slightly different ways: one 3-5-3 stanza, one traditional 5-7-5, and a free form stanza. It took me a little longer than usual to get this done; I had an idea but it took several tries to get something I was pleased with. Consequently I missed the deadline but have a chained haiku that I really like.

Smoke wafts from
A burning ember
In my pipe

An animated
Enchanting dance of smoke rings
Drifting by my eyes

Lulling me into
A tranquil state of mind
Induced by rolling smoke rings

As you can see, I stayed with the guidelines using stanzas of 3-5-3, 5-7-5, and 5-6-7 for the free form ending, while, in my mind at least, chaining them into one poem. Even…

View original post 22 more words

Saving the Pipes


Blog by Alan Chestnutt

I often spend a bit of time several days a week reading some of my favourite blogs during my lunch break at work. I regularly check Alan Chestnutt’s Reborn Briar Estate Pipe website and read some of his articles. I always find some food for thought and often come across kindred ideas that have been rattling around in my head. This was the case yesterday when I went through older articles that Alan had posted. It captured very clearly something I was thinking about as I worked on a particular pipe that I had bought from a pipeman who was a stroke survivor. It obviously had been his favourite pipe and I wanted to bring it back to life. The phrase that Alan used that caught my attention as I read was a simple phrase he used to describe the work he does as a pipe restorer – “Saving the pipes”. I am reblogging this here on rebornpipes as for me it captures the heart of why I work on old briar. Without further introduction here is Alan’s article. Thanks Alan.

The first time I heard the phrase “Saving The Pipes” was on a YouTube video made by TPC (Tobacco Pipe Collectors). This phrase has stuck in my mind ever since. As a pipe restorer, I feel that I am doing exactly that “Saving The Pipes” – but why is this such a vital role in the pipe smoking hobby?

An estate pipe is one that has been used and cherished by a previous pipe smoker. They may not always have been maintained to a standard that we come to expect today, but a little love and TLC can restore it to its former glory. Many estate pipes did not receive a high level of care and attention because in the heyday of pipe smoking, the pipe collection of a smoker may have been limited to one!

I remember my father with his one Falcon pipe. When the smoke was finished, the ash was knocked out and the pipe was refilled an hour later for the next smoke. Sometimes the ash wasn’t even emptied out and fresh tobacco was just loaded on top of it.

Anyone today who is a non-smoker finding a pipe like that may well throw it in the trash can and that would be a crying shame. These old pipes have a history, a story to tell. I have a pipe I am about to restore at the minute. It is a 1st World War officer’s pipe which has had the walls carved by the soldier during the war.Some might say these carvings have ruined a good Barling’s Make pipe, but I disagree. From the carvings, I have been able to establish the regiment of the soldier, where he was trained and where he fought. I am sure that pipe could tell some tales if it could talk. And despite the carvings, the bowl of the pipe is in solid condition – so now we have a smokeable Barling’s Make pipe which were considered at that time to be the best smoking pipes in the world, with a tremendous history attached to boot.Alan There is no question that the craftsmanship, and the quality of the briar, is celebrated as superior in the first half of the twentieth century. Many people will look at these old pipes and consider them junk. It is my role to take someone else’s junk and restore it to as like new condition as possible. This creates a pipe that can be passed on to a new smoker. A pipe with a history, a pipe with many stories to tell, a pipe with well dried out and cured briar that will smoke dry and a pipe from the heyday of manufacture for this great hobby.

When you buy an estate pipe, you will probably spend less than on a new pipe, so there are savings to be made. Take this pipe and have a quiet conversation with yourself. Imagine the hand of the owner that held it before you. Where did he live, what did he do for a living, what stories could he tell you? Fill the pipe with tobacco, light it, sit back and think of former owners. Raise a bowl in their honour and savour the smoke. An old estate pipe will have outlived its previous owner, and when well restored and looked after, may well outlive you also, to be passed into someone else’s hands who will be thinking about your life.

So for a value for money, good quality pipe with a story to tell, why not consider adding a few estate pipes to your collection. You will be glad you did, and I can continue to “Save The Pipes”.

Here is the link for the article above article. Be sure to wander around the site as Alan and his son Adam do stellar work. http://estatepipes.co.uk/shop/saving-the-pipes

Birth of a Handmade JSEC Egg


Blog by Steve Laug

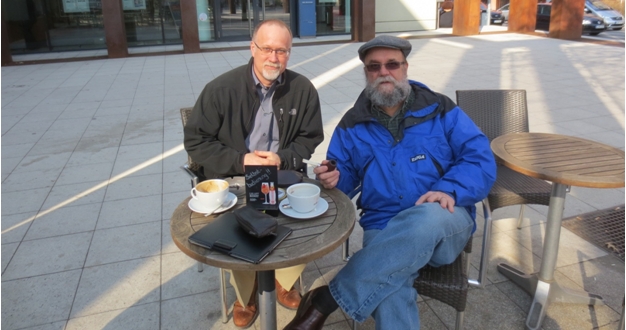
When I met with James in Stuttgart recently I spoke about ordering another pipe from him. On the evening of the day we met I went on his website and a couple of US based sites that carry his pipes and nothing truly caught my eye. I went through his photo gallery of pipes that he had made over the years and chose two different shapes from his website and sent him my request. I really like his Speckled Egg shape and his uniquely rusticated Ria shape. I emailed him regarding these two pipe shapes and let him know of my interest. He said he would let me know when he cut another one of either pipe.

I traveled from Stuttgart to Berlin to meet with another team and do some development work for the Foundation I work for. Then on my last day in Berlin, before heading back to Canada, I got an email from James about a pipe he was in the process of carving. Here is a portion of that email “…I got the urge to do a Speckled Egg… I’ll send you pictures once it’s done… absolutely zero obligation… I just like making the shape… you have first dibs on it if you want”. I could not believe he was already working on one of the shapes I had mentioned. I have to tell you I was really looking forward to seeing the photos of the pipe that he would send.

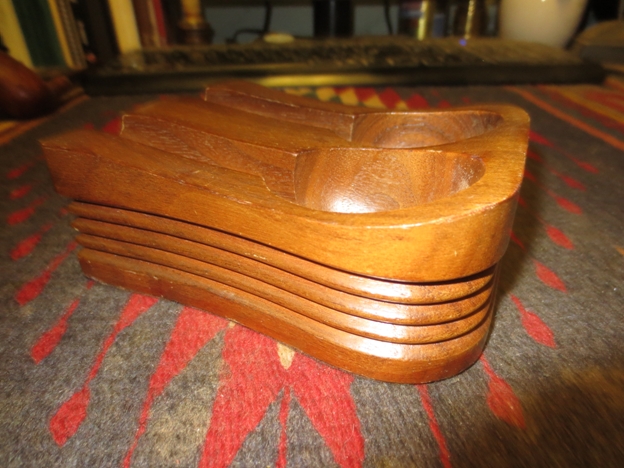
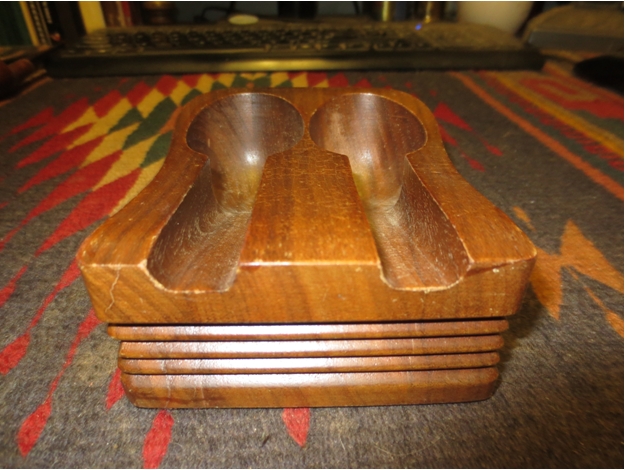
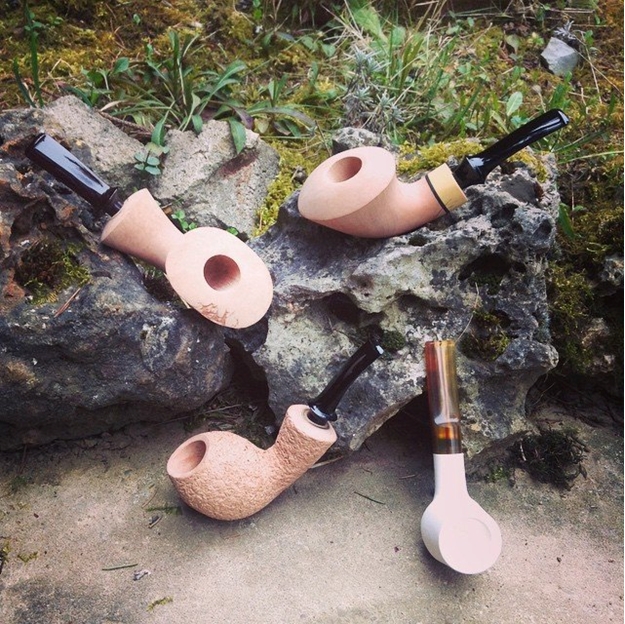
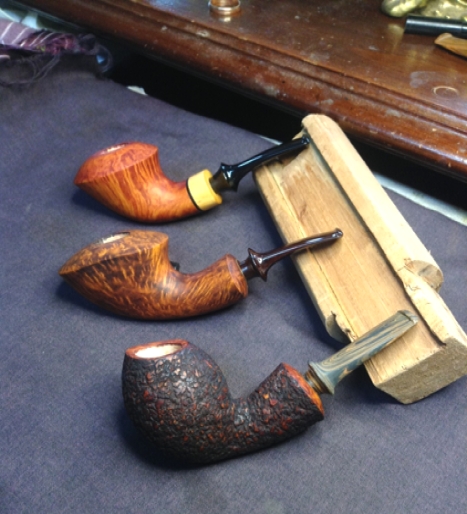
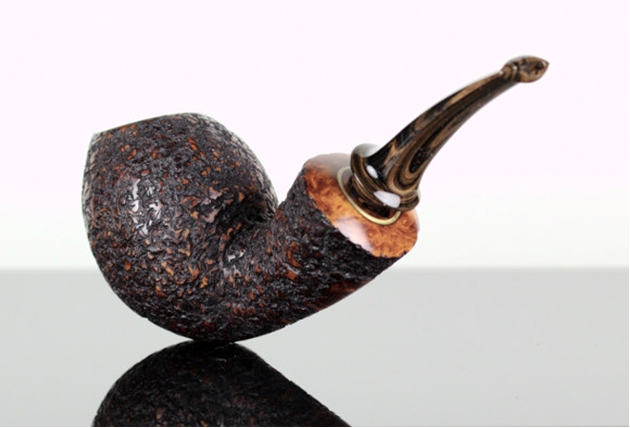
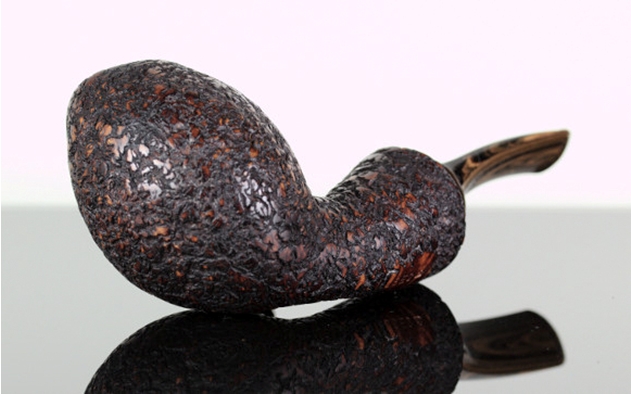
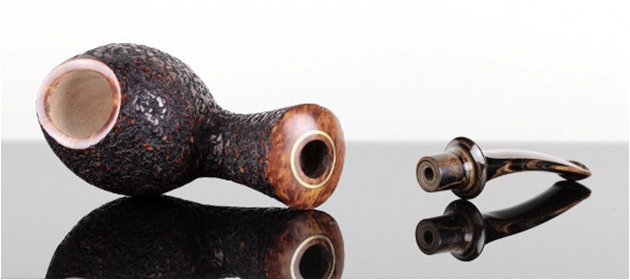
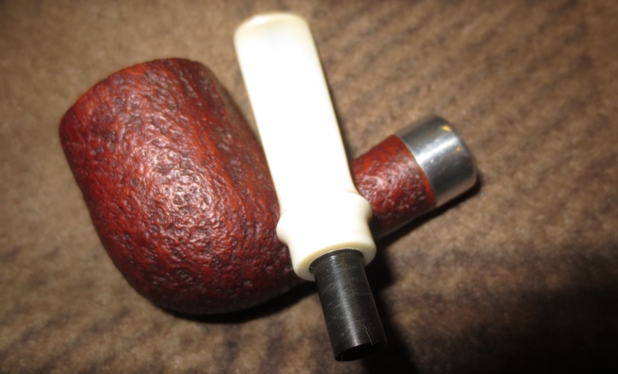
I spent Friday in the air between Berlin and Vancouver and thus totally out of the loop for emails. When I arrived back in Canada though, I had an email waiting for me with the first photos of the new pipe he was working on. It is shown in the photo below of a group of four that he is currently working on. The pipe that I was interested in is on the bottom left of the photo below.JSEC1 Included with that photo were several other photos showing the new pipe with the one that he had been smoking when we had coffee together. He wrote the following, “As you can see the bowl is more defined… I placed the other in the pic for comparison… I can bring in the shank side of the bowl a tic more if you prefer that, but it sits really nicer in the hand than the original…This is the how the shape has morphed over the years… I have several… It’s my favorite shape…” With those words and the photos he had me. I wanted this pipe to be mine.JSEC2

JSEC3

JSEC4 
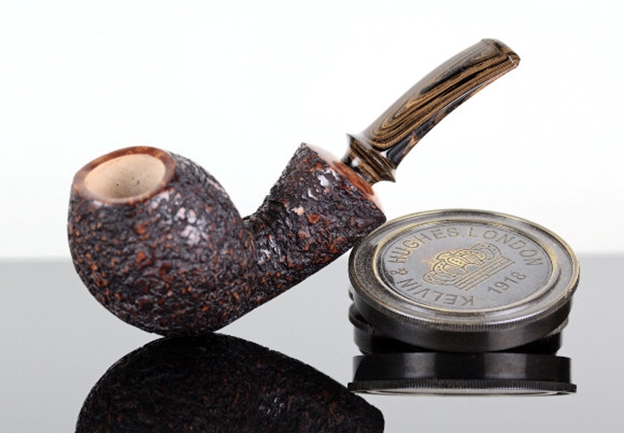
Once I had decided that this was the pipe for me James sent me some choices for the stem material. In the above photos he used a black Ebonite and that was beautiful but I had also seen some of his Cumberland stems. There was a particular Cumberland that he had used on other pipes that I liked. It was a Briar Cumberland. That is what I decided to go with and a stain colour that would match. James sent me the following email after I made my choices: “You won’t be disappointed (with the briar Cumberland)… It’s beautiful material… Me and one other guy are the only ones I know using it a lot 😉 The black is a classic color and you can’t go wrong with it, but Cumberland stems are my favorite… I got a lot of criticism from the U.S. Makers early on because of it… Makes me chuckle now… Since they started using different Cumberland mixes in the last year or two. Have a great rest of your weekend… I’ll send you some progression pictures when they warrant it… James”.

Now the wait began. I was looking forward to the updates on the pipe that would come via email. I have to tell you that James letting me be a part of the process of the birth of this pipe was a special bonus for me. I was excited to see how the pipe would develop when he sent the next installments.

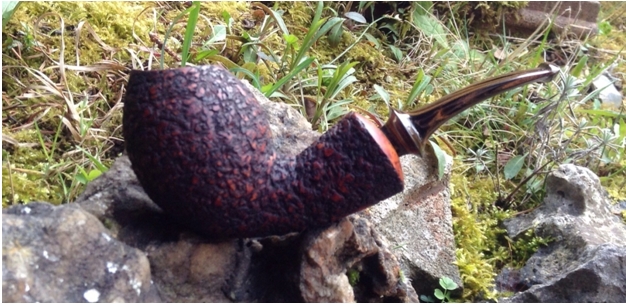
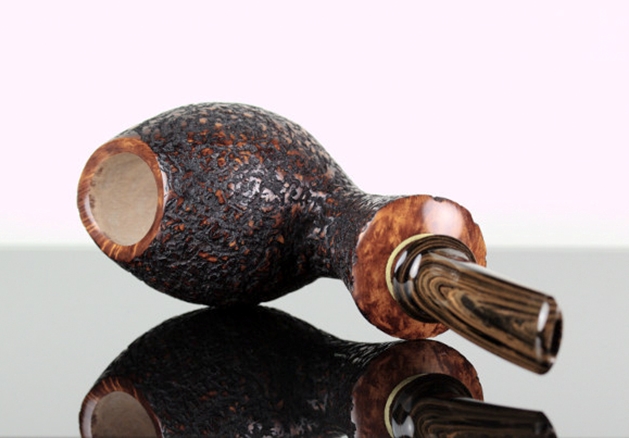
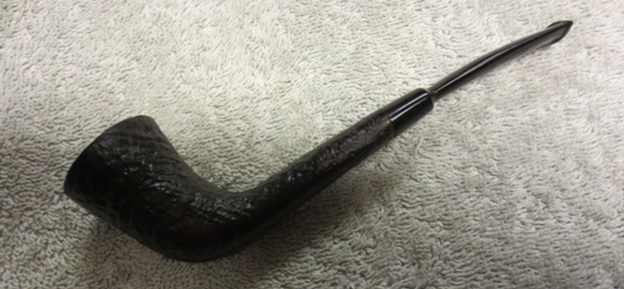
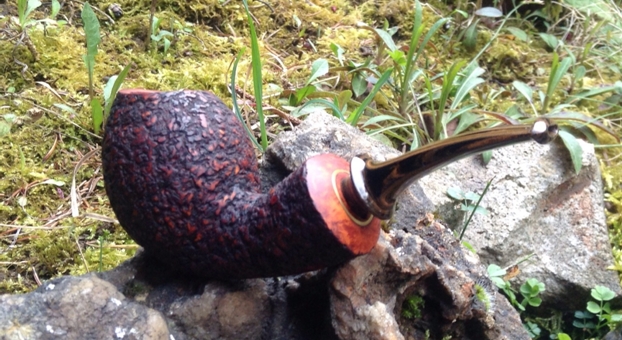
I did not have to wait too long. On Sunday morning (Vancouver time) I woke to several more emails from James. These all included updates and photos of the pipe. It had been stained with his contrast colour stains. It looked very similar to the pipe he smoked while we were together in Stuttgart. The newly cut Briar Cumberland stem looked amazing. I could not wait to see it polished. I loved both the shape and the colours of the pipe and stem. The swirls on the Cumberland stem are very similar to the stem on a pipe I had made by Todd Bannard of Briar Sweat and Tears http://www.briarsweatandtears.com/. James included the following message with the photos: “Getting closer… Wait until the stem is polished and bent… ;-)”JSEC5

JSEC6

JSEC7

JSEC8 I wrote James about my excitement at the look of the stem and the pipe. I really liked the way the Cumberland stem had come out and noted that. James replied, “I told you the briar Cumberland is nice… wait till it’s polished up… it will almost match the colors of the pipe itself”.

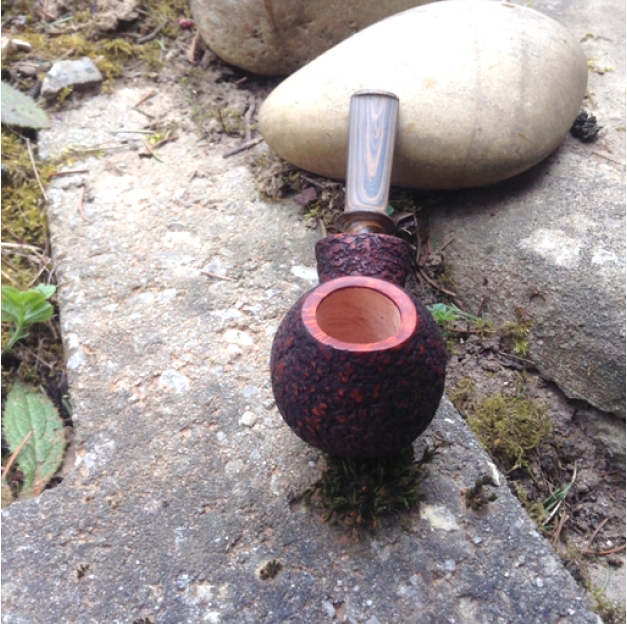
The next morning when I opened my email there was another email from James that included five more update pictures of the polished stem. He wrote: “I think you’ll be pleased with the stem… I love this material… And it shines up really nice… and has an awesome pattern on it.”

Once again I wrote back letting him know that the pipe was amazing in my book and I was very pleased. I asked him about the dimensions and he responded with a few more pictures and the dimensions of the pipe. Here are the dimensions:

Length: 5″ 127mm
Width: 1 5/8” 41mm
Height: 2″ 51mm
Bowl depth: 1 3/8” – 1 ½” 35-37mm depending on where you fill it to
Weight: 56 grams

James also wrote: “I normally coat my bowls on all my pipes… but if you don’t want the bowl coated, I’ll need to know before the weekend… I don’t mind leaving it bare for you… I’m pretty sure you know how to smoke a pipe… Ha, ha. James.” I wrote back and asked that he leave it bare for me.JSEC9

JSEC10

JSEC11

JSEC12

JSEC13 
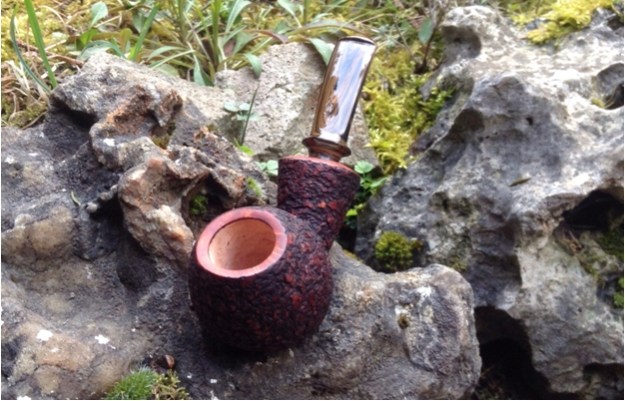
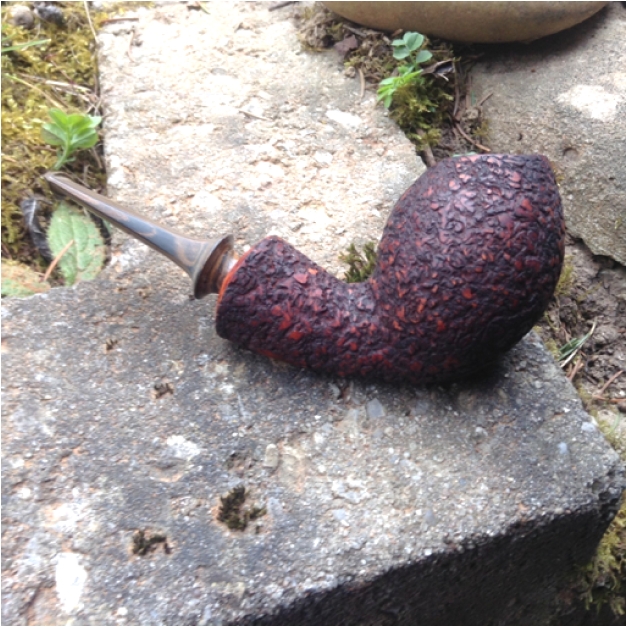
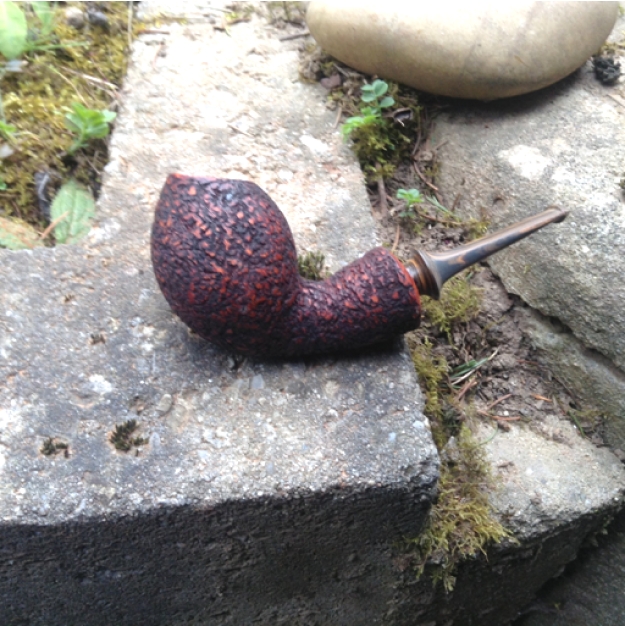
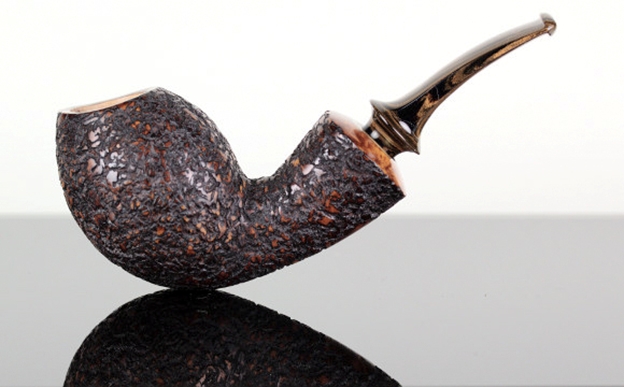
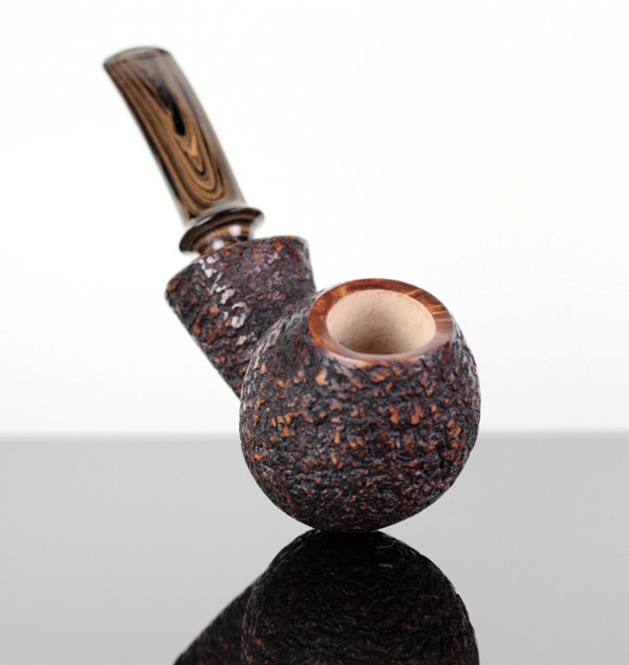
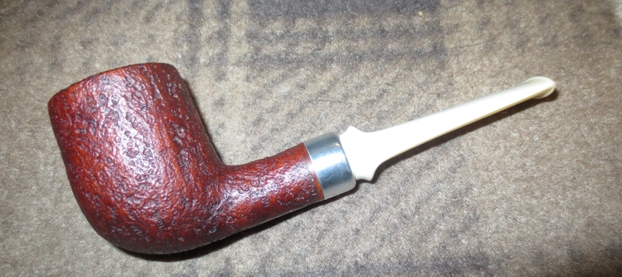
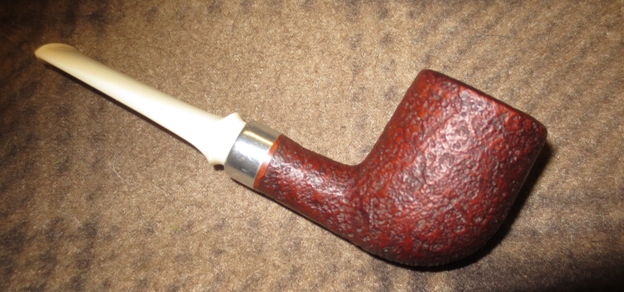
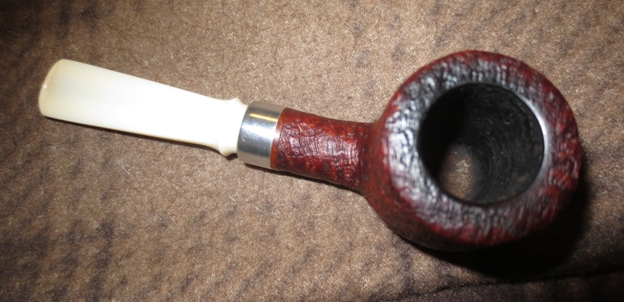
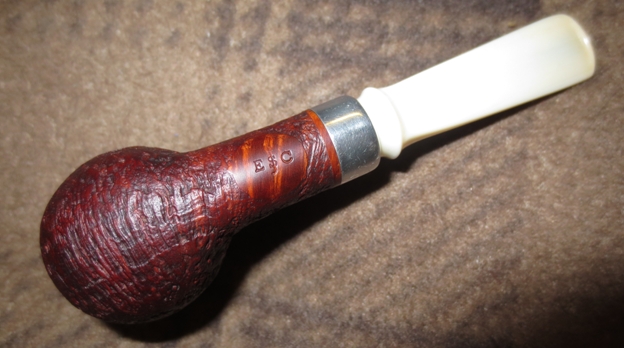
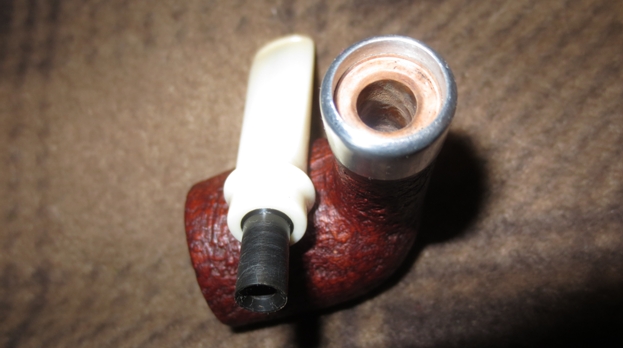
The rest of the week went past quickly with no updates. I knew James put a finish coat on the pipe to set the stain and then did some more polishing. Whatever the process was he said it took about a week before the pipe was completed. Then on Good Friday I received an email that the pipe was finished. James included the following information in his email: “Steve it’s done…. 😉 I like the way the colors came out… Would you like it mailed via German Mail…I can do that tomorrow… or US Mail…that will have to wait till Monday… the German mail should be quicker by a day or two…would be mailed as an international letter… works like a charm each time.”
James included the following finished photos of the pipe to make me salivate. I can’t wait to see it in person. I paid James via PayPal, sent him and email that German mail would be fine. He sent me a notice that the payment came through and a tracking number to trace the shipment.JSEC14

JSEC15

JSEC16

JSEC17

JSEC18

JSEC19

JSEC20

JSEC21

JSEC22

JSEC23 I have to tell you, I have checked that tracking number on the postal site every day since he sent it to see the progress of the pipe from Stuttgart to Vancouver. Can’t wait until I hold it in hand and see firsthand the workmanship that James puts into his pipes. I am already scheming what tobacco tp break it in with. I have a bit of Mc Clellands 5100 mixed with some Perique that has about 5 years or more in the jar. That may well be my break in smoke. We shall see.
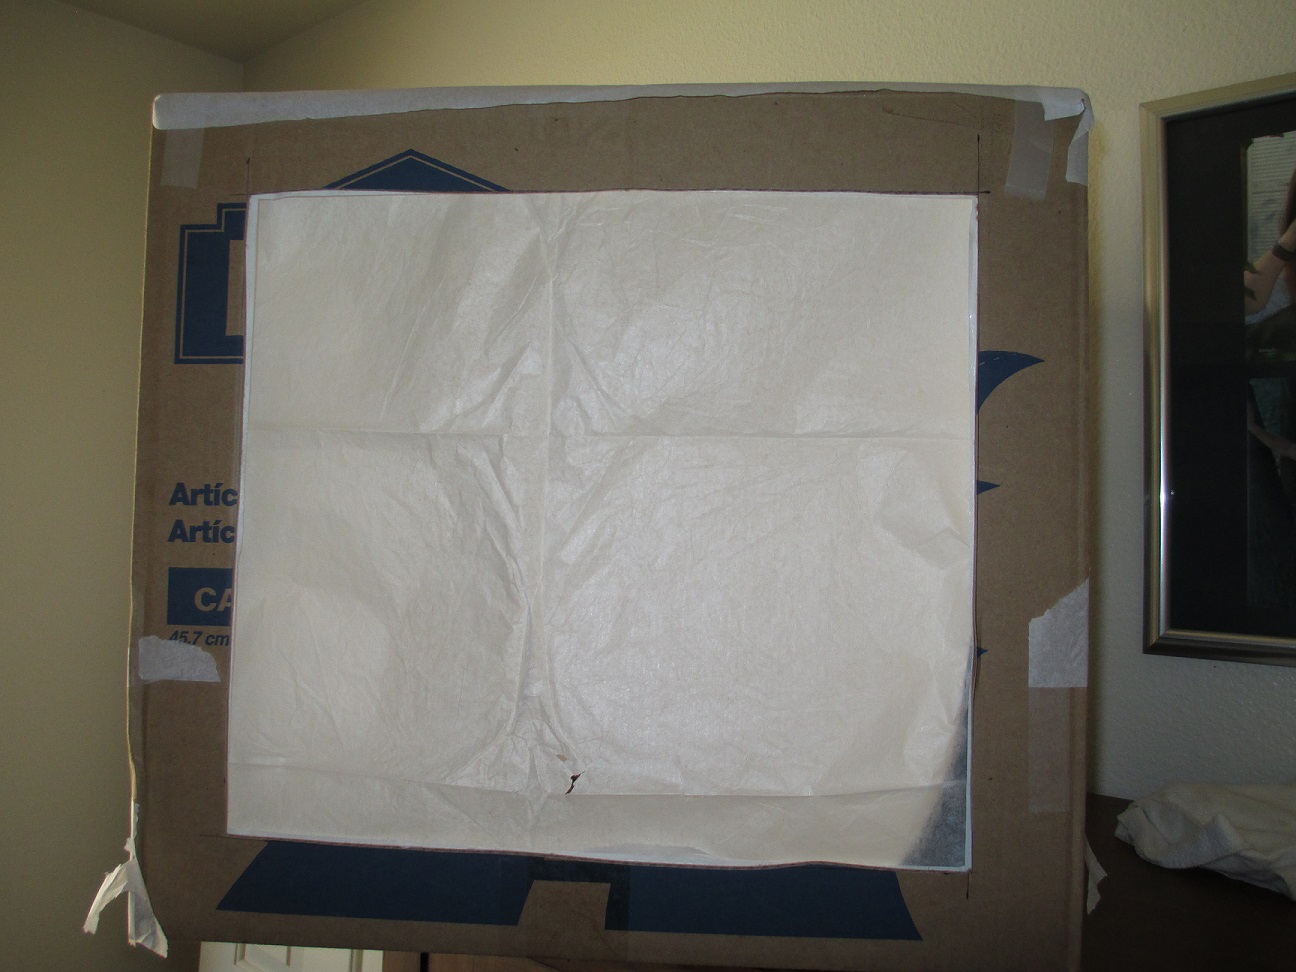
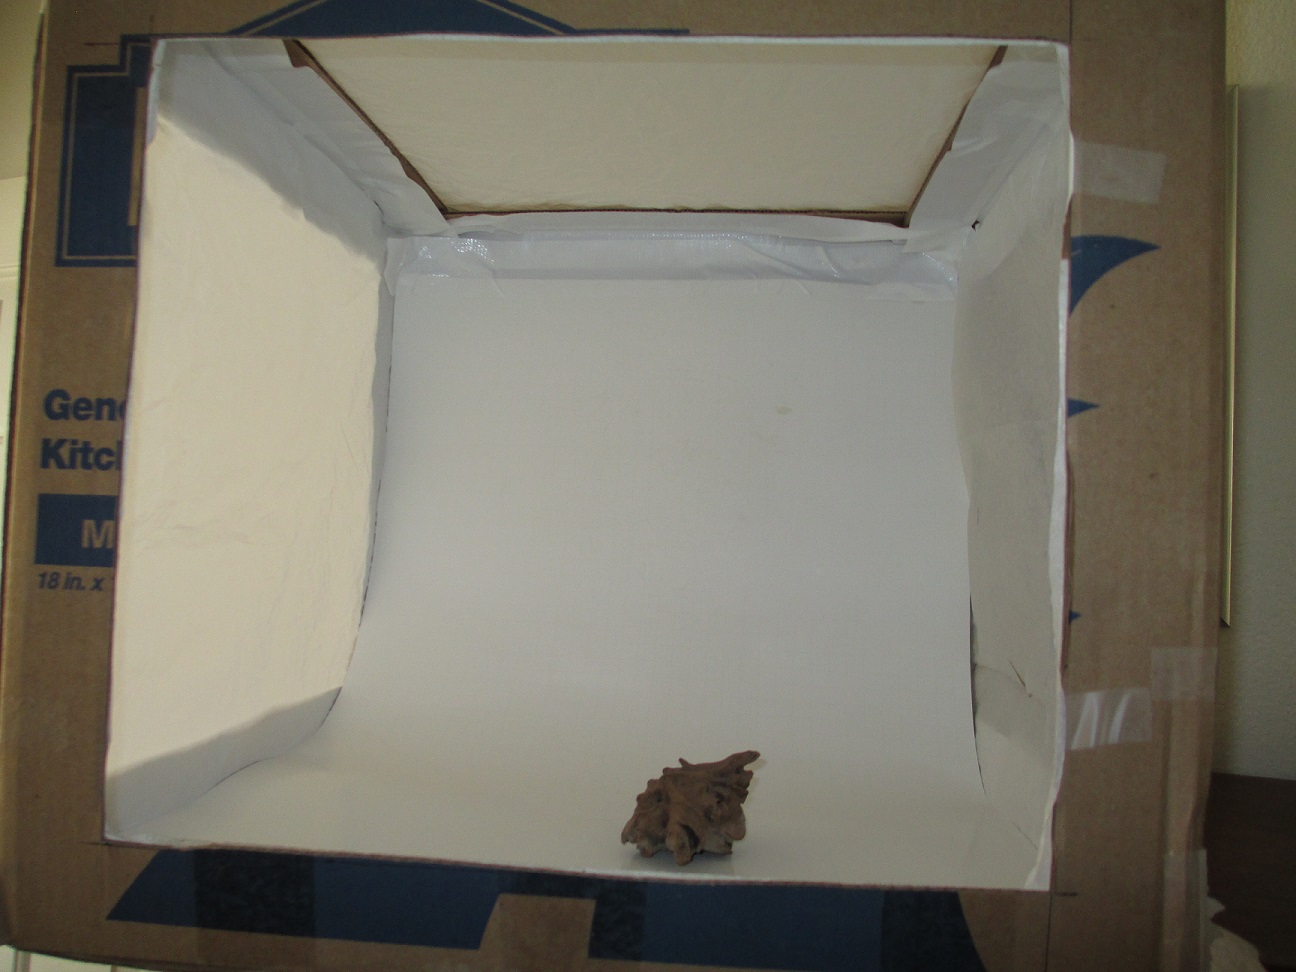
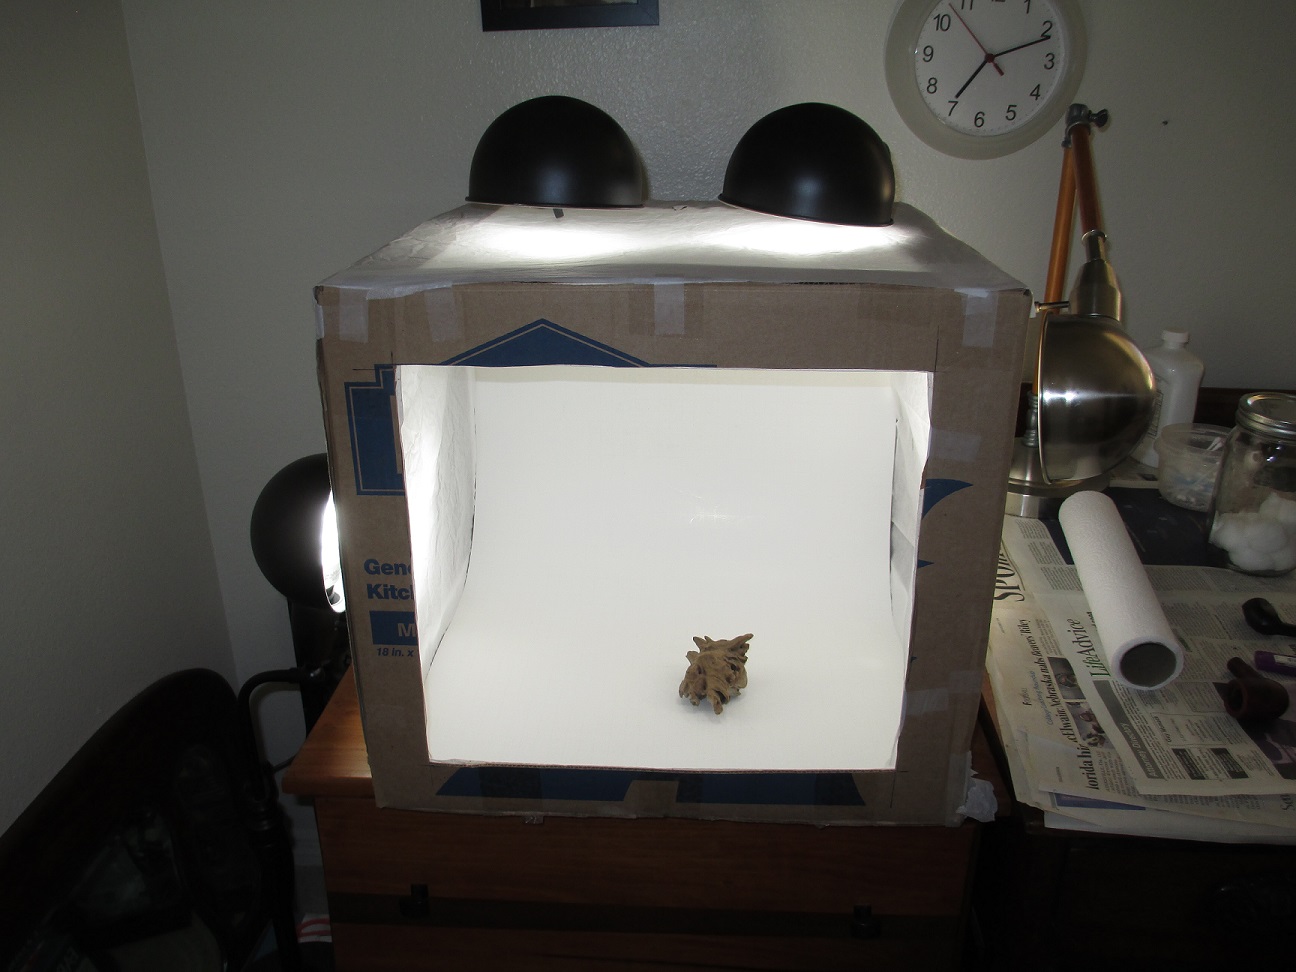
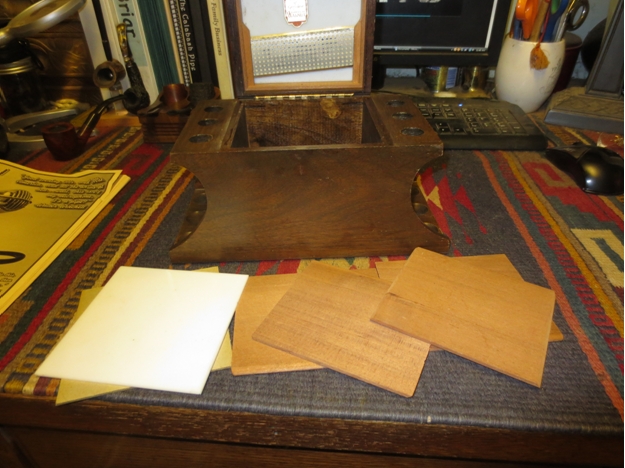
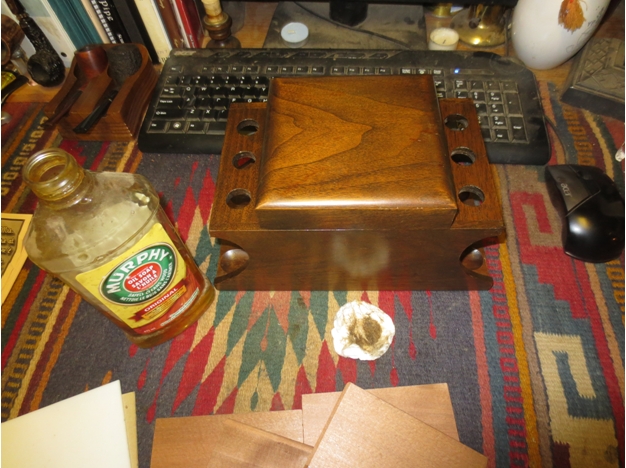
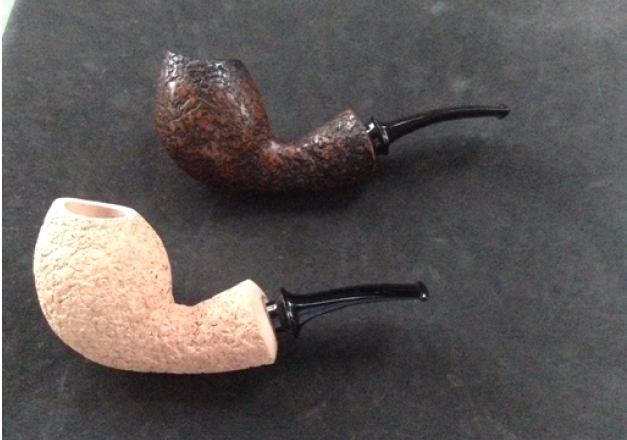
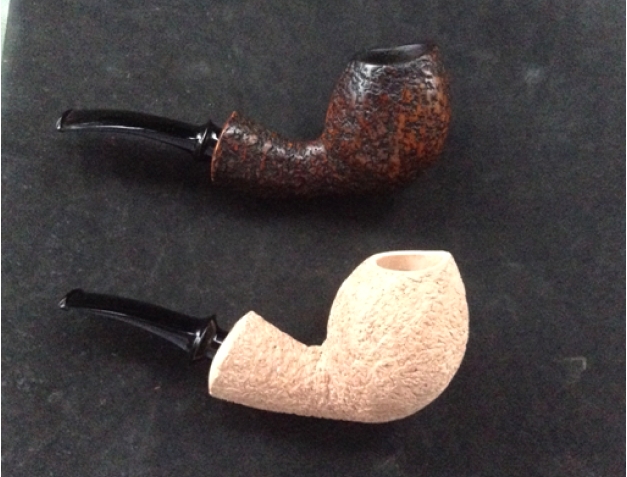
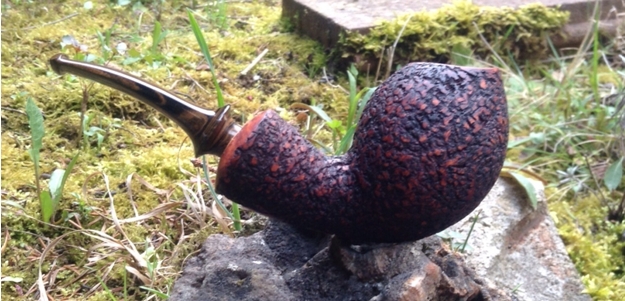
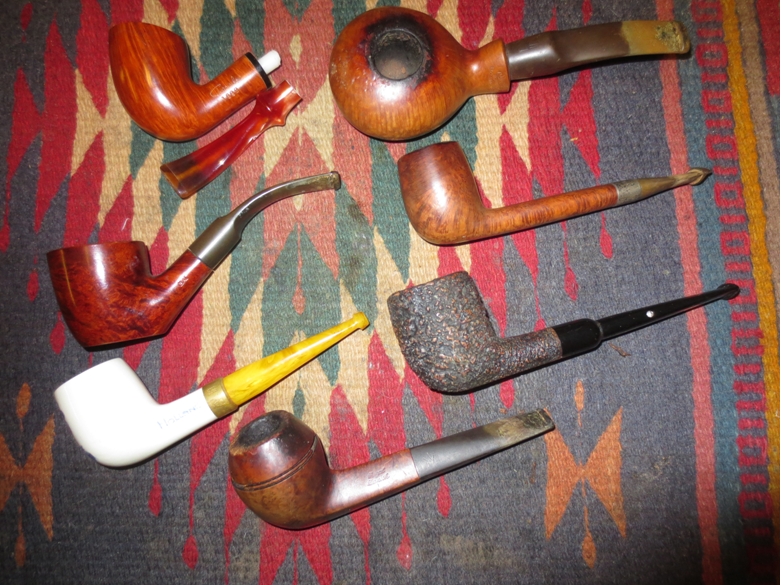
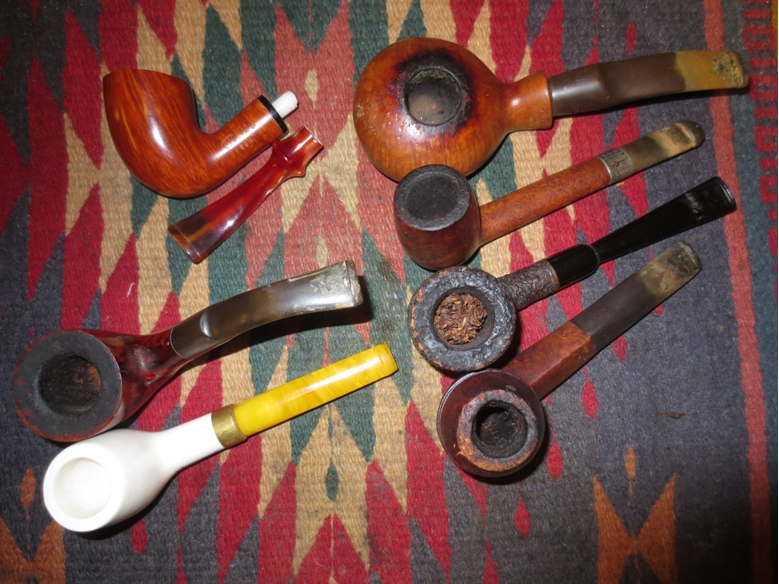
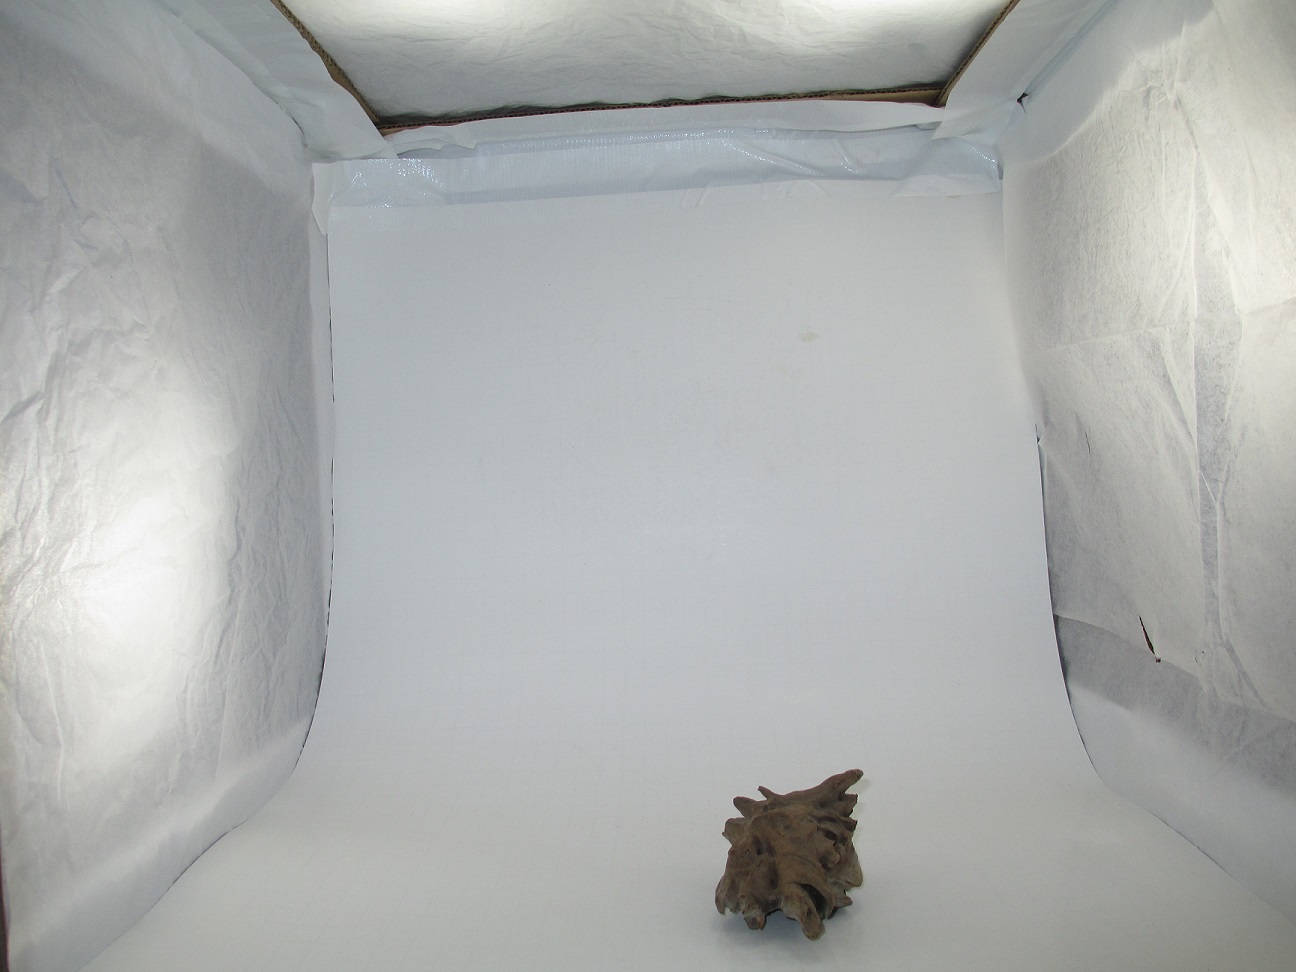
A Good Day Pipe Hunting – A Craigslist Vancouver Find


Blog by Steve Laug

For years now I have checked craigslist Vancouver in hope of finding pipes. I have found a few but they never worked out in terms of picking them up. They always were sold to someone just before I arrived to pay for them. So when I saw this lot on craigslist I was not too hopeful. I fired off an email to the seller and got no response regarding the lot. It had seven pipes, a humidor rack, a two pipe rest and two large unopened 200 gram tins of Borkum Riff tobacco. Yesterday I went online and found the seller’s phone number. I could not believe it when he said that he still had them. I made arrangements to pick them up on Friday. Here are three photos from the advert on craiglist.craig1

craig2

craig3 I talked my youngest daughter and number two daughter into going with me to pick them up. I drove to the seller’s apartment with low expectations. He was selling the lot for $99 or best offer. When I arrived I phoned and he let me into the apartment. It was a bit of déjà vu for me. He was a stroke survivor – same age as I am. I too am a stroke survivor. He had stroked on the left side of his brain leaving his right side damaged – same as me. He had the curled hand and a dragging foot with a bit of slurred speech the same as I had. I stood quite speechless for a few moments and remembered my own struggle with my stroke. I then breathed a prayer of thanks to God for the gracious recovery he gave me through the prayers of his people and hard work. I have very little remaining of the stroke damage. God is good.

We talked for a little while and he showed me the goods. I decided to pay him what he asked – or at least close to it. I had $97 with me so I gave him that and he gave me a bag for the loot. At this point in the game I had not looked too closely at the pipes. When I got to the car and put them in the trunk I went through them quickly. There were some great pipes in the lot along with some I had never heard of. When I got home I unpacked the loot and took the next series of photos. I was very pleased with what I had purchased.craig4 The next two photos show the pipes. Starting with the column on the left of the photo below the names of the pipes were as follows.

Column 1: (left side)
1. Paradis Brothers 1989 shape 93 bent with a broken tenon. Paradis is a Canadian made pipe. It had a dent on the left side of the bowl. The tenon is threaded and I will be able to remove it and put a new tenon on the stem. This one may have had one bowl smoked through it but it was not even darkened from mid bowl to the bottom.
2. Italian made MAT Pot sitter with a stuck stem. The rim was covered in a coat of tars and oil. The stem has tooth marks in it on the top and on the underside near the button.
3. Dutch Ceramic double wall billiard with Delft coloured painting on the front of the bowl of a man in the stocks. It reads Holland on the left side of the shank. The stem is acrylic and is clean. The cork gasket that holds it in the shank is perfect. This is an unsmoked pipe.
4. Royal Danish 33 straight bulldog made by Stanwell. The bowl has a thick cake in it and the top is damage and sloped toward the front of the bowl. The stem is oxidized and has some deep tooth marks in it on the top and bottom near the button. There appears to be a small bite through on the underside.

Column 2: (right side)
5. Squashed Tomato stamped JPL Bruyere, St. Claude, France. Large chunk of nice briar with lots of birdseye on the bottom of the bowl. The bowl has a light cake and the rim is covered with tars and oils. The stem is oxidized and has tooth marks and tooth chatter. JPL stands for Jean Pierre Lacroix. http://pipedia.org/wiki/Lacroix
6. K&P Dublin (Peterson’s) Canadian with a sterling silver band and a p-lip. The rim has some build up and the bowl is lightly caked. The stem is in excellent shape with no bite marks or tooth marks. It is oxidized.
7. Castello Sea Rock 15 AF – made for the North American market with the “diamond” stem insert. Military bit with tooth marks on the top and underside of the stem near the button. Slight build up of white calcification like the stem had originally been smoked with a softee bit. This one has a full bowl of unsmoked tobacco. There is some rim damage from knocking out the pipe on the front outer edge and some tars and oils on the back surface of the bowl.craig5

craig6 I am quite happy with the find. It was a purchase well worth the price. I was more than glad to have paid the bill. The meeting with the seller was also memorable and gave me a lot to be thankful for this Good Friday.

I walked through the door of the shop…and what to my wondering eye should appear?


Blog by Steve Laug

We live in a time of political correctness and a burgeoning anti-smoking lobby. More and more of the childhood characters that I grew up recognizing them by the pipe in their mouth have had the pipe eradicated. Frosty the Snowman is sans pipe, so is Old King Cole, Popeye and even Santa Claus. The ongoing removal of all things pipe and tobacco from the stories of some of my early childhood favourites continues with new victims being added each day to the blade of this hunt. It is irritating to see figurines of characters that the pipe was a part of their persona all mercilessly without the signature pipe. I have come to expect that when I see wood carvings of figurines the pipe will be noticeably missing. It is with that background that the events described in this blog took place.

I travel quite a bit for the work I do – both in Canada and globally. I am always on the hunt for pipes and tobacco shops for me but I also have an ongoing assignment to bring something notable home for my wife and four daughters. On a recent trip to Europe I was in Germany, visiting Stuttgart, Karlsruhe and then ending the trip with about 3 days in Berlin. Down the street from my hotel was a beautiful Christmas shop. My wife has trained me to pay attention to these shops and have a look. Over the years we pick up Christmas ornaments for our four daughters and ourselves at these shops to remember our trips. I could not pass up a visit to the Käthe Wohlfahrt in Berlin, which is open all year, located on the Kurfürstendamm at numbers 225 and 226 (opposite the famous Café Kranzler). I could not be that close to a Christmas shop of that renown and fail to visit it. If the wife and daughters got wind of the fact that I was that close to a shop they would have loved and did not take the time for a visit I would never live it down. Thus, with fear and trembling I knew that I needed to visit and make some purchases for the family Christmas collection. On the second morning I walked down the street and visited the shop.

The shop is huge. It fills two floors and as you wander through it you find baskets and trees and walls of wonderful ornaments, fine Christmas decorations and stylish gift ideas for every occasion. At the heart of the store is a winding, spiral rotunda, leading from the ground floor to the first floor, which allows you to walk up around a festively decorated tree. I have included the photo below and the link to their website for other Christmas lovers. https://wohlfahrt.com/102-1-berlinXmas1 As I wandered through the shop I found that it was filled with many surprises from finally carved Black Forest Cuckoo Clocks to Christmas carousels with windmill blades on top that turned from the heat generated by candles. There were ornaments and carved table settings that all were amazing. But for this North American who has visited many Christmas shops around the world and in both the US and Canada the greatest surprise was the fact that many of the ornaments and displays had Santa Claus and other characters that were smoking pipes. These pipes were a prominent feature of the characters. I have to say that discovering this was a breath of fresh air for me. I have almost given up on finding Santa figures with a pipe let alone wood cutters, dwarves and elves all with pipes. I was delighted and took pictures all around the shop to capture some of the figures and displays showing pipes. There were so many that I easily could have filled a memory card with photos. The few I took convey the feeling of the prevalence of the pipe among the characters of the shop. I am including those photos in this blog to give you a bit of a feel for what I saw.

Use your imagination to walk with me up the winding, spiral rotunda in the shop and see the figures through my eyes. I felt like a kid in a candy shop. Not only could I find the ornaments that my wife and daughters would love but I could also take in the stirred memories of childhood characters from books and movies that were present with pipe in hand or mouth. It was astounding. In the first photo I took every character had a pipe in his mouth regardless of the figure. There must have been over 30-40 figurines in that display and all had different pipes. Some were short pipes like the ones in the photo below and some were longer old German style folk pipes.Xmas2 The next display that caught my eye was a shelf filled with a variety of Santa Claus figures. Every one of them had a pipe in his mouth all different pipes of various shapes and styles.Xmas3 Even the wooden cut out tableaus had pipemen featured in them. The picture below shows one such tableau with a wood-cutter taking a pipe break after cutting firewood. The first photo below is a close up of the wood-cutter. The second photo is of the larger tableau – with a base of at least 1 meter. Throughout the scene there were figures smoking a variety of pipes.Xmas4 Next to the wood-cutter was another tableau of a quiet clearing in the woods with trees and ground covered with snow. In that scene there were several figures at work, again all had pipes in their mouths.Xmas5 When I finished taking in as much of the shop as my mind and eye could contain I carried the ornaments I had picked for the wife and daughters to the cash register to check out. As I laid them down on the counter I looked up. And what to my wondering eye should appear? There above the checkout desk was another Santa figurine with a German Folk pipe in his mouth.Xmas6 Thanks for giving this old man’s written memories a read. For me the shop was a breath of fresh air. It was a delight to walk into a shop that still paid service to my literary and film memories of characters who I grew up with who still looked like I remembered them. It was a pleasure to see that those who raise the placard of anti smoking had not made their way into this bit of paradise and sanitized yet another place of memories from my childhood. Yes indeed, the pipe is alive and well in the figurines of at least one Christmas Shop that I visited. I only wish the shop was closer to Vancouver so that I could visit again to take in more of the incredible ornaments and figurines. Ah well, I will be back in Berlin again in the year ahead and will certainly visit the shop once again.

Great afternoon in Stuttgart, Germany with Pipemaker James Gilliam


Blog by Steve Laug

For most of the month of March I have been in Europe doing some work for the Foundation I am with. I spent some time earlier in the month in Athens, Greece before coming to Stuttgart, Germany last week. Previous to the trip I had written James Gilliam about the possibility of getting together while I was in Stuttgart. I had some free time on Thursday afternoon so we met up for a bowl or two and a coffee at a local coffee shop. We met and visited for a few hours and talked pipes and pipe making. I learned quite a bit about some of the polishes, stains and tools that James uses and will be hunting them down with the links he sent me later that evening.Sttugart visit I appreciated James making time to get together and enjoyed our visit. We had chatted over the internet on forums and via email previously but this was the first face to face meeting. I have one of James’ pipes – a nice bamboo billiard that I thoroughly enjoy. It is a great smoking pipe. I also have one of James’ restorations – a restemmed Yello-Bole that is also a favourite. I traded him for that a while back and originally was going to sell it. The stem was so nicely made that once I had it in hand I kept it. James makes one of the best stems from button to tenon that I have found. The shaping and button/slot work is excellent and make a very comfortable smoking pipe. His drilling is open and the draw is effortless.

When I contacted James and arranged to meet him in Stuttgart before my trip I went through some of my pipes and chose one that I would give him. The gift pipe, a horn-shaped pipe stamped Little Champion seemed to be the one that stood out. It had a nice blast and a unique shape. It was a little one but it is about the size James makes his pipes. The write up on the refurb on this one can be found here: https://rebornpipes.com/2014/12/24/the-little-champion-057-horn-reborn/ Champ1

Champ2 We enjoyed some coffee and conversation and James laughingly said that he was smoking his pipes instead of selling them. He had been smoking one of his speckled egg pipes while we visited and a small little billiard lay on the table. It had a lovely shallow blast and an aluminum end cap. The stem was a faux military mount that sat nicely inside the end cap. James had turned the aluminum end cap and polished it until it shone. The ivory coloured polyester stem looked like ivory. The soft colour and the smoothness of the polyester gave the pipe stem a warmth and depth that was beautiful. Then to my surprise at one point in the afternoon James gifted me the little billiard. I could not believe that James gave me this pipe. It is an amazing gift and a great smoking pipe. I have been smoking some aged Louisiana Red in it since I returned from Germany and the size, shape and weight and the craftsmanship have made it an instant favourite. Thanks so much James for the unexpected gift. I look forward to other JSEC pipes joining this one and the bamboo shank pipe in my rack in the days to come.JSEC4

JSEC5

jsec6

jsec7

jsec8

JSEC9

A gift pipe reamer that looks like an instrument of torture – A GBD reamer


Blog by Steve Laug

I was gifted this old GBD Pipe reamer by Mark Domingues recently. (Thanks Mark for the great gift.) I have added it to my collection of pipe reamers. It is a frightening looking tool that for all appearances could be an instrument of torture rather than a pipe reamer. I have to say I have tried it out and I would think seriously before using it again to ream a bowl. The spikes and points are sharp like the teeth on a cheese grater. This one was unused which is amazing for a tool of this age from the 50’s. It is stamped on one side of the handle with the GBD logo in an oval over the PAT. NO. 22411-09.
GBD Reamer
On the other side it is stamped with the GBD Logo in an Oval over MADE IN ENGLAND. The reamer is made out of Sheffield Steel with the spikes hardened against damage and to promote efficiency. It measures about 5.6cm by 3.6cm.
GBD2
In researching the background on the reamer I found that original patent on the reamer was for a Terry’s “Hedgehog” Pipe Reamer. It bears the same patent number and is essentially the same tool. In the 2 photos below I have put the two reamers above and below each other to show how they are the same. The Hedgehog is pictured with a Euro coin and an American 25 cent piece to an idea of its size. On the opposite side the Hedgehog reamer has the same PAT. NO. 22411-09 stamping. It appears to me that the reamer design is identical between the GBD and the Hedgehog.
GBD3

GBD4
I did some more digging and found that they also made one for Dr. Plumb pipes. It is stamped Dr. Plumb’s in script on one side and has the same patent information on the other side. That is not surprising as Dr. Plumb is a seconds line from GBD. But the research I did makes me believe that the Terry’s Hedgehog reamer was manufactured and stamped for a variety of pipe companies and used as an advertising gimmick.
GBD5
I have no idea when the sales card in the next photo was made but it gives an idea of how the Hedgehog tools were marketed by Cadogan. These are the Dr. Plumb’s version of the tool.
GBD6
I also found this modern version of the reamer that is still available today. It is clearly not as well made as the original and the two halves are not joined in the same manner. Even the spikes on the new one do not look as well made or as sharp.
GBD7
Hopefully this little piece on the Hedgehog Pipe Reamer, no matter what the stamping or age, has sparked your interest in this piece of pipe history. It certainly has joined the ranks of other pipe paraphernalia that I have in my collection. I will keep an eye for more of the older versions that bear different pipe marks on the top of the reamer.

A Major Disappointment – MOULD attacks my Balkan Sobranie Virginian No. 10


Blog by Steve Laug

Some of you will remember reading of my classic antique mall find in October of 2013 of a tin of Balkan Sobranie Virginian No. 10. I have written previously about the excitement of finding it and discovering that it was not empty. https://rebornpipes.com/2013/10/22/the-pipe-hunt-rule-3-check-out-every-tobacco-tin/ I brought the broken flake tobacco home with me and jarred it in a Mason jar. I ran the jar through my dishwasher and while it was still hot jarred the tobacco. I pressed the lid in place. Over the months since finding it I have smoked quite a bit of it. When I first put it in the jar I pressed in tight. By the time I wrote about this disappointing discovery the tobacco was loose in the jar.img_0486

img_0488 I have had the jar sitting on my desk in my study since I found it and regularly opened the jar to imbibe of the aged leaf. It was a great smoke and one that I was rationing out to conserve it for as long as possible. I had not had a bowl of it for about a month or more so with my time off of work over Christmas I decided I wanted a bowl of the Balkan Sobranie. I was working on rebornpipes blog, doing some maintenance work and figured a pipe of this would be just the ticket. I reached for the jar and opened it so that I could stuff some in my bowl. The first thing that hit me was a musty, mouldy smell. I don’t know about you but when I am writing something I often don’t pay much attention to the tobacco that I reach and stuff into my pipe. This time though the smell caught my attention. It was off and I immediately stopped what I was doing and brought the jar over under the light. Sure enough there was light green fuzz all over the top of the tobacco. I could not believe what I saw. The mould had taken over the tobacco. All of the smells of aged Virginia and cigar leaf were gone and in their place was the smell of moulding vegetables. It smelled awful. In all the years I have been smoking a pipe I have never had a jar go mouldy on me. But there is a first time for most things and it here it was. I was incredibly disappointed. I took the photo below with a zoom lens to capture the effect of the mould on the tobacco.IMG_3127 I set up a magnifier and took the photo below through the lens to give you a better look at the mould. I put the lid on the jar and shook the tobacco to see if the mould went all the way through the lot. It did. Even the tobacco in the very centre of the jar had mould. The entire jar was covered in mould with it growing on the sides of the glass and on the lid as well. I took the jar out to the compost bin and dumped the aged tobacco into the compost. To say that I was a bit disappointed that I had lost this tin of aged tobacco is an understatement. It was one that I enjoyed and was looking forward to smoking again. I scrubbed out the jar with boiling water and a scrub brush. Then I ran it through the dishwasher again – twice for good measure. I threw away the lid and ring and used a new ring. I am still dubious as to whether the next tobacco I put in the jar will do the same thing. I guess time will tell.IMG_3128 I wracked my brain to see if I could recall anything I had done differently in preparing either the jar or the tobacco to pack in it. I did not rehydrate the tobacco so I added no moisture to the mix. The jar was airtight the first time I opened it because the seal popped with a whoosh. I suppose it is possible that there was mould in the air in my study but I have never had a problem with that in the past. So the mystery remains.