Blog by Steve Laug
In the process of refurbishing estate pipes, a thing that I enjoy doing, I use two pipe reamers almost every time I begin the work. Both of them have different strengths or advantages that I have come to count on in the process of using them. They work on the thickest and hardest cake that I have found in these old work horse pipes. I have written of the advantages and weaknesses of both in the review that follows.
The first of these is readily available on EBay as Kleen Reem pipe reamers. There is also a similar reamer available going under the label of the Senior Reamer which can be purchased at most of the online pipe vendors. The reamer I have is pictured below. It is an adjustable three blade hardened steel reamer. The top is the adjustment knob and as it is turned it opens the blades wider or narrower. The utility of this reamer is that it is able to be adjusted to multiple bowl sizes. The blades remain vertical so that the bowl does not taper. It works very well for cylindrical shaped bowls. The hardened steel does a great job cutting back the carbon of the cake and can be adjusted to allow for different cake depths. The one draw back of this reamer is that it does not do a great job on the heel of the bowl in rounded or U shaped bowls. It is perfect for the conical bowl or V shaped bowl that tapers to a point. In the U shaped bowls I have to finish the reaming by using the second tool below or a piece of sand paper wrapped on a dowel.

The case that the reamer came in is functional and strong. In the bottom edge of the case there is a banded group of cut pipe cleaners.
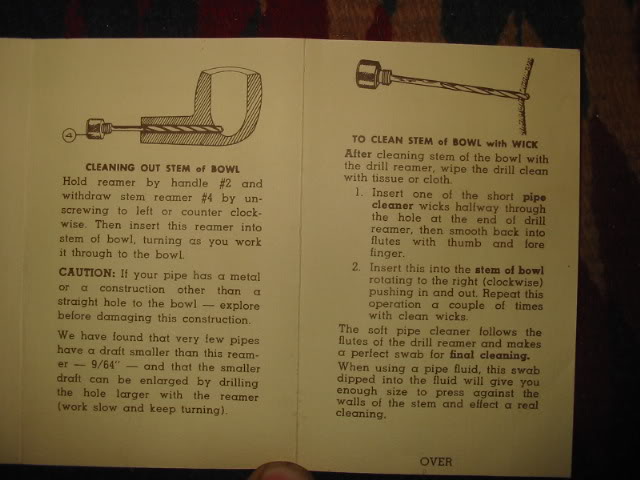
A brilliant part of this tool is found under the adjustment knob on the top. The knob can be turned to unscrew it from the main unit. Once it is removed it reveals a drill bit attached to the knob that is designed to clean out the airway in the shank. It can be twisted into the shank to reopened clogged and restricted airways without damaging the pipe. I use the drill bit by itself the first few times through the shank to remove the grime and tars. I then follow up with the pipe cleaners inserted and wrapped up the bit then dipped in alcohol to remove the loosened grime from the shank of the pipe. I have replaced the original ones that came with the kit many times with cut pieces of regular or fluffy pipe cleaners. The diagram below shows the bit inserted in the shank. It also shows the winding of the pipe cleaners on the drill bit that I referred to above.
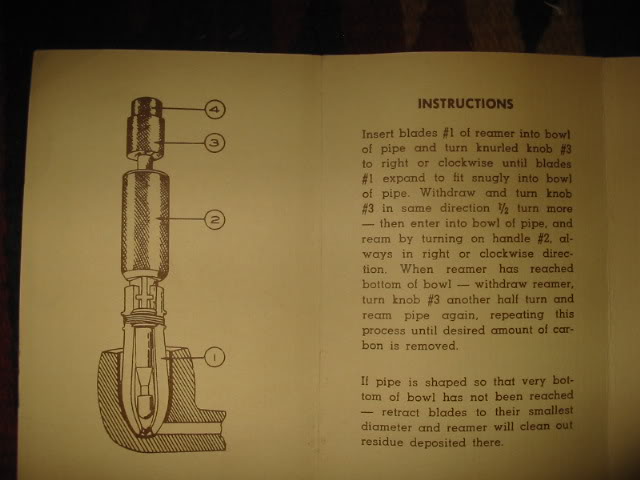
The picture below shows the reamer as diagrammed with the instruction manual that came with the Kleen Reem kit. The numerals on the diagram are explained in the instructions on the right side of the picture. I use the reamer as a regular part of the cleaning routine I have established for working on estate pipes.
I would recommend either the Senior Reamer or the Kleen Reem Reamer for all those who clean and work on their own pipe and those who do refurbishing of estate pipes. When you purchase it know that you will need another tool or have to use sandpaper and dowel to maintain the heel of the bowl.
The second reamer that is in my refurbishing tool kit is called a Pipnet Reamer. I found this reamer when the one above left me with work to do at the bottom of the bowl. I was searching for a tool that did a better job in that part of the bowl. This reamer has also been packaged and sold in North America under the Castleford name. From my experience while these two versions of the reamer look the same, the Castleford set is not as well made as the Pipnet set. I will comment on that later in this article. Both sets come in a cardboard storage case and include a foam insert with cut spaces for the “T” handle and four heads of different diameters. To use the reamer the heads (tenons) are inserted into a square slot (mortise) on the bottom of the handle and then can be turned into the bowls for a thorough reaming. The picture below shows the Pipnet set that I have. I have reboxed it in an old wooden box that my kids had around. I found that it is a perfect fit and keeps the parts together.

The greatest asset of this tool in my opinion is that the interchangeable heads make it possible to work with a variety of bowl sizes and with various cake thicknesses. On older heavily caked bowls the reaming can be done in stages until it is the cake thickness matches the desired depth chosen by the refurbisher. This also makes it very easy to ream the cake all the way back to the wood or to leave any amount of cake you chooses. The size and shape of the combined handle and heads make it easy to keep the tool vertical in the bowl and avoid over reaming or ruining the roundness of the bowl by reaming at an angle.
Often when I am refurbishing older pipes I use both reamers mentioned in this article to complete the reaming to my satisfaction. I start reaming with the Pipnet and end with the KleenReem or the reverse depending on the bowl shape. I find that the design of the tool allows me to have a good grip on the handle as I turn the blades to cut the cake. I begin with the smallest head and work my way up to the size that brings the bowl to a place where I then use the KleenReem to finish the work.
Each cutting head of the Pipnet tool has four blades inserted into a hard plastic head. They are basically hardened steel “U” shapes that meet at the bottom of the head and go up the length of the head. The cutting head, though obviously designed for “U” shaped bowls, also can be used in conical bowls. Again the reaming process should begin with the smallest head that fits into the bottom of the bowl and then working up the varying sizes of heads until the bowl is completely reamed. The design and shape of the heads is visible in the picture of the Castleford Set below.

In terms of durability I have used the Pipnet set for five years without any damage to the handle or heads. I was concerned when the tool arrived that the stress on the handle head connection (tenon/mortise) when turning it into the bowl would be problematic. When twisted or turned I can feel the give or strain in the plastic junction. In the 5 years I have used the Pipnet set I have not had any problems with this concern. Last year I was given a Castleford set to use as a backup. It looked like it was the same tool at a glance. I broke the handle mortise connection after the first couple of uses. In comparing the two sets I can see that the Pipnet set is made of a heavier/thicker plastic in the handle connection than the Castleford. That is probably the reason that it has outlasted the Castleford.
I purchased my Pipnet on EBay and continue to see sets show up there regularly. It is also available through various pipe and tobacco shops on the web. One or both of these reamers will serve the refurbisher well in the quest for a clean, restored pipe. Take into consideration the strengths and limitations of both and make your choices from an informed position. Enjoy your restoration work.
