Blog by Steve Laug
This is another blog written in the Answers to Questions series. I have often been asked via email, messenger or phone call for a recommendation for a pipe reaming tool. I have answered that question so many times it is almost a script now. I basically use two different reamers on the pipes I work on. The first is a Kleen Reem Pipe Tool and the second is the PipNet Pipe Reaming set. I thought it was time to post this as a blog on rebornpipes and use it as a comparison between the original tools and others that I call “pretenders”.
Over the years of my refurbishing experience I have used and worn out many pipe reamers. I have tried older and newer pipe reamers that have all promised to be the best and last one that I will have to purchase. Needless to say, I have a collection of various reamers other than I like looking at the creativity that sent out such a variety into a limited world of pipe smokers who actually ream their pipes. I rarely use many of them but they are fun to look at. One thing I have learned that even with the reamers I use, that not all pipe reamers are the same even if they look the same. I want to take this opportunity to compare two different reamers – the Kleen Reem Pipe Tool and the PipNet Pipe Reamers what I call the originals with the ones I call lesser copies. I will also be looking at the PipNet pipe reaming set in the two iterations that I am familiar with – the clear amber version and the opaque tan version. Understand that I have used all of these reamers so I am not coming from a place of prejudice but rather from an assessment of durability and functionality.
1. Kleen Reem and Senior Pipe Reamers.
I remember that when I first saw these two reamers for sale on eBay I thought they were the same. I had never seen either of them up close so I had no way of truly knowing. Since then I have had both of them in my refurbishing arsenal. I have used them both and I have no problem saying that the Kleen Reem tool is by far a superior product. The first photo below shows the Kleen Reem Pipe Tool and the second photo shows the Senior Pipe Reamer. 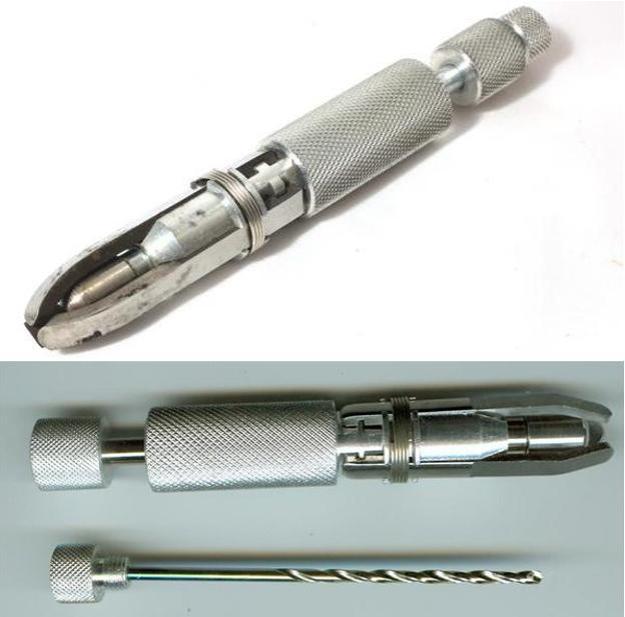 Looking at the two pictures above I want to do a bit of comparison. The adjustable cutting head on the Kleen Reem tool is made of thicker hardened steel and no matter how often I have pushed the blades against hardened carbon on the inside of a bowl they have not grown dull. The blades in the closed position are very close together allowing you to ream the bottom of a bowl. The profile of the blades is different – the senior reamers blades look more flat and angled, while the Kleen Reem blades have a flowing curved shape. The cylinder between the blades that expands and contracts them differs in shape. The Kleen Reem cylinder is more bullet shaped with a pointed end and the Senior is flatter and more cylindrical. I think this explains why the Senior reamer cannot be closed as tightly for use in a smaller bowl. The drill bit/ that is in the handle of the reamer looks the same but it is not. It is more substantial and solid in the Kleen Reem tool than the one in the Senior reamer. The drill bit has a hole in the end of it that you can wrap up the grooves of the bit, dip in Alcohol or liquor and scrub out the inside of the shank. Kleen Reem’s come with a bunch of the short pipe cleaners inside a little ring that holds them. The weight of the Kleen Reem tool is substantially heavier than the Senior reamer.
 I have learned from using the tool that the Kleen Reem mechanics never seems to stick no matter how dirty the tool I have used. I have three or four of these in different cases and all of them seem impervious to dirt and carbon. I have bought all of them on eBay in a variety of conditions and with cleaning all work well. They keep on going no matter what they are put through. Their durability can also be seen in that they have lasted through the years and the originals are still sold on eBay.
You can see my preference in the above is for the Kleen Reem tool. It seems that they were first made by the B.A.C. Needham Company and later by the W.J. Young Co. in Peabody, Massachusetts. Each Kleen Reem pipe reamer came in a variety of packaging styles. The original BAC Needham’s came in a cardboard case (this is the first one that I purchased over 20 years ago). The earliest versions sat in a soft green bedding and still had “Pat. Pend.” stamped on the cap for the drill bit. I have other ones that have a red bedding.
2. Pipnet and Castleford Reamers.
Pat Russell did a great comparison review of these two reamers in an earlier blog on rebornpipes. I am including the link if you want to read it fully. https://rebornpipes.com/2014/07/20/castleford-pipnet-reamer-side-by-side-comparison-pat-russell/. I will summarize some of the major differences that I have found between two very similar looking reamers.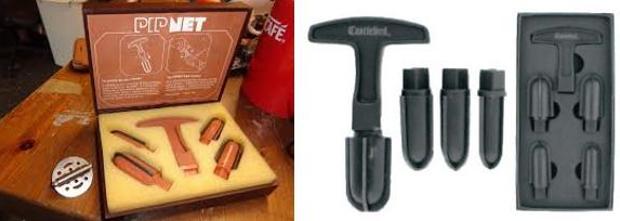 I first bought a PipNet Pipe Reamer on eBay almost 20 years ago. It came in a plastic box imprinted with the PipNet stamp and information. It had an instruction sheet on the inside of the cover. It was made of an opaque tan coloured high density plastic that is very strong. I have used it heavily over the past years, reaming literally hundreds of pipes and it is still in great condition. The thick carbon steel blades have held their edge and work as well as they did when I received it. The hard plastic T-handle and four detachable cutting heads have not cracked or broken. The heads still fit well in the handle, snug and tight with no rattle or looseness.
Not long after that I was gifted a Castleford Reamer. It came in a cardboard box with a clear plastic insert in the lid. The T-handle and cutting heads were black plastic and on first glance, they appeared to be the same as the PipNet set. However, it did not take long to learn firsthand the difference in the two sets. I used the Castleford on a thickly caked bowl that the PipNet easily handled and the blades had a hard time cutting into the cake. The handle felt flimsy in comparison to the PipNet and as I turned it, using the smallest cutting head the square end of the cutting head snapped off. I figured it was a fluke. I put the next head in the handle and turned it. This time the T-handle itself snapped, rendering the set useless. To have both the handle and a cutting head snap was no accident. I compared the two T-handles and could see that the Castleford was significantly thinner than the PipNet handle. The square slot that held the heads had thin walls. The plastic itself seemed lighter weight and more brittle than the PipNet. Looking at the material it seemed be less dense on the Castleford.
I went on to compare the square end of the bits on both. The Castleford was cast different from the PipNet. It seemed to be thinner even at the joint of the square with the blades. I compared the cutting blades and found that the steel on the blades of the Castleford were not as thick, beveled or hard as the ones on the PipNet. I knew that the PipeNet blades were carbon steel but the blades on the Castleford did not seem to be made of the same steel.
3. Pipnet clear amber and PipNet opaque tan Reamers.
For comparison sake I thought I would end this blog on my favourite reamers with a comparison of the PipNet reamer that is opaque tan with the clear amber one made by the same company. This may seem unnecessary but I have found that even these two sets are different.
The carbon steel blades are the same and cut the carbon cake very well. They both hold the sharp edge very well and do not wear. The difference lies in the durability of the plastic T-handle and cutting head. The opaque plastic seems to be harder than the clear amber plastic. I used the amber plastic (which is a newer reamer) reamer for several weeks. I began to feel it flex as I turned it in the bowl. After a few uses it started to show cracks in the plastic T-handle around the connection with the cutting head. The heads began to fit more loosely in the handle than when I started. I continued to use it for the entire two weeks.
The last time I used it, the connector on the handle cracked and a chunk of the plastic fell off. I switched to the opaque T-handle and kept working and in short time the cutting head also broke off. It was very clear that it was not as durable even when using it in the same manner as the opaque one. The remaining cutting heads fit in the opaque T-handle so they remain usable but I am quite disappointed in the quality of the newer amber plastic version. I will always continue to hunt for and use the opaque (older reamer) one. I have bought several and given them away to others as gifts. I need to find a backup set for myself as well.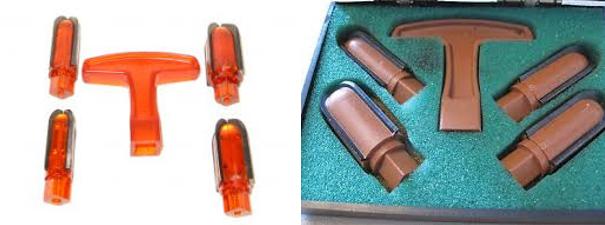 With that, I conclude my answer to the question regarding the pipe reamers I use and the comparison of the real and the pretenders in my opinion. Over the years, I always reach for these two reamers without giving the choice much thought. I just unthinkingly choose these two. However, it seems that I reach for the PipNet reamer first. It is my go to reamer. I start with the smallest cutting head and work my way up to the largest one that will fit in the bowl. The Kleen Reem is always the second choice for most pipes. Sometimes for a deeper, tapered and narrow bowl, I will start with the Kleen Reem. Both occupy a drawer right next to my worktable.
With the last comparison, I end this Answers to Questions blog. I hope that it has given you some insight into why I chose the tools that I use. You should know, if you are a frequent reader of rebornpipes, that there is always a rationale to my choices. They generally come from much experimenting with a variety of reamers with many discards that go either into my collection of reamers or into the dustbin. I hope that it has been helpful for you in selecting the reamer that you will purchase. Thank you for taking time to read this blog. Cheers.